
Powerful forms for data collection and Wide API to merge automation using the best wokflows such as N8N, Zapier. Excellent tool for data collection. Recommended 100%. Furthermore, support is awesome.

Last updated on July 15, 2025 by Njones35
How to Verify Email Addresses in WordPress [3 Steps!]
Do you want to use WordPress to verify email addresses before submitting a form? Do you want email verification without user registration?
Approximate read time: 5 minutes
Sometimes, you don't want to invite everyone to the party. One way to ensure that only verified users can see a form is to use WordPress to verify email registration to unlock access to forms.
This isn't something you'd do to all your contact forms, but if you want users to register for an invite-only event, you'd need to make sure that only the invited users can access your registration form.
In many cases, it is essential to ensure form submissions come from legitimate users.
Email verification can be triggered automatically when a new user is registered on your WordPress site. If you create user accounts with your WordPress forms, you can block other forms from logged-out users. Quick and simple, no passwords necessary.
In this quick guide, we'll show you how to verify email addresses in WordPress to ensure only valid form entries. Once the setup is complete, you'll have a form that users can only complete after verifying an email in WordPress.
Let's dive in!
Read more: 7 Best Wordpress Email Marketing Plugins
Upgrade your WordPress site with powerful, flexible forms.
Verify email address without registration
Although this isn't a built-in feature in Formidable Forms, our WordPress form builder is quite dynamic. With a few tweaks, you can verify user email addresses in any WordPress form you choose! It's like having two-factor authentication (2FA) without an external verification plugin.
If you aren't already a Formidable user, you'll be amazed by its powerful WordPress forms features. To fully implement this feature, you'll need Formidable Pro.
If you haven't settled on a complete form-building solution for your WordPress website, now is the time! We offer a 14-day money-back guarantee. In theory, you could try Formidable, follow this guide, and get your money back immediately if you don't like the results.
...no questions asked!
Here are the basic steps we'll take in this how-to guide:

Step 1: Create the email verification form
First, create a form to request the user's email address for user verification. This form can be short and sweet, without extra details, and acts as the verification screen. Our form asks for an email address with a confirmation field. That's it.
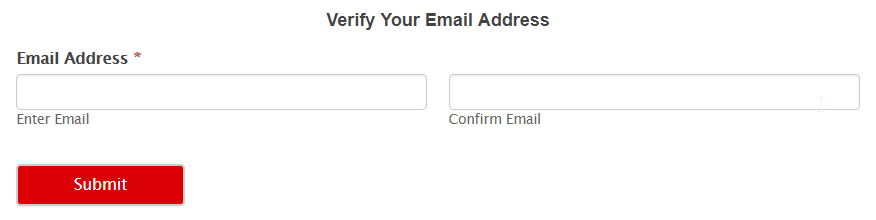
This initial form displays a success message to instruct the user to check their inbox and confirm the email address.
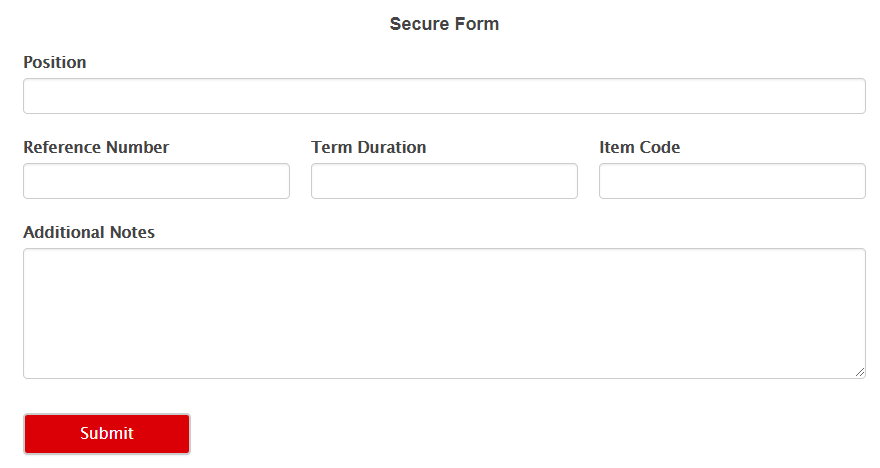
Step 2: Use a View to hide form B (unless the user verified their email)
Form B should only be visible to users who have verified their email addresses via Form A. To achieve this, place the shortcode for form B inside a View. Use filtering to hide it from non-verified user roles.
- Set the View to show a "Single Entry" from Form A.
- I'll keep it simple, with only the shortcode for Form B in the Content box.
- Add two filters so the View Content (Form B) will only be visible if both the Entry Key and Email Address match an entry in Form A. Add default=1 to the filters so if the URL is changed, it doesn't ignore the filter.

If the page is loaded directly without clicking on the link in the email, these filters will return "No Entries" and hide the form instead of an error message. Combining the random (and not publicly visible) entry key with the email address greatly increases the security of this system.
Modify the default "No Entries" message to include the shortcode for Form A or a link. This tells visitors who may arrive at the verification page to confirm their email address before proceeding.

Step 3: Add a verification link in the email message
WordPress email confirmation is triggered when a user submits an email address using Form A. The email must contain a link to the View created in step 2.
We'll create this link using the guide to create a custom search. Pass the entry key and email address to match the filters in the View. If you add matching filters in the view, you can use any form values you'd like.
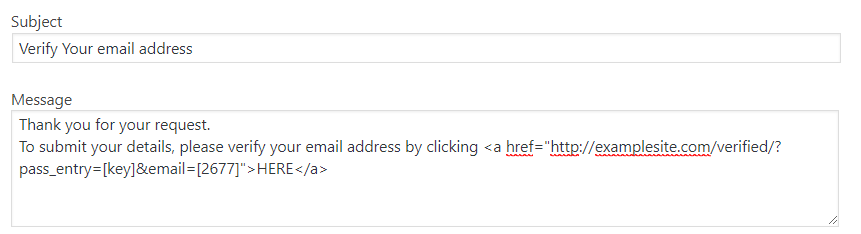
When the link in the verification email is clicked, the View matches the data in the URL to an entry in Form A. When it finds a match, the form is visible!
So that's it! There are three simple steps to create a form that users can only complete after email verification. Have you used similar methods to verify users who aren't logged in? Let us know in the comments below.
Keep it locked to the Formidable blog for more WordPress tips, guides, and how-to's. Also, join our community on Facebook, Twitter, and YouTube for more WordPress email tips and tricks!
Read more about WordPress email
 Make Your WordPress Form Notification Emails Look Professional
 How to Schedule Email Autoresponders in WordPress [No Code!]
 How To Use WP Mail SMTP with the WP Mail SMTP Plugin [Guide]
 How to Change the Email Address in a WordPress Contact Form
 How To Send a WordPress Email Confirmation [Only 2 Steps!]
 How To Create a Mailgun Subscribe Form in WordPress
 How to Create Holiday Out of Office Messages for WordPress Forms
 Why You Should Replace HTML Email Links with Email Contact Forms
 How to Send Emails to Dynamic Recipients from a WordPress Contact Form
 SendGrid + WordPress: The Ultimate WordPress Email Delivery
This article may contain affiliate links. Once in a while, we earn commissions from those links. But we only recommend products we like, with or without commissions.

