
Formidable Forms has made my life so much easier as an event planner.


Last updated on July 16, 2025 by Formidable Team
How To Create a Fitness Tracker in WordPress
Are you a fitness buff running a community site? This step-by-step guide will show you how to make a fitness tracker for your WordPress website.
Approximate read time: 8 minutes
Looking for a way to take your fitness website to the next level?
With a WordPress fitness tracker, you can inspire & motivate your audience to achieve their goals! Let's face it: the online fitness community is competitive. With many websites, you need exciting content to stand out.
As a health and fitness enthusiast, you should know no pain, no gain. But in this article, we'll show you how to easily create a fitness tracker for your WordPress site!
Once we cover some of the basics, we will show you how to make a simple weight loss tracker step by step. Let's get into it!
Upgrade your WordPress site with powerful, flexible forms.
Why create a WordPress fitness tracker?
A fitness tracker can help tremendously if you want to generate a loyal following and drive tons of traffic to your WordPress site.
And if you're looking for ways to make money online with your fitness blog or gym management system, a fitness tracker with a large user base could generate a lot of income.

Think about it! More search engine traffic means more opportunities to promote your business. You could place more advertising, sell more affiliate products, and build your brand awareness. Eventually, you could even sell your own branded fitness products.
You could even create your own fitness community. Offer a free version to existing gym members, or sell it as a paid upgrade.
Fitness trackers in action
Scaling up your business opportunities might seem like a lofty goal, but fitness tracking can lay the foundations for an entire health-focused website. Take the example of MyFitnessPal by Under Armour or the Fitbit app.

They built an entire community around a series of fitness trackers. Users can track calories and determine how many they should burn to reach their goal weight. This website integrates into an Android and iOS fitness app, but it can be simple and work well (as we'll show you below).
Here's the bottom line: it can be pretty powerful when users can see and track their health data directly. From daily calorie intake to body mass index, people can better themselves.
The result? More traffic & more chances to grow your online fitness business.
From Idea to Reality in Minutes. Build Powerful Forms, Dashboards, Apps and More.
Formidable Forms makes advanced site building simple. Launch forms, directories, dashboards, and custom WordPress apps faster than ever before.
What kinds of fitness trackers are there?
There are many options for fitness tracking. You can track everything from weight loss to meal planning. As long as it relates to fitness goals, there's a way to do it!
Here are a few goal-based fitness trackers you could use on your WordPress site:
- Fitness calculators
- Meal trackers
- BMI calculator
- Workout log/activity tracker
- Calorie counters
- Exercise log
- Workout diary
- Sleep tracking
As you can see, many ways exist to collect and display fitness data. It could be as simple as a platform where users can plan workout schedules.
Another no-brainer idea is meal planning. Creating a meal planner could be as straightforward as configuring a WordPress form builder plugin to display form data in a calendar.
This setup could also incorporate a macro calorie counter, allowing users to adjust their diet's balance of fat, protein, and carbohydrates. If carbs are the enemy, a calorie calculator makes removing them much easier.
Wrap things up by collecting body measurements so users can see their progress over time. A graph that displays a user's weight with the progress tracker data can show whether they are gaining or losing weight over time.
Learn more: How to Make a Fitness Calculator in WordPress
Who can benefit from creating a fitness tracker?
If you run a health and fitness business, nothing stops you from using fitness trackers. We've already discussed fitness community sites, but that's just the tip of the iceberg.
- Crossfit clubs
- Fitness centers
- Gyms
- Personal trainers
- Nutritionists
- Sports medicine
- Exercise bloggers
- Fitness influencers
The list goes on and on. These days, businesses need great content to grow and attract new customers. Blog articles, guides, and videos are a great start.
But WordPress goal trackers give your audience a reason to return to your site repeatedly!
You must be convinced by now, so let's get to it!
Create a WordPress fitness tracker in 5 steps

This example shows you how to make a simple yet effective fitness tracker that displays daily progress across key fitness metrics.

1. Download and install Formidable Forms
You'd think you need a WordPress fitness tracker plugin.
But you need the best form plugin for WordPress to create a fitness tracker in WordPress. And our Formidable Business plan is all that's required!
This is worth it if you're serious about upgrading your fitness business. For new users, Formidable Business starts at just $199/year.
With a Formidable Business plan, you'll be able to take on fitness tracking and much more:
- Build any form with our user-friendly form builder
- Display form data with eye-catching WordPress graphs
- Fully integrate with dozens of third-party services (by using our Mailchimp WordPress add-on, for example)
- Make your forms match your WordPress theme with our visual form styler
Formidable Business unlocks dozens of powerful WordPress form-building features!

Here's what you need to get started with a Formidable Business plan:
- An updated WordPress site
- Formidable Business license
- Formidable's lite WordPress plugin (installed automatically with Business)
- Around 5 minutes of your time
2. Create a fitness tracking form in WordPress
Once Formidable is up and running, the next thing to do is create a form. With Formidable's drag-and-drop form builder, this could not be easier!
All you do is drag in the fields you need, click the update button, and voila!
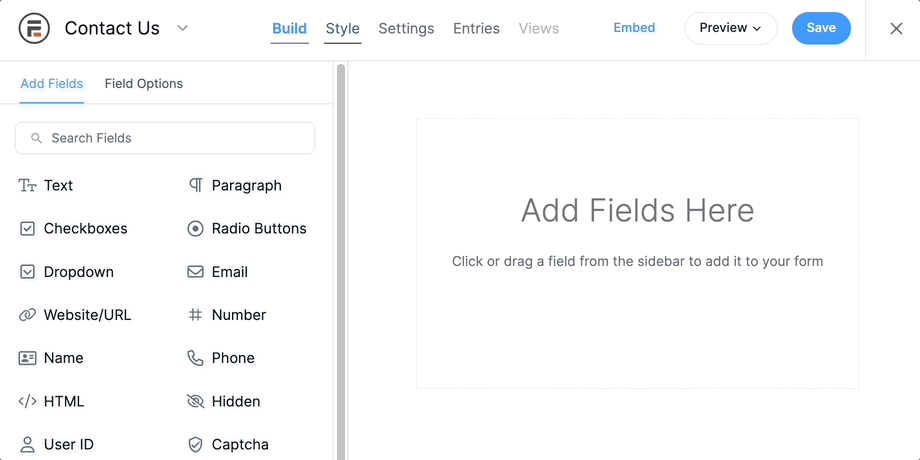
For this example, we will boost body shapes with a simple weight loss tracker. To do this, we only need a form that tracks weight and the date.
For this tutorial, let's add the following fields to our form:
- Date field
- Number field - OR - Number slider (weight)
- User ID field
One thing to point out: we need a User ID field so that the form data will be associated with the logged-in user. Be sure to look into the field options to give your number field the appropriate label. In this case, you'd want to specify that users can input weight in kilos or pounds.
If you want to update the colors, fonts, styles, or any other UI design, visit our Formidable Form Styler.
Once you've done that, click Update and move on to step 3.
Did you know? In Formidable, you can create exercise trackers too. Users can select different activity types like cycling, swimming, or hiking! And, of course, you can graph the results, too.
3. Input some test entries
This part is straightforward. Click the Entries tab above the form builder, then click the Add New button. Your newly created form will pop up, giving us test data to display later.
Now, add a few entries and move on to step 4.
4. Publish your fitness tracking form
Next, we need to publish our fitness tracking form. The perfect place to publish this on a fitness community site would be on a user's profile page.
If you haven't already set up your community website, this might be a challenge. However, for testing purposes in this tutorial, we can create a new post or page in the WordPress admin as usual.
Once you've created a new post or page, we can publish our form using one of the following methods:
5. Display fitness tracking graphs
Here's where it all comes together! In theory, there are a lot of places where we might want to display our users' fitness data:
- Public user profiles
- Forum signature section
- Leaderboards section
- Private profile area
Once you have the data, it can be displayed in many exciting ways! In this quick example, we'll show you how to display a simple graph on the same page or post you created in the last step.
In Formidable, graphs come with a ton of options. So tweaking things to look just how you want them isn't too hard. Consider a few things, like which graph style you want to display.

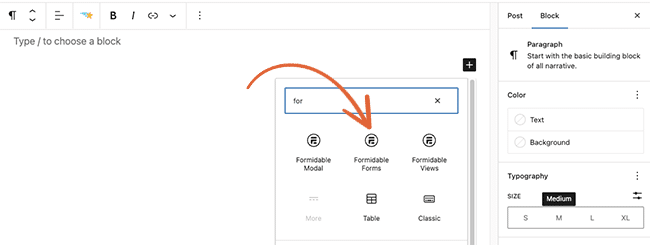
All you need is the WordPress Charts and Graphs plugin from Formidable Forms, which is under the Add-ons.
Then, you can simply add the Formidable Chart block to insert a chart on your post or page:

The resulting graph should look something like this:
Get a fitness form builder now
After you've tweaked your graph to perfection, you'll have a fitness tracker that community members can proudly show off on their profiles.
Hopefully, this guide inspired you to see how much is possible with Fitness + Formidable, your best fitness tracker plugin.
Stay tuned to the Formidable blog for more WordPress tips on forms, fitness, and everything. Have a great day!
Read more about everything Fitness and Formidable!
 How To Make a Fitness Calculator in WordPress [2 Easy Steps]
This article may contain affiliate links. Once in a while, we earn commissions from those links. But we only recommend products we like, with or without commissions.

