
Formidable Forms has made my life so much easier as an event planner.


Last updated on December 1, 2020 by Ryan Cordoni
How to Create a Zoom Webinar Signup Form for WordPress
Want to run Zoom webinars the easy way? With Zapier & WordPress, you can create a Zoom webinar signup form that runs every time someone registers!
 Approximate read-time: 8 minutes
You have an audience & you have an idea. Video conferencing via Zoom has become a popular way to seamlessly run webinars. How about what happens before the webinar though?
You may have your audio & video set up perfectly, but there's a lot more to consider in the days leading up to your webinar. One of the most important things is managing your attendees.
How do they register? What happens after they register? How do you keep track of attendee information? Unfortunately, Zoom doesn't always have the best answers by itself.
What Zoom does best is video conferencing. To fill in the gaps, we can use the popular web automation app called Zapier. With Zoom integration, you can build a marketing automation system that works together with your WordPress website.
Here's what you'll need to make this setup work:
Approximate read-time: 8 minutes
You have an audience & you have an idea. Video conferencing via Zoom has become a popular way to seamlessly run webinars. How about what happens before the webinar though?
You may have your audio & video set up perfectly, but there's a lot more to consider in the days leading up to your webinar. One of the most important things is managing your attendees.
How do they register? What happens after they register? How do you keep track of attendee information? Unfortunately, Zoom doesn't always have the best answers by itself.
What Zoom does best is video conferencing. To fill in the gaps, we can use the popular web automation app called Zapier. With Zoom integration, you can build a marketing automation system that works together with your WordPress website.
Here's what you'll need to make this setup work:
 There's a lot that can be done with marketing automation & Zapier. Here's what we'll show you how to do today:
- Create a Zoom webinar signup form for WordPress
- Connect your WordPress site to Zoom via Zapier
- Set things up to run every time someone registers

Upgrade your WordPress site with powerful, flexible forms.
Why host a webinar in Zoom?
If you are at the point where you are hosting webinars, great job! You know the power to make money online is limited only by the imagination. But if you are new online business & webinars, there's a bit of a learning curve. Don't expect to sell tickets overnight. Let's first look at the difference between a Zoom meeting and a Zoom webinar. Here are the differences:1. Different video conferencing format:
- Zoom meetings: interactive group sessions.
- Zoom webinars: one or a few hosts speaking to an audience.
2. Best used for:
- Zoom meetings: best used for customer meetings, sales or training.
- Zoom webinars: large events and public lectures or fitness classes.
3. Different cost:
- Zoom meetings: free and paid options.
- Zoom webinars: available in pro or higher subscriptions.
 So why host a webinar in Zoom? It's considered one of the best webinar software apps out there! But besides that, here are a few reasons:
- Webinars can be monetized for added revenue.
- You can easily record webinars (and then re-purpose them into video content).
- Webinars are far cheaper than renting a physical meeting space.
- Hosting webinars builds trust and develops authority with your audience.
From Idea to Reality in Minutes. Build Powerful Forms, Dashboards, Apps and More.
Formidable Forms makes advanced site building simple. Launch forms, directories, dashboards, and custom WordPress apps faster than ever before.
What organizations & businesses host webinars?
When it comes to live webinars, there are a number of businesses that can capitalize.- Fitness trainers: Run a fitness class from your living room.
- Churches: Your next sermon could be delivered to a remote audience.
- Educators: Deliver your lectures to home-based learners.
- Medical doctors: Host consortiums for the worldwide medical community.
- Coaches: Inspire your followers from afar with a Zoom webinar.
1. Download & Install Formidable Forms
 To create a signup form, you're going to need a WordPress form builder plugin. Why not use ours? 🙂 Besides, for this setup to work, you will need a WordPress form builder that integrates with Zapier.
In this case, you'll need to use the pro version of Formidable. But if you're serious about starting a webinar business, this is really worth considering.
With Formidable Pro, you can automate webinar registration & more:
To create a signup form, you're going to need a WordPress form builder plugin. Why not use ours? 🙂 Besides, for this setup to work, you will need a WordPress form builder that integrates with Zapier.
In this case, you'll need to use the pro version of Formidable. But if you're serious about starting a webinar business, this is really worth considering.
With Formidable Pro, you can automate webinar registration & more:
- Setup dedicated email autoresponders.
- Fully integrate with dozens of third-party services (like Zapier and MailChimp).
- Display form data to create websites + more.
- Collect payments via Stripe, PayPal or WooCommerce.
- Survey webinar attendees to constantly improve your process.
 Here's what you need to get Formidable Pro operational:
- An up-to-date WordPress site
- Formidable Pro license (purchased at our pricing page)
- Formidable's lite WordPress plugin (installed automatically with Pro)
- Around 5 minutes of your time
2. Create & publish webinar registration form
Now we need to create a form. This will serve as our primary Zoom webinar registration form. Once the form is created & published, you'll only have two more steps to complete.Create a new form
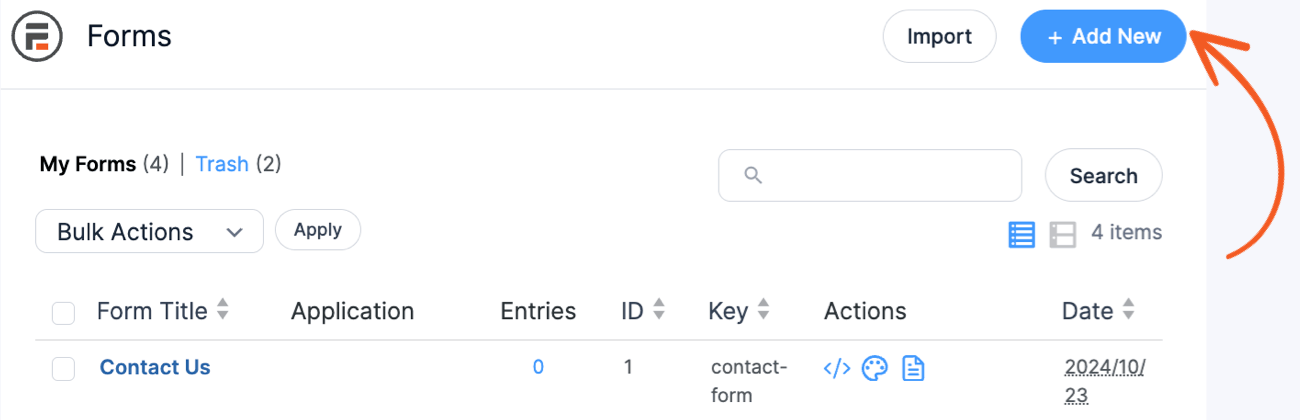
- Go to Formidable → Forms and click + Add New at the top of the page.
- Search for 'webinar' and click the webinar registration form template or click Blank Form to create your own.
- Give your new form a name and click Create to start building your webinar registration form.
Add form fields
 If you used the webinar registration form template, just review it and update it for your needs.
If you created a new blank form, we'll need to do add some form fields. By now you should be looking at Formidable's drag and drop form builder. From this interface, form design is easy.
As you can see, there are quite a number of fields to choose from. For a webinar registration form, let's include the following fields at least:
If you used the webinar registration form template, just review it and update it for your needs.
If you created a new blank form, we'll need to do add some form fields. By now you should be looking at Formidable's drag and drop form builder. From this interface, form design is easy.
As you can see, there are quite a number of fields to choose from. For a webinar registration form, let's include the following fields at least:
- Single Line Text: First name, Last name, Organization, Job title
- Email address: The user's preferred email address
- Dropdown: Country, Industry
Create some test entries
 For all this to work properly, we'll need some test entries. We need these entries to test that Zapier can pull the right data when we are connecting everything together.
To do this, click on the Entries tab then click the Add New button to add new entries.
When you add an entry, use one of your own email addresses. This is because we want to make sure that any confirmation emails you set up are actually working.
For all this to work properly, we'll need some test entries. We need these entries to test that Zapier can pull the right data when we are connecting everything together.
To do this, click on the Entries tab then click the Add New button to add new entries.
When you add an entry, use one of your own email addresses. This is because we want to make sure that any confirmation emails you set up are actually working.
Publish the form
Almost done! Now all you need to do is publish your form. From your WordPress dashboard, create a new WordPress page or post, then publish:- Use the shortcode builder
- Insert the form shortcode manually
- Use a WordPress form block
3. Link your Zoom webinar form to Zapier
For all this to come together, you'll need to set up Zoom, Zapier and Formidable to work seamlessly together. If you are brand new to Zoom and Zapier, take a look at their quick-start guides below: This all boils down to 4 major steps:- Signup for Zoom account & Zapier account
- Connect Formidable Forms & Zoom to Zapier
- Create a new webinar in Zoom
- Create a zap in Zapier
1. Signup for Zoom account & Zapier account
Visit Zoom.us and get Zoom. Remember that you'll need any of the zoom paid plans to use webinars. Then head over the Zapier.com and open an account there. The free version of Zapier allows users to run 100 Zapier "tasks". That means you'll need to upgrade if your webinar has more than 100 people.2. Connect Formidable Forms & Zoom to Zapier
 Once you've got all your accounts, it's time to connect them using Zapier.
Once in Zapier, click on My Apps in the sidebar, then use the search box to connect a new account. Follow the instructions and you should be connected in no time.
All you'll need is the Formidable API key, which is found in the Formidable Global Settings page.
Once you've got all your accounts, it's time to connect them using Zapier.
Once in Zapier, click on My Apps in the sidebar, then use the search box to connect a new account. Follow the instructions and you should be connected in no time.
All you'll need is the Formidable API key, which is found in the Formidable Global Settings page.
3. Create a new webinar in Zoom
In your Zoom account, create a new webinar. Don't worry about the specifics, we just need a test webinar for now.4. Create a zap in Zapier
Set the zap trigger
Here's where the magic happens! In Zapier, click the Make a Zap button to get started. Zaps run when a Trigger occurs. In this case, we want to make a zap that runs when somebody fills out our webinar registration form. That means we need to choose Formidable Forms as our trigger app. Then you'll choose the Trigger Event, in this case, that would be New Entry. After that, choose your Formidable account and then choose the correct form to use as part of the trigger.
After that, follow the process to Find Data. You should be able to see a success message telling you that an entry was found.
Then you'll choose the Trigger Event, in this case, that would be New Entry. After that, choose your Formidable account and then choose the correct form to use as part of the trigger.
After that, follow the process to Find Data. You should be able to see a success message telling you that an entry was found.

Set the zap action
Now that we've defined the trigger, we need to set things up to send data to Zoom. In the Do This section, choose the Zoom app and choose the Action Event - in this case, we want to choose Create Registrant. Next, you'll choose your Zoom account then customize the data that you send to Zoom. You can't send everything to Zoom, but you'll be able to get a registrants email, first name, and last name.
You'll also be able to choose whether or not to send a confirmation email. This would be a great addition to the signup process for your audience.
Zoom confirmation emails include the links needed to join webinars, greatly simplifying the process for everyone.
Finally, the last step is to test your zap. Here's what should happen when a new form entry is received:
Next, you'll choose your Zoom account then customize the data that you send to Zoom. You can't send everything to Zoom, but you'll be able to get a registrants email, first name, and last name.
You'll also be able to choose whether or not to send a confirmation email. This would be a great addition to the signup process for your audience.
Zoom confirmation emails include the links needed to join webinars, greatly simplifying the process for everyone.
Finally, the last step is to test your zap. Here's what should happen when a new form entry is received:
- The data is sent to Zoom
- Zoom adds a new registrant
- A confirmation email is sent via Zoom
You're all set!
Now your upcoming webinars will be easy to manage. Of course, running a webinar is still very involved. At least administration is now a piece of cake! If you're looking for more ways to upgrade your WordPress site, stay tuned to the Formidable Blog.Read More from the Formidable Blog
- 9 Ways to Make Money Online (with Examples)
- 18 Easy Ways to Speed Up WordPress Sites
- How to Show Social Feeds on WordPress Community Sites
- The Best WordPress Plugins to Download
- 8 Ways to Reduce HTTP Requests on WordPress sites
Still not using the top WordPress form builder plugin available today? Get started with our free plugin or our feature-rich premium plans!
This article may contain affiliate links. Once in a while, we earn commissions from those links. But we only recommend products we like, with or without commissions.

