
Any data submitted in a Formidable form can be displayed on your WordPress site using Views. A View can display a listing of all submitted entries and a detailed page for individual entries if wanted. With Views, your options are virtually limitless. You could create a real estate listings site, a job board, a journaling app, an event calendar, etc. You may also use a View to search and filter entries from the front-end of your site.

Upgrade your WordPress site with powerful, flexible forms.
Download and install
- If you haven't already, install and activate the current version of Formidable Forms Premium on your WordPress site.
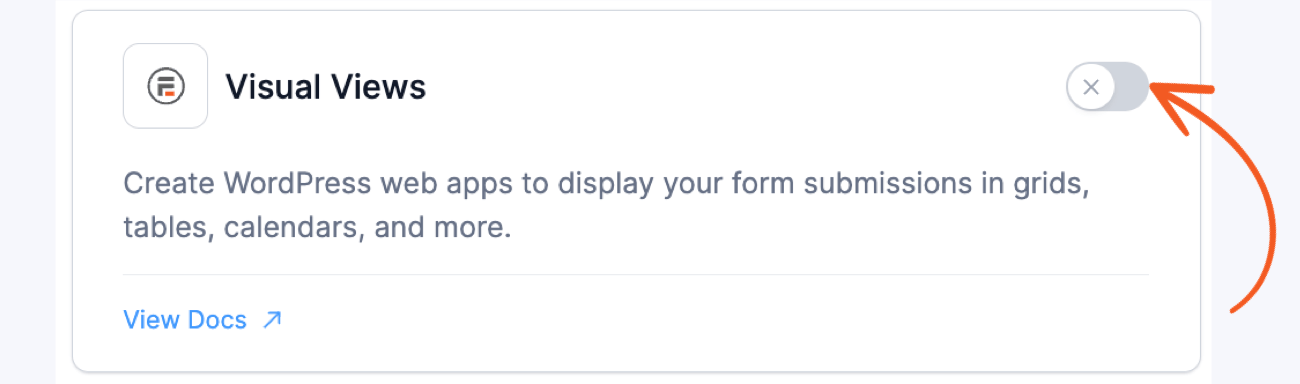
- After confirming your Formidable Forms license, proceed to the Formidable → Add-Ons page and toggle on the Visual Views plugin.

From Idea to Reality in Minutes. Build Powerful Forms, Dashboards, Apps and More.
Formidable Forms makes advanced site building simple. Launch forms, directories, dashboards, and custom WordPress apps faster than ever before.
Display entries in a table
If you would like to create a table that displays WordPress form entries on the front-end of your site, follow the instructions below.
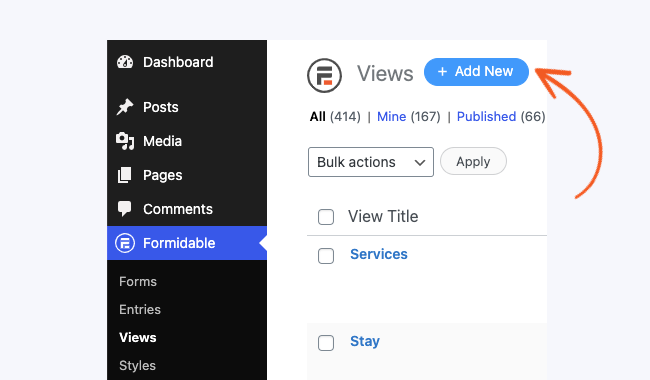
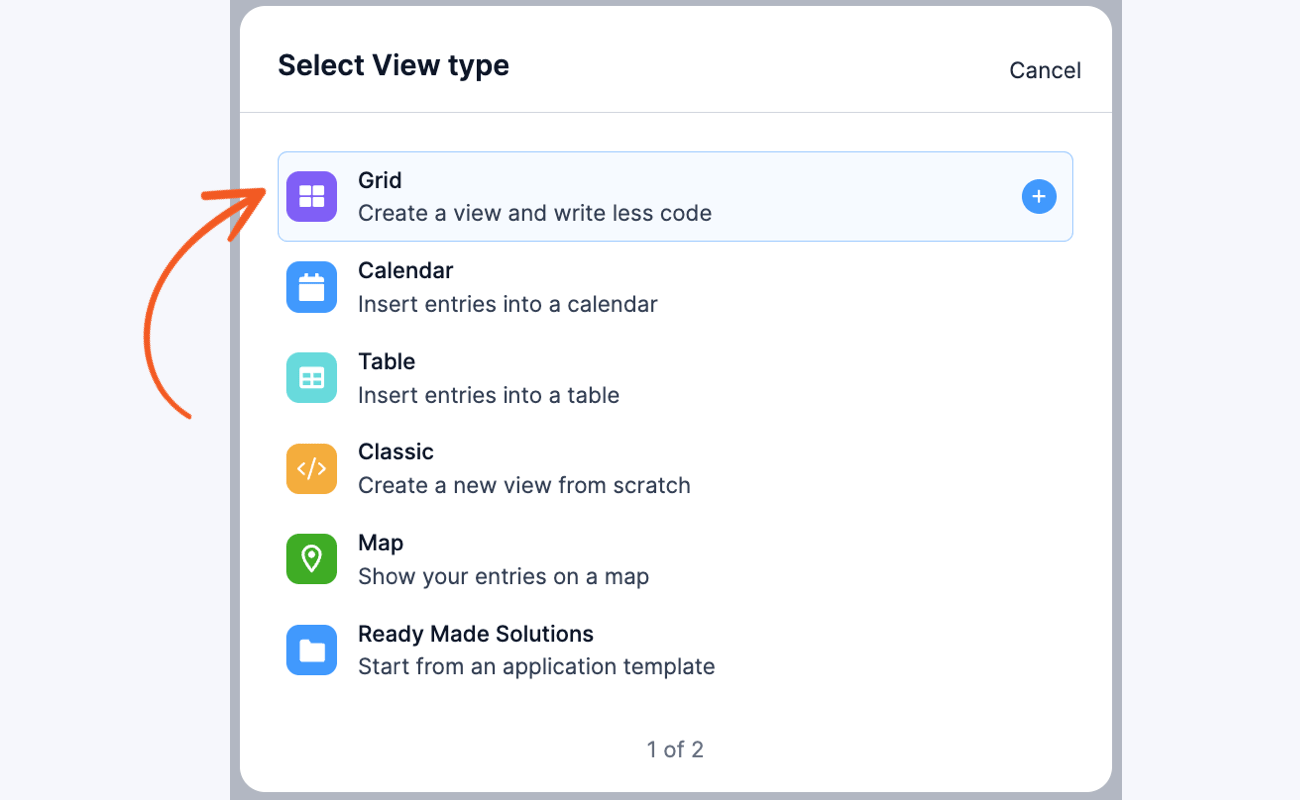
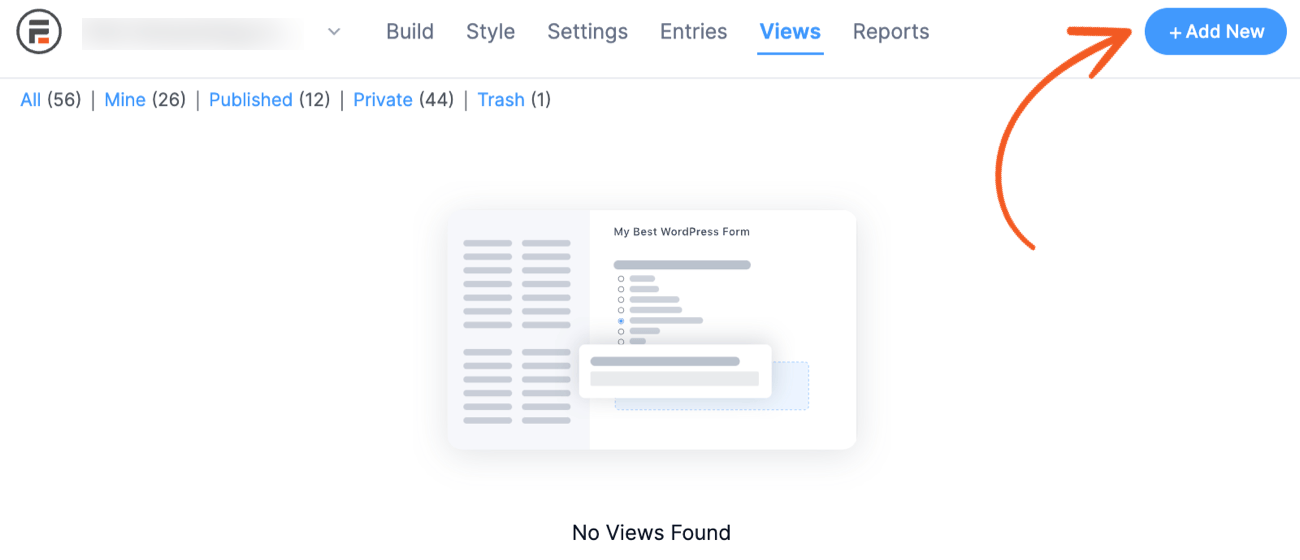
- Go to Formidable → Views. Click the Add New button at the top of the page.
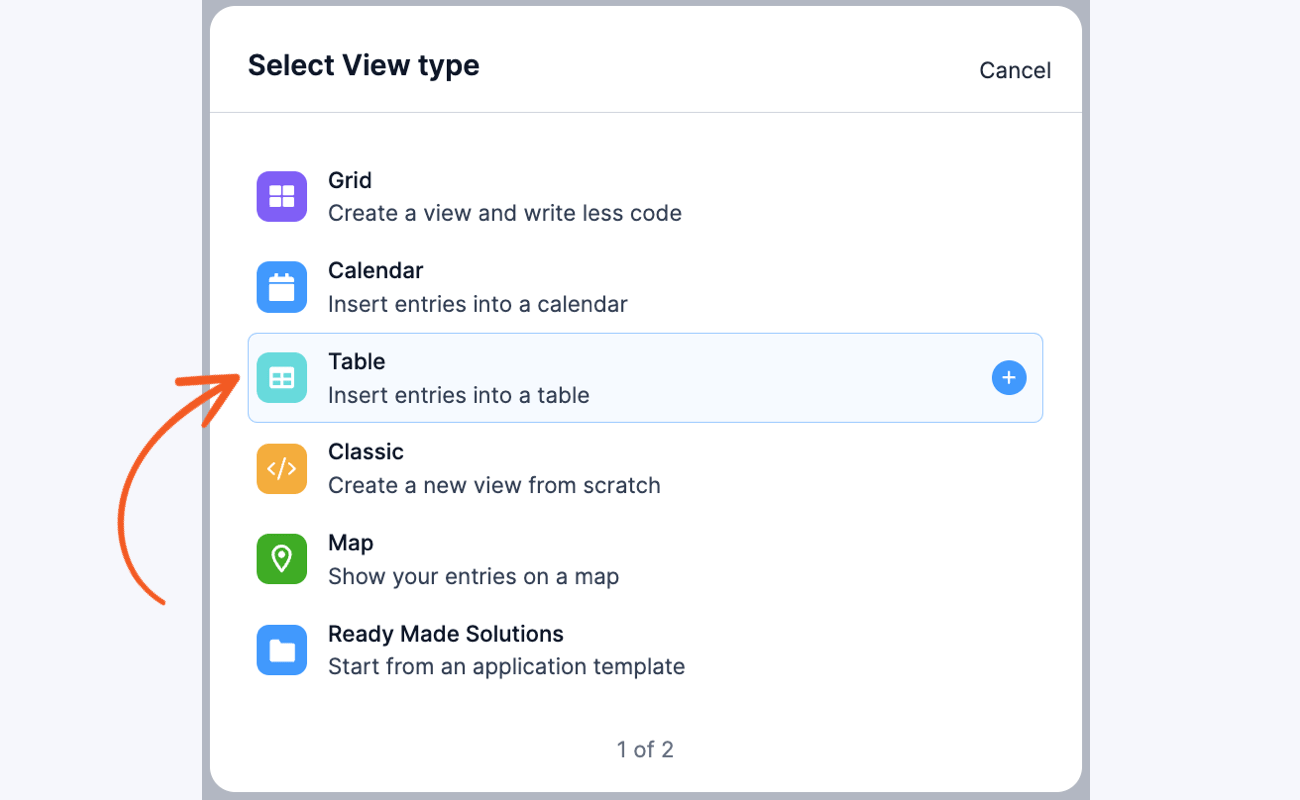
- Select Table View as the View type.For more information on these formats, please see the Visual View Settings page.
- In the Use Entries from Form dropdown, select the form that will be used as the data source. The View Name will be automatically populated with the selected form.
- In the Customize View, select the columns that you want to display in the View. You have the option to select all columns, deselect all columns, or search for a specific form field.
- Click the Create a View button and the Table View will be automatically generated.
- In the Advanced Settings, set the Page Size to 50 or less.
- Click Update to save your View.
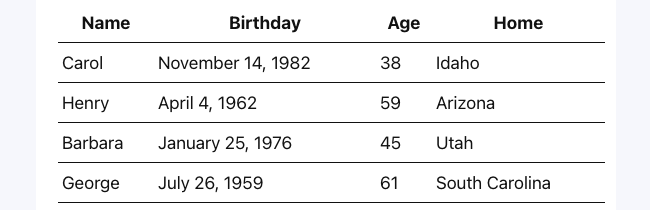
- Publish your View on a page. When the page is visited, it should look something like this:
 For more information on these formats, please see the
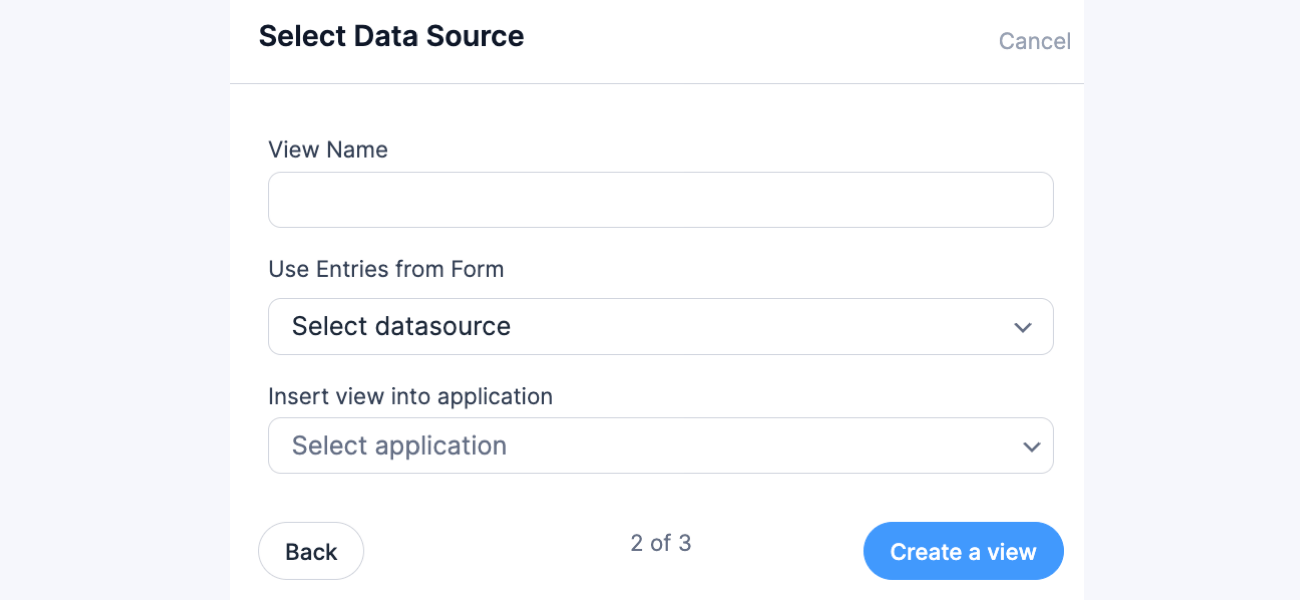


Styling the table View
To customize your table View, go to the Table Settings and choose from the different styling available from the Row Style dropdown. You can also add a custom class by inserting it on the Custom classes box.
- Match theme settings - Show table that matches the theme settings.
- Zebra Stripes - Show table in alternating rows.
- Grid - Show table in a grid layout.

To Make table responsive, select this checkbox in the table settings.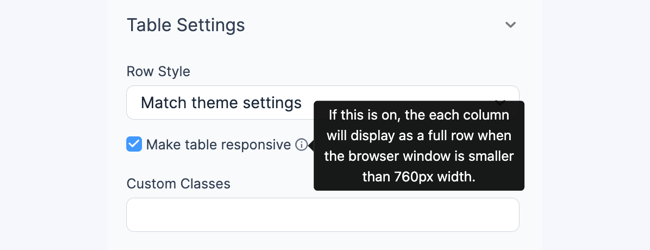
If you don't see this option right away, go to your Formidable → Styles page and click the Update button to update the style settings.
If you would like to make your table sortable from the front-end, check out these instructions. You can insert "tablesorter" in the Custom classes box to allow for JS-side table sorting.
Display entries in a bulleted list
If you would like to create a bulleted list of entries for the front-end of your site, follow the instructions below.
- Go to Formidable → Views. Click the Add New button at the top of the page.
- Select Classic for the View type.
For more information on these formats, please see the Visual View Settings page. - In the Use Entries from Form dropdown, select the form that will be used as the data source. The View Name will be automatically populated with the selected form.
- In the Before Content box, add the following HTML:
<ul>
- In the Listing Page Content box, select the Text tab and add the following HTML:
<li>[874]</li>
Replace '874' with the field ID or key from your form. If you have set up a detail page, you can add a link to this by replacing [874] with:
<a href="[detaillink]">[874]</a>
- In the After Content box, add the following HTML:
</ul>
- Click Update to save your View.
- Publish your View on a page. When the page is visited, it should look something like this:


Display entries in a numbered list
If you would like to create a numbered list of entries for the front-end of your site, follow the instructions below.
- Go to Formidable → Views. Click the Add New button at the top of the page.
- Select Classic for the View type.
For more information on these formats, please see the Visual View Settings page. - In the Use Entries from Form dropdown, select the form that will be used as the data source. The View Name will be automatically populated with the selected form.
- In the Before Content box, add the following HTML:
<ol>
- In the Listing Page Content box, select the Text tab and add the following HTML:
<li>[874]</li>
Replace '874' with the field ID or key from your form. If you have set up a detail page, you can add a link to this by replacing [874] with:
<a href="[detaillink]">[874]</a>
- In the After Content box, add the following HTML:
</ol>
- Click Update to save your View.
- Publish your View on a page. When the page is visited, it should look something like this:

You can add HTML and CSS to completely customize your View. Add the CSS to your Formidable → Global Settings → Custom CSS.
Display entries in a listing format
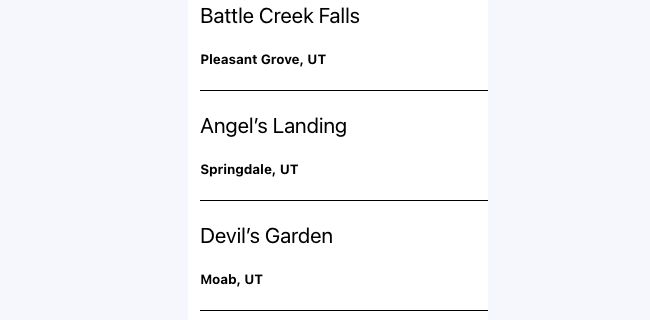
If you would like to display a list of entries in a format similar to this Trails demo, follow the instructions below.
- Go to Formidable → Views. Click the Add New button at the top of the page.
- Select Grid for the View type.
For more information on these formats, please see the Visual View Settings page. - In the Use Entries from Form dropdown, select the form that will be used as the data source. The View Name will be automatically populated with the selected form.
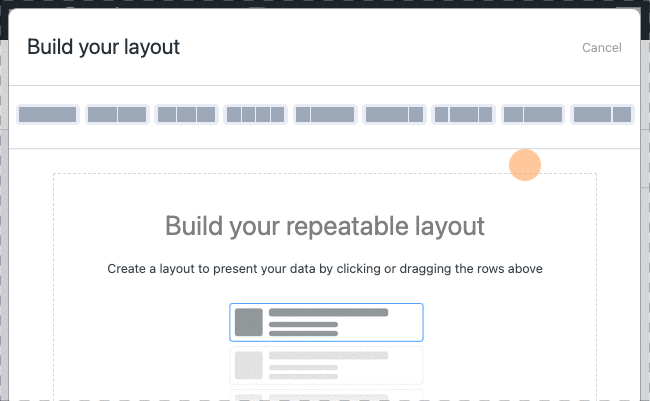
- Create the layout you would like. For this example, we'll skip the layout and click the link to start adding content.
- In the Listing Page Content box, select the Text tab and add the following.
<h3>[100]</h3>
<strong>[101]</strong>
<hr>
Replace 100 and 101 with the field IDs or keys from your form. If you have set up a detail page, you can add a link to this by replacing [100] with:
<a href="[detaillink]">[100]</a>
- In the Advanced Settings, set the Page Size to 50 or less.
- Click Update to save your View.
- Publish your View on a page. When the page is visited, you should see something like this:
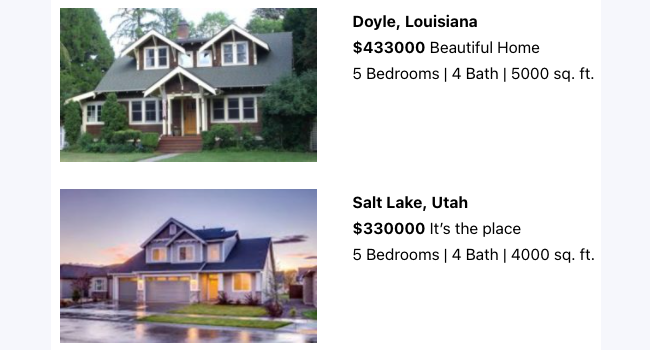
Display entries in a listing format with images
If you would like to display a list of entries with images, follow the instructions below.
- Go to Formidable → Views. Click the Add New button at the top of the page.
- Select Grid for the View type.
For more information on these formats, please see the Visual View Settings page. - In the Use Entries from Form dropdown, select the form that will be used as the data source. The View Name will be automatically populated with the selected form.
- Click the Layout Builder button and add a two column row. You can add more rows and columns if you prefer.
- Click Save Layout.
- Click the plus to add content in the first box.
This box is for the image, so insert:[home-image show_image=1 size=medium]
If you would like a detail page, you can add a link to this by replacing this shortcode with:
<a href="[detaillink]">[home-image show_image=1 size=medium]</a>
- Click Update View, and then the plus for the second box. This box is for the text content. Add the following in the text editor for this box:
[city], [state]
$[listing-price] [blurb]
[bedroom] Bedrooms | [bathroom] Bath | [sqft-living] sq. ft.
Replace home-image with your File Upload field ID. Replace city, state, lsting-price, blurb, bedroom, bathroom, and sqft-living with the field IDs/keys from your form.
- In the Advanced Settings, set the Page Size to 50 or less.
- Click Update to save your View.
- Publish your View on a page. When the page is visited, you should see something like this:

Display entries in a gallery format
If you would like to display your entries in a gallery format, follow the instructions below.
- Go to Formidable → Views. Click the Add New button at the top of the page.
- Select Grid for the View type.
For more information on these formats, please see the Visual View Settings page. - In the Use Entries from Form dropdown, select the form that will be used as the data source. The View Name will be automatically populated with the selected form.
- Click the link to start adding content, and add the following content:
<img src="[100 size=thumbnail]" alt="" style="width:100%" />
<p>[101]</p>
Replace 100 with the ID or key of the file upload field in your form. Replace 101 with a field ID or key from your form. If you would like a detail page, you can add a link to this by replacing <img src="[100 size=thumbnail]" alt=""/> with:
<a href="[detaillink]"><img src="[100 size=thumbnail]" alt=""/></a>
- In the Grid Style Settings, drag the Number of grid columns to 3 columns. Also set the Padding to 0.
- In the Advanced Settings, set the Page Size to 50 or less.
- Click Update to save your View.
- Publish your View on a page. When the page is visited, you should see something like this:

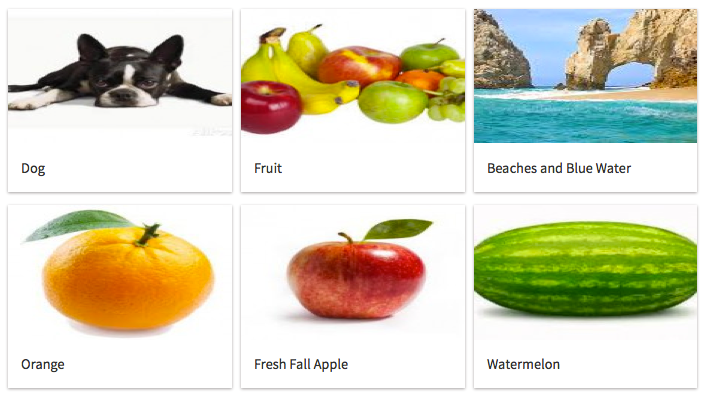
If you would like to download this View instead of setting it up yourself, please see the Gallery Demo.
Display entries in a calendar
If you want to display calendar entries, follow the instructions below.
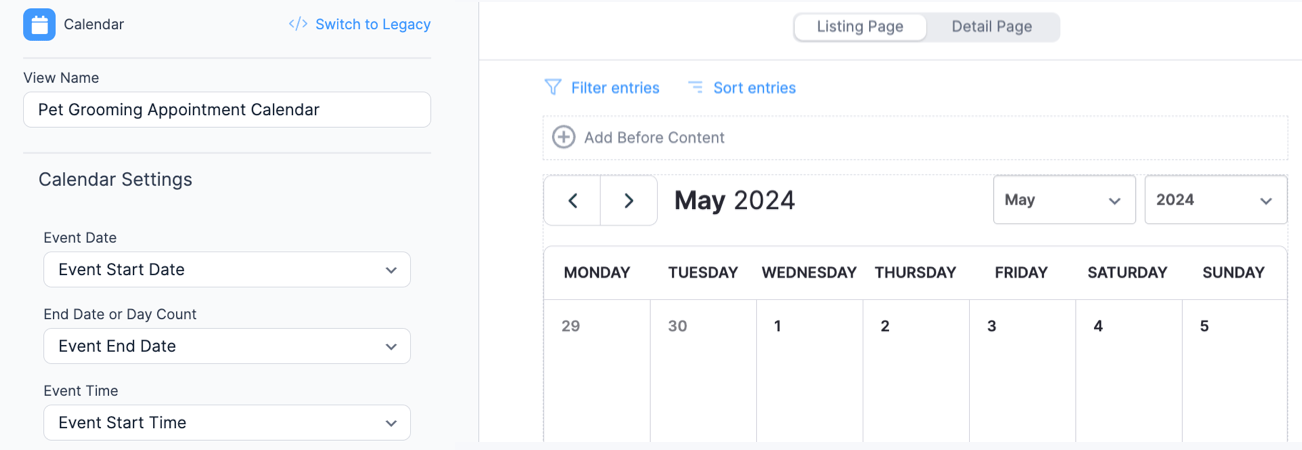
- Go to Formidable → Forms. Navigate to your form and proceed to edit.
- Click the Views tab, then click the Add New button at the top of the page.
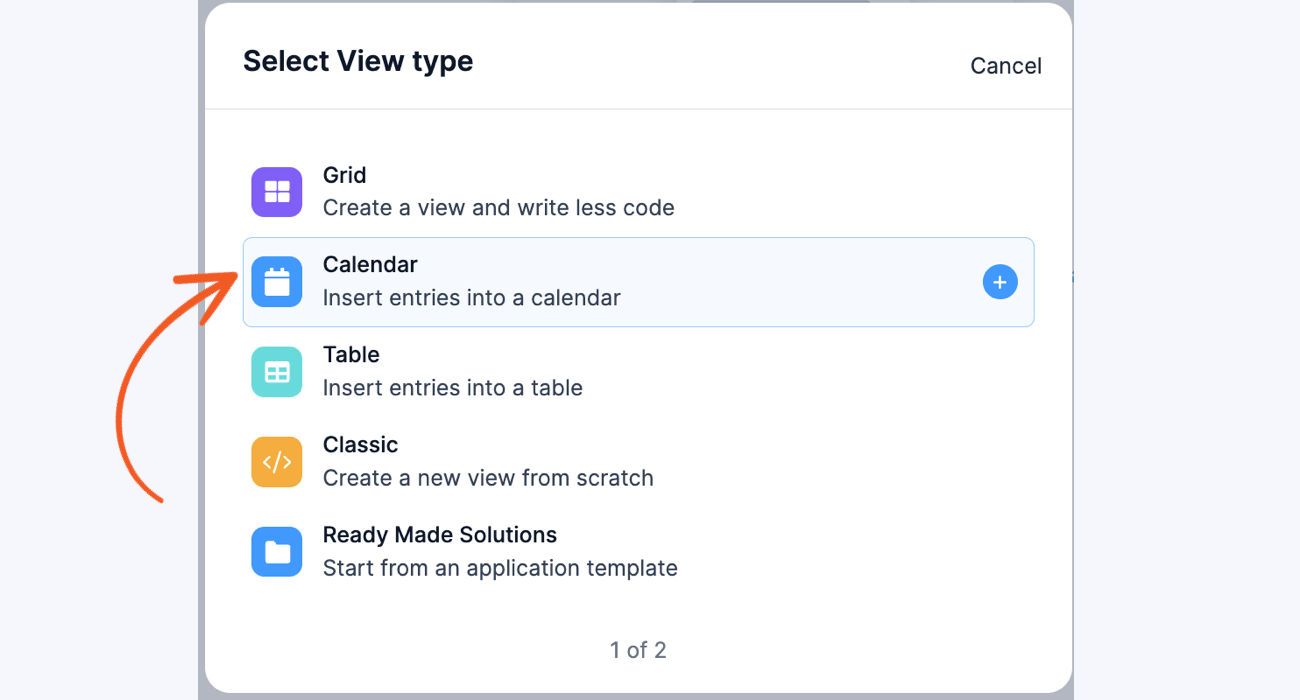
- Select Calendar as the View type.
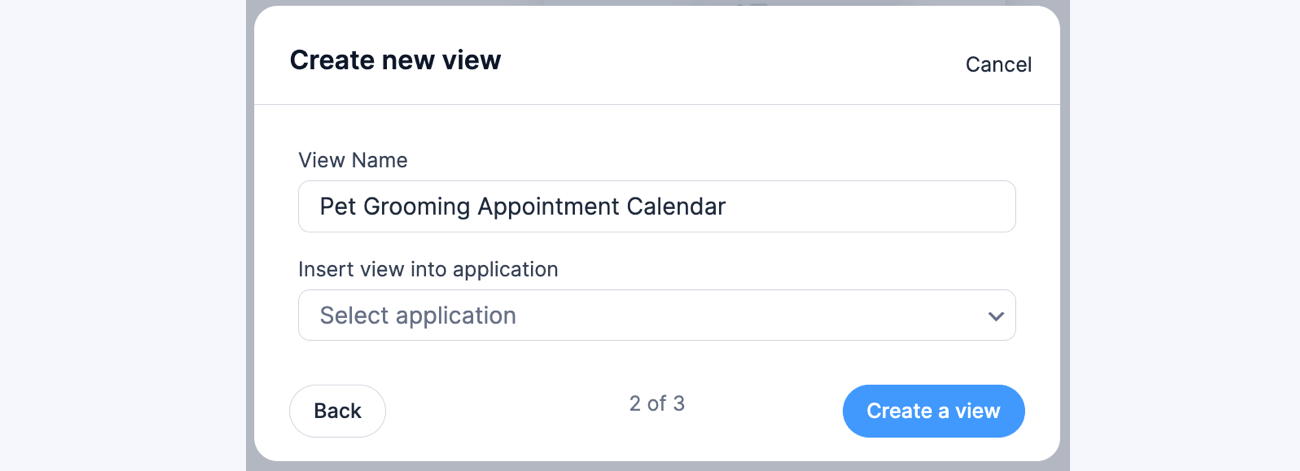
- The View Name will be automatically populated with the title of the selected form but can be changed to your preference.
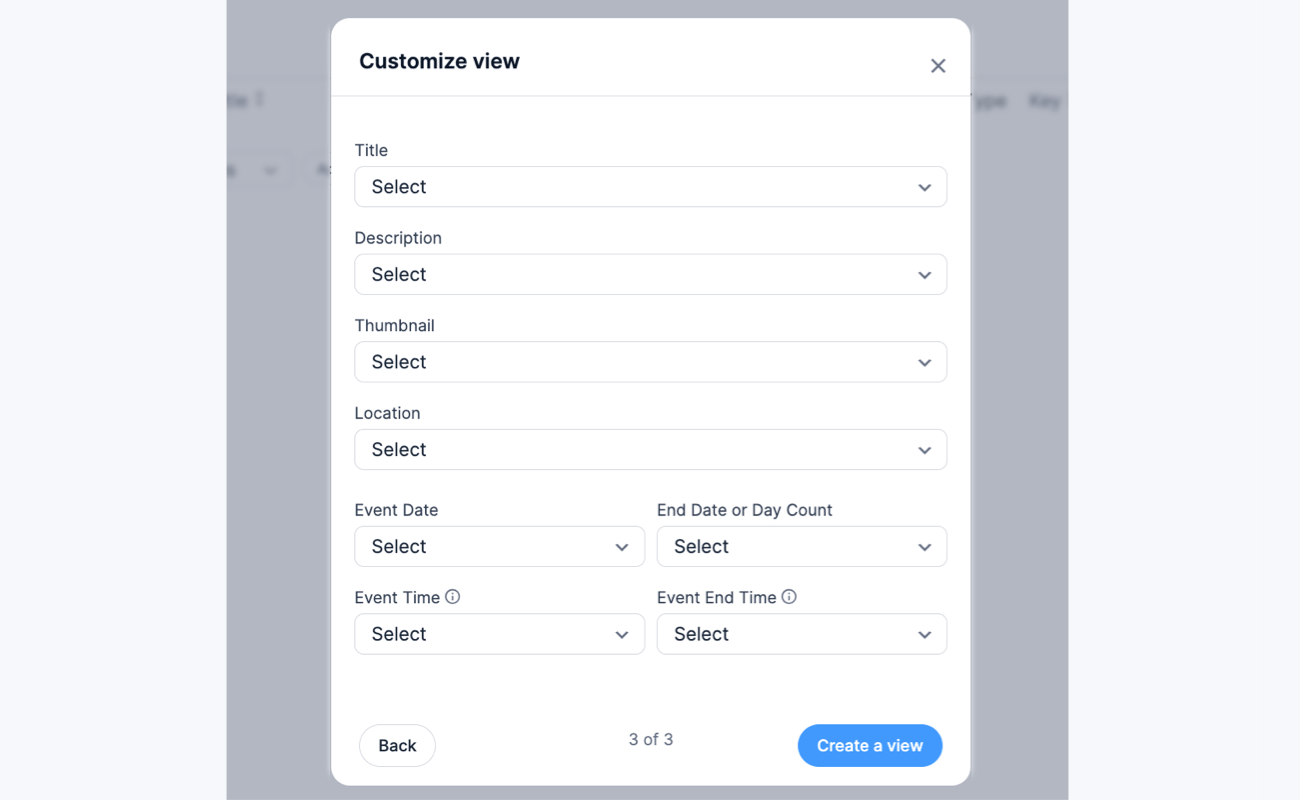
- Several calendar options will appear where you can customize your Calendar View.
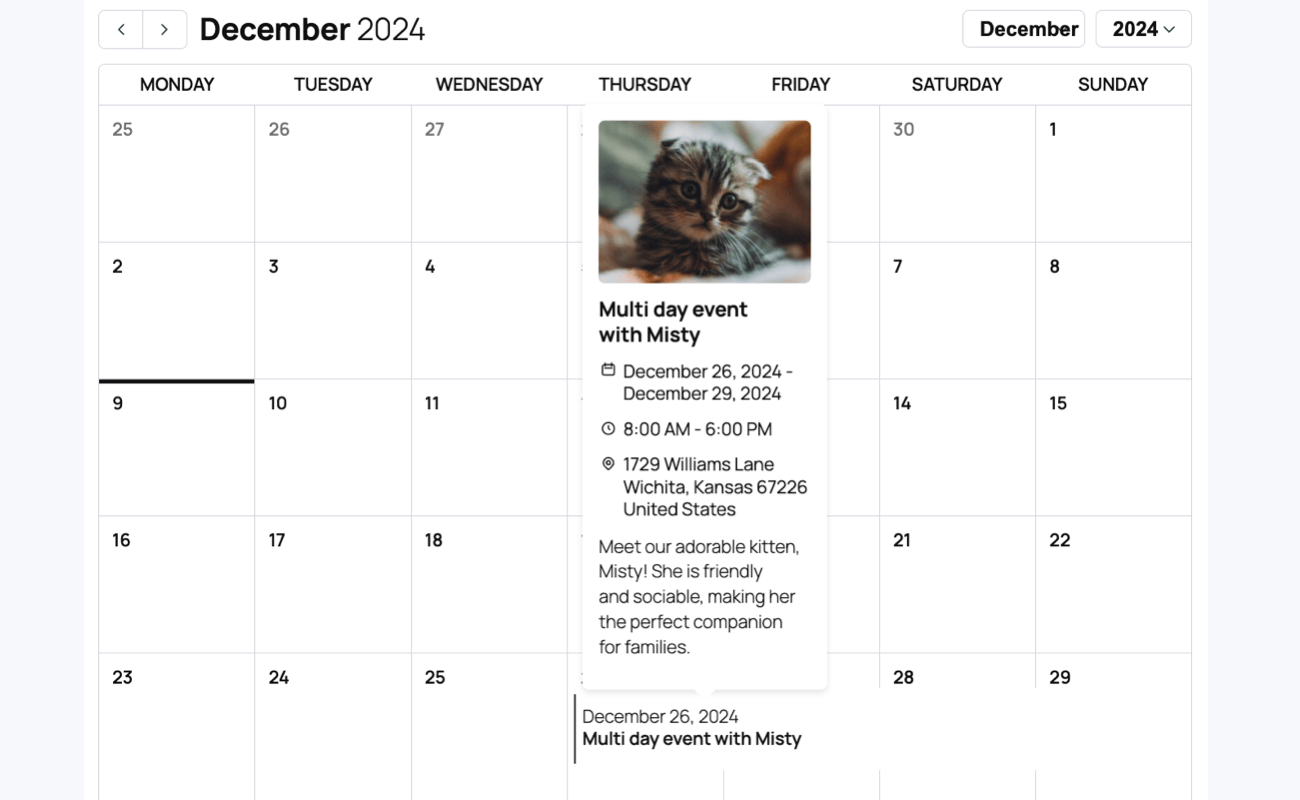
- Title: The first text field data will be taken as the title in the popup. If no text field is added, there will not be a title in the popup details.
- Description: The paragraph field will be considered an event short detail in the popup. If the field is missing, the details won't be displayed in the popup content.
- Thumbnail: The image attachment to a file upload field will be taken as a thumbnail. If no file upload field is added or the attachment image is missing, the thumbnail won't be displayed in the popup.
- Location: The address field will be provided as an option for the Event location. If the form does not include an existing address field, the location will not appear in the popup content.
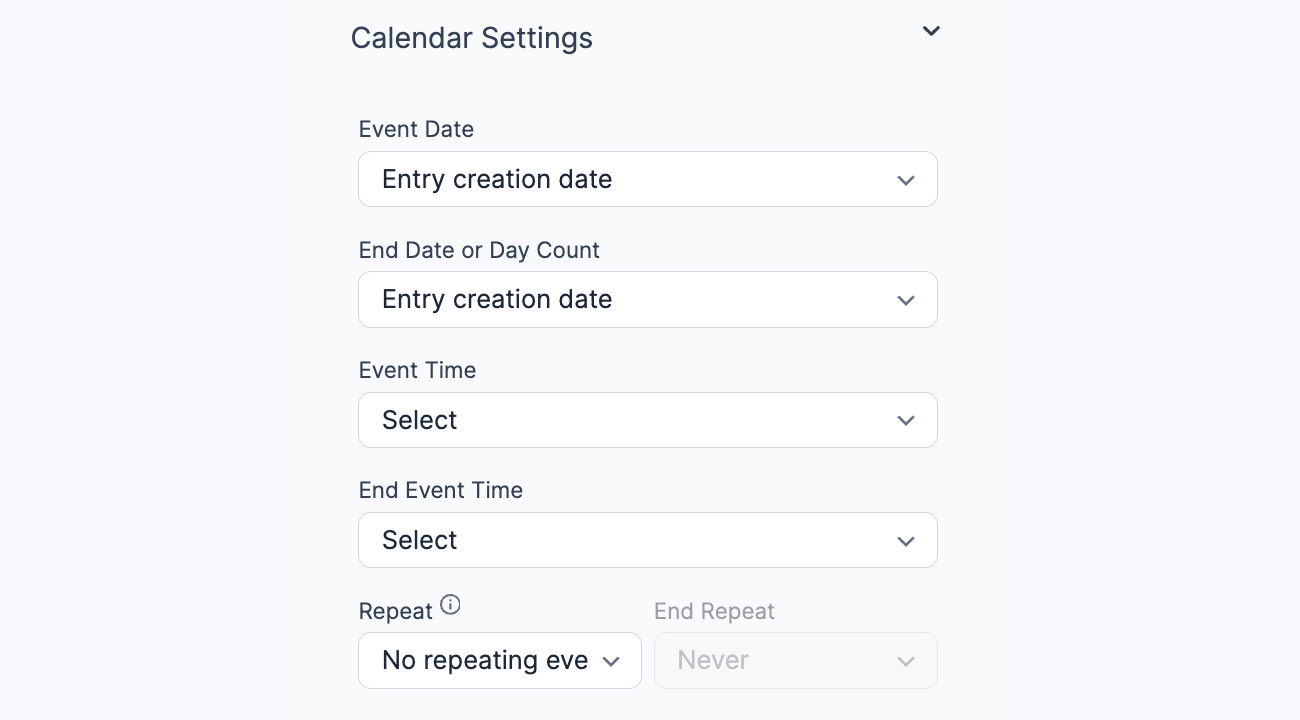
- Event Date: Select the date field which will determine the date or start date of each event. By default, the first date field will be considered as the event start date. Only one date will be displayed if only a single date field has a value.
- End Date or Day Count: If you have any multi-day events, select the date field, which will determine the end date or day count (which can be a number field) for the event. By default, the second date field will be considered the end date.
- Event Time: Select the time field which will determine the time or start time of each event. By default, the first time field will be considered as the event start time. Only one time will be displayed if only a single time field has a value.
- Event End Time: If you have multi-day events, select the time field to determine the end event time. Only the event start time will be displayed if no field is selected.
- Click the Create a View button in the modal to proceed.
- In the Calendar settings, you can change the settings you have previously configured when you first created the Calendar View. This includes changing the Repeat and End Repeat settings.
- Repeat: If you would like to have repeating/recurring events, select a dropdown or radio button field from your form that contains values like Daily, Weekly, Monthly, or Yearly. Select the Use separate values option for this field if you want more repeat options. Then you can add text like Every other week with a saved value of +2 weeks or even just 2 weeks. Here is an example of what your dropdown/radio button field may look like:
- End Repeat: If you have repeating events and would like to set an end date for some or all of them, select the date field, which will determine the end date for each repeating event.
- Repeat: If you would like to have repeating/recurring events, select a dropdown or radio button field from your form that contains values like Daily, Weekly, Monthly, or Yearly. Select the Use separate values option for this field if you want more repeat options. Then you can add text like Every other week with a saved value of +2 weeks or even just 2 weeks. Here is an example of what your dropdown/radio button field may look like:
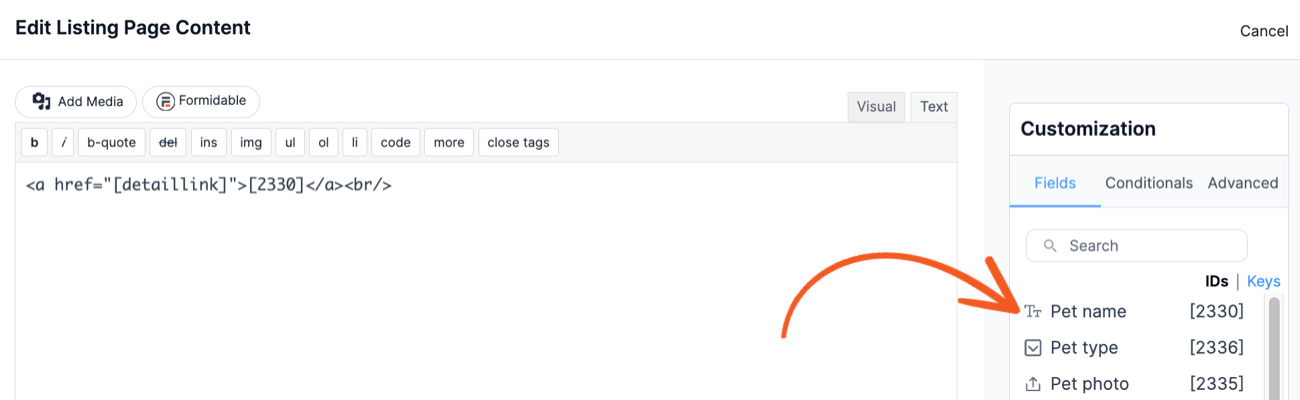
- A preview of the calendar will be shown in the Listing Page box. To start editing the content, click the calendar.
- To customize the text displayed on the calendar for each event, go to the Listing Page, select the Text tab, and insert your preferred text. You can use the field ID/key to display the data dynamically. If you want to show more details when a user clicks on an event, you can add the following:
<a href="[detaillink]">[2330]</a><br/>
Replace 2330 with the ID of one of the fields from your form, most likely the event title.
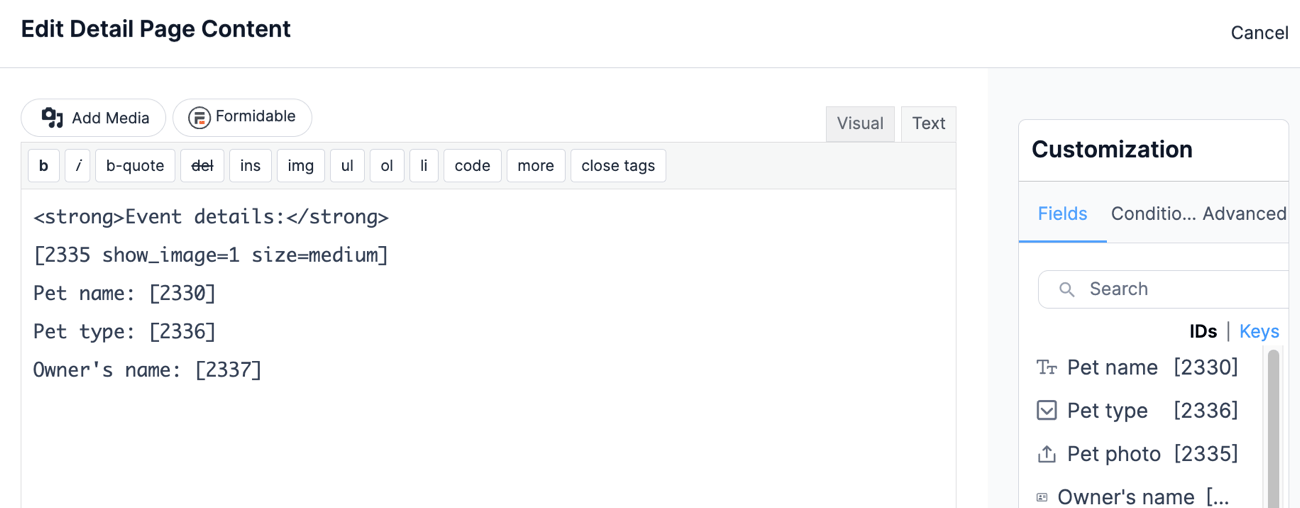
- Click on the Detail Page tab.
Use the Customization panel (right sidebar) to add a few fields to the content box. A few helper tags are available inside a Calendar View, including [event_date]. Your content for the detail page may look something like this: - Click Update to save your View.
- Publish your View on a page. When the page is visited on desktop, you should see something like this:
- When the page is viewed on mobile, clicking on an event will display the details below the calendar.


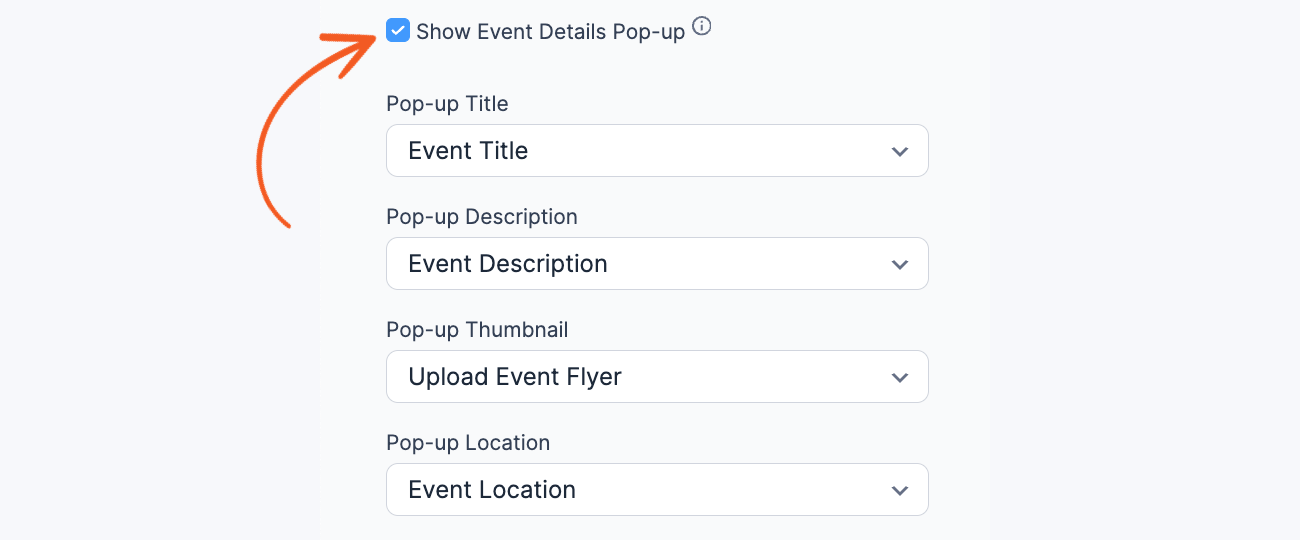
Display event details in a popup
To show the event details in a popup window when you hover over an event in the Calendar, follow the instructions below.
- In the Visual Views editor, navigate to the Calendar settings on the left sidebar and select the Show Event Details Popup checkbox.
- When you select this checkbox, several dropdown fields will appear where you can assign a field for each option.
- Pop-up Title: Choose a title for the popup. All the text fields from the form will be available as options for this field.
- Pop-up Description: Choose a description for the popup. All the paragraph fields from the form will be available as options for this field.
- Pop-up Thumbnail: Choose a thumbnail for the popup. All the file upload fields from the form with an attached image will be available as options for this field.
- Pop-up Location: Select an address for the popup. All the address fields from the form will be available as options for this field.
- Click the Update button to save your settings. When you preview the Calendar, you should see a popup window when you hover over an event.
Styling the calendar View
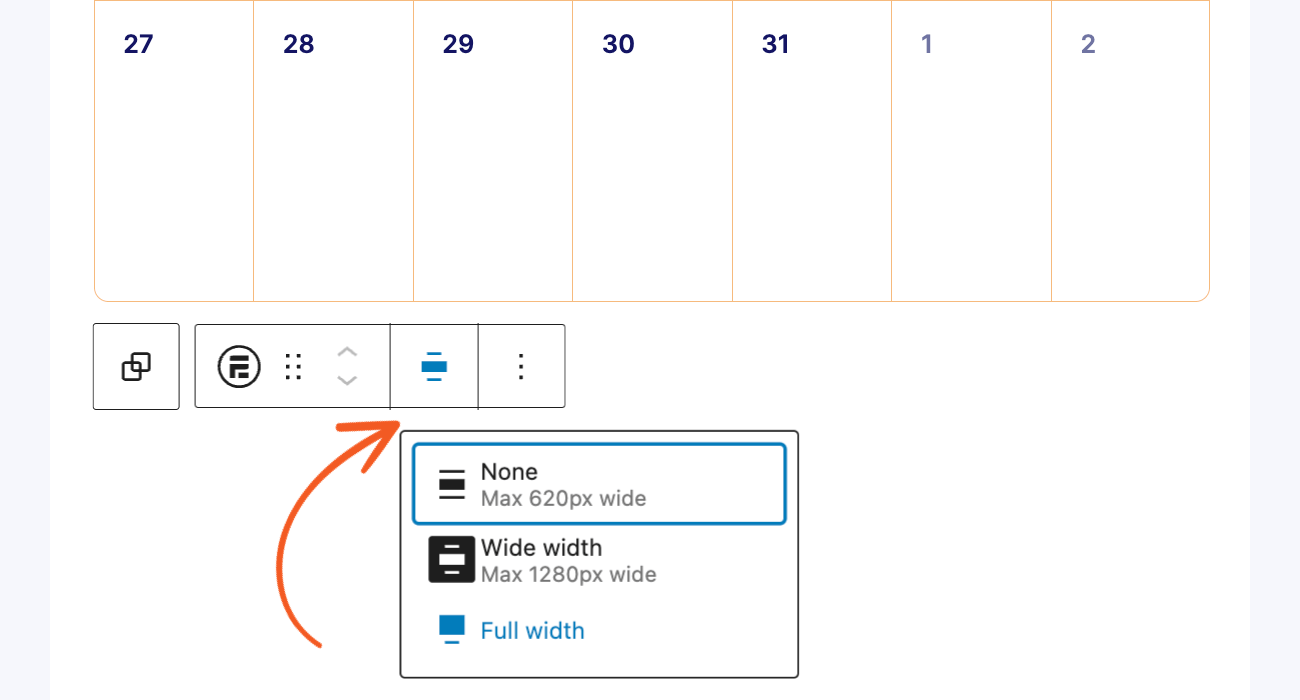
If you publish the Calendar View using a block, the styling can be customized on the WordPress page editor block settings.
- Container width: Set the container width from the block toolbar. The supported values are Full Width and Wide Width.
- Colors: Set the stroke, event color, text color, and background color from the Color section.
- Font size: Set the font size from the Typography section. There are two ways to change the font sizes. Choose from the available options: S (12px), M (14px), L (16px), or by adding a custom font size.


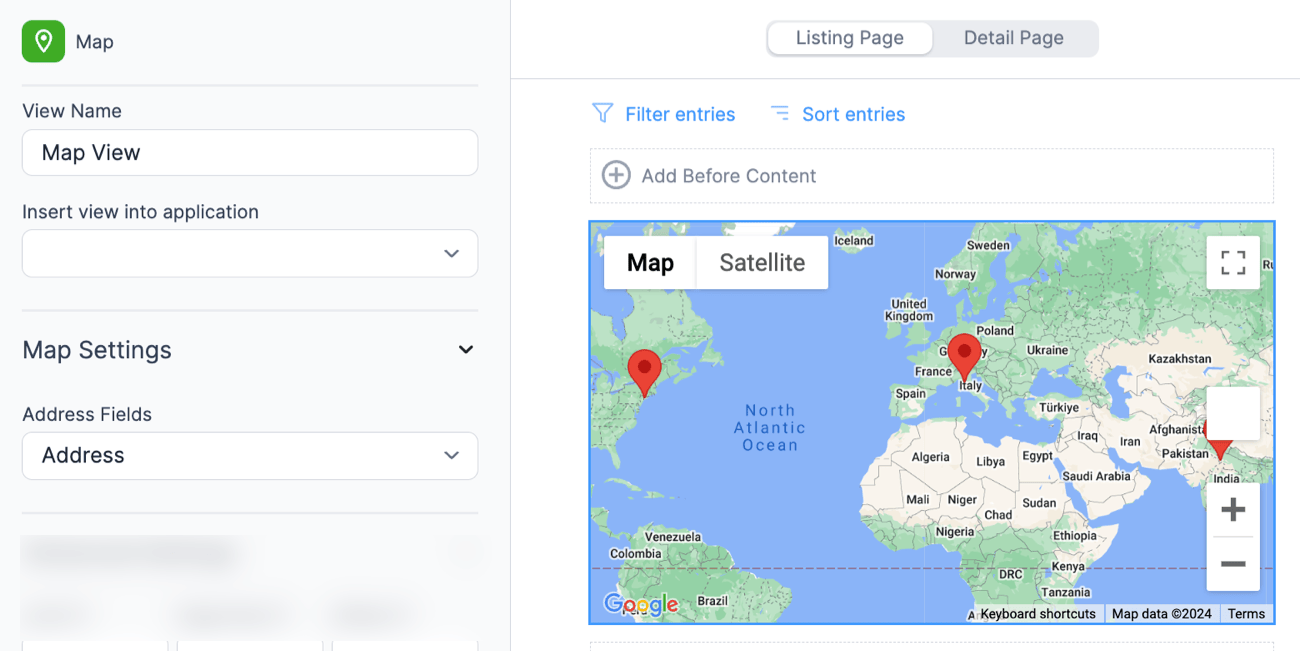
Display entries on a map
If you want to display the entries on a map, follow the instructions below.
- If you haven't yet, install and set up the Geolocation add-on on your site.
- Go to Formidable → Forms. Navigate to your form and proceed to edit.
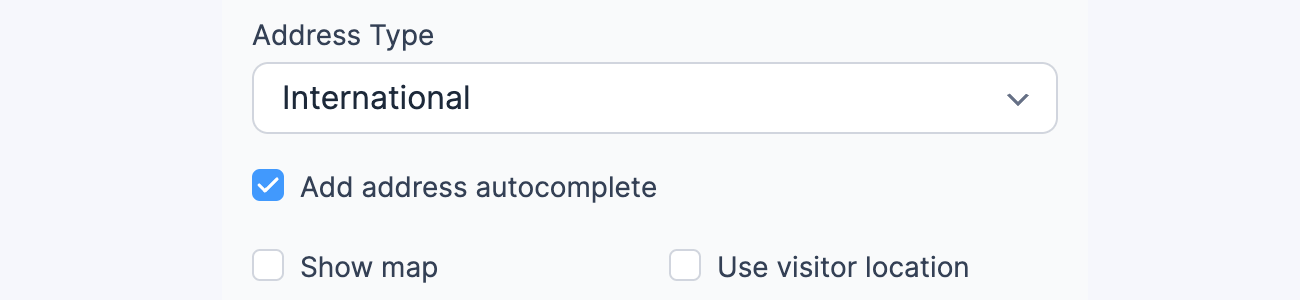
- In your form, insert a text field that can be used as the place name. Insert an address field and select the Add Address autocomplete checkbox. Save your changes by clicking the Update button.
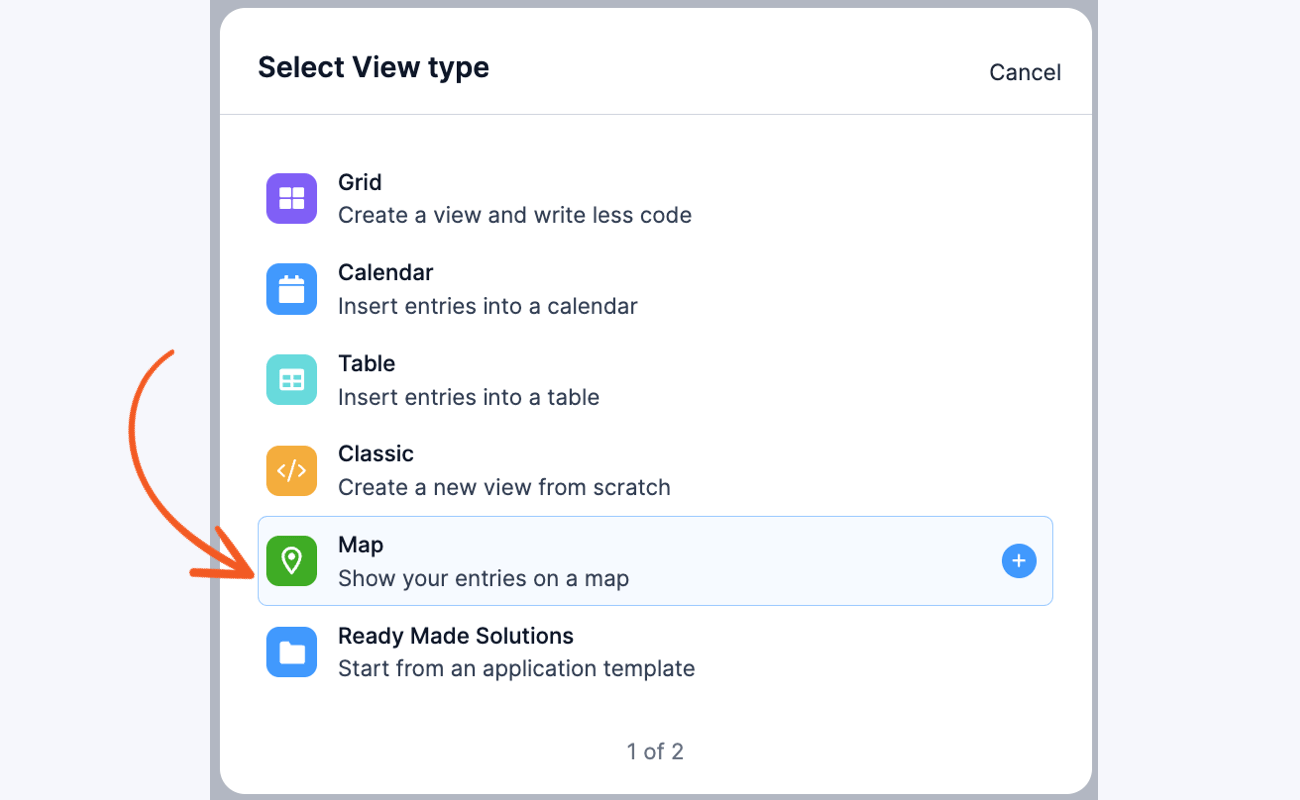
- Navigate to the Views tab, then click the Add New button at the top of the page.
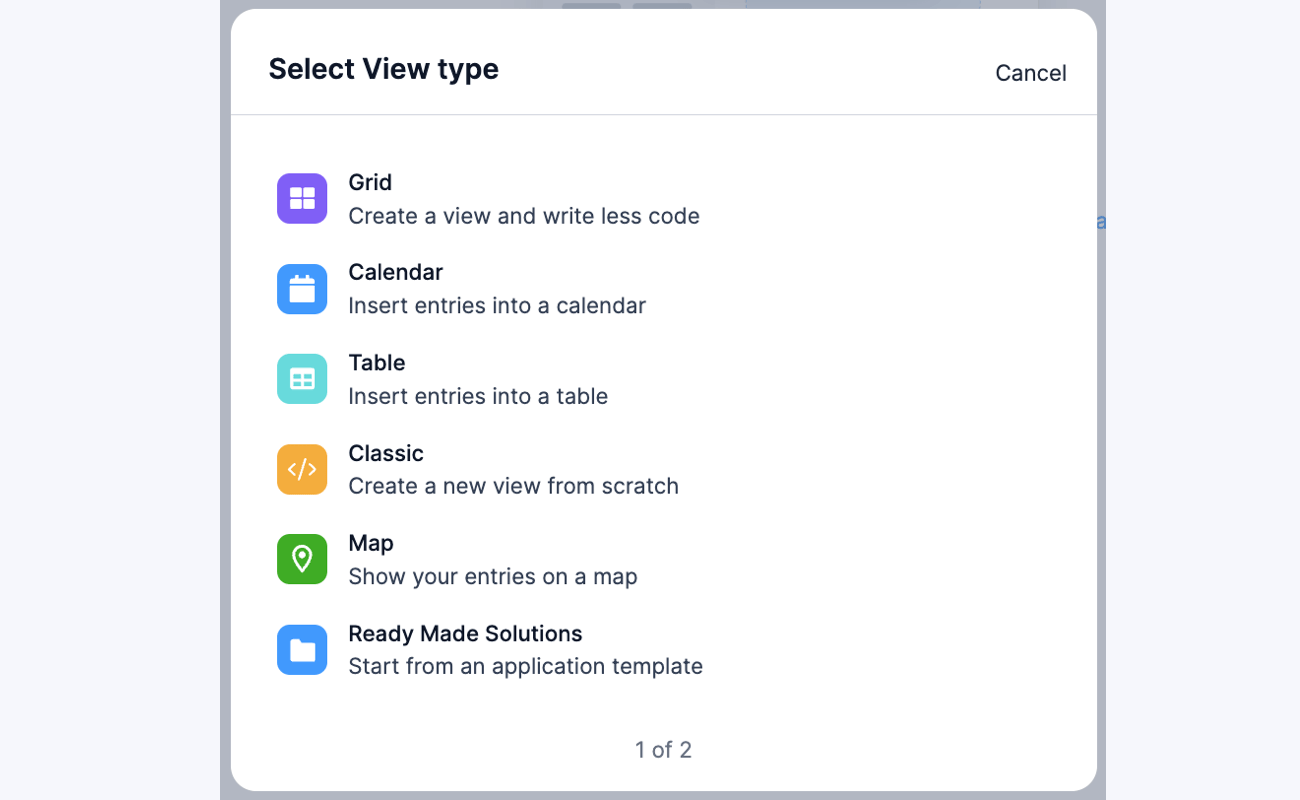
- Select Map as the View type.
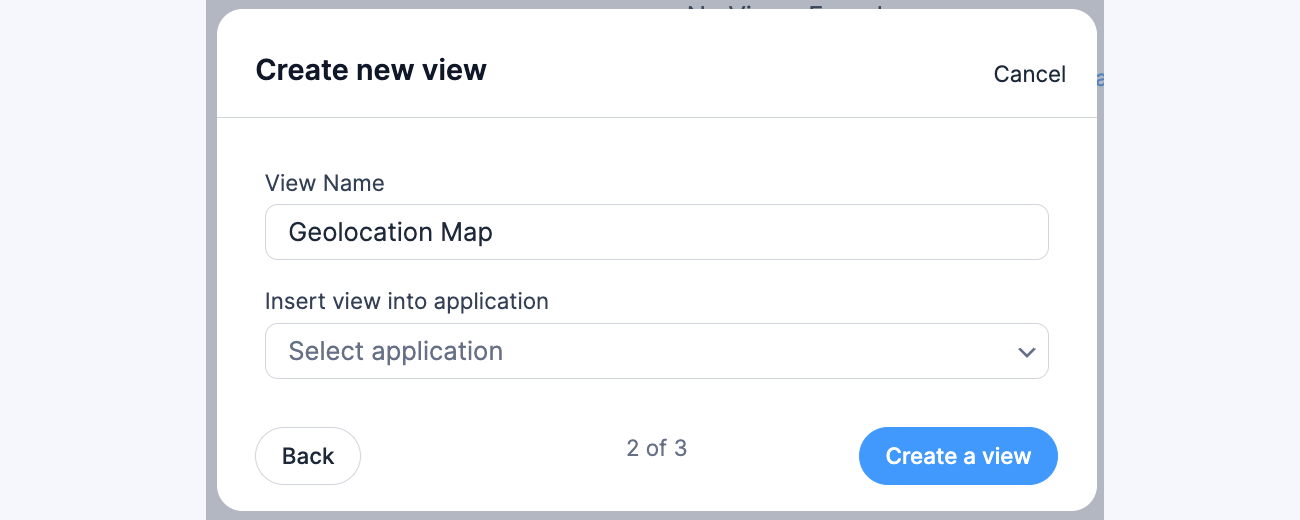
- The View Name will be automatically populated with the title of the selected form but can be changed to your preference.
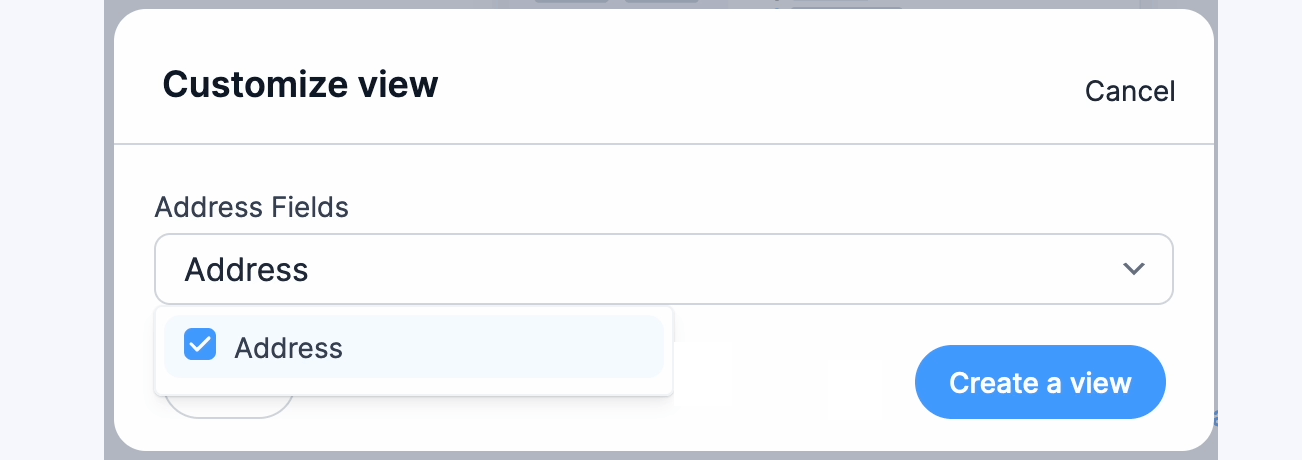
- Select an address field to use on the map. Note that you must use the Geolocation add-on on your address field before you create the entries.
- Click the Create a View button in the modal to proceed.
- Once you're in the Visual Views editor, the map settings are on the left sidebar. A preview of the Map will be shown in the Listing Page box. To start editing the content, click the map.
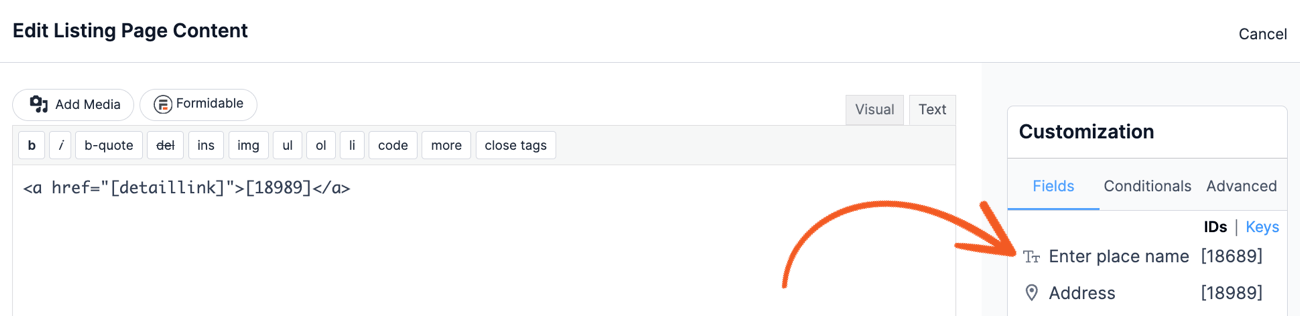
- In the Listing Page content, select the Text tab and insert the ID/key of the text field. If you want to show more details when a user clicks on the map, you can add the following:
<a href="[detaillink]">[18989]</a><br/>
Replace 18989 with the ID of the text field, most likely the place name.
- Click on the Detail Page tab.
You can insert the ID/key of the address fields to display the map details. Read more on displaying the Geolocation data. - Click Update to save your View.
- Publish your View on a page. When the page is visited, you should see something like this:


Display entries on a timeline
If you want to display your form entries as a visual timeline, follow the instructions below.
- Go to Formidable → Forms. Navigate to your form and proceed to edit.
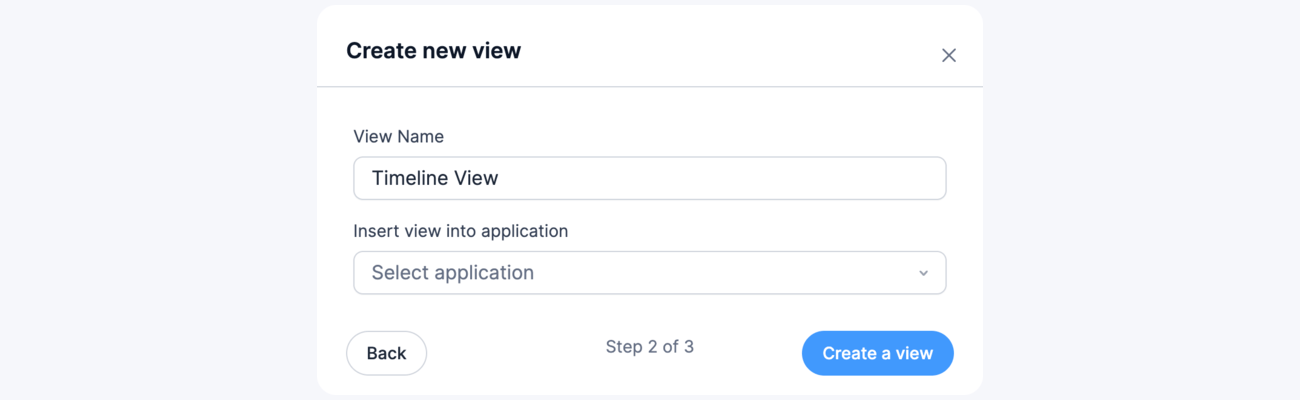
- Click the Views tab, then click the Add New button at the top of the page.
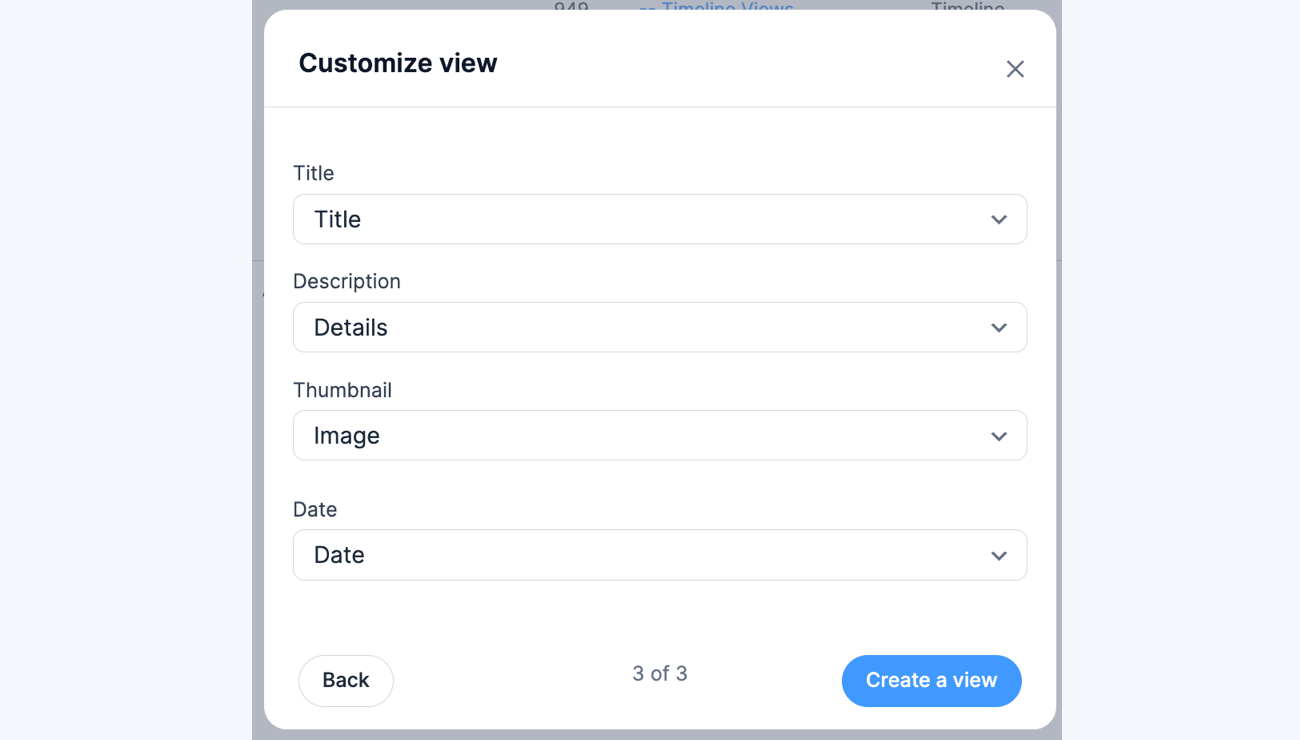
- Select Timeline as the View type.

- The View Name will be automatically populated with the title of the selected form, but can be changed to your preference.

- Several timeline options will appear where you can connect your form data to the timeline.
- Title: Select a text field to use as the card title. If no text field is added, there won't be a title on the card.
- Description: Select a paragraph field to use as the card description. If the field is missing, the description won't be displayed on the card.
- Thumbnail: Select a file upload field to use as the card image. If no file upload field is added or the image is missing, the thumbnail won't be displayed on the card.
- Date Field: Select the date field that determines where each event appears on the timeline. By default, the first date field will be used.
- Click the Create a View button in the modal to proceed.
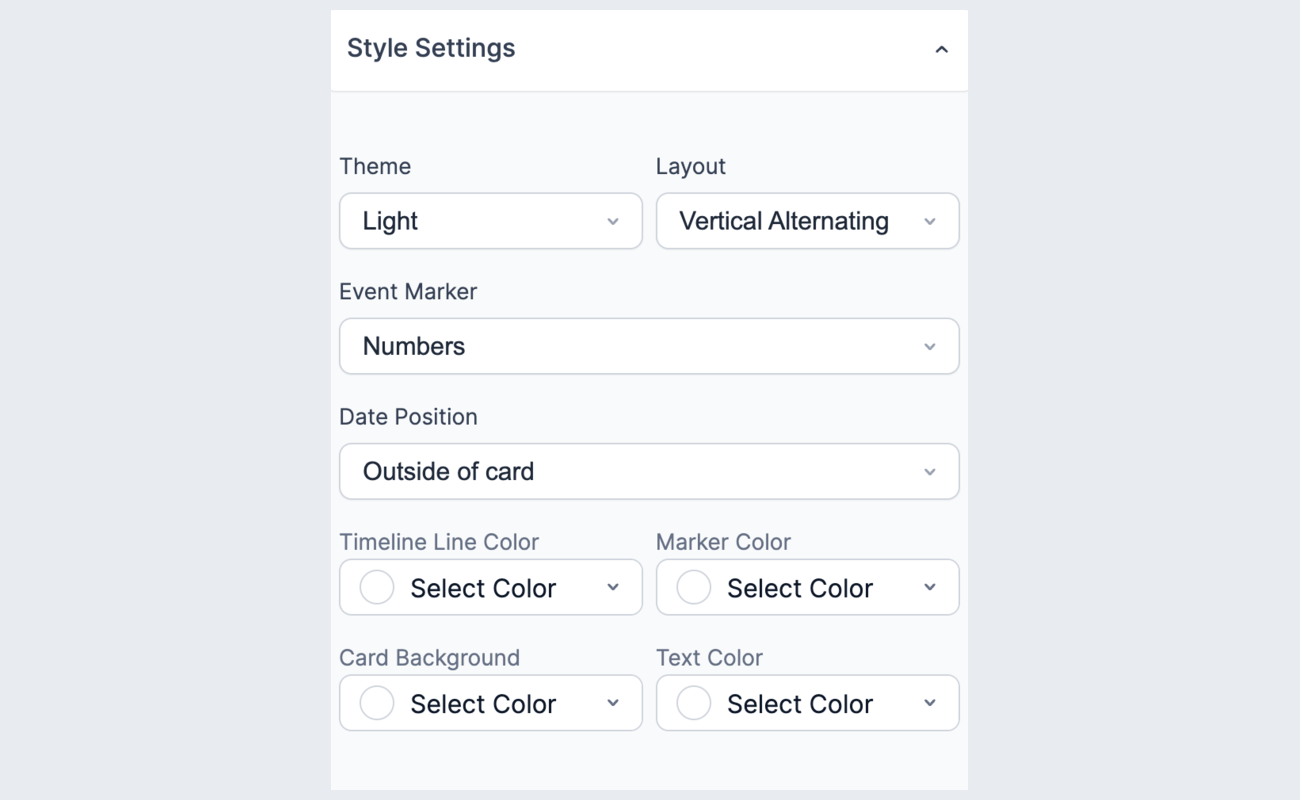
- Once you're in the View builder, the Timeline Settings and Style Settings panels are on the left sidebar. You can adjust the settings you configured during creation, and you can also enable additional options like Show Details Popup, Natural Timeline, and Add Dividers.
For more information on these settings, see the Visual View Settings page. - Use the Style Settings panel to customize the look of your timeline. You can change the theme, layout, event marker style, date position, and colors without writing any code.
- If you want to show more details when a user hovers on a timeline card, make sure the Show Details Popup checkbox is selected in the Timeline Settings. You can also click on the Detail Page tab to add content for the pop-up.
Use the Customization panel (right sidebar) to add field IDs or keys to the Detail Page Content box.
- Click Update to save your View.
- Publish your View on a page. When the page is visited, you should see your entries displayed along a timeline.

Styling the Timeline View
You can customize the appearance of your Timeline View directly from the Style Settings panel in the View builder. Here are a few things you can change:
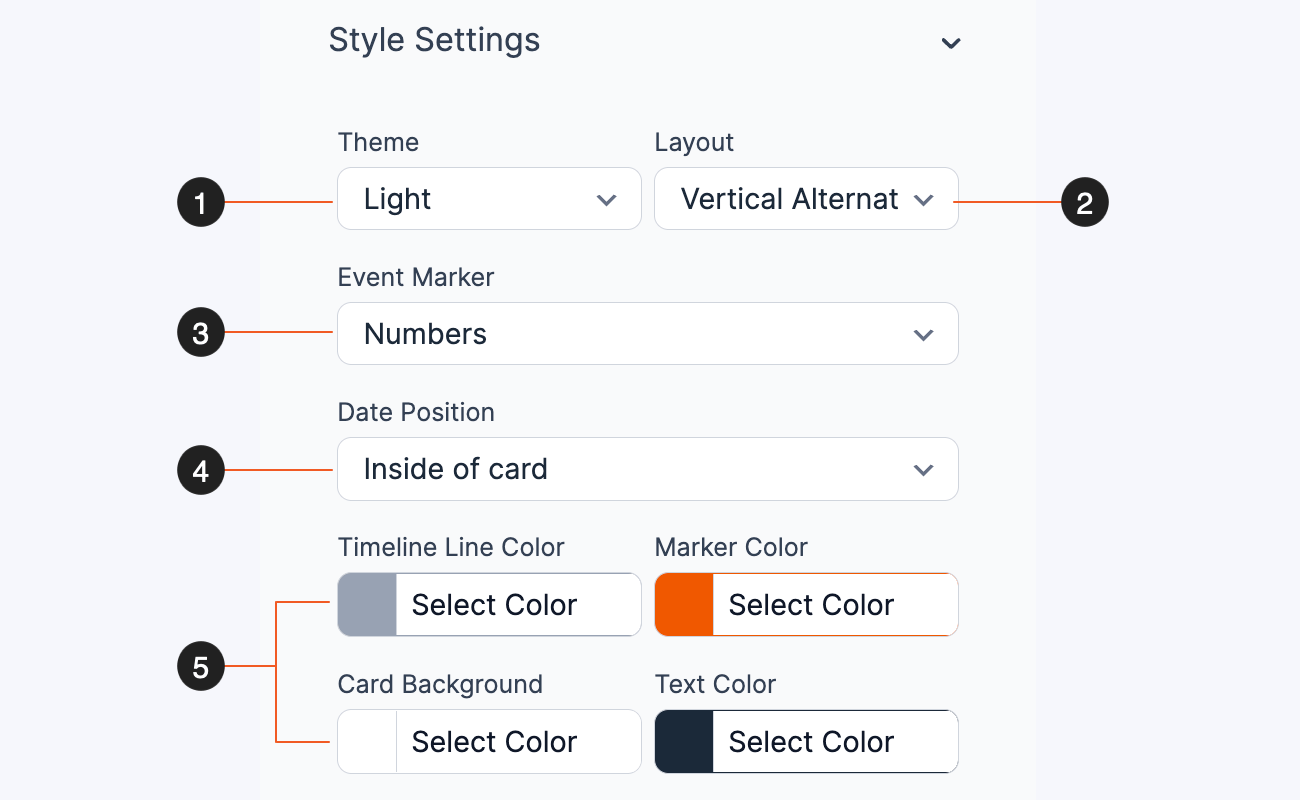
- Theme: Choose from Light, Dark, No Background, or Life Events. The Life Events theme uses the thumbnail as a full card image, which is great for milestones or personal history timelines.
- Layout: Choose between Vertical Alternating, Vertical One Side, Horizontal Alternating, or Horizontal One Side.
- Event Marker: Pick Numbers, Dots, or an Image as the marker style. If you select Image, you can also choose the marker size.
- Date Position: Display the date outside or inside the card.
- Colors: Set the timeline line color, marker color, card background, and text color to match your site's branding.
For a full breakdown of every Timeline View Style setting, check out our guide on Timeline View settings.
Display a single entry
If you would like to display a single entry from your form, follow the instructions below.
- Go to Formidable → Views. Click the Add New button at the top of the page.
- Select Grid for the View type.
For more information on these formats, please see the Visual View Settings page. - In the Use Entries from Form dropdown, select the form that will be used as the data source. The View Name will be automatically populated with the selected form.
- In the Advanced Settings, set the Limit to 1.
- Click start adding content, and add a few fields IDs using the Customization panel (right sidebar).
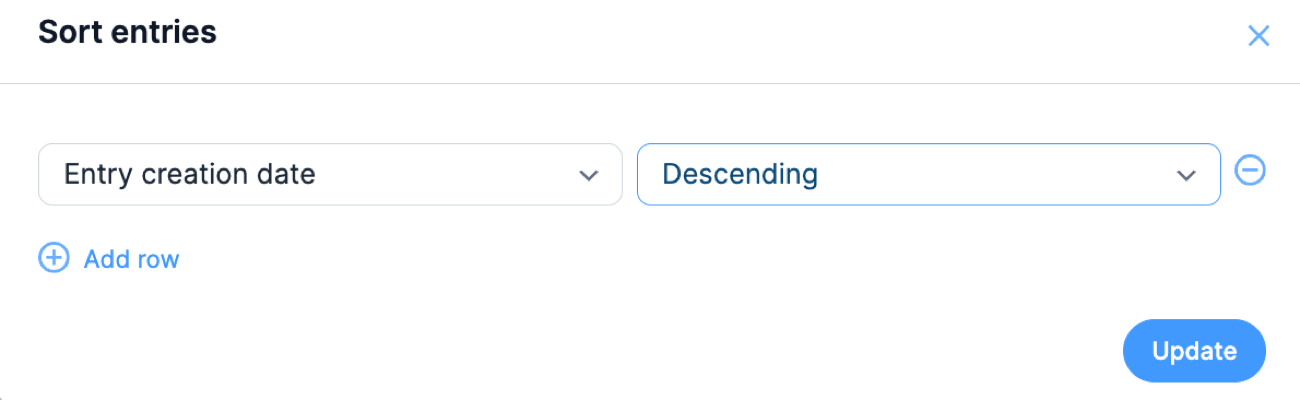
- Now you need to choose which entry to display. You can control which entry shows up by setting sorting or filtering entries in the View builder.
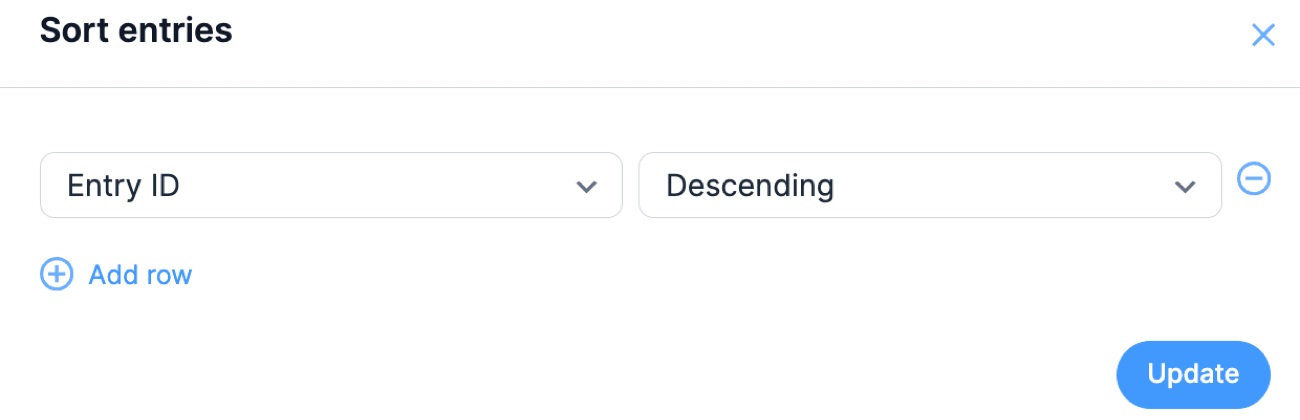
- If you want to display only the most recent submitted entry, add a Row in Sort Entries to 'Entry creation date - Descending'.
- If you want to display only the current user's entry, add a Filter that says 'UserID equals to current_user'.
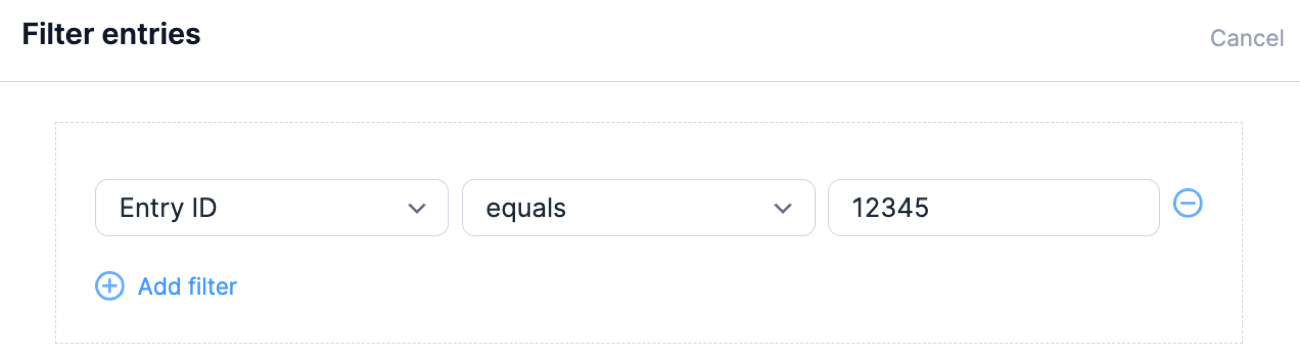
- If you would like to display a specific entry, add a Filter which says 'Entry ID equals to 12345', where 12345 is the ID of the entry you want to display.
- If you would like to display a random entry every time the page is visited, set the Order to 'Random'.
- If you want to display only the most recent submitted entry, add a Row in Sort Entries to 'Entry creation date - Descending'.
- Click Publish or Update to save your View.
- Publish your View on a page. When the page is visited, you should see values from a single entry.


Create a basic detail page
If you would like to create a basic detail page for a View, follow the instructions below.
- Go to edit any View.
- In the Listing Page Content box, select the Text tab and add a link to the detail page:
<a href="[detaillink]">[100]</a>
Replace 100 with a field ID/key from your form.
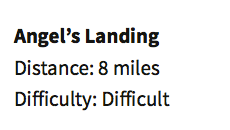
- Click on the Detail Page tab.
Use the Customization panel (right sidebar) to add field IDs/keys to the content box. It may look something like this:<strong>[100]</strong> Distance: [101] Difficulty: [102]
Replace 100, 101, and 102 with field IDs/keys from your form. If you would like to use a shortcode to insert all the fields for a single entry in the detail page, you can use the frm-show-entry shortcode and replace x with [id].
- Click Update View button to save your View.
- Publish your View on a page if you have not done so already. When the detail page of your View is shown, it will look something like this,
Create a detail page with an image
If you would like to create a detail page that includes an image, follow the instructions below.
- Go to edit a View.
- In the Listing Page Content box, select the Text tab and add a link to the detail page:
<a href="[detaillink]">[100]</a>
Replace 100 with a field ID/key from your form.
- Click on the Detail Page tab.
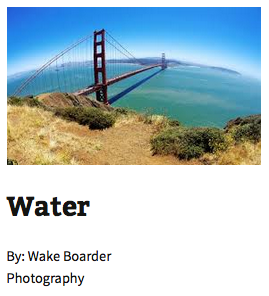
- In the Detail Page Content box, select the Text tab and add the following.
<img src="[art-file size=medium]"/>
<h2>[art-title]</h2>
<p>By: [art-fname] [art-lname] [art-media]</p>
Replace art-file, art-title, art-fname, art-lname, and art-media with field IDs/keys from your form.
- Click Update View button to save your View.
- Publish your View on a page if you have not done so already. When the detail page of your View is shown, it will look something like this,
Link to the detail page from the listing page
If you like to show a list of entries that link to a more detailed page, follow the instructions below. Before proceeding with the instructions, make sure you already have a Classic or Calendar View created.
- Go into edit a View that has Classic or Calendar selected for the View Type
- In the Listing Page Content box, select the Text tab and include something like this:
<a href="[detaillink]">[872]</a>
Replace '872' with a field ID from the form.
- Make sure you have added content to your Detail Page. If you have not added content yet, you may follow the instructions here.
- Click Update View button to save your View.
- Publish your View on a page if you have not done so already. When the page is visited, it will work like this:

Create a View for the current user
If you would like to create a View that only displays the current user's entries, follow the instructions below. Before proceeding, you will first need to create a View.
- Go into edit the form that is connected to your View. Add a UserID field if it doesn't already have one.
- Go into edit your View.
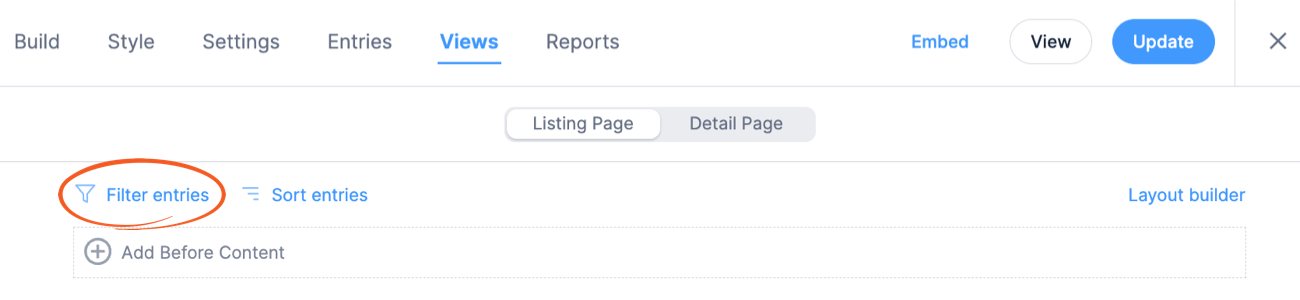
- In the View Builder, click the Filter entries link.
Set up the filter so it says User ID equals to current_user.
Please note that for this to work you must have the User ID (hidden) field in your form. - Click Update View button to save your View.
- Publish your View on a page if you have not done so already. When the page is visited, the View will only display the entries that the logged-in user submitted.
Graph user's most recent entry
Display the user's most recently submitted information in a graph. Please note that your users must be logged in when submitting entries in order for this to work.
- Go to Formidable → Views. Click the Add New button at the top of the page.
- Select Classic or Grid for the View type.
- In the Use Entries from Form dropdown, select the form that will be used as the data source. The View Name will be automatically populated with the selected form.
- In the Advanced Settings, set the Limit to 1.
- In the Listing Page Content box, select the Text tab and insert the following shortcode:
[frm-graph fields="x,y,z" entry="[id]"]
Replace x, y, and z with a field IDs or keys from the form. Leave [id] as is. This shortcode will get the entry ID dynamically. For more graphing options, see the graphs documentation.
- In the View Builder, click the Filter entries link.
Set up the filter so it says User ID equals to current_user. Please note that for this to work you must have a User ID (hidden) field in your form. - In the View Builder, click the Sort entries link.
Set the Order to Entry ID - Descending. - Click Publish or Update to save your View.
- Publish your View on a page if you have not done so already. Now when the page is visited, it will show a graph with the current user's most recent entry.


Create a View from a Repeater
When you create a repeatable section in a form, it technically creates a new form. This form is considered a child form, and the parent form is the form which holds the repeatable section.
You may need to create a View from your Repeatable Section if you want to sort or filter by a field in the Repeatable Section. In these cases, you can directly choose the Repeatable Section from the 'Use Entries from Form' dropdown menu in a View. The naming of the child form will be the name of your Repeatable section in your form with '(child)' next to it.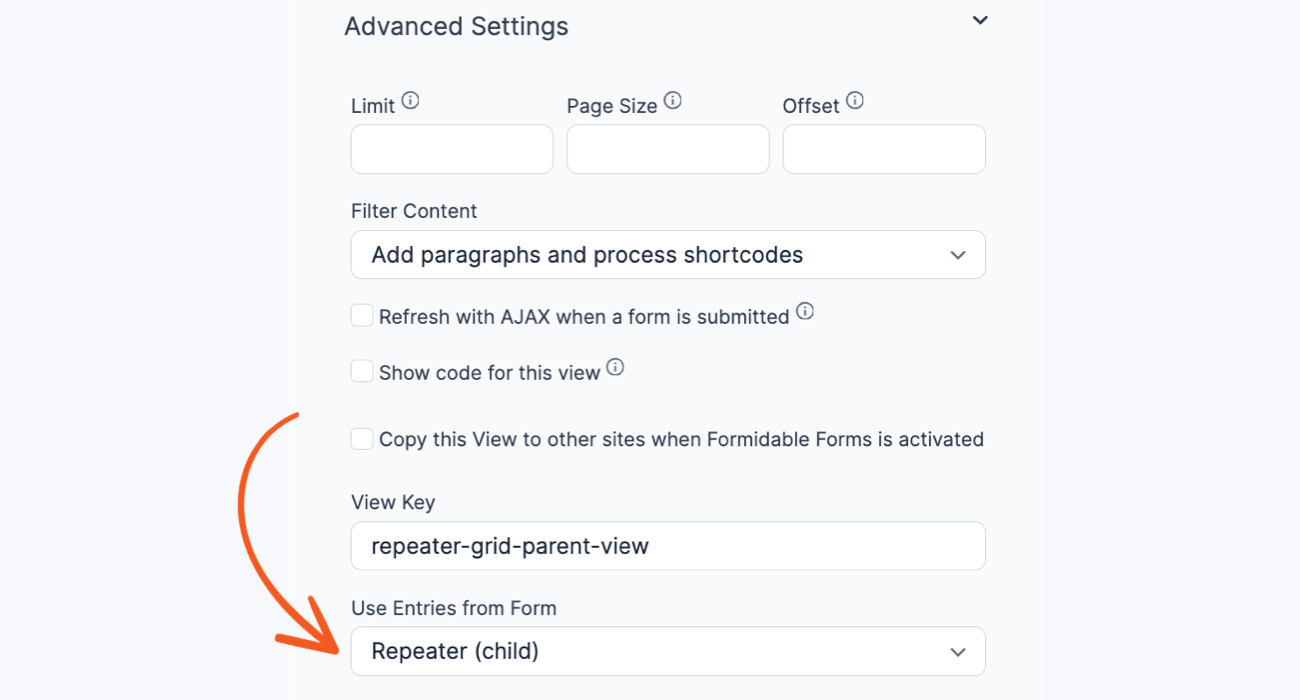
If you would like to include any values from fields outside of the Repeatable Section, you may use this shortcode in your View Content:
[frm-field-value field_id=x entry="[parent_id]"]
Replace x with the ID of any field outside of the Repeatable Section.
To include an edit link in the Repeater View that will link to the parent entry, use the frm-entry-edit-link shortcode.
[frm-entry-edit-link id="[parent_id]" label="Edit" page_id=y]
Replace y with the Page ID where the form is published.
Filter Repeatable Child View By a Field In the Parent View
If you create a View directly from the Repeating Section and you insert it inside of the main View, then you can search values inside and outside of the repeating section. You'll insert the child View like this:
[display-frm-data id=x p_id="[id]"]
You will also need to add a filter in the Child View that says
Parent entry ID equals to [get param=p_id]
Then, if you are searching entries and want to search values outside of the repeating section, add a filter on the main View. If you want to search values inside of the repeating section, add a filter on the main View and on the Child View.
Create View by Post Status
If you are creating posts with your form, you may want to create a View that only shows posts that are published, or posts that are still drafts. If you would like to create a View that displays only draft posts for example, follow these instructions.
Show entry after form submission
If you would like to show a user the details from their submitted entry immediately after form submission, follow the steps below.
- Go to Formidable → Views. Click the Add New button at the top of the page.
- Select Classic or Grid for the View type.
- In the Use Entries from Form dropdown, select the form that will be used as the data source. The View Name will be automatically populated with the selected form.
- In the Advanced Settings, set the Limit to 1.
- In the Listing Page Content box, select the Text tab and start adding content. You can use the Customization panel on the right sidebar to add a few field IDs or keys to the content box. Your content may look something like:
Email: [181]
Phone Number: [182]
- In the View Builder, click the Filter entries link.
Add a filter that says Entry Key equals to [get param=entry_key default="none"]. - Save the View then publish it on a page. Copy the URL of the page.
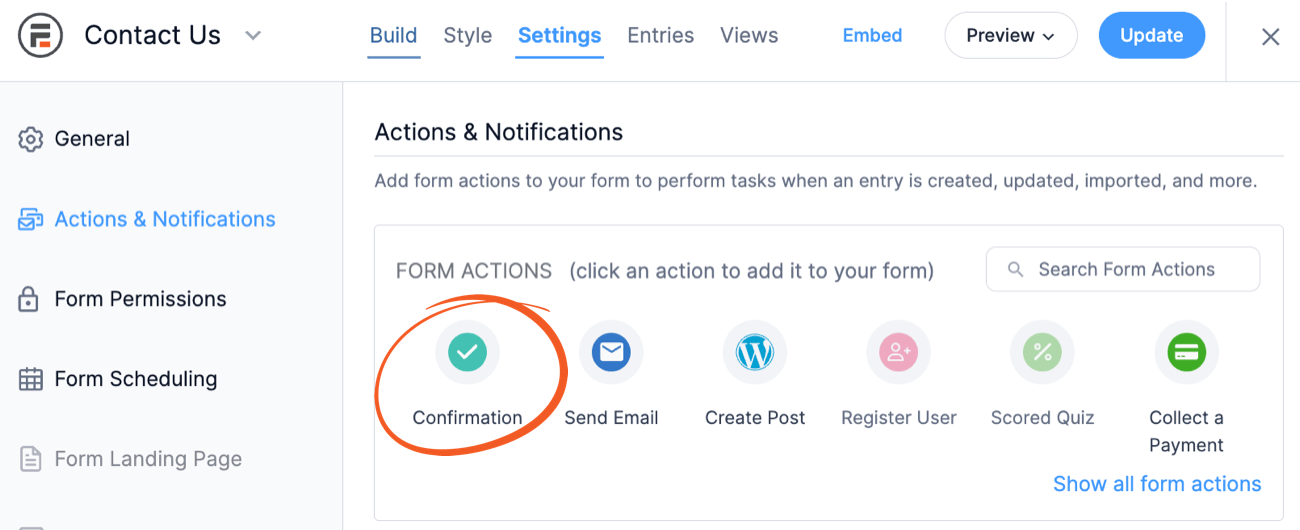
- Go into edit the form that users will be filling out. Click on the Settings → Actions & Notifications. Click on the Confirmation action.
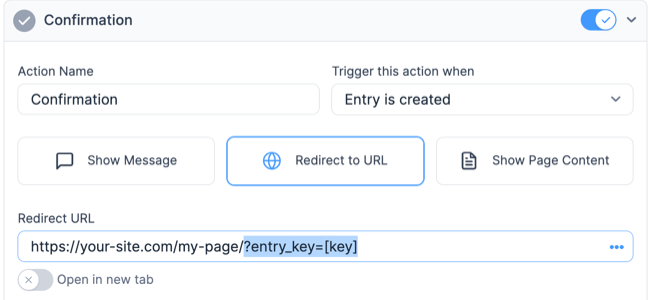
- Select the Redirect to URL button. In the Redirect URL box, paste the URL of the page where your View is published, followed by ?entry_key=[key].
- Click Update to save your form.
- Now when a user fills out the form, it will immediately redirect to the View where the user can see the details from their submitted entry.


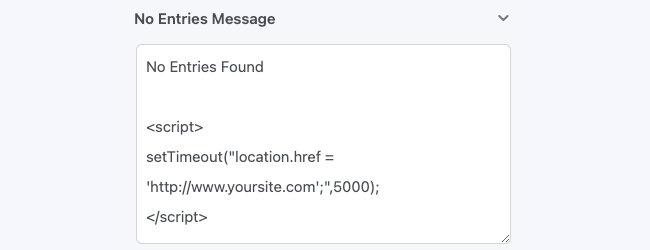
Redirect if No Entries found
Use this JavaScript Example to set a timeout to automatically redirect to another page.
- In the View settings (left sidebar), insert the JavaScript Example in the No Entries Message box.
- Change 5000 to the length of time you would like before the auto-redirect. Note: 5000 milliseconds is equal to 5 seconds until the redirect happens.
- Click Publish or Update to save your View.
Create a download link
If you would like to show a link that allows users to download a file upon clicking it, follow the steps below.
- Go into edit a View.
- In the Listing Page Content box, select the Text tab and insert the HTML tag (including the download attribute).
<a href=".../wp-content/uploads/image.png" download="image">Download file</a>
Replace /wp-content/uploads/image.png with the file URL and replace the image with the filename of the downloaded file.
- Click Update to save your View.
If you're displaying images uploaded from a File Upload field, your content may look like this to download the full-sized image:
<a href="[101 size=full]" download>[101 show_image=1]</a>
Replace 101 with the ID of the File Upload field.
Advanced customization shortcodes
A variety of helpful advanced customization shortcodes like entry ID, entry key, and post ID can be used in your View. For more information on these available shortcodes, visit the Helpers page.
Troubleshooting
Missing boxes in View settings
In the Legacy Views, the Customization box in the sidebar scrolls with the page to make it easy to click and add content into your View. If a box gets moved into the sidebar it will be hidden under the Customization panel. Click the Unlock icon to let the panel move with the page.
403 Forbidden error
If you encounter an error message displaying 403 Forbidden: You do not have permission to access this document, you can reach out to your web host to disable rule 214420 in Mod Security. This should allow you to access the document without issue.
Calendar scrolling
If the page slides when the click a previous or next month link, and the page does not change, this indicates a conflict with your theme (like Divi). The easiest solution is usually to turn off smooth scrolling in your theme.
Related customizations
- Use this CSS example to force day content in a Calendar View to a specific height and add scroll box.
Related developer hooks
- Display multi-selected option values in a view using the frmpro_fields_replace_shortcodes hook.
- Generate slug for the View detail page using the frm_validate_entry hook.
