
What a pleasure to have support within minutes. Brillant, accurate answer, and solved the question. Thanks to the Formidable Team. Eric


Last updated on September 30, 2026 by Formidable Team
How to Create a Private WordPress Journal Platform
Have you ever wanted to host your own private WordPress journal? It can be pretty simple!
We’ll show you how in just four steps.

For some users, journals were the backbone of the early internet. These forums helped people connect and bond over similar interests. Over time, forums made way for social media platforms like Instagram. You may be wondering if there’s an easy way to replicate this with a private WordPress journal or diary app.
Fortunately, the right tool can make this easy. By using a few simple settings in Formidable Forms, you can create a beautiful online journal.
In this article, we’ll look at the reasons you might want to create a WordPress journal. Then, we’ll walk you through four steps to do so. Let’s get started!
Upgrade your WordPress site with powerful, flexible forms.
Why you might want to create a WordPress journal
A WordPress journaling app can be an effective way to build a community. Users can read each other’s entries and find a sense of connection with each other.
Sometimes a private WordPress journal is preferable. You might want to create a safe space like Penzu where users can feel comfortable writing their thoughts.
However, WordPress journals don’t all need to be personal. You can build an online community for users to discuss topics and new products. This can also be a way to make money online.
For example, you might create an online journal that focuses on the best new computers. You could then make some money by inserting affiliate links to relevant products.
From Idea to Reality in Minutes. Build Powerful Forms, Dashboards, Apps and More.
Formidable Forms makes advanced site building simple. Launch forms, directories, dashboards, and custom WordPress apps faster than ever before.
How to create a private WordPress journal platform
Before we start, make sure you have Formidable Forms installed on your WordPress site. You’ll also need the Views plugin.
Step 1: Create a form with a User ID field
To kick things off with this powerful piece of journal software, we’ll create a new form. Go to Formidable → Forms → Add New. You can either use a form template or a blank form.
Once you’ve chosen your template, you’ll be taken to the creation page. In the side menu, find the field labeled User ID:

Click on the item and drag it over to your form. Make sure you have a Paragraph field or Rich Text field too. If you'd like a photo journal, add a File Upload field as well. Daily photos will make the digital journal more endearing and personal.
Then, press the Update button in the upper right-hand corner to save your work. This digital diary form will automatically adapt to your screen size.
Step 2: Turn on editing in the form settings
Next, navigate to the Settings tab at the top of the screen and select Form Permissions:

The only thing you’ll need to do here is to check Allow front-end editing of entries. This will allow users to change what they’ve written even if they’ve already submitted the form.
You also have a few other options. For example, you could limit form visibility for logged-in users only. If you’re creating a private online diary, this is the best way to keep journal entries private with password protection.
When you’re ready, click on Update.
Step 3: Create a view for editable WordPress journal entries
Now, we’ll need to create a new View. Head to Formidable → Views → Add New.
Here, you have three pre-made choices for how you’d like to display your diary entries: as a grid, a table, or a calendar. You can also work from scratch with the Classic option:
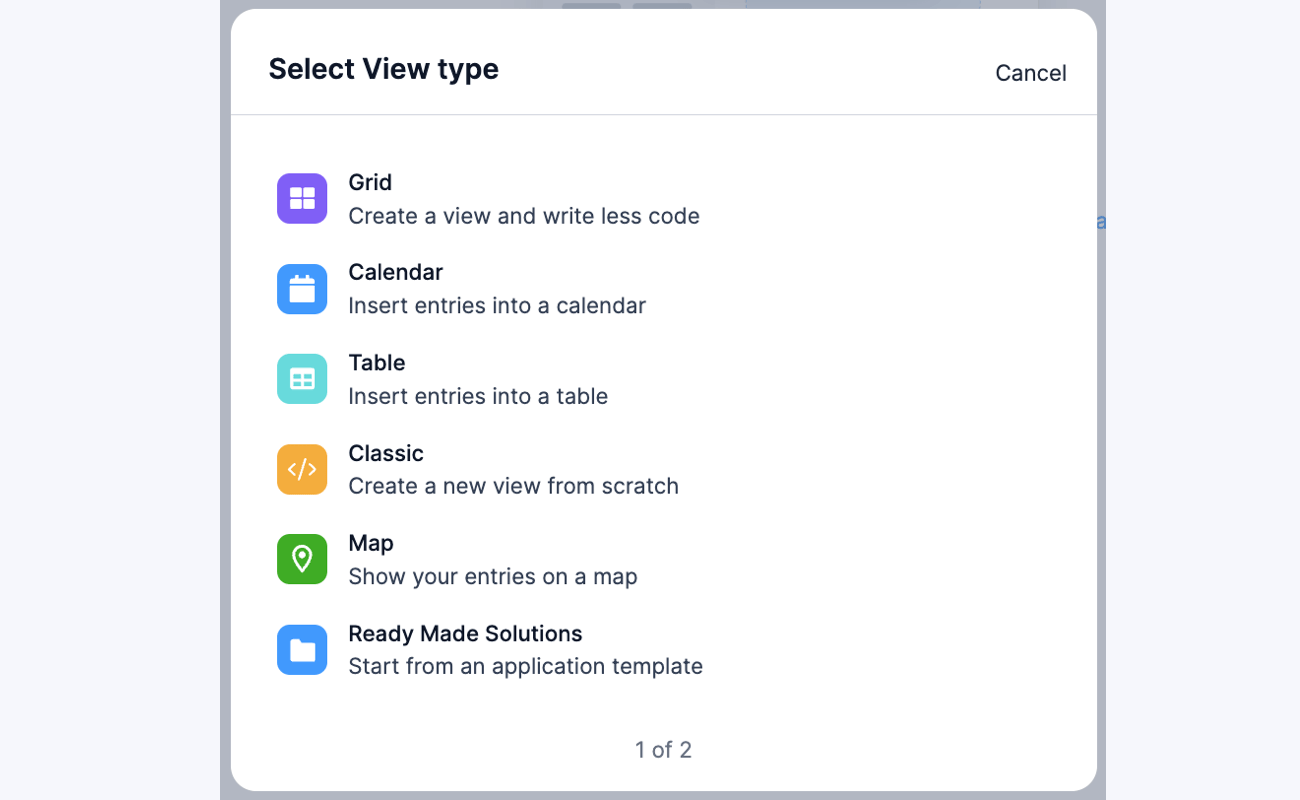
After selecting your view, you can choose your journaling form from the Use Entries from Form option. This will ensure that your view uses data from the right location. Name your view and click on Create a view.
Next, you can style your view to display editable entries. Click the link to start adding content. Use the sidebar to insert the paragraph field you added in the form and the entry creation date. It'll look something like this:
[created-at]
[25]
You may also want to add a link to edit. This makes it easy for users to edit a WordPress journal. You'll need to add the following shortcode in the View content where you want the link:
[editlink label="Edit" page_id="y"]
In this example, replace "y" with the ID of the page where you published your journal form.
Also, add the shortcode for the digital diary form in the Before Content box, and in the box for the No Entries Message. This way, the form will always be available on the page for journal writing.

You can find more information on how to create a view in our knowledge base. Remember to save your work when you're done.
Step 4: Add a filter for user ID
Finally, we’ll add a filter for the User ID field. Filters have many uses. For example, you could make it so that users can only view their own posts. This may be ideal if you want your WordPress journal to be private.
To add this feature, click on Filter entries in your View settings:

In the first drop-down, select User ID. The middle drop-down should read is equal to. Finally, enter current_user into the third field. Click on Update view to save your work.
Here’s a basic sample of our result:

You might also want to add a special WordPress journal theme styling at this stage. A more personal feel is great. This can help set your site apart from competitors. Additionally, getting as specific as a daily journal WordPress theme might be more effective.
Conclusion
A WordPress journal can serve many purposes. It can help people get to know each other, or it can be a personal space for users to gather their thoughts. However you want to style your journals, Formidable Forms makes it easy.
In this article, we covered four steps to set up an online WordPress journal:
- Create a journal form that includes a user ID field.
- Make sure front-end editing is set up for your form.
- Set up a view to show editable entries.
- Add a filter for user IDs.
Formidable Forms is a flexible, powerful product. Learn more about our online software features to see what else you can do!
Read More from the Formidable Blog
 You Describe the Form, Formidable Builds It in Minutes
 Forms vs Apps in WordPress: Where Simpler Tools Collapse
 Gravity Forms vs Formidable Forms at Real World Scale
This article may contain affiliate links. Once in a while, we earn commissions from those links. But we only recommend products we like, with or without commissions.