Any data entered into a Formidable form can be displayed on your site using Visual Views. Learn about the different View types and Advanced settings that you could use to accomplish more with your Views. If you're ready to create a View, you may follow these step-by-step instructions.
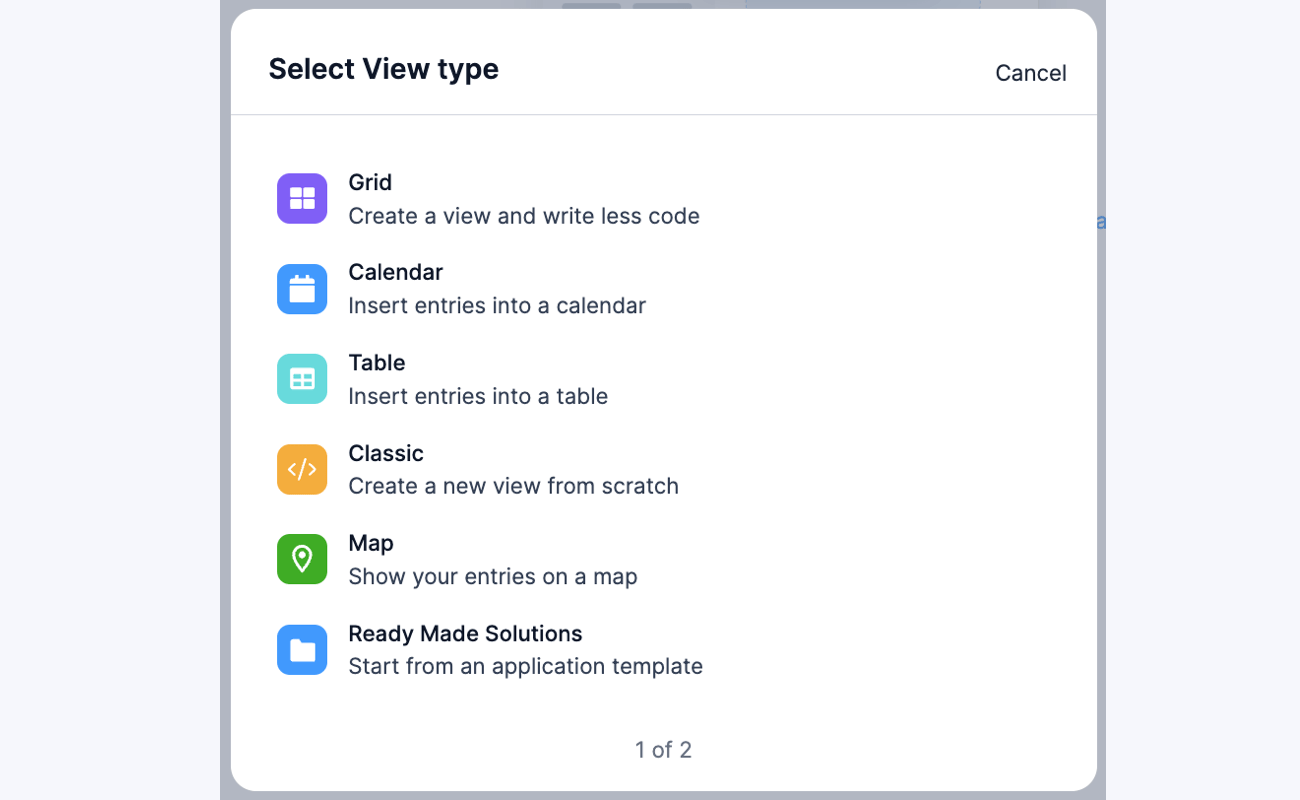
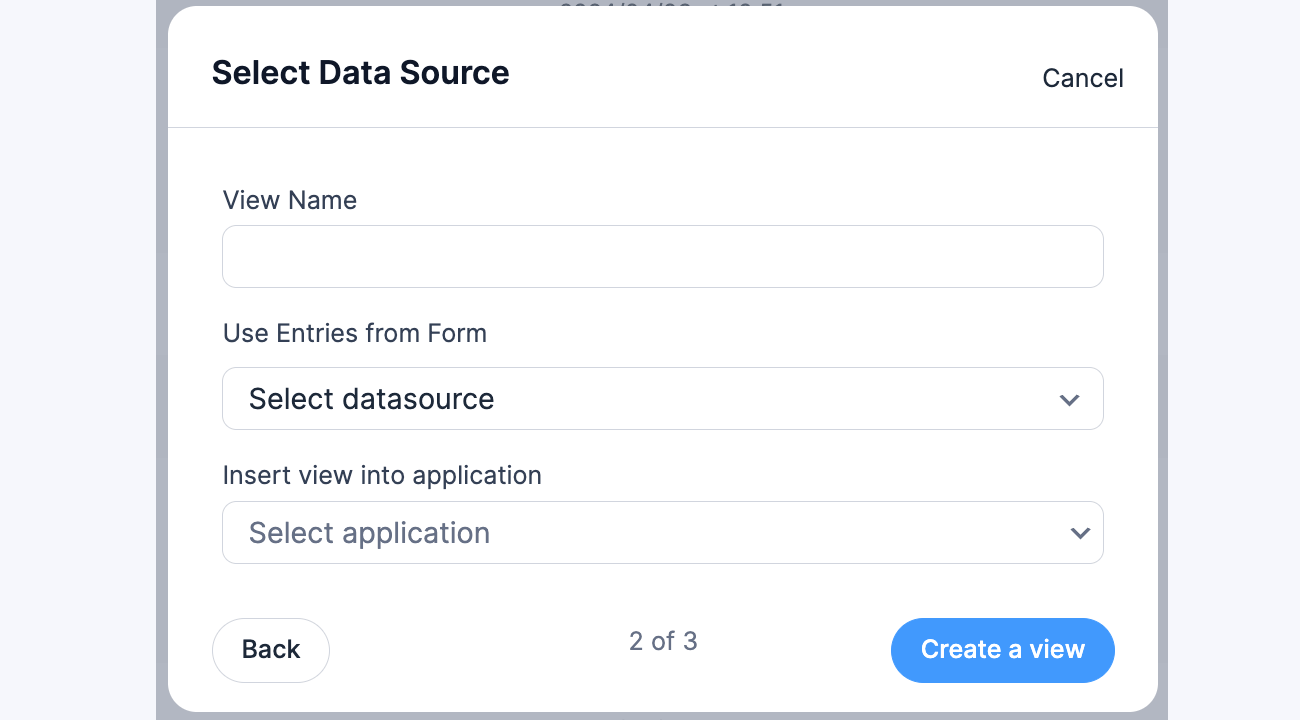
When creating a new View, these settings are displayed:
- Select View Type: You can choose between the Calendar, Classic, Grid, Map, Table, or Timeline.

- Select Data Source: From the Use Entries from Form dropdown, select the form containing the data you want to display. The View Name will be automatically populated with the selected form. Select the Insert View into application dropdown if you want to include the View into an existing application.

Upgrade your WordPress site with powerful, flexible forms.
View type
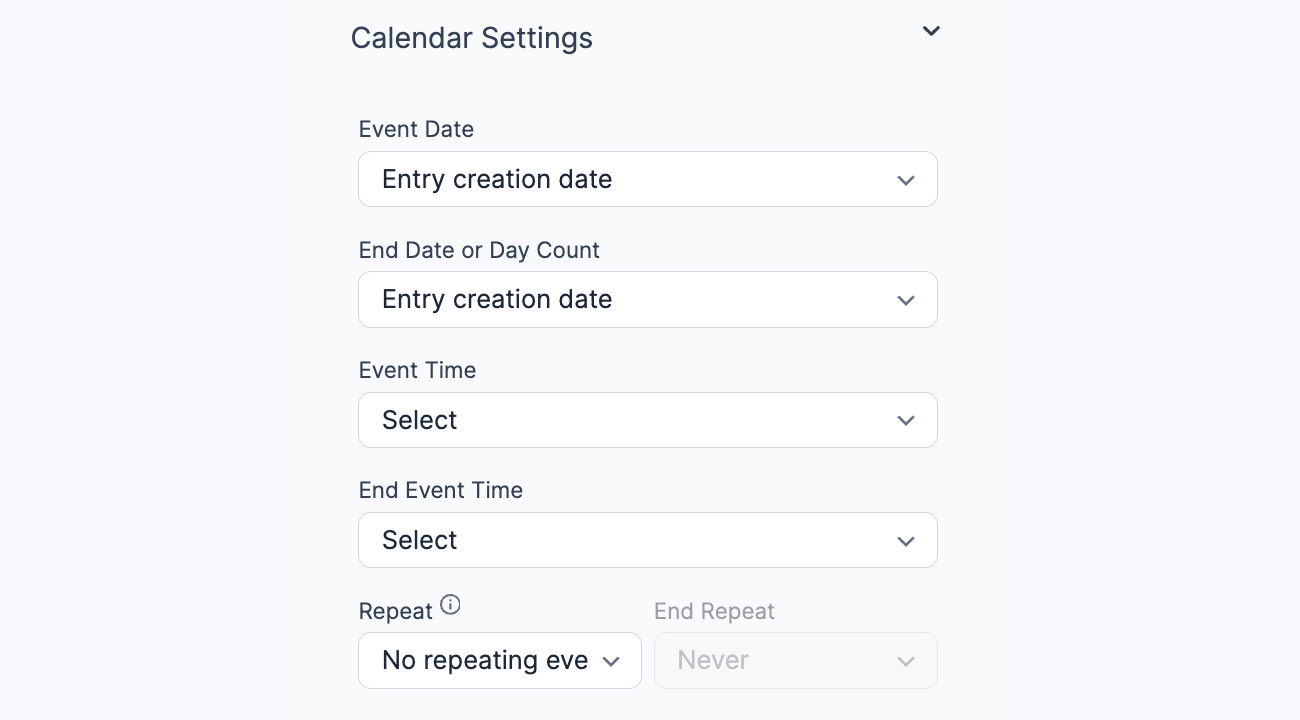
Calendar
Show entries in a calendar format. Each event on your calendar can be turned into a link to a more detailed single entry page. When you select this option, these dropdowns will appear.
- Event Date: Determines where an event will appear on the calendar. For example, if you select "Entry Creation date" from this dropdown and create an entry on March 1st, 2013, the entry will appear on your calendar on March 1st, 2013. If you have any date fields in your form connected to this View, you can select a date field from the dropdown.
- End Date or Day Count: Determines when each event will end if you want to allow multi-day events. If you have a second date field or a number field in your form, you can select this from the dropdown.
- Event Time: Choose a time field that indicates when each event begins. If you don't select a field, the system will use the first time field as the event start time. If only one time field has a value, only the start time will be shown.
- Event End Time: For multi-day events, select a time field that represents when the event ends. If you do not select an end time field, only the start time will be displayed.
- Repeat: Determines the period for any repeating events. If you would like to have repeating events, select a dropdown or radio button field from your form that contains values like "Daily", "Weekly", "Monthly", or "Yearly". If you want more repeat options, check the "Use separate values" option for this field. Then you can add text like "Every other week" with a saved value of "+2 weeks" or even just "2 weeks". Here's an example of what your dropdown/radio button field may look like:
Repeating events can also be set with relative PHP date formats. For example, you can add an option like "first Tuesday of next month."
- End Repeat: Determines the end date for any repeating events. If you have repeating events and would like to set an end date for some or all of the repeating events, select the date field that will determine the end date for the repeating event.


Click here to see an example of a Calendar View. Any text added to the Content box that includes an entry will be used for each date on the calendar. The Detail Page Content box is for single entries. Several shortcodes like [event_date] and [end_event_date] can be used in the Calendar View.
Classic
This View Type can be used to create a new View from scratch. When you select this option, click the Listing Page tab in the View builder and use the Content box to add all the field entries you would like to get listed. Any of the text in the Content box will be repeated for each entry.
Learn how to use the Detail Page Content and Detail Page Slug below. See the demo page for an example of a View with a detailed page.
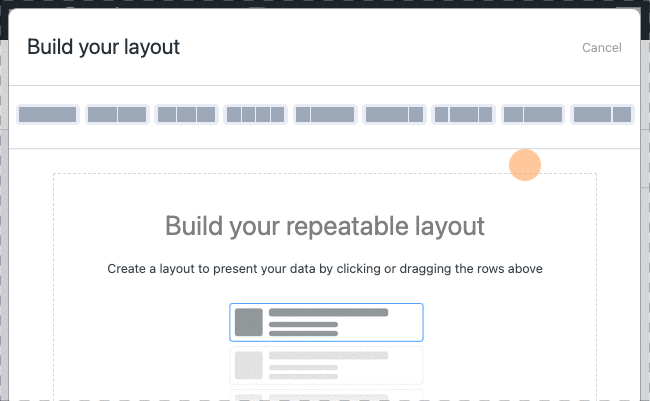
Grid
This View type enables a drag and drop builder to easily create a View layout using draggable column and row blocks. Learn how to display entries in a listing format, listing format with images, gallery format with the Grid type.
The Grid Style Settings let you customize the look of your View
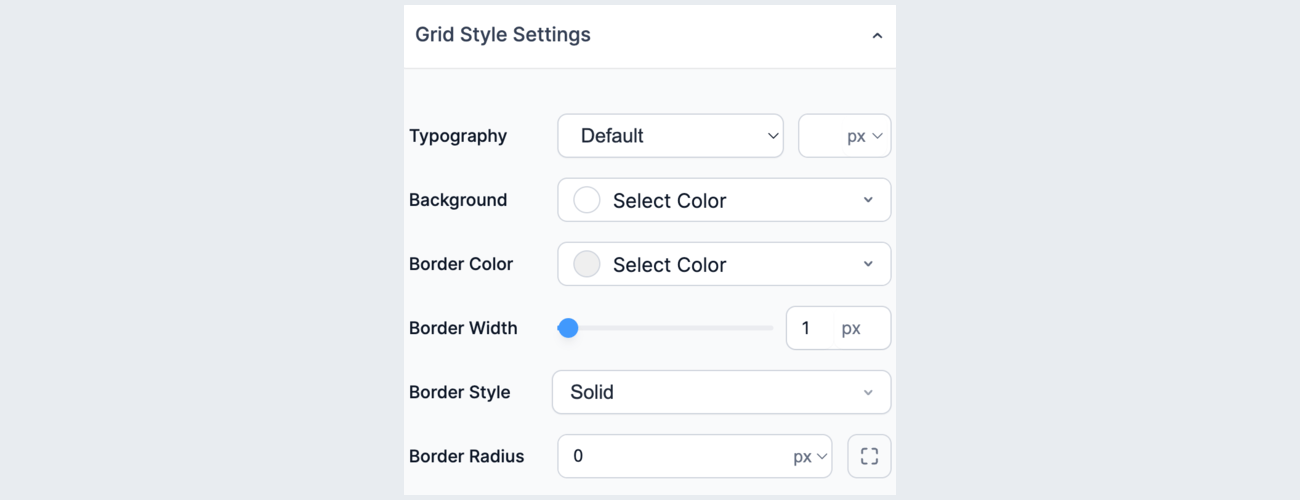
Typography Set the font size for the text inside your grid items. Use the dropdown to choose a size preset (such as Large) or enter a custom value in the px field next to it.
Background Choose a background color for your grid items. Click Select Color to open the color picker and select the color you want.
Border Color Choose a border color for your grid items. Click Select Color to open the color picker and select the color you want.
Border Width Use the slider to adjust the thickness of the border around each grid item. You can also type a value directly in the px field.
Border Style Use the dropdown to choose how the border looks. Options include Solid, Dashed, Dotted, and more.
Border Radius Round the corners of your grid items by setting values for each corner. There are four corner inputs, each with its own px value. You can set them all to the same value for uniform rounding, or adjust each corner individually.
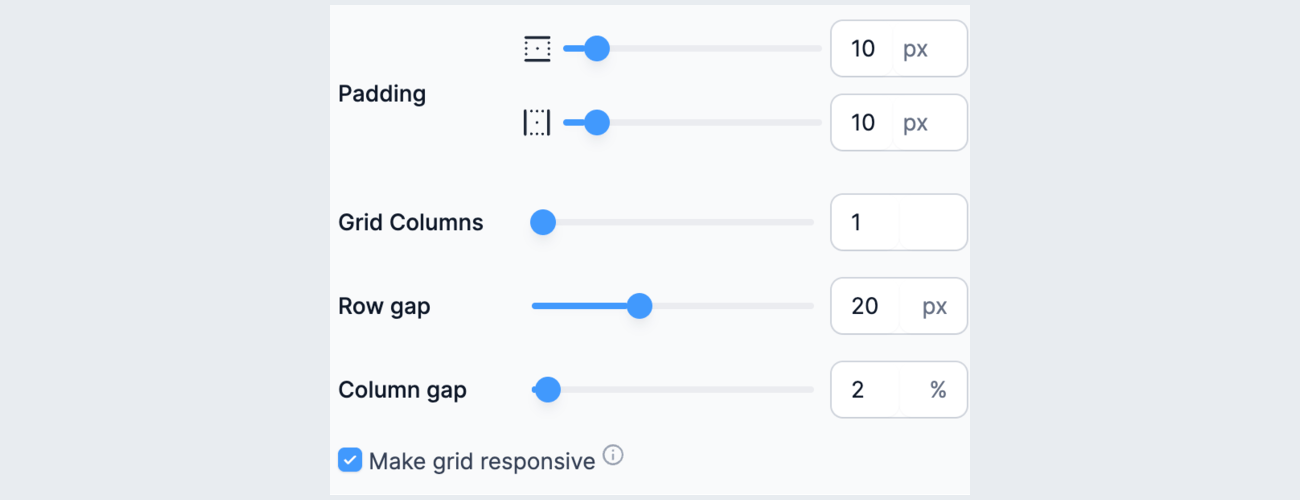
Padding Control the space inside each grid item between its content and its edges. There are two sliders: one for top and bottom padding, and one for left and right padding. You can also type values directly in the px fields.
Grid Columns Set the number of columns your grid displays. Use the slider or type a number in the field on the right.
Row Gap Set the amount of space between rows in your grid. Use the slider or type a value in the px field.
Column Gap Set the amount of space between columns in your grid. Use the slider or type a value in the px field.
Make grid responsive Check this box to make your Grid View responsive. When this is enabled and the Number of grid columns is set to 1, responsive styling will be applied to grid layouts with multiple columns. For example, if your View has two columns, the layout will stack into a single column on smaller screens.
Custom Classes Add custom CSS classes to your grid items for advanced styling.
For more information on how to use a Grid type, please see this video tutorial.
Map
This View type allows interactive maps to be embedded directly into your pages, where every entry has a location pin on the map. Learn how to display entries on a map using the Map type. Here's how it works:
- Install the Geolocation add-on.
- Create a Map View. Give it a title and use the address autocomplete to add locations for each entry.
- Embed the Map View on a page. When exploring the interactive map, users can zoom in and out to find specific listings or click a marker for detailed information.

Table
This View Type will automatically show your form entries in a table on the front-end. After choosing a form where the entries will be coming from, you can select the columns you want to display, and the HTML code will be auto-generated in the View builder. Learn how to create a Table View.

Table settings The Table settings has multiple action icons and field options that will give you the ability to customize the View styling. These settings can be found in the View builder.
Click the settings icon on the right side of the column to add a column name, add link to details page, duplicate and delete columns.
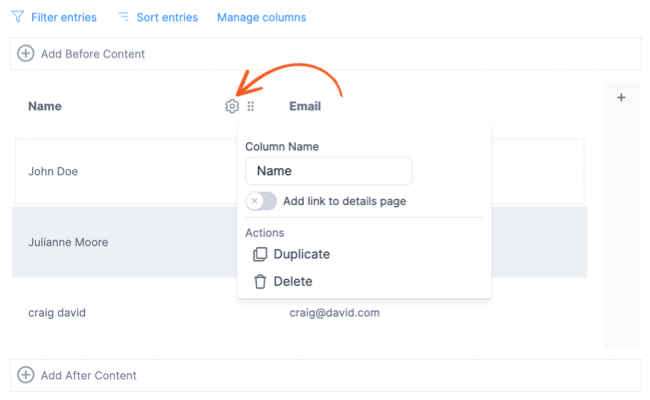
- Column Name: Set the name for each column in the Table View.
- Add link to details page: Select this toggle if you have added a Detail page.
- Duplicate: Create a copy of the existing column
- Delete: Delete the selected column.
Select the Manage columns option to customize which form fields should be shown in the Table View. By default, it will display the current selected and unselected fields.
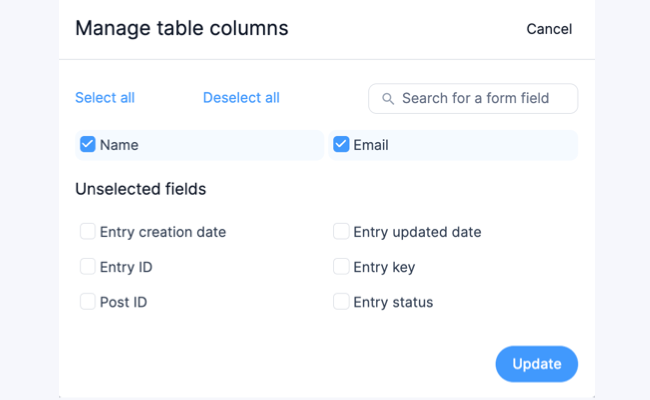
- Select all: Click this to select all columns in the table.
- Deselect all: Click this to deselect all columns in the table.
- Search: Type in the box to search the form field name.
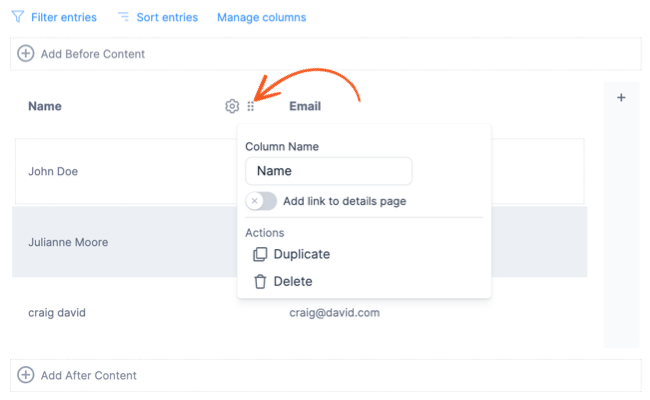
To Add a column, click the Plus icon on the right side of the table.

To Move a column, select the Move icon and drag/drop to re-order the table columns.
Timeline
This View type will show the entries as cards in an interactive timeline.
Timeline Settings
The Timeline Settings panel is where you connect your form data to the timeline. Use these fields to control what shows inside each card.
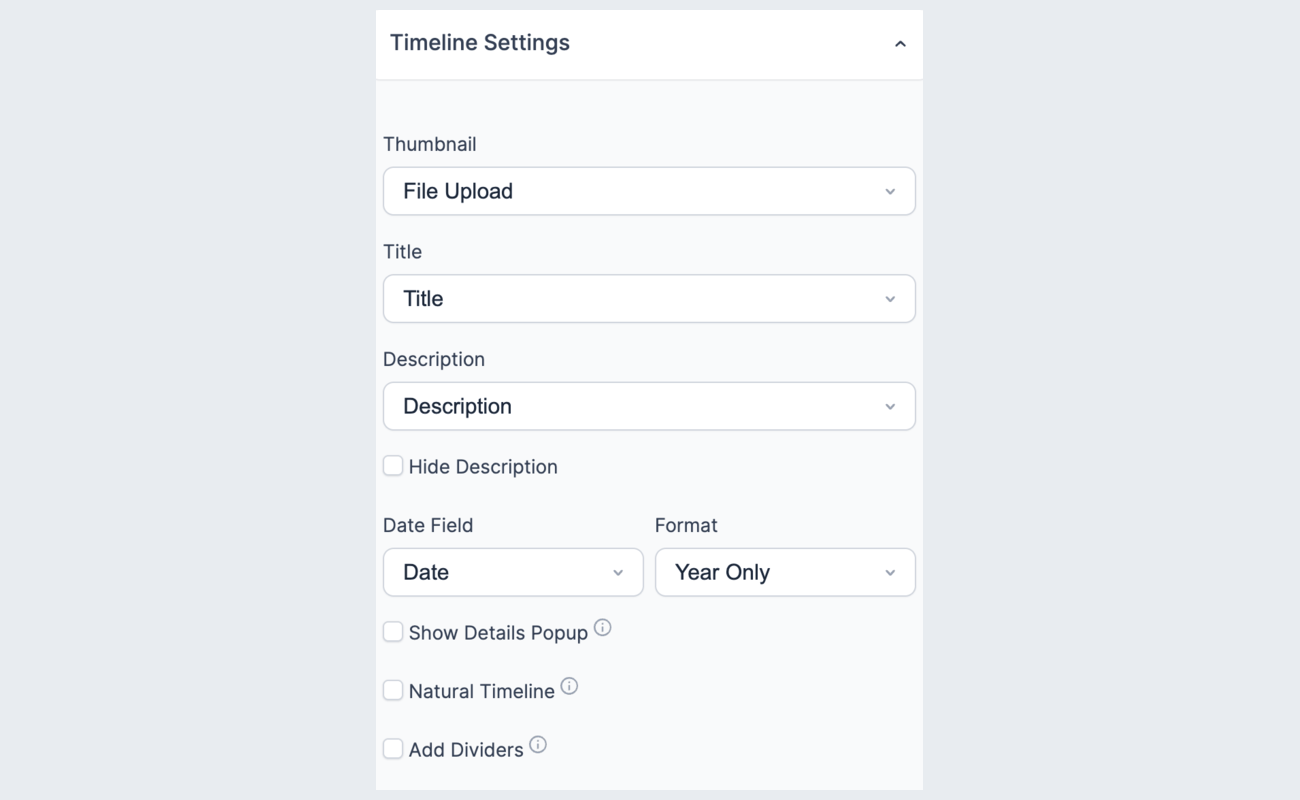
Thumbnail
Select a file upload field from your form to use as the card thumbnail. This is also used as the main image in the Life Events theme. Leave this empty if you don't need a thumbnail.
Title
Select a text field from your form to use as the card title.
Description
Select a paragraph field from your form to use as the card description. Check the Hide Description checkbox if you want to show only the title and thumbnail on each card.
Date field and format
Select a date field from your form using the Date Field dropdown. This date is used to place each event on the timeline. Once you select a date field, use the Format dropdown to choose how dates are displayed:
- Year Only – Shows only the year for each event.
- Custom – Shows the full date based on the date format you select.
Show Details Popup
Check Show Details Popup to open entry details in a popup when a visitor clicks on a timeline card. If this option is unchecked, clicking a card will redirect the visitor to the entry's dedicated detail page instead.
Natural Timeline
Check the Natural Timeline to space events proportionally based on the number of years between them. This creates a more realistic timeline where events that are far apart in time appear further from each other on the timeline.
Add Dividers
Check Add Dividers to group your entries and separate them with a visual divider. You can group entries by Year or Month.
Style settings
The Style Settings panel lets you control the look and layout of your Timeline View.
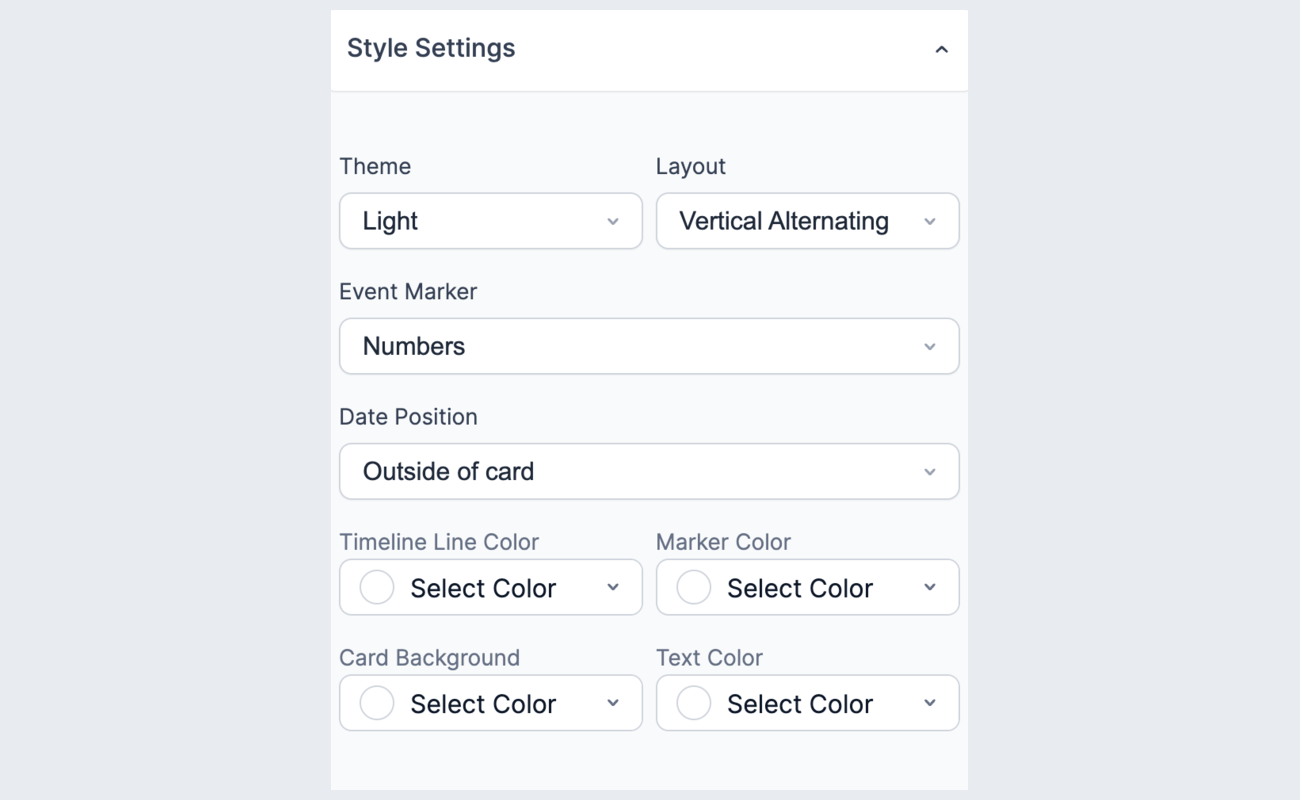
Theme Choose from 4 built-in themes:
- Light – A clean, light background with dark text.
- Dark – A dark background with light text.
- No Background – Cards display without a background color.
- Life Events – A special theme that uses the thumbnail as a full card image, great for milestone or personal history timelines.
Layout Choose how your timeline is arranged on the page:
- Vertical Alternating – Cards alternate from left to right along a center line.
- Vertical right – All cards appear on the right side of the timeline.
- Vertical left – All cards appear on the left side of the timeline.
- Horizontal Alternating – Cards alternate above and below a horizontal line.
- Horizontal Top – All cards appear on the top side of a horizontal line.
- Horizontal Bottom – All cards appear on the bottom side of a horizontal line.
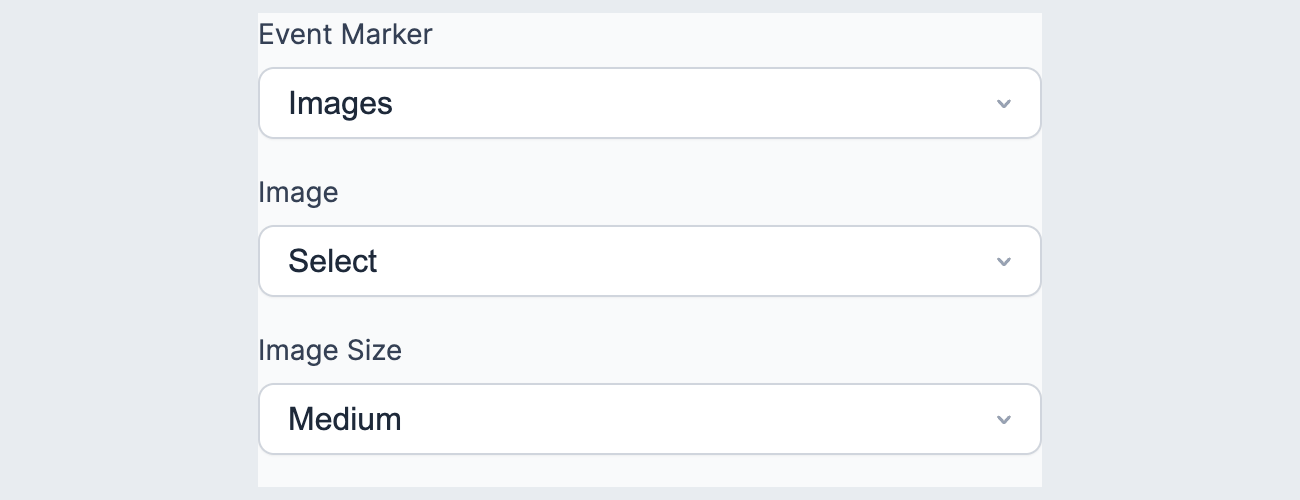
Event Marker Choose how each event is marked on the timeline:
- Numbers – Each event is marked with a sequential number.
- Dots – Each event is marked with a simple dot.
- Image – Each event uses the upload file thumbnail image as the marker. When you select Image, you can also choose the marker size: Small, Medium, or Large.
Date position Use the Date Position dropdown to control where the date appears on each card:
- Outside of card – The date is displayed next to the event marker, outside the card.
- Inside of card – The date appears inside the card itself.
Colors Customize your timeline's colors to match your site's branding. You can set each of the following independently:
- Timeline Line Color – The color of the vertical or horizontal line connecting events.
- Marker Color – The color of the event markers on the line.
- Card Background – The background color of each event card.
- Text Color – The color of the text inside each card.
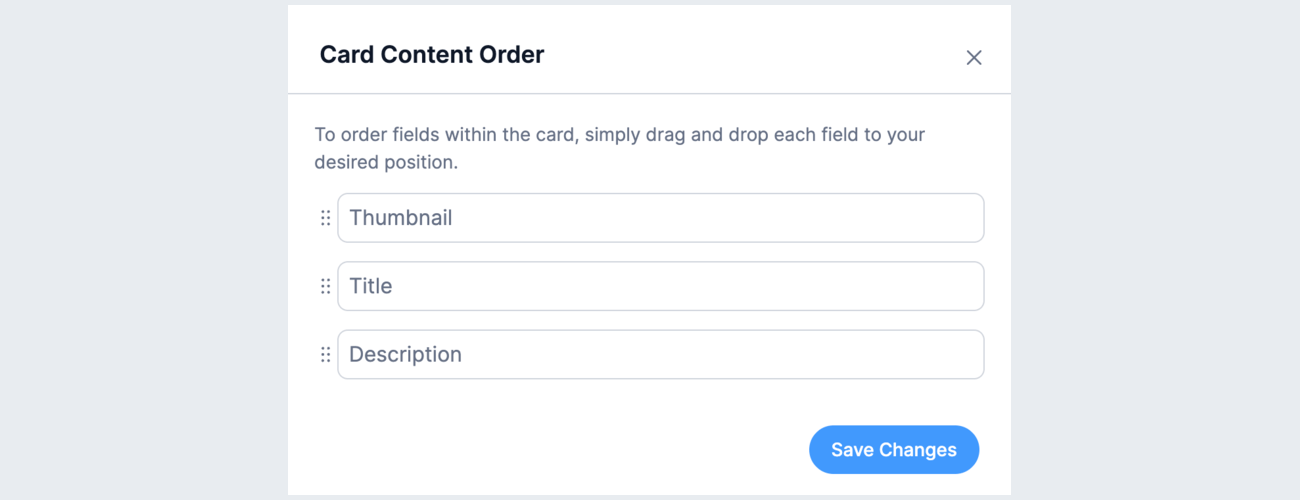
Card Content Order
Use the Card Content Order settings to control the order of fields inside the cards. To access these settings, click the content area of the View, then click on the Card Content Order link in the top-right corner.
Custom CSS
The specificity of the CSS on the View-specific Custom CSS panel follows this order: Any custom CSS added to the Listing Page tab affects the entire Timeline View and all of its elements. Custom CSS added to the Detail Page tab only affects the Timeline View popup if it's enabled.
From Idea to Reality in Minutes. Build Powerful Forms, Dashboards, Apps and More.
Formidable Forms makes advanced site building simple. Launch forms, directories, dashboards, and custom WordPress apps faster than ever before.
Basic settings
If you want to make changes after creating a View, you can edit it on the left sidebar of the View builder.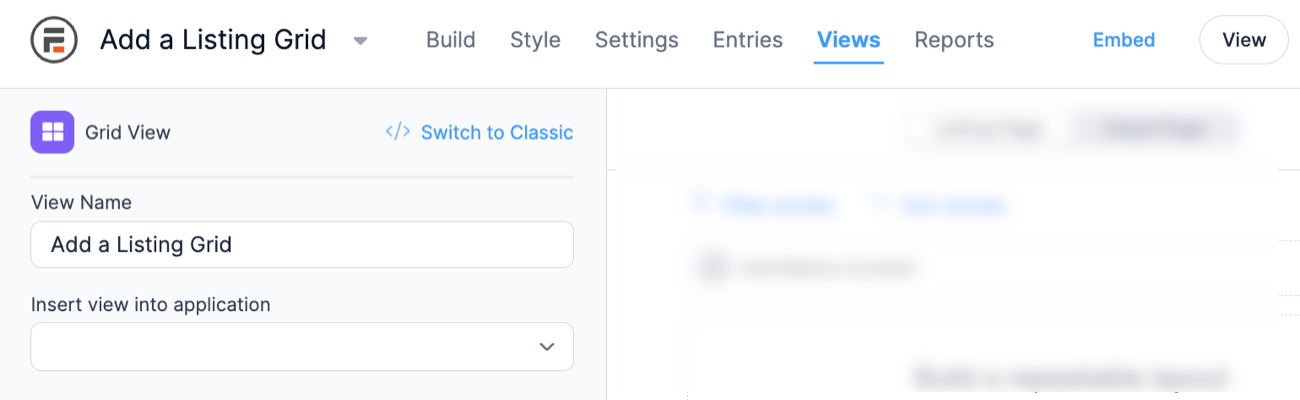
- View Name: Add a name to identify your View.
- Insert View into application: Select which application you want to insert your View.
- Insert manually: Use WordPress shortcode or PHP code to insert the View manually.
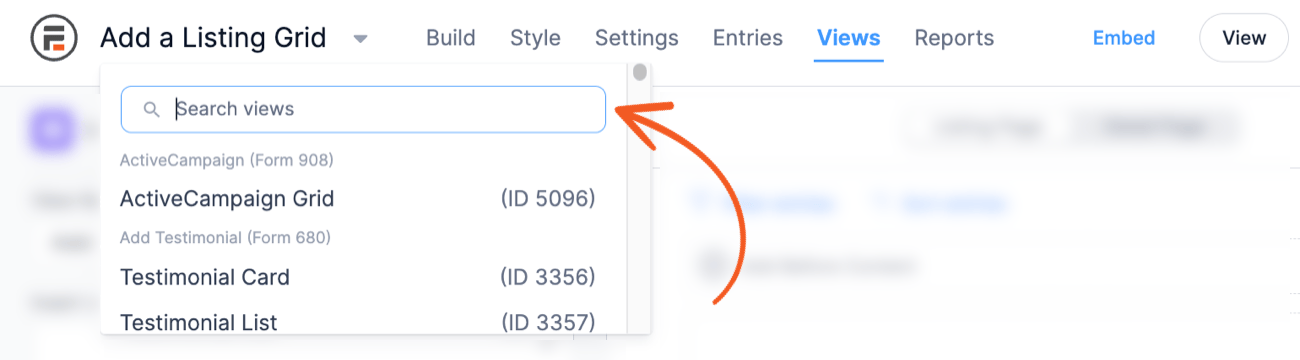
Search Views
Click the View name dropdown at the top to switch to other Views quickly without leaving the editor. When you search the form title, all of the views for the form will also match the search. The form title is displayed above each View name.
Content
The Content section is where you can insert fields from your form, text, shortcodes, HTML, etc. that will be displayed in your View. This section will be repeated for each entry in your View. You may present the entries from your form as a table, list, gallery, or any other format using text, HTML, and CSS.
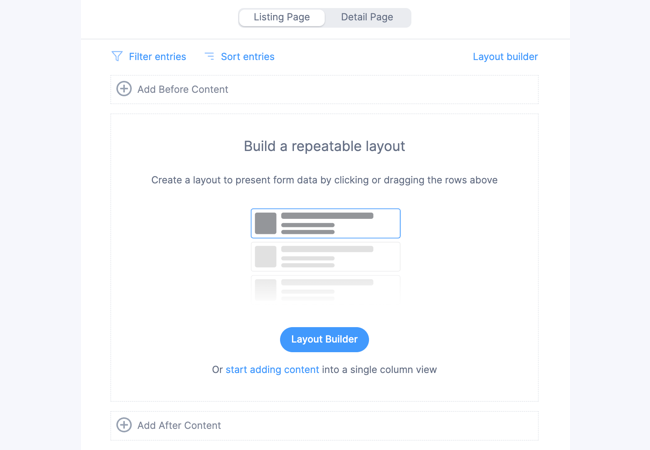
You can use a combination of the Filter Entries and Sort Entries settings to determine which entry will display in the View.
Filter Entries
Limit which entries are shown. Entries can be filtered based on parameters in the URL, the current user, date ranges, etc. For more information on filtering views, click here.

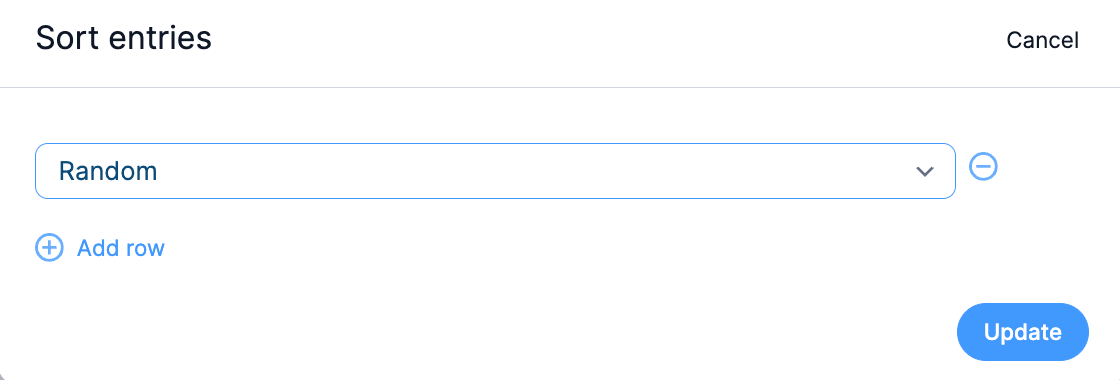
Sort Entries
Sort your displayed entries by any field, entry creation date, entry update date, or randomly rotate.
If you display a single entry from your form and have selected Entry creation date – Descending, only the most recent entry will be displayed.
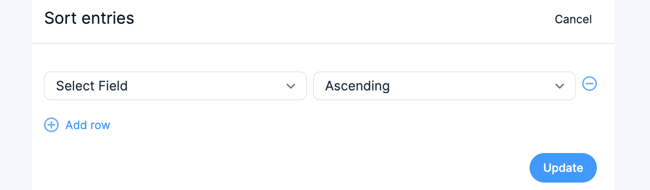 Likewise, when you select Random, a random entry will be displayed whenever the page is visited or refreshed.
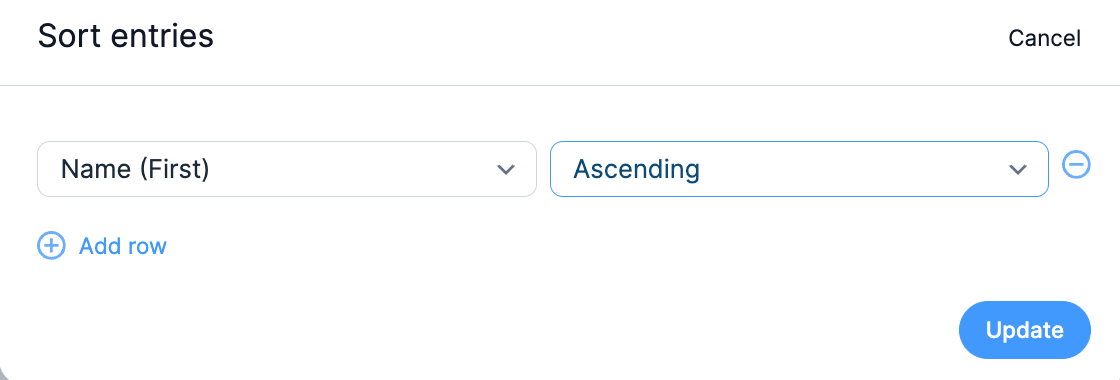
Views can be sorted by Name subfields. You can sort it by selecting the Name (First) and Name (Last) options.
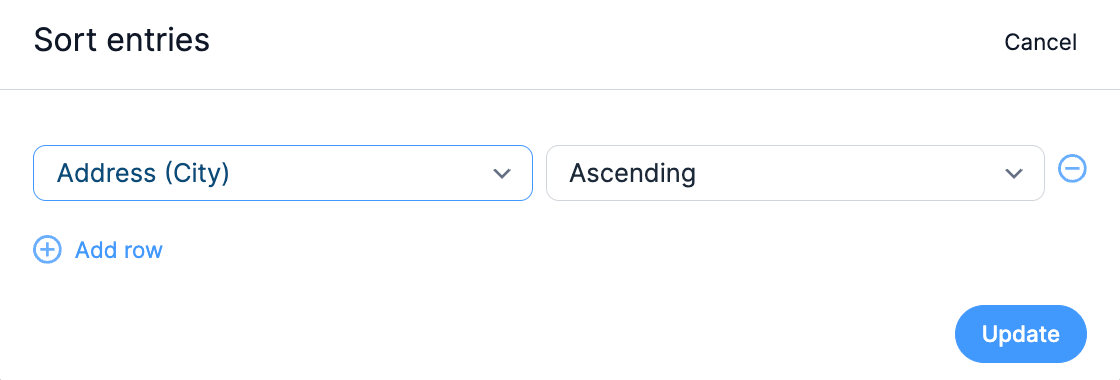
 Likewise, Views can be sorted by Address subfields. You can sort it by selecting the Address (Country), Address (State), Address (City), and Address (Zip).
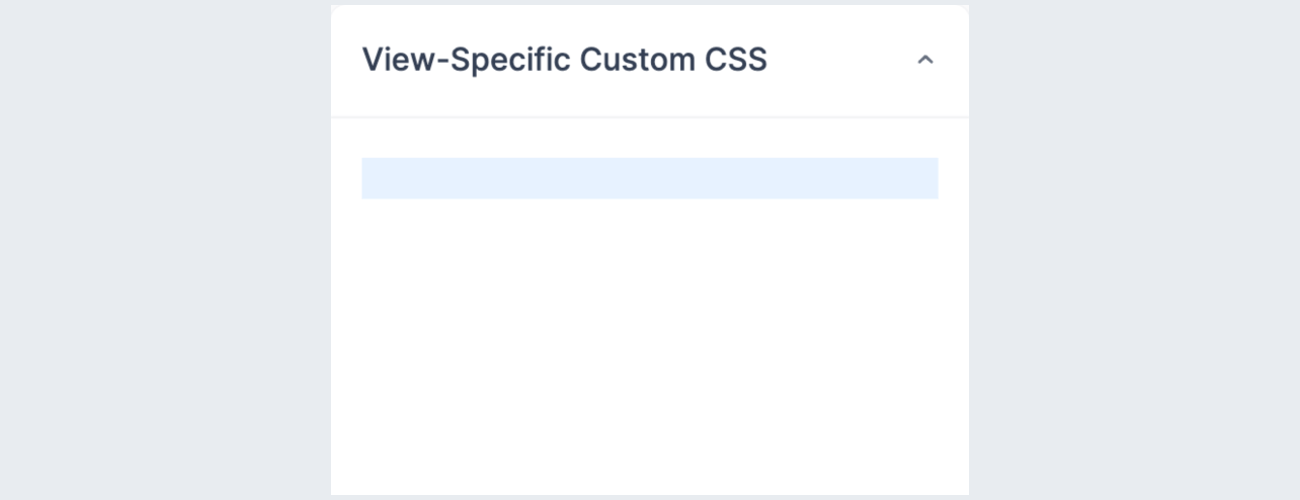
View-Specific Custom CSS
Add custom CSS to any view directly on the content area of the view. Click on the content area of the view of the Listing or Detail page. You can locate the Custom CSS panel under the Customization panel.
Before and After Content
These boxes are optional, but the Before Content section is a good place to put table headers or other content that should not repeat with each entry. The After Content section is a good place to put table footers or other content that should not repeat with each entry.
Detail Page Content
This setting is available with any View type. If the Detail Page tab is selected in the View builder, the Detail Page Content box will appear where you can use all the same shortcodes and conditional statements that the Listing Page Content box uses. This box is for the detailed single entry page.

The Customization panel in the right sidebar contains links and buttons which will help you insert fields and other shortcodes in your View content. For some examples of what you can do with Views, take a look at some demos.
Advanced settings

Limit
Limit the total number of entries displayed in your View. Leave blank if you would like all entries shown. Set the Limit to 1 if you want to display a single entry.
Page Size
Split your View into pages by setting a page size. Enter the number of entries you would like displayed on each page in the Page Size box.
Offset
Adjust the offset to display results from a specific point in your data set. For example, if you set the offset to 1 and the page size to 10, the query will start from the second record and show the following ten results.
Pagination Type

To display the Pagination Type dropdown, add a value in the Page Size input.

- Reload full page. Select this option to allow pagination by reloading the entire page.
- AJAX pagination. Select this option to allow pagination without reloading the entire page.
- Load more entries. Select this option to add a Load More button that displays more entries when clicked. Set the button text in the Global Settings → Message Defaults page.
- Infinite scroll. Select this option to automatically load more entries as the user scrolls down the page.
Detail Page Slug
This option will show when the main content box includes [detaillink] or the Detail page has content. It will be used when building the URL for the detailed entry pages. In the Parameter Name box, add the text you would like to add to the end of your site URL. The Parameter Value dropdown allows you to select the entry ID or key, which will also add on to the end of your site URL.
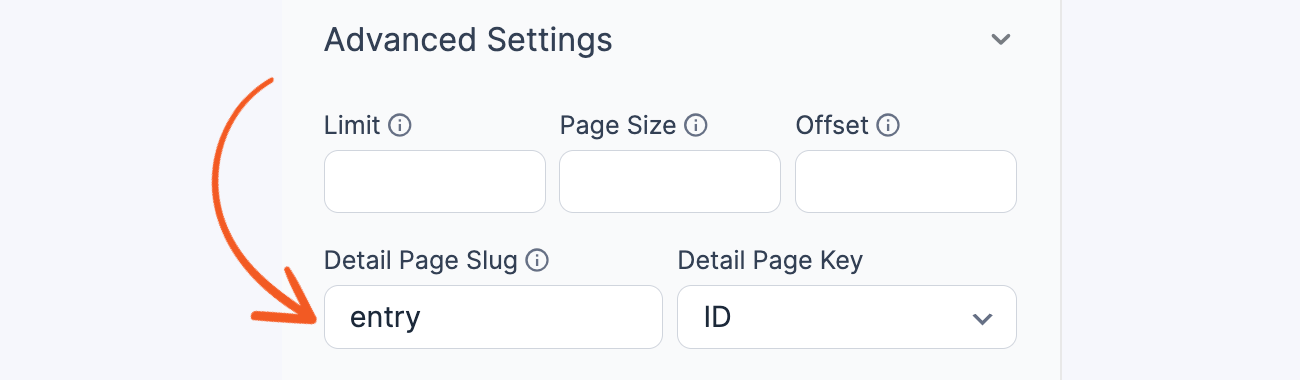
For example, if you type jobdetails in the Parameter Name box and select ID for the Parameter Value, your URL for the detailed entry page would look like: http://example.com/job-listings/jobdetails/1309/.
The ID number on the end is specific to each detailed entry page. If you select Key for the Parameter Value, the ID (1309 in this example) would be replaced with the key which you can optionally define when you edit or create an entry.
Filter Content
Filter how the View content is shown when published on a page, post, or text widget.
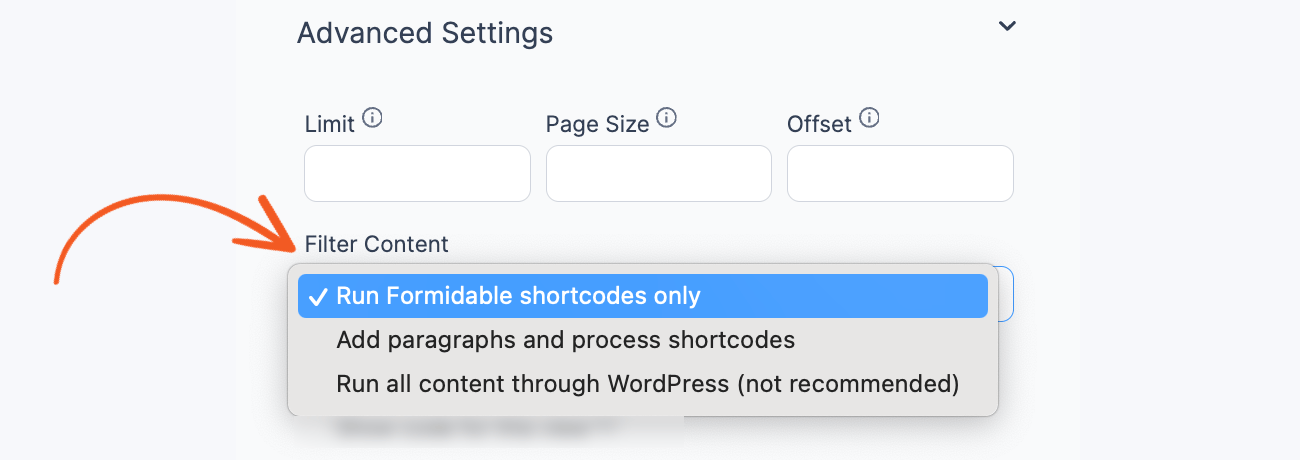
- Run Formidable shortcodes only. Set as the default filter for the View content.
- Add paragraphs and process shortcodes. Choose this option if you need to run your View content through other plugins to process external shortcodes.
- Run content through WordPress (not recommended). Choose this option if you are using a plugin that depends on the the_content PHP filter.
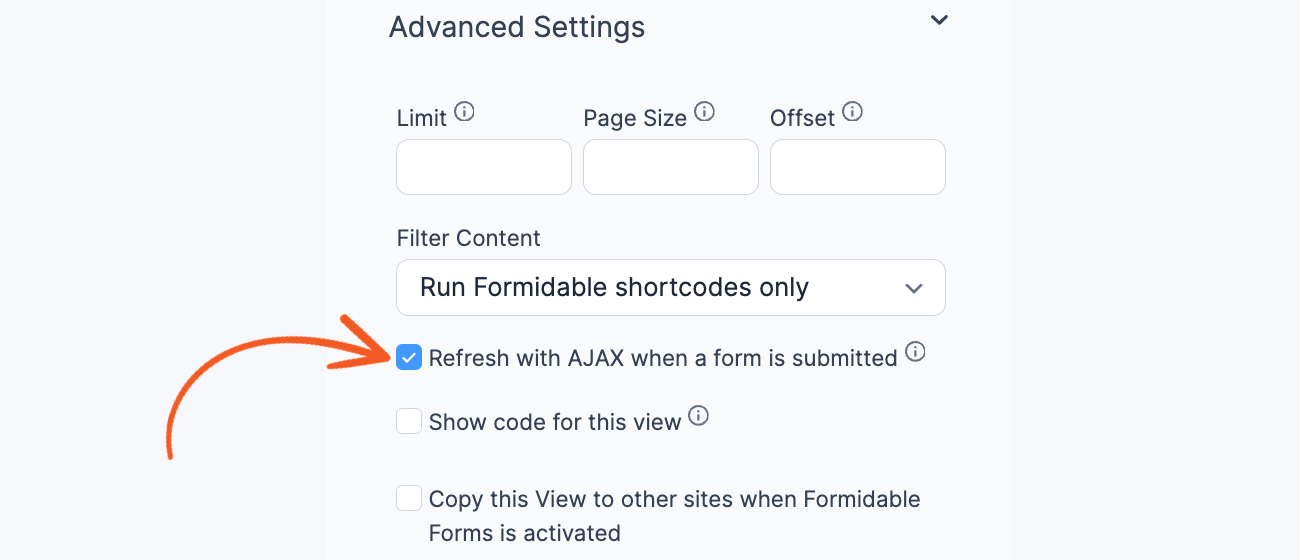
Refresh with AJAX
This feature triggers an AJAX refresh of the View following a Formidable form submission. This process allows the content to be updated smoothly without needing a full page reload.
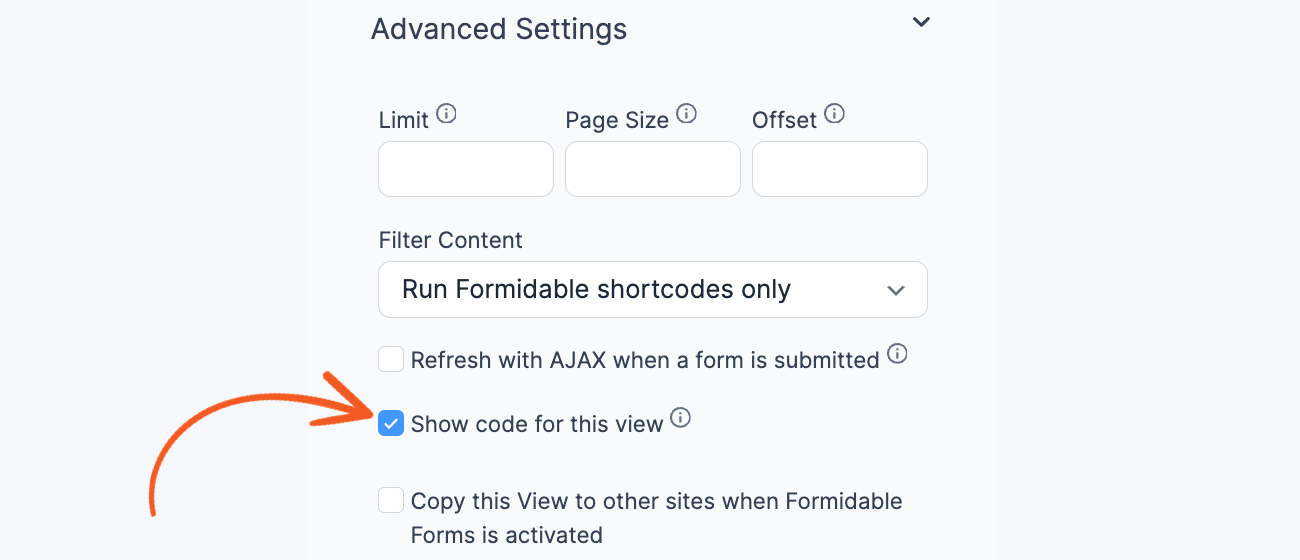
Show code for this View
This checkbox is forcibly selected if you include a <table> tag in the Before Content box. If you are editing a view and notice the visual tab is selected and your table HTML is missing, you can switch to the HTML tab, close the content pop up, and reopen it. As long as the settings have not been saved, your old HTML will be back to way it was before loading it in the visual tab. While this is checked, the preview will also display the HTML as code.
Copy this View to other sites
Allows you to copy the current View network-wide when Formidable Forms is activated. This setting only shows up when it's a multisite network.
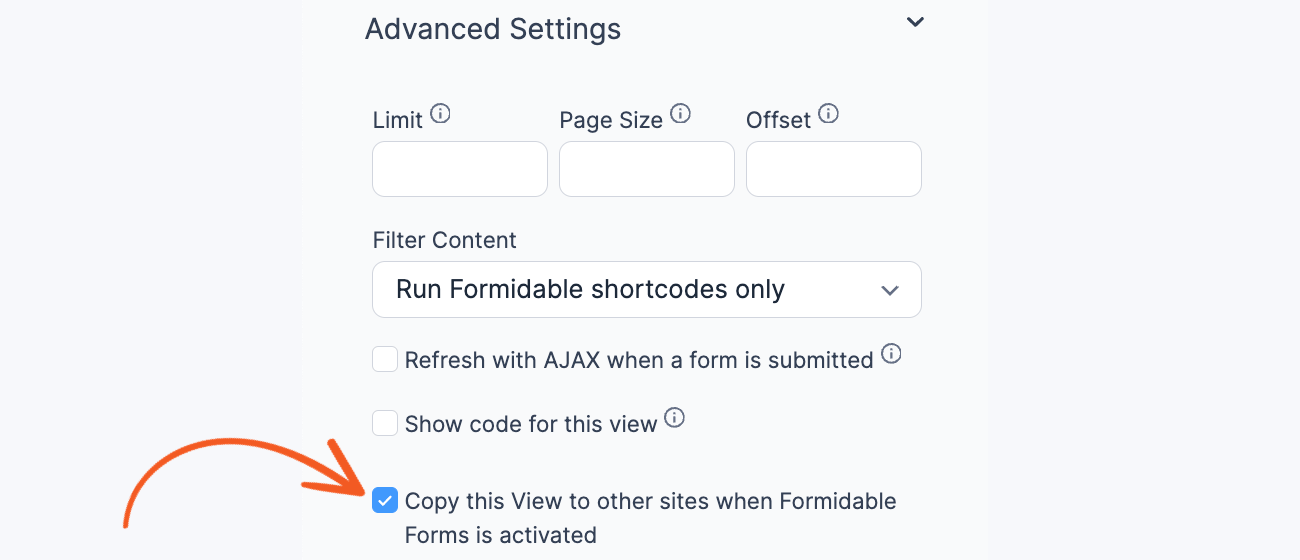
- In the Advanced Settings, select the Copy this View to other sites when Formidable Forms is activated checkbox. Click Update to save your settings.
- In your new subsite, install and activate Formidable Forms.
- It will automatically copy the Views to the new subsite. This option works for both the master site and subsites. It will not copy the View to sites where Formidable Forms is already activated.
View Key
While this is automatically generated based on the View name that you first added, you can still change this if you want.
Use Entries from Form
Select the form that contains the data you would like to display in your View. In this dropdown, you will only find forms that are compatible with the previously selected View template.
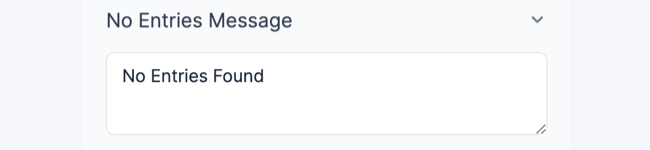
No entries message
Enter the message you would like users to see when there are no entries to display.
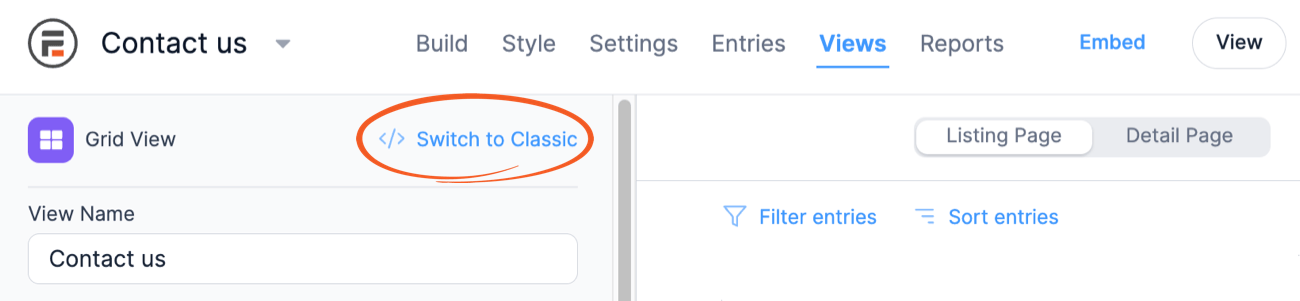
Switch to classic
Switching to Classic View gives you complete control of your HTML. This option is available when you're using a Table or Grid type.
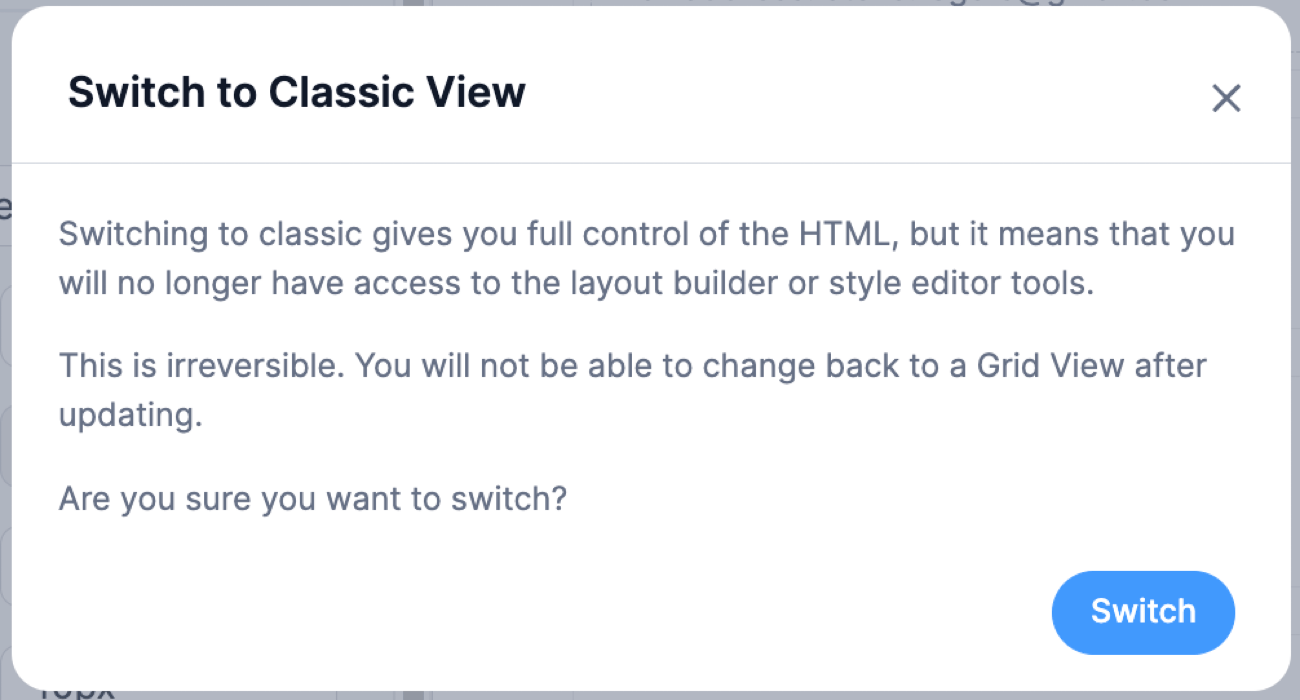
- Click the Switch to Classic link in the top-left area of the Visual Views editor.
- A confirmation box will then appear, asking you to verify your action. Switching to Classic View will discontinue your access to the Layout Builder or the Style Editor tools.
Important: This is irreversible. This is irreversible. After switching, you cannot change back to a Table View or Grid View.
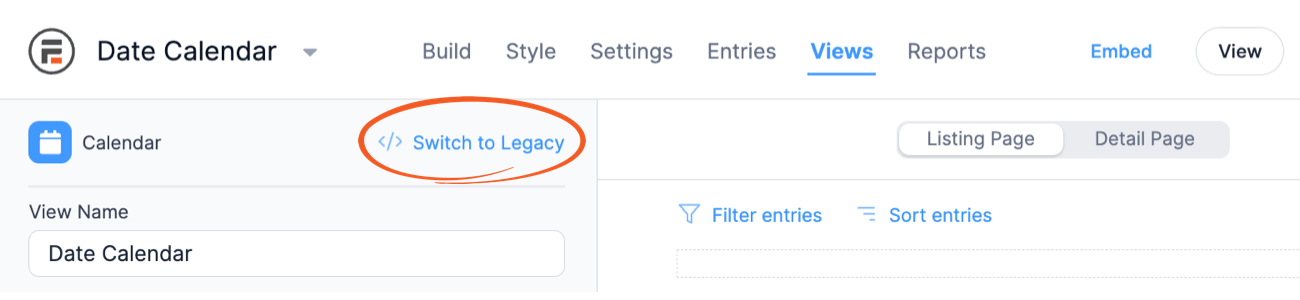
Switch to legacy
Switching to Legacy View allows you to change the modern Calendar view to a Legacy calendar. This option is only available when you are using a Calendar type.
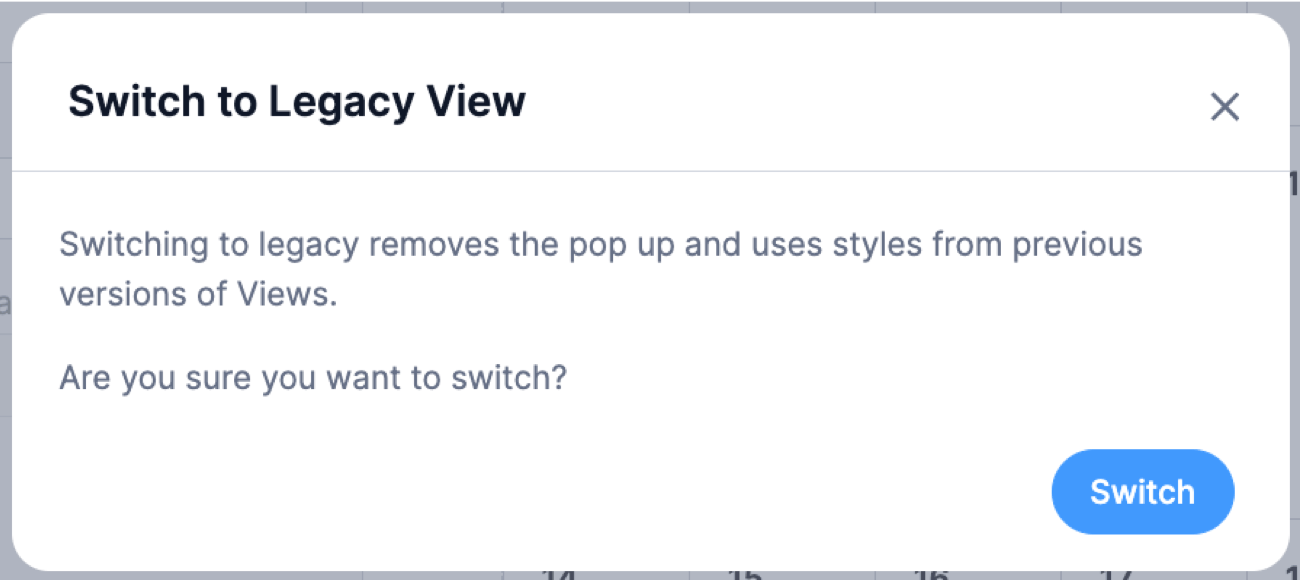
- Click the Switch to Legacy link in the top-left area of the Visual Views editor.
- A confirmation box will then appear, asking you to verify your action. Switching to Legacy View removes the Event Details Popup and uses styles from previous versions of Views.
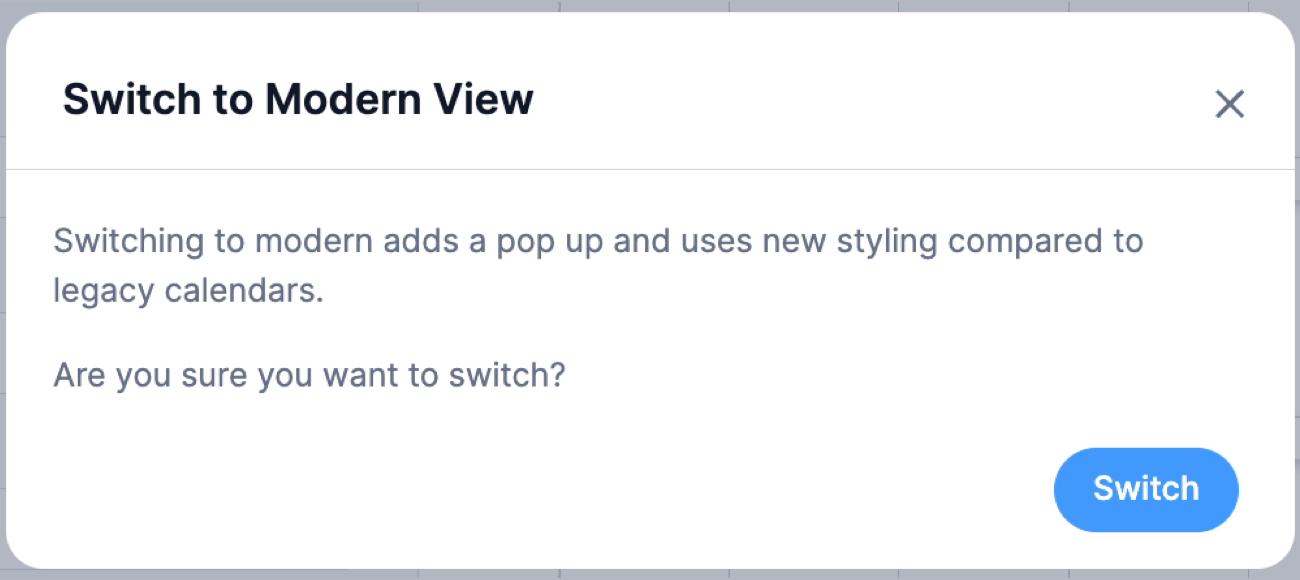
- If you want to switch back, click the Switch to Modern link from the sidebar.
- A confirmation box will then appear, asking you to verify your action. Switching back to Modern View adds the Event Details Popup and uses the new styling, which will differ from Legacy calendars.

View
By clicking the View button, it will generate a preview link. The visibility is set to public if you publish it on a page, post, widget, or even within another View. We recommend using the View shortcode on a page instead of the Preview link.
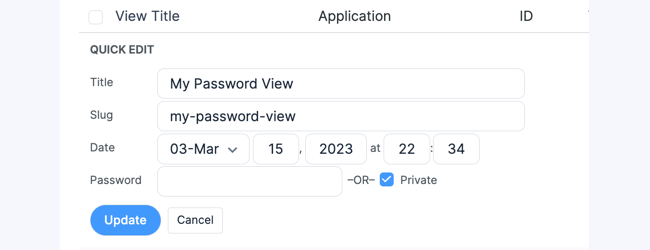
View Visibility
Learn how to manage the visibility of your Views to ensure that sensitive data is properly protected. The visibility setting helps control whether or not a View can be indexed or accessed in certain scenarios.
- When you set a View's visibility to private, it restricts access to the frm_display preview link. (e.g., https://yoursite.com/frm_display/basic-view/)
- Publishing a View on a page allows anyone with access to that page to view the data.
- To prevent Views from being indexed or accessed without permission, make sure all Views that contain sensitive information are set to private.
You can set a View to private to maintain the security and privacy of your data by following the steps below. Note: Always verify that your Views are configured correctly before publishing them on a public page.
- Navigate to the Formidable → Views.
- Select a View and locate the Quick Edit option to configure the visibility settings.
- Set the visibility status to Private.