
Integrate your WordPress forms with Stripe to process your one-time and recurring payments. Stripe forms enhance the user experience by allowing users to stay on your site while securely making a payment.

As of Formidable Stripe version 3.0, the add-on has been updated to accept payments with Link by Stripe. Learn more on how to set up Stripe Link.
Upgrade your WordPress site with powerful, flexible forms.
Download and install
-
- If you haven't already done so, install and activate Formidable Forms.
- (Optional) In your WordPress admin, go to Formidable → Add-Ons and toggle on the WordPress Stripe plugin.

- Once the plugin has been activated, go to your WordPress Dashboard and look for the Formidable menu.

From Idea to Reality in Minutes. Build Powerful Forms, Dashboards, Apps and More.
Formidable Forms makes advanced site building simple. Launch forms, directories, dashboards, and custom WordPress apps faster than ever before.
Set up Stripe API integration
Once you have successfully activated Formidable Forms, you need to connect it with your Stripe account to start accepting payments. To do this, follow the steps below.
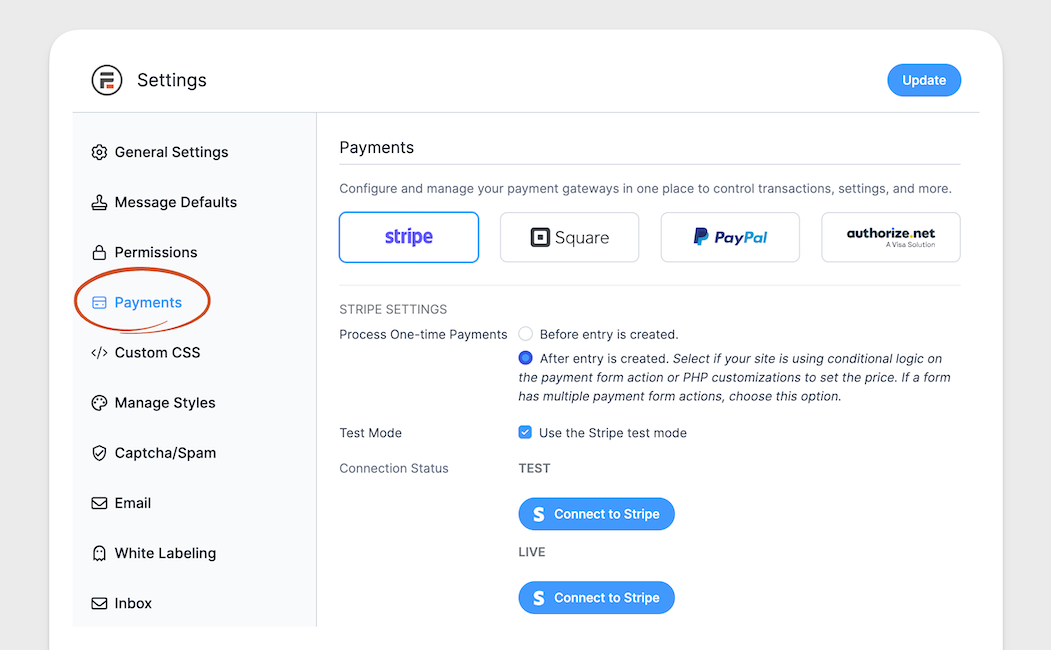
- Go to Formidable → Global Settings → Payments, select the Stripe tab, and click the Connect to Stripe button. Keep in mind that this will need to be done once for testing purposes and once for when the system goes live.
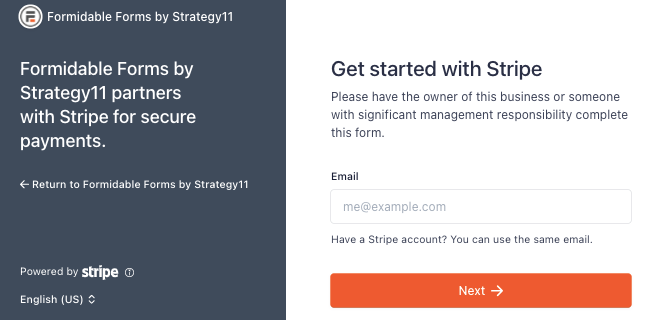
Processing one-time payments option is a premium feature. - To authorize the connection between your forms and Stripe, you will be redirected to connect.stripe.com, where you can log in and select your Stripe account.
- After completing the required steps in the Stripe wizard, you will automatically be redirected back to your site.
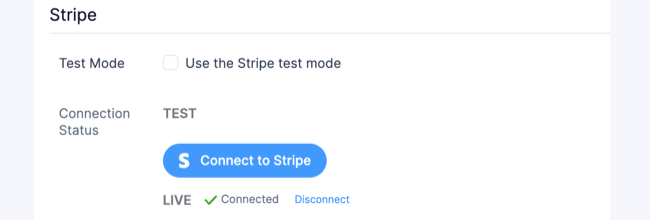
- To confirm a successful connection, look for a green checkmark with the text Connected next to the Connection Status.
- Now you are ready to start collecting secure payments. All the webhooks are covered, and need no additional setup.
Set up a Stripe form to collect payments
Once you have the Stripe plugin activated and have connected your Stripe account, you can set up a form to take Stripe payments. Follow the directions below to collect Stripe payments with a Formidable form.
-
- Go into edit the form and add a Payment field to start processing payments in Stripe..
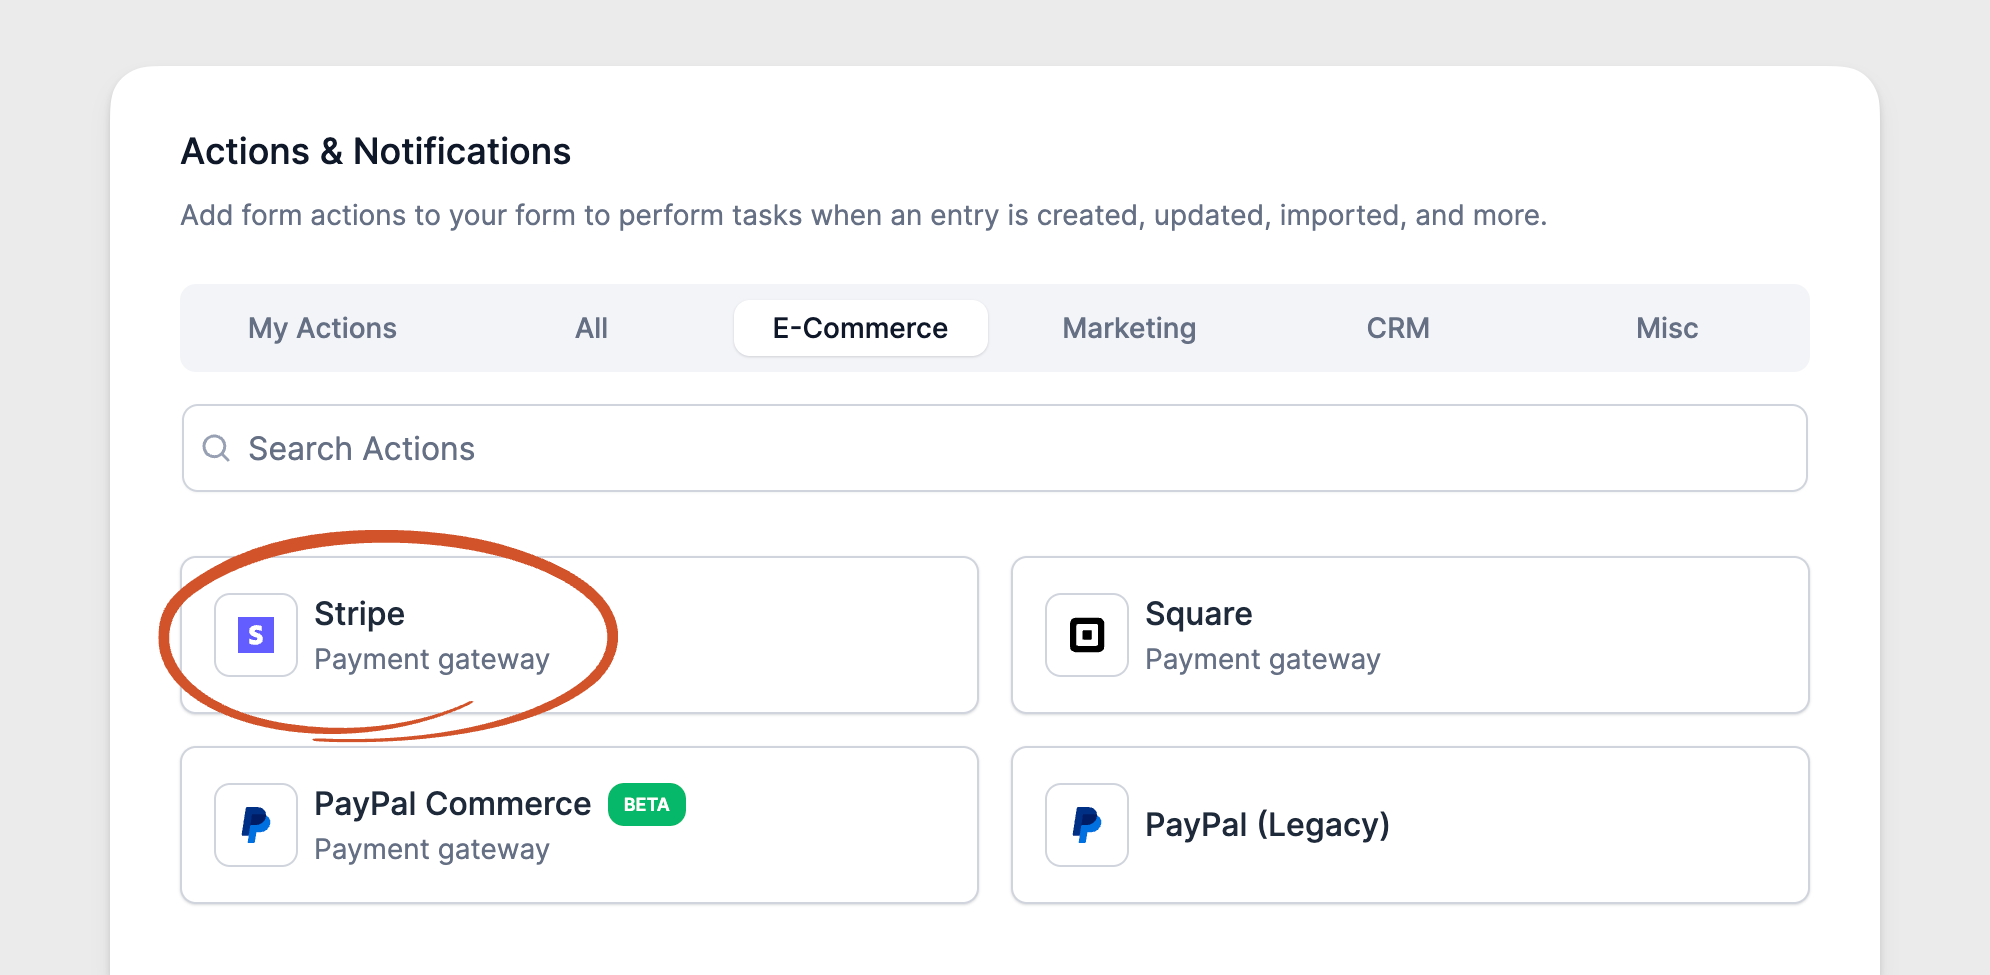
- Go to your form Settings → Actions & Notifications. In the E-Commerce tab, click the Stripe action, or search for it if needed.
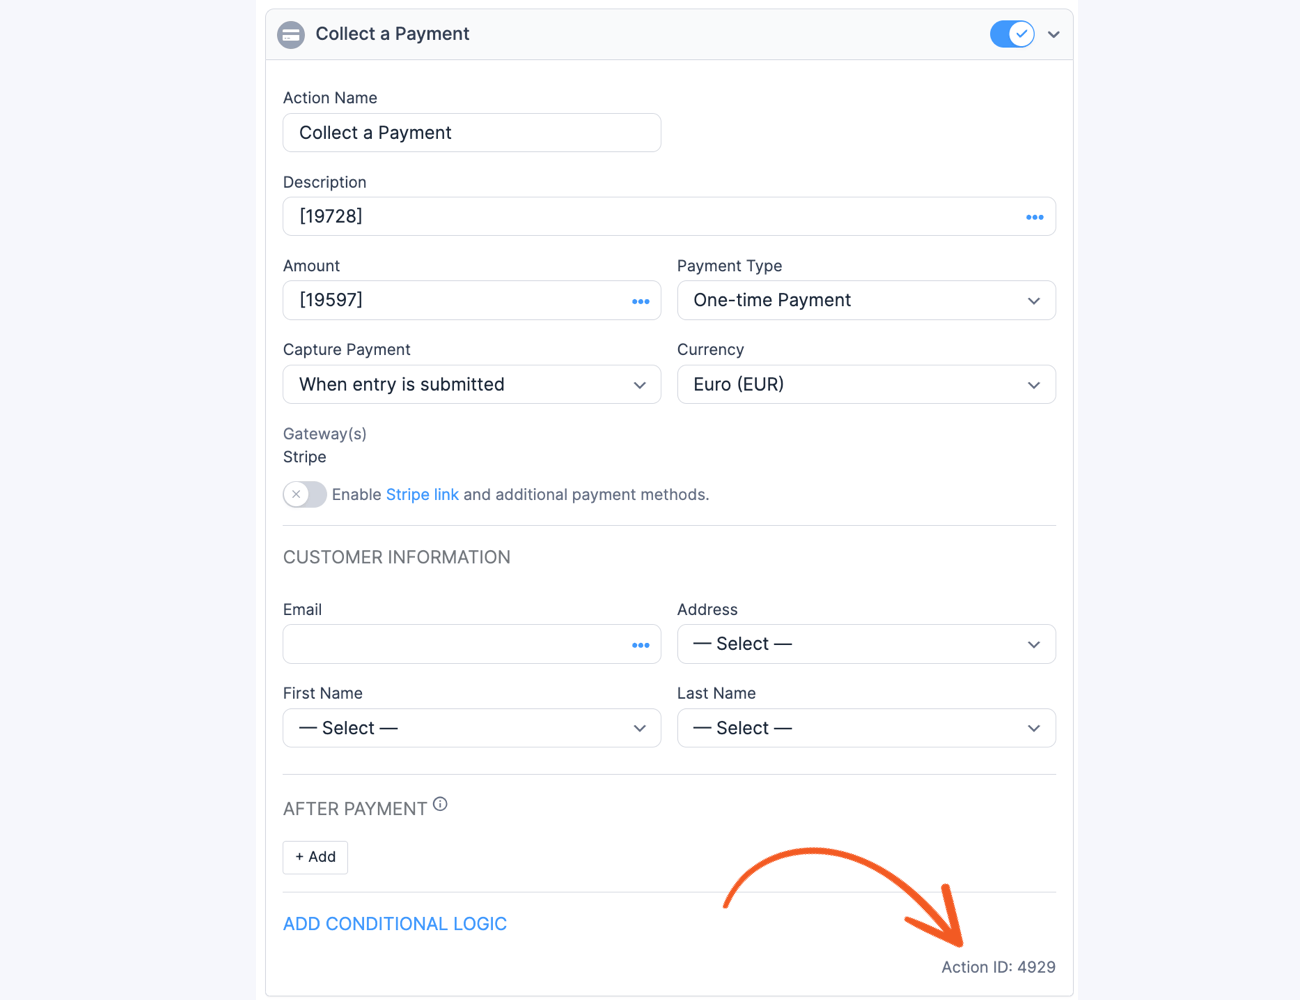
- Give your Payment action an Action Name for easy reference. This name will only be seen on the back-end.
- Give your Payment action a Description to attach to the payment. This information will be sent to Stripe along with the payment. You can either type in a description, or use a field from your form to set the description dynamically. If you would like to use a field for the description, click the icon in the Description box and then select your field in the modal box. This will insert a value like [3130] for your Description setting.
- Set the Amount for the payment. You can either type in an amount, or use a field from your form to calculate the amount. If you would like to use a field for the amount, click the icon in the amount box and then click your field in the modal box. This will insert a value like [3138] for your Amount setting.
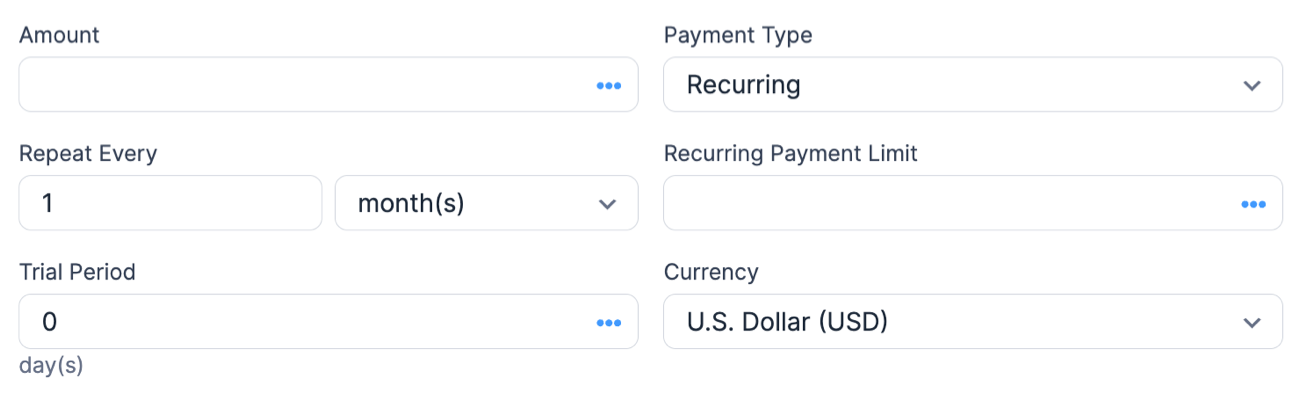
It may be helpful to use field calculations to calculate a total in your form. Note: If you are using a field that uses separate values in the Amount field, insert [x show=value] instead of [x], where x is the field ID.For extra security, calculate the payment amount in a Virtual Field so the total is never exposed in the browser. The server-side value can then be referenced in the Amount setting of your Stripe action. - Your Payment Type can be one-time or recurring. You can add multiple actions to your form if you would like both one-time and recurring payments. If you would like to allow either a one-time payment or recurring subscription, be sure to add conditional logic to both actions so they will only trigger at the times you would like. If you have chosen a recurring payment type, you will see the following options:If you are running Stripe Lite, it is not possible to conditionally run payment actions. To conditionally allow payments, this feature requires the Stripe add-on. Learn more about the difference between Stripe Lite and add-on.
- Would you like to Capture the Payment later? You can authorize the payment now, and manually collect it later. Or finalize and collect the payment when the entry is submitted. Capturing a payment later is a premium feature.
- Set your preferred currency for Stripe. By default, this will be set to the Global currency.
- Click the toggle to enable Stripe link and additional payment methods.
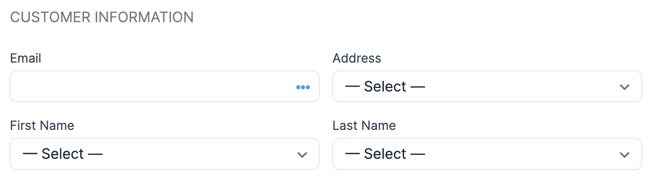
Learn more on the different Stripe payment gateways. - The Customer Information fields can be associated with field values in your form.
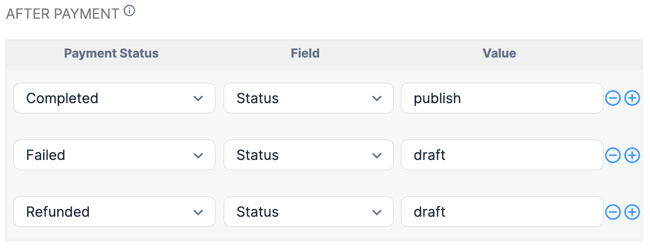
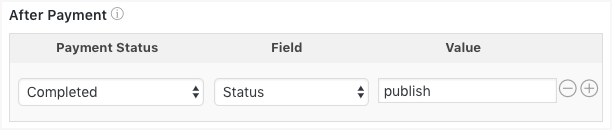
If you would like to pass a custom address to Stripe, you will need to add an Address field to your form. Note: Lite users can't add an address field. This also means the user's country will be auto-detected by Stripe and can't be customized. - You can also change field values automatically when a payment is completed, fails, or is refunded. Anything you set here will be also be triggered with every payment in a subscription. After Payment settings are a premium feature.
For example, if you are creating posts, and would only like the post published when it is paid, use the After Payment settings. When the Payment is Completed, set your post status field to "publish". When Failed, set it back to "draft." - After saving the Stripe form action, a Payment method field is added automatically on your form. This field is required. Do not remove it or your payments will not be sent to Stripe for processing.
- Go into edit the form and add a Payment field to start processing payments in Stripe.
 .
.


-
-
- With Strong Customer Authentication (SCA) implementation, the payment field is not visible when editing an entry.
- When the form is submitted, an entry is created. If the payment fails, the entry is deleted immediately after.
- If you have set up your emails to trigger when an entry is created, it will still be sent even if the payment fails. If you only want to send the emails for completed payments, change the trigger to Successful payment.
-
Trigger Actions after payment
There are several actions that can be triggered after a payment is complete or fails. Email notifications, Twilio (text messages), and MailChimp actions are currently setup to work this way. In each of these actions, you'll find options in the "Trigger this action after ____" setting. If you would like an email to be sent after the payment is complete, uncheck "Create" and check "Successful Payment."
When a one-time payment fails initially, only the entry created trigger is activated. The "Failed Payment" event will not trigger in this case, only for a recurring payment that fails.
With recurring payments, each payment will trigger one of these actions ("Successful Payment" or "Failed Payment"). The "Failed Payment" event occurs when a payment that is part of a recurring subscription fails.
Run a test payment
It is often helpful to run a test payment to ensure that your form and Stripe function well. By enabling test mode, you can simulate transactions without impacting actual payments. Follow the steps below to run a test payment.
- Go to Formidable → Global Settings → Payments, then select the Stripe tab.
- Select the option to Use the Stripe test mode. Make sure you have connected to your Stripe account for the Test connection. Hit Update.
- Open the page where your Stripe form is published.
- Submit a test entry. Use 4242424242424242 for the credit card number, any three digits for the CVC, and any future date. Enter at least 50 cents for the amount.
- To access the Payments page, navigate to Formidable → Payments. Once there, you will see a column labeled Mode, which shows test payments if it has a value of Test.
- That's it! The form should be submitted normally if it is configured well and there are no errors.


If you want to test a variety of situations, see Stripe's testing documentation.
Save payment status in a field
If you would like to save the status of a payment in a field in your form, follow the instructions below.
- Go into a form that has a Stripe action included.
- Add a hidden field and Name it 'Payment status'.
- Go into your form's Settings → Actions & Notifications and open the Stripe form action.
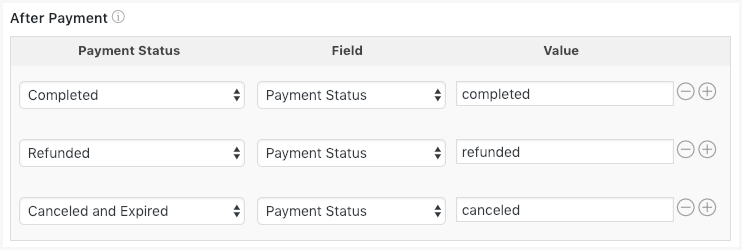
- Scroll down to the After Payment section. Click the Add button.
- In the 'Payment Status' column, select Completed. In the 'Field' column, select your 'Payment status' field. In the Value column, select Completed. You can do the same for the Refunded and Canceled payment status.
- Hit Update. When a form payment is successfully completed, the payment status field will switch to Completed' to reflect the status of the Stripe payment. If the payment status is not updating properly, please make sure that your API keys are set up and saved accurately.
Add sales tax to total
You can calculate sales tax by following our guide to calculating sales tax. Then you can add it to the total amount collected in your Stripe payment action.
Conditionally collect payments
If you would like to set up different payment options in your form using Stripe, you'll need Conditional Logic. Suppose you have three payment plans in your form: Basic, Pro, and Enterprise.
- In your form, add a dropdown, radio, or checkboxes field called Payment Plan. For this example, you would add the options: Basic, Pro, and Enterprise. When your users fill out the form, they will select the payment plan that they would like to avail.
- Go to your form Settings → Actions & Notifications. In the E-Commerce tab, click the Stripe action, or search for it if needed.
- Set the Action name to Basic Plan and select your preferred payment type, if it is a one-time payment or recurring.
- Click Add Conditional Logic and add the following.
- Do this action if any of the following match: Payment Plan equals Basic.
- Click the Update button to save the form action.
- Now, users who selected the Basic payment plan will only be charged for the amount relevant to their chosen payment option.
- Repeat steps 2-5 to create the form actions for the other payment plans.
- To be sure that the one-time payment is processed, go to Formidable → Global Settings → Payments, select the Stripe tab, and select After entry is created.
- Click the Update button to save the Stripe settings.


Need to conditionally collect payments through Stripe and PayPal in the same form? See how to add optional online payment processing to WordPress Forms.
Set up a recurring payment
If you want to set up a Stripe form action to take recurring payments, follow the steps below:
- Set up your WordPress form to take Stripe payments and set an Amount for the payment.
- Under Payment type, select 'Recurring'.
- In the Repeat Every section, select how often the payment will recur.
- To cancel a subscription after a specified number of payments, you can set the Recurring Payment Limit by entering a number or selecting a field. It will allow you to choose the duration of the subscription before it gets automatically canceled.
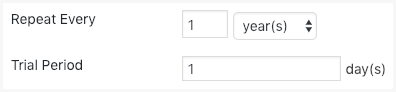
- You may include a trial period before the actual subscription begins. If you would like to include a trial period, select how long the Trial Period will be.
- Click Update. When a user submits the form, Stripe will automatically bill the user at intervals determined by your 'Repeat Every' setting.

Set up multiple types of payment
With Stripe, any number of payment options can be triggered on single form submission. Here's an example of how you can allow multiple payments such as one-time (non-recurring) payment, payment with a trial, and recurring payment. All of these form actions should trigger upon form submission.
- Go to Settings → Actions & Notifications. In the E-Commerce tab, click the Stripe action, or search for it if needed.
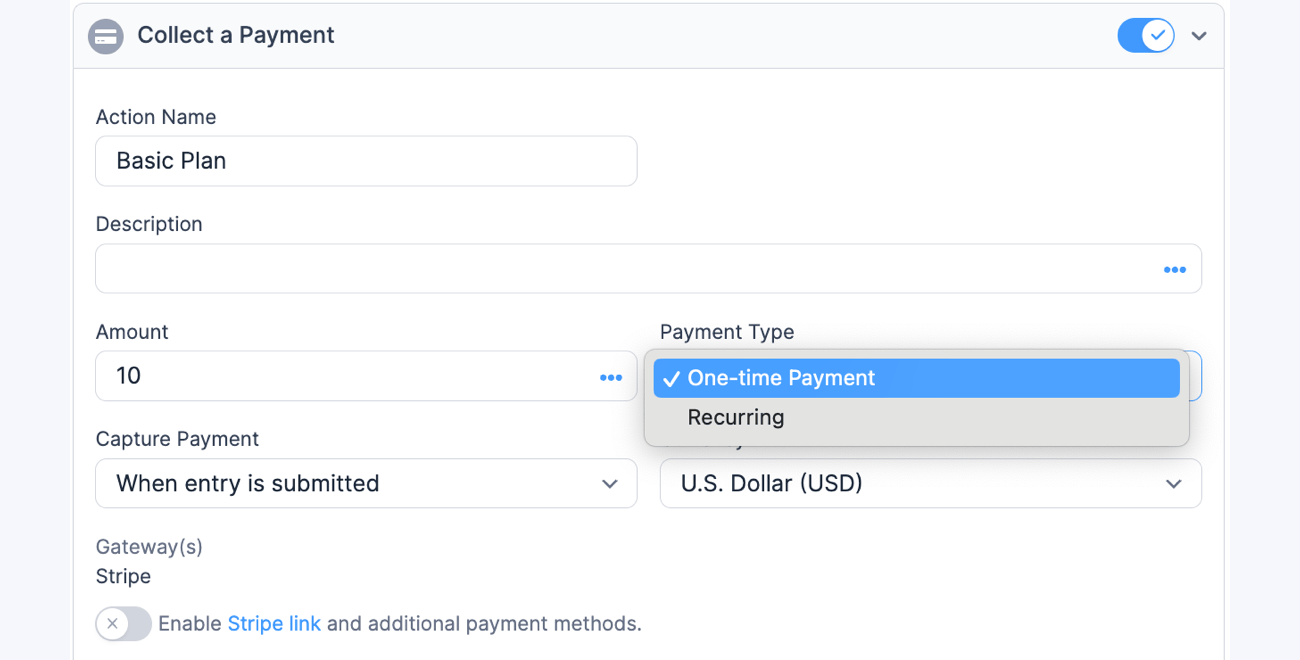
- In the Action Name box, insert 'Collect a Payment'.
- In the Amount box, type in the amount of the non-recurring payment or use a field from your form to calculate the amount.
- In the Payment Type, select 'One-time Payment'.
- In the Actions & Notifications, add another Stripe form action.
- In the Action Name box, insert 'Collect a Payment with trial'.
- In the Amount box, type in the amount of the recurring payment or use a field from your form to calculate the amount.
- In the Payment Type, select 'Recurring'.
- In the Repeat Every section, select how often the recurring payment will take place. In the Trial Period section, select how long the 'Trial Period' will take place.
- In the Actions & Notifications, add another Stripe form action.
- In the Action Name box, insert 'Collect a Recurring Payment'.
- In the Amount box, type in the amount of the recurring payment or use a field from your form to calculate the amount.
- In the Payment Type, select 'Recurring'.
- In the Repeat Every section, select how often the recurring payment will take place.
- Click Update. When the user submits the form, all form actions will be triggered for each type of payment.


Conditionally allow credit card payments
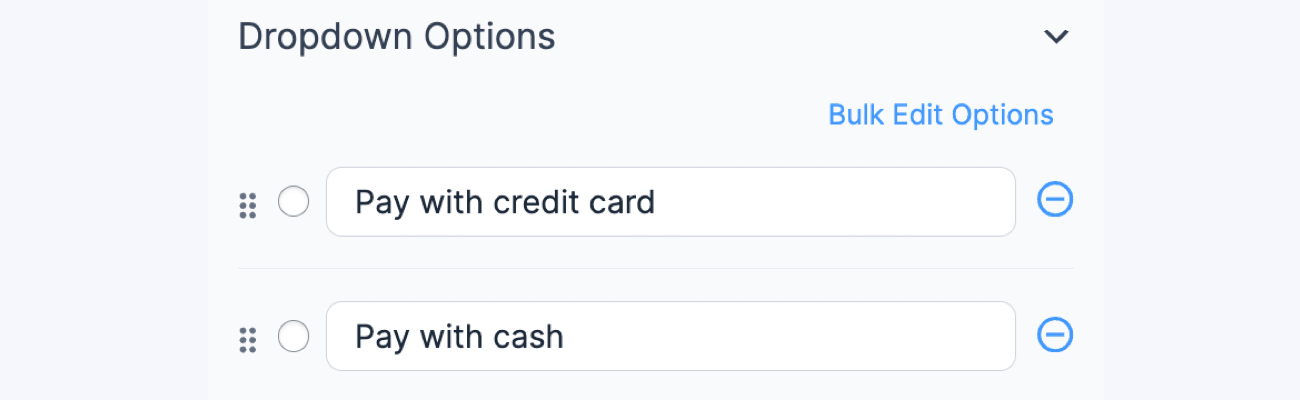
To conditionally allow credit card payments in your Stripe form, you must add conditional logic to your payment field and the Stripe form action. Suppose you have two payment options in your form: Pay with a credit card and Pay with cash.
-
- In your form, add a dropdown or radio field called Payment Option. For this example, you would add the options: Pay with credit card and Pay with cash.
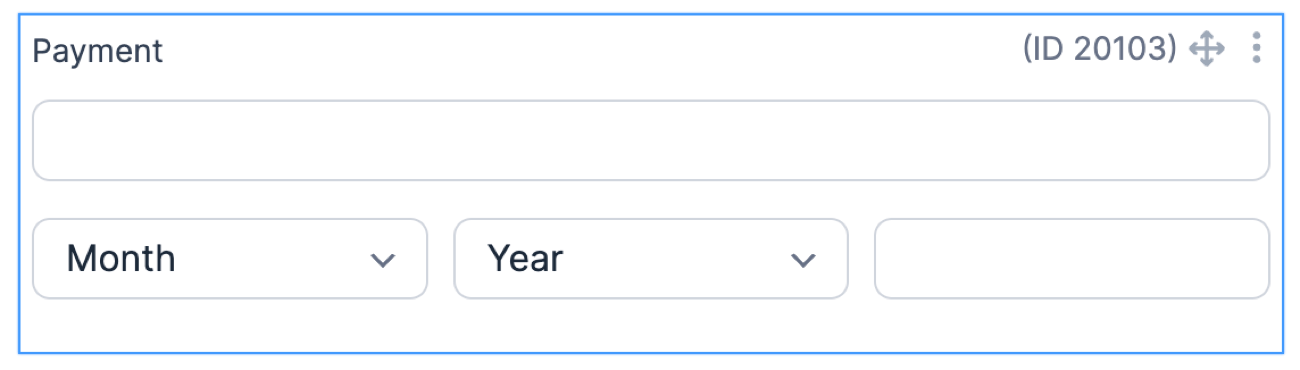
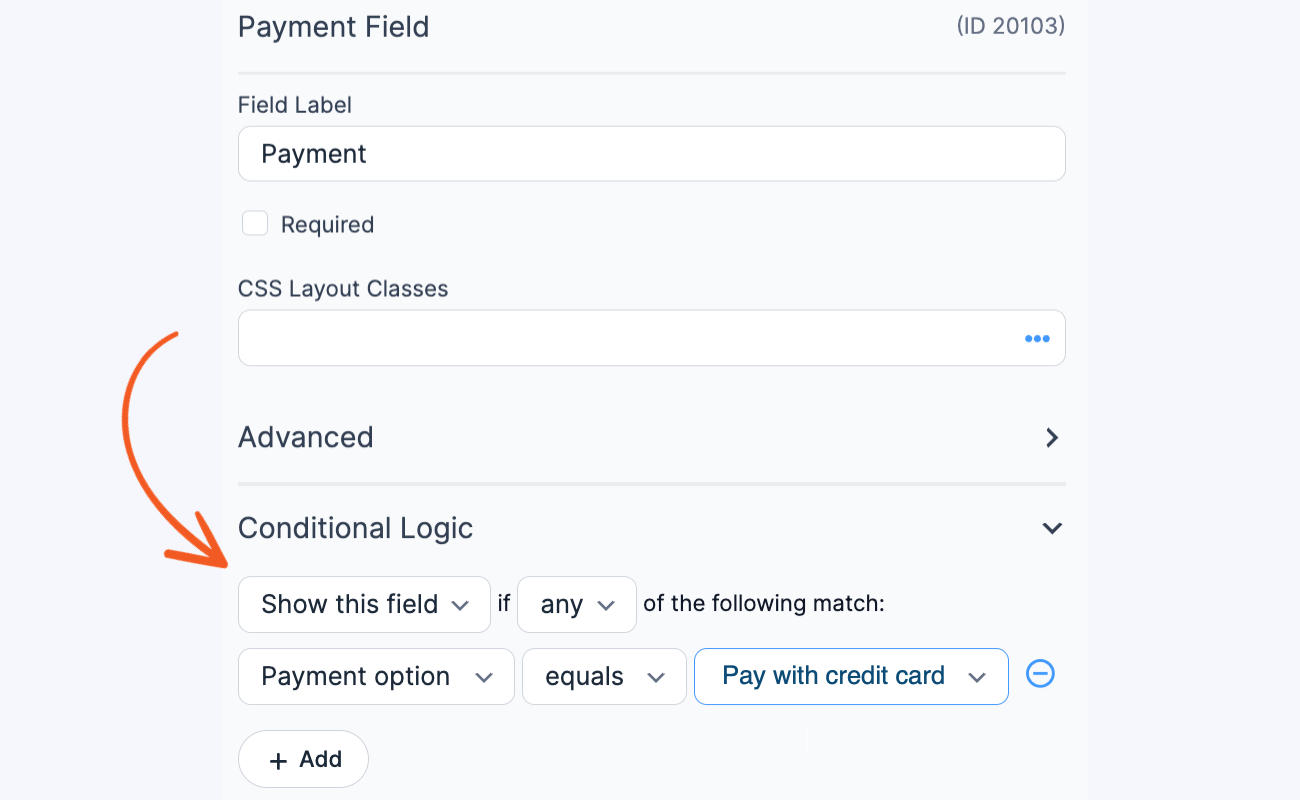
- Add a Payment field to your form.
Then, add conditional logic to show the Payment Option equals Pay with credit card. - Go to your form Settings → Actions & Notifications. In the E-Commerce tab, click the Stripe action, or search for it if needed.
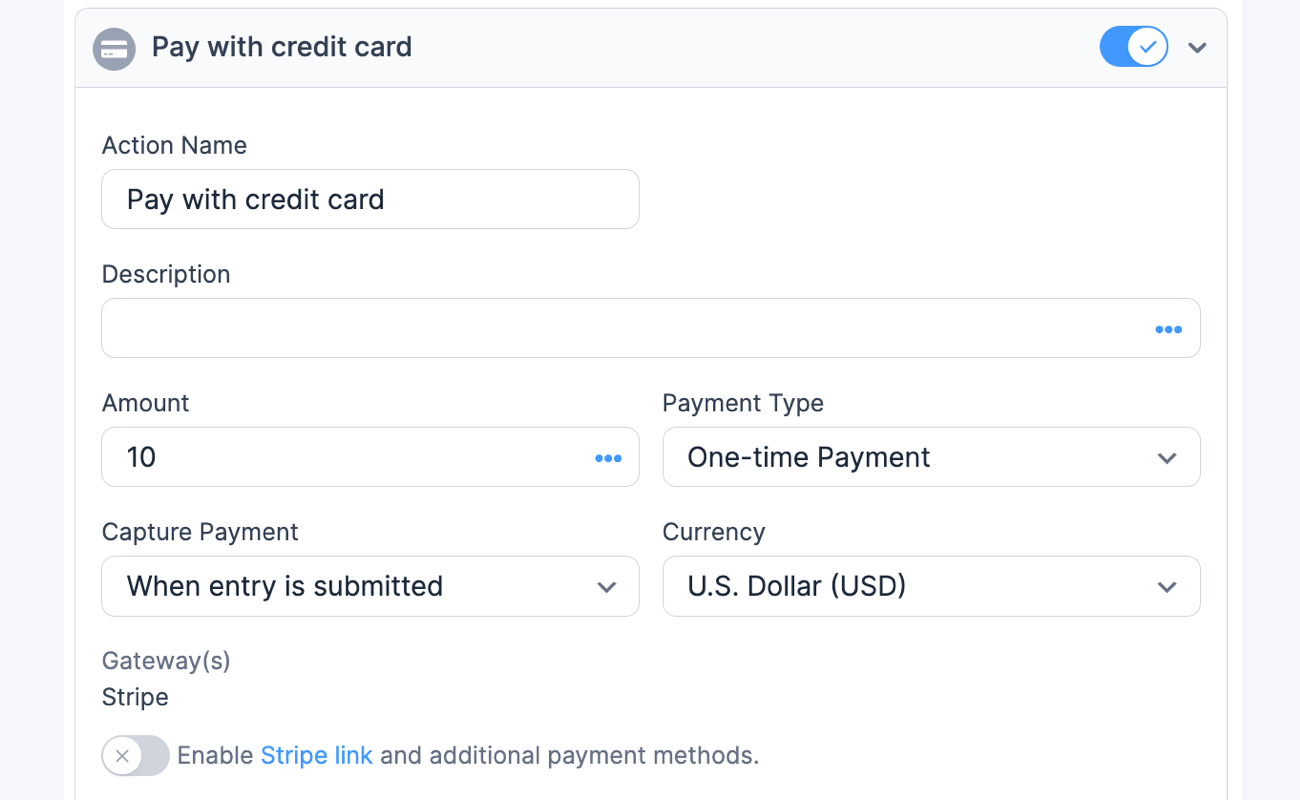
- Rename the label to Pay with credit card. Enter the amount and select your preferred payment type, whether it is one-time or recurring.
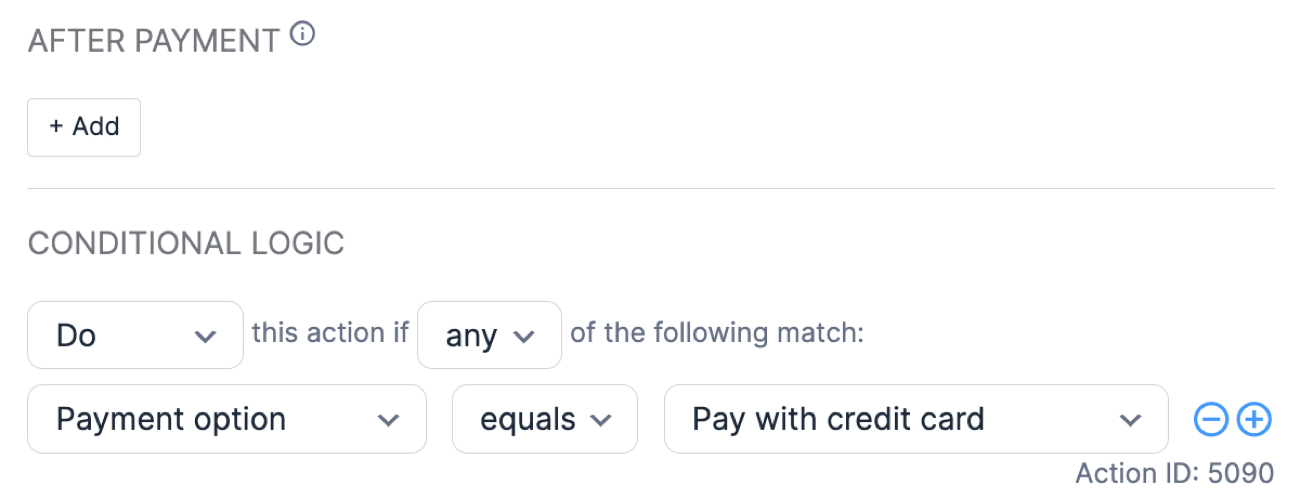
- Scroll down the Stripe form action and add conditional logic. Set it up to trigger when the Payment option equals Pay with Credit Card.
- Click the Update button to save the form action. A Payment Method field will be added automatically to your form. This field is required and should not be removed, or the payments will not be sent to Stripe for processing.
- In your form, add a dropdown or radio field called Payment Option. For this example, you would add the options: Pay with credit card and Pay with cash.
Users can select which payment option they want to use when filling out the form. If they decide to pay with a credit card, they will only be charged for the amount configured in the Stripe form action.
Set up Stripe Link

Link by Stripe is a secure and fast way to collect payments with the one-click checkout process. It allows users to store their encrypted information easily for future transactions. Learn more about Stripe Link.
- To get started, go to your Stripe Dashboard → Settings → Payment Methods and select your site from the dropdown on the upper left corner. Scroll down to the Wallets section and click the Turn on button for the Link payment method.
- If you haven’t yet, set up your Stripe form to collect payments.
- In the Stripe form action, switch the toggle on for Enable Stripe link and additional payment methods to enable it.
- Upon checkout, user accounts are authenticated by Stripe link using their email address.
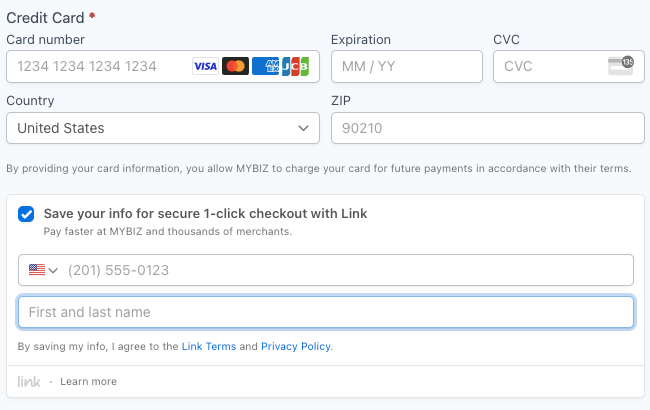
- Collect email at payment. If you have not added an email field in your Stripe form action, the Stripe Link will automatically insert an email field on the payment form, right above the payment field.
- Collect email before payment. If you have added an email field in your Stripe form action, it will trigger the Link authentication flow when the user enters their email address.
- Collect email at payment. If you have not added an email field in your Stripe form action, the Stripe Link will automatically insert an email field on the payment form, right above the payment field.
- When an existing user completes the payment form again, Stripe Link will verify their identity by prompting a one-time code.


- You can use Stripe Link without signing up for one-time payments. All you need is to fill in all of the fields.
- If you don't have Stripe Link set up (which happens at least on your first time, based on your email address), it will prompt you if you want to Check out faster with Link.
- If you have set up Stripe Link already, it will prompt you for your 6-digit code when you enter your email address (directly underneath the email address input). It is a number that gets texted to you from Stripe. During testing (though there will be no text message), you can use any code. See note about error codes.
Testing Stripe Link
You can use any valid email and any code during testing, except for a few codes that trigger errors. Note that the verification code will not actually get sent to your phone during test mode.
- Error 000001: Code invalid
- Error 000002: Code expired
- Error 000003: Max attempts exceeded
Not all 3D secure credit card numbers work with Stripe link for testing. The number 4000000000003220 does work and is intended for testing Stripe link with 3D secure.
Turn off Stripe Link
The Link payment method setting in the Stripe dashboard determines whether the Link button will be displayed in the single-line credit card field or the Save for Later option will be available in the payment field. To set the rule conditions, follow the steps below.
- Go to your Payment Method settings in the Stripe Dashboard.
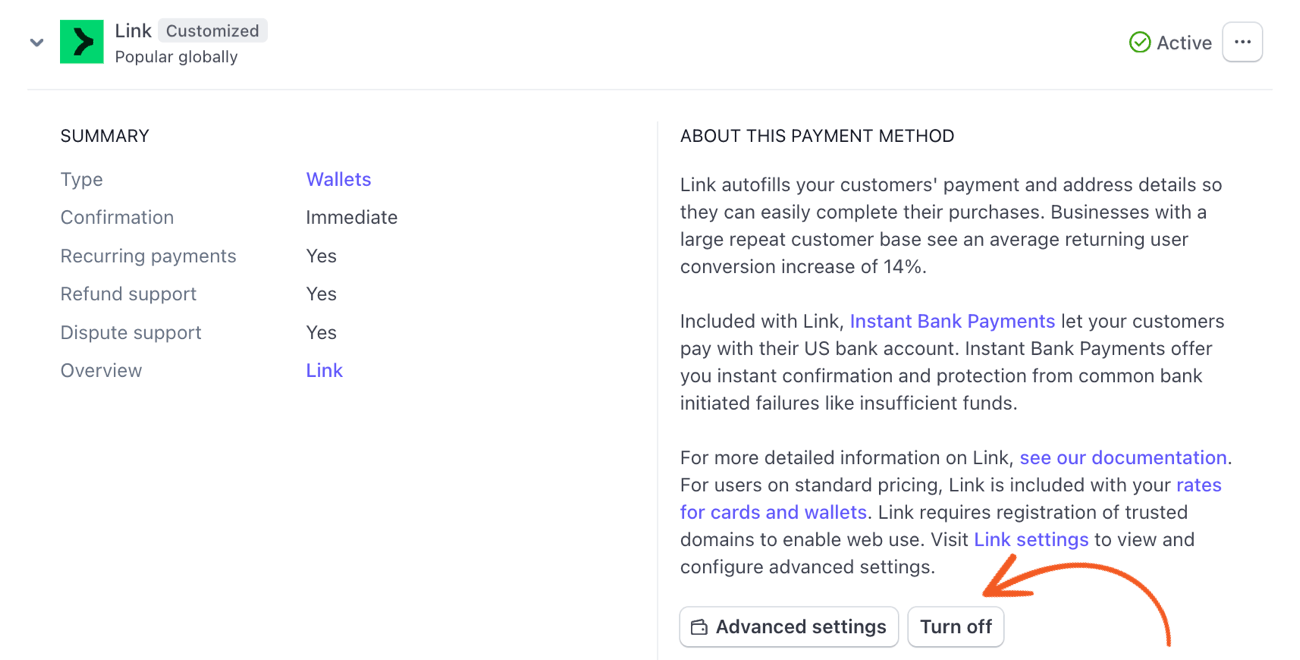
- Scroll down to the Link Payment method and click the Turn off button.
- Select the menu icon to Create custom rules.
- Set custom rules for the Stripe Link by selecting which integration to use.
- Toggle off the Card element to turn off the Link button in the single-line credit card field.
Note that this will only happen if you have disabled the Stripe link in the form action. - Toggle off the Payment element to turn off the Save for Later option in the payment field. This will still work even with the Stripe link enabled in the form action.
- Toggle off the Card element to turn off the Link button in the single-line credit card field.
- Then, select the Save Rules button to apply the changes. After disabling the Link, your website may take a few minutes to reflect this change.


Styling Stripe Link
The elements will use your form styling automatically. If a Stripe link input has not yet been validated, the submit button will be disabled. When it is disabled, it will appear at 0.5 (half) opacity/semi-transparent.
Other considerations
- Link by Stripe is fully launched in the US and several other countries. Learn more on Stripe's Website - Country Availability.
- In terms of browser compatibility, Stripe elements don't support Internet Explorer.
Stripe payment methods
Start accepting credit and debit card payments (Visa, MasterCard, American Express), digital wallets (Apple Pay, Google Pay, Cash App, etc.), and bank transfers (ACH, SEPA, and iDEAL payments) using your Stripe form. Click here for additional information on implementing these payment options.
- Certain payment methods only allow one-time payments and not subscriptions. This includes buy now pay later methods, bank redirects like iDEAL and Bancontact, as well as some wallets like AliPay. Refer to the Stripe documentation to determine which payment methods support subscriptions or recurring payments.
- As of Stripe 3.1, this includes an update for Stripe SDK v10.14.0.
- If you are filtering payment methods using a hook, you must include the standard "card" and "link" types, or they will be excluded.
Processing payments
There is a processing intent status that some payment methods will use, including ACH Direct Debit (US Bank Account).
When a form is submitted with a processing payment status, it will include a Stripe processing message right after the submit message.
The additional message can be customized in the Formidable → Global Settings → Message Defaults.
Set up a Stripe form to send emails
After setting up a form to collect Stripe payments, you can select the Successful Payment trigger to send an email once the payment has been completed. Emails will only be sent once Stripe confirms that the payment has been successfully processed.
Here are some of the action types that could be triggered after payment:
- Failed Payment. Set an automated email notification in case of a failed payment.
- Processing Payment. Set an automated email notification when payment is submitted to Stripe but is not completed.
- Canceled Subscription. Set an automated email notification when a recurring payment is canceled.
- Canceled Subscription and Expired. Set an automated email notification when a recurring payment has been canceled and expired.
- Refunded Payment. Set an automated email notification on a refund.
Resend emails on complete payment
If you have set up an email to trigger after collecting a Stripe form payment, you can resend an email by following the steps below:
-
- Add a payment status field in your form if you don't have one already.
- Go into the form's Stripe action. In the After payment section, set the value to Paid when the payment status is Completed.
- Add another email action to your form, set the trigger to Entry is created.
- Add conditional logic to this email action to fire only when the Payment status field equals Paid.
- On your form Entries page, click the entry that you want to resend the email.
- In the Entry Actions section (right sidebar), click the Resend Emails link to resend the email.


Note: This process will work if you have selected After entry is created in Formidable → Global Settings → Payments on the Stripe tab.
Customize the subscription renewal email
To set this up, you can use the inline conditional statements. In this case, if the entry was created more than 14 days ago, the email content can be different.
[if created_at less_than='-7 days']Thanks for your renewal! Your next payment will be in x days.[/if created_at]

[if created_at greater_than='-7 days']Thanks for your initial payment! Your first renewal will trigger in x days.[/if created_at]
Replace 7 with your renewal period.
Set up Authorize and Capture
Stripe has a two-step payment process which allows you to authorize a payment then capture it later. One of the benefits of using this feature is that you can capture the cardholder's payment only after an order or item is ready. This can help in reducing processing fees if there is a chargeback or refund. To get started, follow the steps below:
- Open the form action settings to create a Stripe payment. Change Capture Payment to Later (collect manually).
- Go to Formidable → Payments. When a payment is authorized but not captured, the status will be displayed as Authorized.
- Select the payment to manually capture and click Capture now.
- If the payment was successfully captured, the payment status will change to Completed. If the payment is not captured within 7 days, the authorization will expire and the funds will be released


Process refunds
Once you have received a payment, refunding said amount can be quickly done with the Stripe add-on.
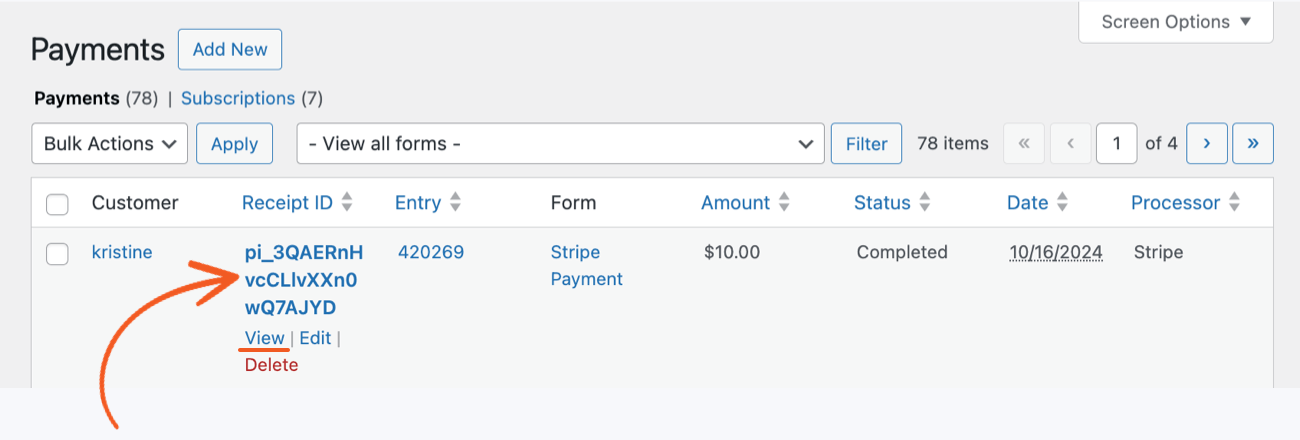
- To do this, navigate to Formidable → Payments. Hover over the Receipt ID column for the payment you want to refund and click the View link.
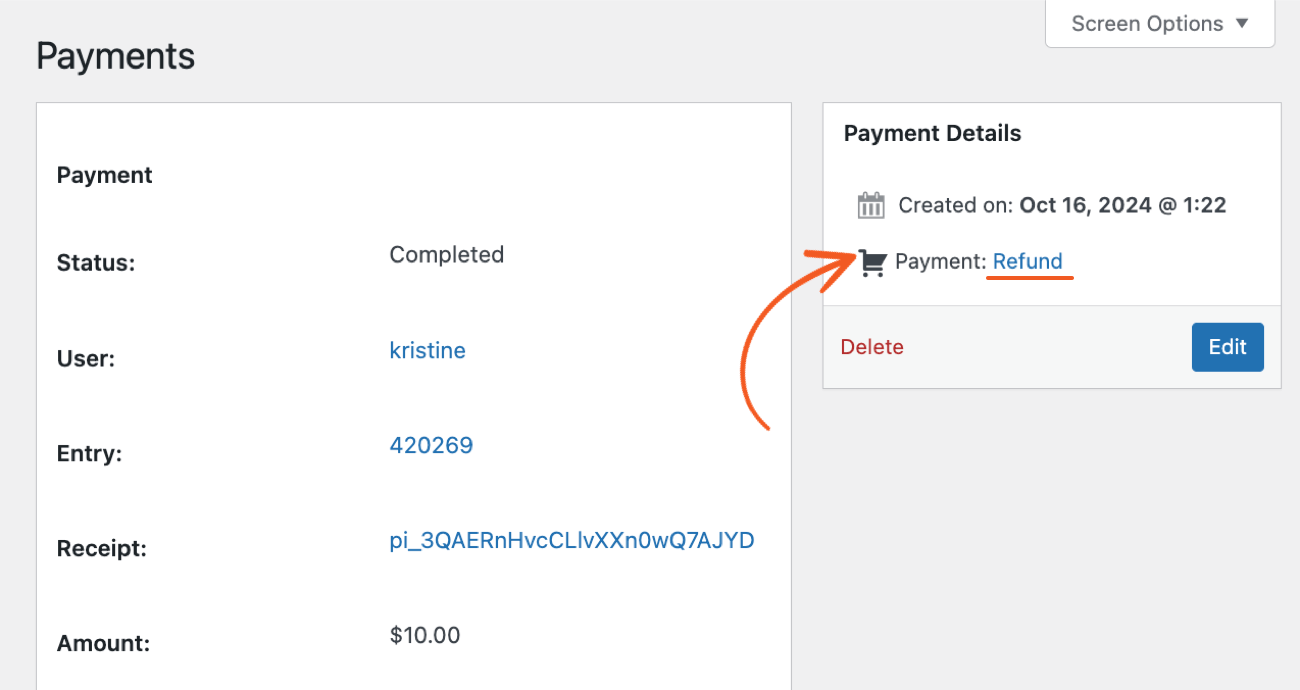
- Inside this page, you can see several bits of information, but what we are looking for is located on the top right corner of your screen, the Payment Details widget.
- Click on Refund. Then click Confirm in the confirmation box that shows up.
If everything works as expected, the word Refunded should appear where the Refund button used to be.


Note: The frm_payment_status_refunded hook and the payment status on the entry won't update if refunds are done through the Stripe dashboard and not through Formidable.
Display Stripe payment details
You can capture the customer Stripe payment information using the [frm-payment] shortcode within a page, email, or a View.
By default, a date uses the WordPress date format setting. To customize the date format, you can pass a format option in the shortcode like this:
[frm-payment entry=[id] show=amount format="Y-m-d"]
Show payment details
You may insert the following shortcode to show the Stripe payment information from the Formidable → Payments table.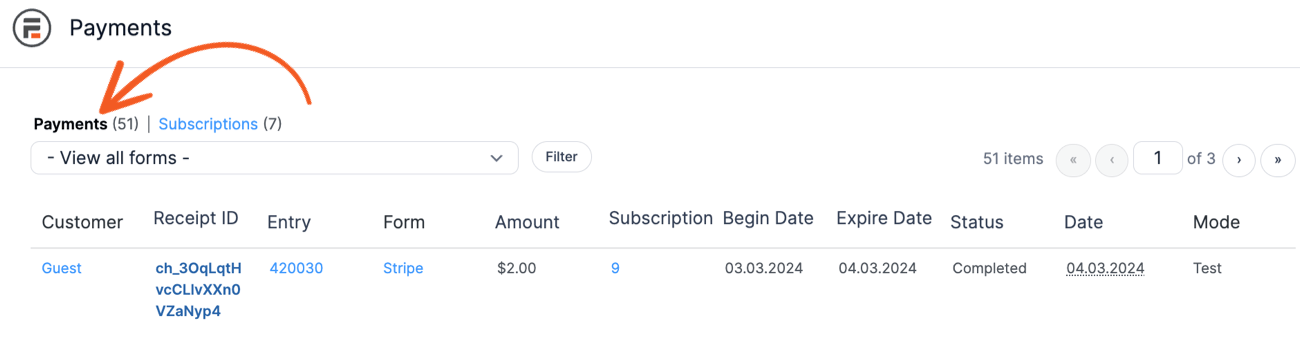
- status: Show the status of the Stripe Payment.
[frm-payment entry=[id] show=status]
- created_at: Show the creation date for an entry.
[frm-payment entry=[id] show=created_at]
- receipt_id: Show the receipt ID for a specific entry.
[frm-payment entry=[id] show=receipt_id]
Note: You can use either [frm-payment entry=[id] show=receipt_id] or [frm-receipt-id entry=[id]], and they will have the same results. - sub_id: Show the subscription ID.
[frm-payment entry=[id] show=sub_id]
- amount: Show the amount paid in the Stripe transaction.
[frm-payment entry=[id] show=amount]
By default, the amount will include the currency formatting. It includes the format option that supports numbers and currency.
[frm-payment entry=[id] show=amount format=number]
- begin_date: Show the date when the subscription begins.
[frm-payment entry=[id] show=begin_date]
- expire_date: Show the date when the subscription will expire.
[frm-payment entry=[id] show=expire_date]
Use the Recurring payment limit option in the Stripe action if you want to cancel a subscription after a specific number of payments. - paysys: Show the payment processor used in the transaction.
[frm-payment entry=[id] show=paysys]
- test: Show how many test payments have been made.
[frm-payment entry=[id] show=test]
- action_id: Show the ID of the Stripe action.
[frm-payment entry=[id] show=action_id]
Show subscription details
You may insert the following shortcode to show the Stripe payment information from the Formidable → Payments → Subscriptions table.
- subscription_next_bill_date: Show the next bill date of the subscription
[frm-payment entry=[id] show=subscription_next_bill_date]
- subscription_status: Show the status of the subscription.
[frm-payment entry=[id] show=subscription_status]
Export list of payments
If you would like a compiled list of all the payments made in your Stripe form, you can export the entries as a CSV file. This will include the payment details and status.
To get started, navigate to the Formidable → Entries page and select the form where the Stripe payments were made. Then click the Download CSV button above the entries table to export the payment details via CSV.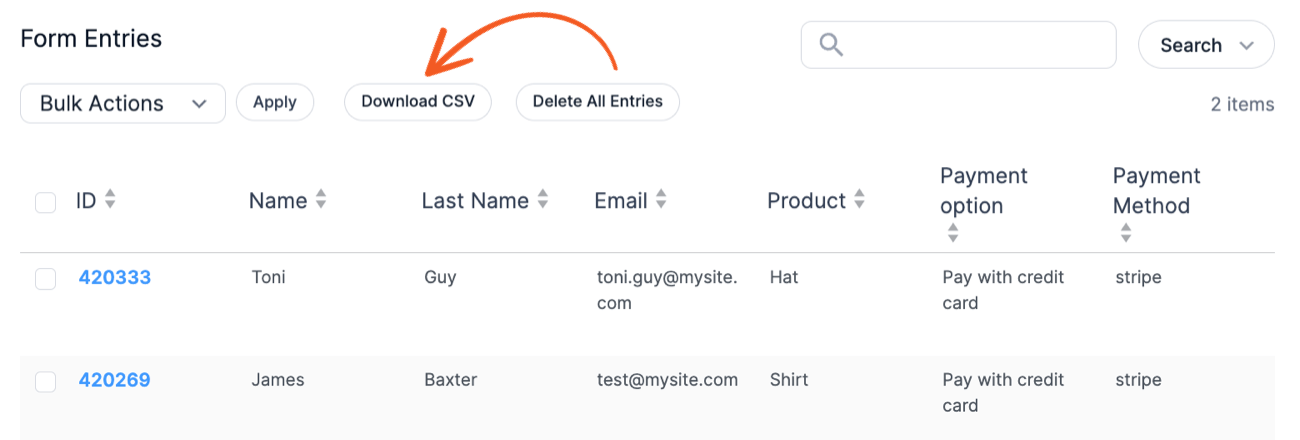
Show a list of subscriptions
As an admin, you can see all the subscriptions on the Formidable → Payments → Subscriptions page.
Each subscription can be canceled from here as well.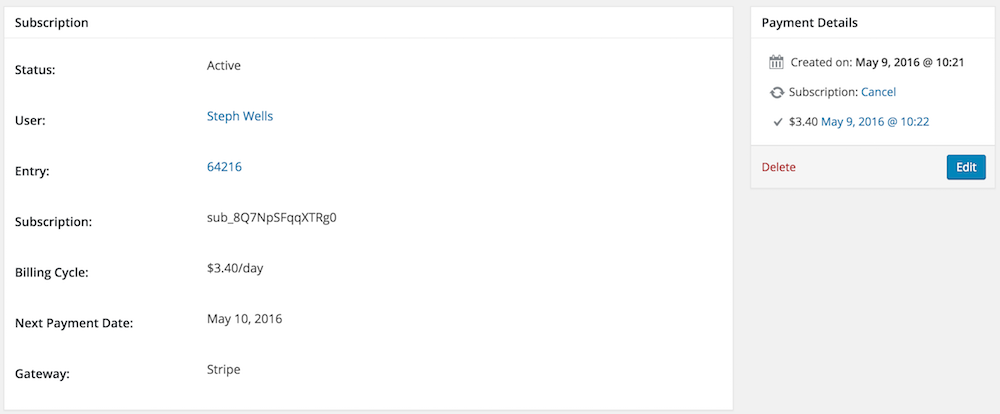
Show subscriptions for current user
If you would like to show your users a list of their subscriptions, along with cancellation links, insert [frm-subscriptions] on a page. If a user is logged in, they will see their subscriptions listed here.
Conditionally show active subscriptions
If you would like to display the active subscriptions for the current user but conditionally show the payment form when there is none, you can set this up by following the instructions below.
- In the form builder, add a hidden field called Payment Status and save the payment status in the field. Make sure that you have added a field for the Completed payment status.
- Create a single entry View of the same subscription form.
- Set up the View filter such as:
- User ID equals current_user.
- Payment Status equals completed.
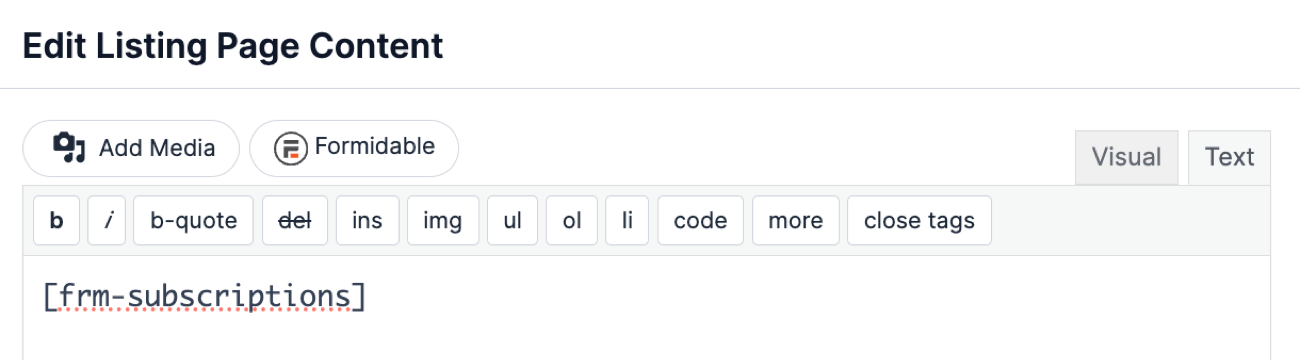
- In the Listing Page Content box, insert the [frm-subscriptions] shortcode to show your users a list of their subscriptions.
- In the No Entries message box, insert your Payment form shortcode:
- Click Update and publish the View on a page.


Find the payment action ID
To find the Stripe payment action ID, follow the steps below.
- Navigate to your form settings.
- Go to the Actions & Notifications page and select the Stripe action.
- The payment action ID will be displayed in the bottom right corner of that form action.
Get receipt ID
Use this shortcode to show the payment's receipt ID. It is a payment intent ID or charge ID with one option: entry. The entry can be an entry ID or entry key.
To get the receipt ID for the current entry:
[frm-receipt-id entry="[id]"]
To get the receipt ID for a specific entry ID:
[frm-receipt-id entry="65076"]
The shortcode may be placed in a View, email message, success message, or even an API action that fires after a payment is complete.
Publish a post on complete payment
If you would like to publish a post after collecting a Stripe form payment, follow the steps below.
- Set up your form to take a Stripe payment.
- Add a Create posts action.
- Add a post status field to your form, if you don't have one already.
- Select 'Draft' as the default value in your new 'Status' field.
If you do not want the user to have access to changing the status of this field, you can set the field to Read Only. You can also hide the whole field from the user by changing the Visibility to 'Administrator'. - Click Update.
- Go into the form's Stripe action. In the After Payment section, set the dropdown in the Payment Status column to 'Completed', set the dropdown in the Field column to your 'Status' field, and type 'publish' in the Value column.
- Click Update and Publish your form on a page. Now when a user submits the form with their payment information received, the post will be published.

Troubleshooting
The Stripe Token is missing
If you see this error message, check each of the following:
- Do you have a payment field in your form? If not, this is required in order for a payment to process.
- Is your API key correct? Please review the steps above to make sure your API keys are setup and saved accurately.
- Do you have more than one payment form on the same page? This is a current limitation of the Stripe add-on that we plan to improve in the future.
- Are Formidable Forms and Formidable Forms Pro up to date? If not, please update.
- Do you have another plugin installed that uses Stripe? If so, try deactivating it to check for a conflict.
- If you have the Formidable Authorize.net plugin installed, you must choose between using that or the Stripe add-on. They're not designed to work together at the moment.Note: If you only have Stripe Lite enabled, installing the Formidable Authorize.net plugin or other payment methods will not cause any issues.
If you continue getting this message, please create a new ticket in the help desk.
No such plan
The Stripe form settings automatically create a plan in Stripe. However, if the Stripe account is changed, the plan will not exist in the new account. If you submit a payment form and see the 'No such plan' message, return to the Stripe payment settings for this form, and save the settings again. This will trigger the plan to be created in Stripe again. It may help to make a small change in these settings to ensure the plugin knows to create the plan.
No such customer
When a logged in user submits a payment, a customer is created for that user in Stripe. The customer ID is linked to the logged in user. If the Stripe account is changed, or the customer account deleted in Stripe, a logged in user who has previously submitted a payment may see the message "No such customer" when a payment form is submitted. When this happens the customer ID is unlinked from the user, and the next try from this user should be successful. This message will not appear for logged out users or for those submitting the first payment. To avoid this issue, do not delete customers in Stripe.
If this error continues, the customer id assigned to the user can be manually deleted in PHPMyAdmin or with a line of code.
$user_id = 1; // Change the user id to the user getting errors.
delete_user_meta( $user_id, '_frmstrp_customer_id' );
delete_user_meta( $user_id, '_frmstrp_customer_id_test' );
Incomplete payments
When a form is loaded, an incomplete payment is created in Stripe. As the form is filled out, the value of the payment is updated.
If you would like to disable these incomplete payments in Stripe for $1 (or another currency), go to Formidable → Global Settings → Payments, then select the Stripe tab. Set the option to Process One-time Payments to After entry is created.
Payment Intent status: requires_payment_method
If you are seeing this error in the Stripe logs, then it is possible that the automatically generated "Payment Method" field has been deleted or otherwise modified. This field is hidden, but required for Stripe to process the payment. If you don't see the field in your form, delete the payment field and the Stripe form action, and then re-create them. If the field is present, make sure there is no conditional logic set on this field.
The provided PaymentMethod was previously used
If you are seeing an error message that looks similar to this: "The provided PaymentMethod was previously used with a PaymentIntent without Customer attachment", first make sure that you are running the most current version of the Stripe add-on. If you are and continue to see this message, it's possible that the Payment Method field has become unlinked from the Stripe form action. Try deleting the Payment Method field from your form, along with the Stripe form action(s), and recreate the Stripe form action(s).
Please specify an amount for the payment
If you are seeing this error message when attempting to submit your payment form, then there is likely an issue with the Amount set in the Stripe form action. Please check the following:
- There are only numbers in the Amount field in the Stripe form action—no commas, currency symbols, or text.
- If using a field to calculate the total, make sure the correct field shortcode is in the Amount field in the Stripe form action, and the calculation is correct and contains no text.
- If the above steps do not resolve the issue, try deleting the Payment Method field from your form and the Stripe form action, and recreate the Stripe form action.
Logging for other errors
A log file is stored inside of the Stripe plugin that keeps a list of the most recent errors. If you run into an error related to the payments and are not sure where to start, a log message would be helpful. The log can be located in wp-content/plugins/formidable-stripe/formidable-payments/log/results.log. The most recent messages are at the bottom of the log.
In addition to the log stored in Formidable, Stripe has a separate log. It may be useful to compare the two and see if additional errors are appearing in your Stripe account log as well. You can find it in your Stripe dashboard under Developers → Logs.
No payments created
If no payments are showing up under your Formidable → Payments page, it's possible that your database has not created a Payments table or is not properly updating. On some servers, the database user doesn't have permissions to ALTER database tables. To grant and revoke rights to database tables using phpMyAdmin, follow the instructions below:
- Navigate to the Privileges tab which has a list of your users.
- Click the Edit Privileges link.
- Select your database.
- In the Database-specific privileges, select the wp_frm_payments table.
- In the Table-specific privileges, you can define the operations in detail.
- Manually make adjustments to the table to match the structure in our database schema.
Note: If you are using the PayPal add-on at the same time, leave the Completed column as is.
Cannot set id on this object
If you see the error message Cannot set id on this object. HINT: you can't set: id, check each of the following:
- Do you see anything related to this error in the Stripe logs?
- Do you have another plugin installed that uses Stripe? Try deactivating it to check for a conflict.
If you continue getting this message, please create a new ticket in the help desk.
The account id does not match its signature
If you see this error message, it means that no account ID is sent to our Stripe connect service. The data that is being passed to us isn't what we're expecting it to be.
You might want to check if your Stripe API integration has been disconnected or if the account password is wrong. If you continue to see this message, check for plugin/theme conflicts.
The payment method type link is invalid
If you see this message along with a 400 error in the Stripe dashboard, you have not enabled Link first in the Stripe dashboard. Please ensure that the provided type is activated in your dashboard. 
Stripe connections are not working
If you click the Connect to Stripe button and it never reaches the initial Stripe setup page, you might be getting blocked by a security service on their server. If you see an error message cURL error 28: Connection timeout, please check the following:
- Your web host may be blocking communication with formidableforms.com and causing the Stripe connections to stop working. how to whitelist our IP.
- The cURL is not enabled on your server. If you need help checking this, contact your host to find out.
- If that does not eliminate the error message, you may be behind a corporate firewall preventing communication with formidableforms.com. Please get in touch with us through the help desk for assistance.
Missing payments
If the Stripe payment is not reflected even after submitting the form, you might have added conditional logic to the Payment method field. It can affect the Stripe form action, resulting in the form being submitted without processing any payments or displaying errors. To resolve this issue, try to delete the conditional logic from your Payment method field.
If you plan to collect payments only when a specific field option is selected, you can add conditional logic to the Stripe form action. Stripe can trigger any payment option on a single form submission. It will ensure that the payment is triggered only when required. Learn more about conditionally allowing payments.
Incorrect $1 payment amounts in Apple Pay and Google Pay
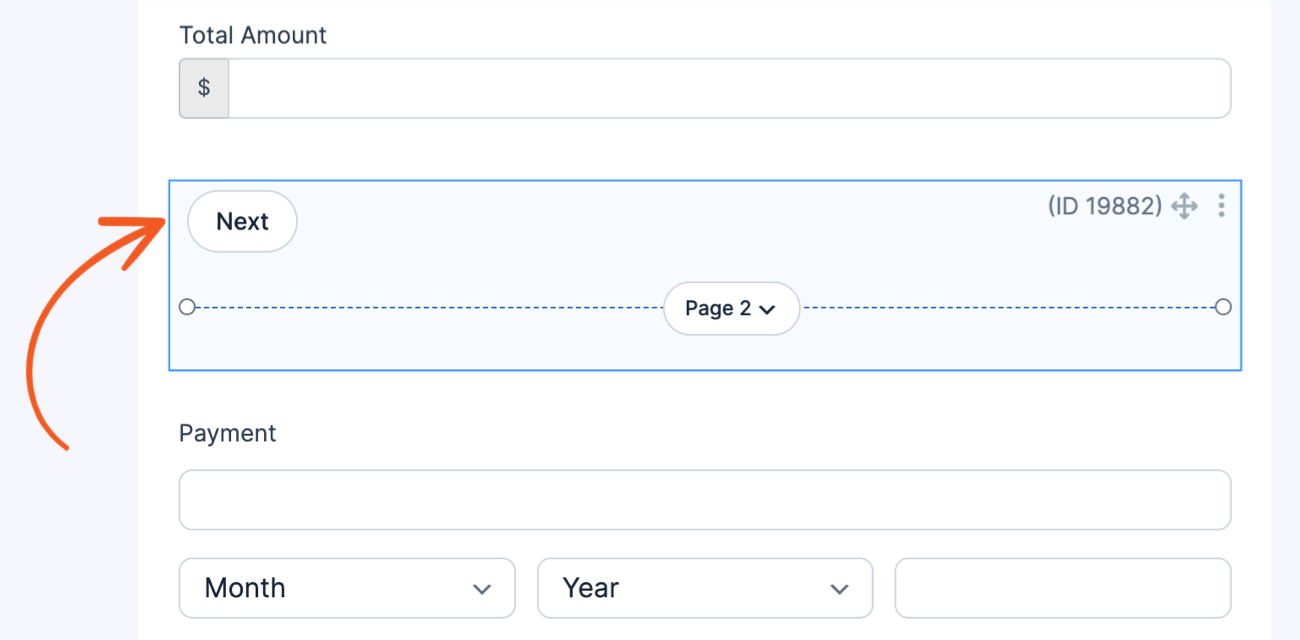
If you have set up your form to accept Stripe payments with Google Pay or Apple Pay, you might encounter an issue where the payment amount is incorrectly set to $1. This is due to a limitation with Stripe when the total amount is calculated dynamically, and the Stripe link is active. As a workaround, follow the steps below.
- Go to your form builder and set it up as a multipage form.
- Add a page break field between the Amount field and the Payment field. Since the Stripe Link is only initialized when the Payment field is loaded on the page, having it on the next page allows it to retrieve the calculated total amount.
- That's it! The Stripe transaction should process the correct amount when the form is submitted.
Disable Stripe Link Autofill
When using some browsers, you might see the Link Autofill on the payment field even when you have toggled off the Stripe link in the form action.
To disable Link Autofill in your form, follow the instructions below:
- Navigate to your Stripe Dashboard → Settings → Payments → Payment Methods and scroll down the page until you find the Link payment method.
- Click the Turn off button to disable the Link payment method.
- Once the Link has been disabled, the change may take a few minutes to take effect on your website.

This account cannot make live charges
If your Stripe payment form throws an error message "This Connect account cannot currently make live charges. The requirements.disabled_reason property on the account will provide information about why this account is currently disabled" during checkout, this usually happens when Stripe restricts the user's account. Stripe may be reviewing the account due to certain risk factors or as part of their business verification process. You can contact Stripe directly to identify the issue with this error message.
Amount too small
The amount_too_small error code indicates that the payment amount you entered in your Stripe transaction is below the minimum limit set by Stripe. To resolve this issue, please select a higher amount and attempt the transaction again.
- Stripe has established minimum payment amounts for charges to ensure that their fees do not exceed the charge amount.
- The minimum amount required varies depending on the currency of the payout bank account.
- With subscription charges, zero-amount charges are allowed for coupons and free trials, while any non-zero charge must meet the minimum payment requirement.
For more detailed information, refer to the Stripe documentation on minimum and maximum charge amounts.
Additional Customizations
Change the user role
You may want to change the role back if a payment fails or is refunded. Use the frm_payment_status_complete hook if you want to change the user role when the payment is completed. With a recurring payment, this hook will be fired each time a payment is completed.
Similar hooks are fired each time the status on payment changes. These hooks work exactly the same way but simply fire at different times.
- frm_payment_status_complete
- frm_payment_status_refunded
- frm_payment_status_failed
- frm_payment_status_canceled
Trigger an action based on payment amount
If you want to trigger an action in another form (or the same form) when a payment is more than a certain amount, use the following example:
add_action( 'frm_payment_status_complete', 'frm_trigger_action_on_payment' );
function frm_trigger_action_on_payment( $atts ) {
  $payment_amount = $atts['payment']->amount;

  if( $payment_amount < 100.00 ) { // Change 100.00 to the payment amount above which you want to trigger the action
	return;
  }

  $entry_id = isset( $atts['entry'] ) ? $atts['entry'] : $atts['payment']->item_id;
  $entry = FrmEntry::getOne( $entry_id, true );
  $form = FrmForm::getOne( $entry->form_id );
  FrmFormActionsController::trigger_actions('update', $form, $entry, 'email');
}
As is, the above example will trigger all Email actions set to trigger on update, in the same form. If you want to trigger an action in a different form, change $entry_id to the entry ID of an entry in another form.
Trigger an action on complete payment
Use the frm_payment_status_complete hook if you want to target a specific payment action ID and send an email on complete payment.
Save receipt ID in a field
If you want to trigger saving the receipt ID into a field on complete payment, use the following example:
add_action( 'frm_payment_status_complete', 'frm_trigger_receipt_on_payment' );
function frm_trigger_receipt_on_payment( $atts ) {
$receipt_id = $atts['payment']->receipt_id;
$entry_id= $atts['payment']->item_id;
	if(!empty($receipt_id)){
		FrmEntryMeta::add_entry_meta( $entry_id, 1819, "", $receipt_id); //change 1819 to the ID of the field in which you want to store the entry ID
	}
}
Use the Stripe receipt
By default, an email form action can be used to send a receipt. In this case, the email would be set to trigger after successful payment. But this example will allow you to use the Stripe receipts.
add_filter( 'frm_strp_new_charge', 'set_stripe_to_trigger_receipt', 10, 2 );
function set_stripe_to_trigger_receipt( $new_charge, $atts ) {
  if ( $atts['action']->ID == 30 ) { // change 30 to your payment form action ID
    $email_field_id = 25; // change 25 to your email field id
    $new_charge['receipt_email'] = $atts['entry']->metas[ $email_field_id ];
  }
  return $new_charge;
}
Note: This will only work for live payments. Read more about using Stripe receipts.
Get customer ID
You can find the Stripe customer ID in the user meta called _frmstrp_customer_id or _frmstrp_customer_id_test. To get the customer ID, use this line of code:
get_user_meta( get_current_user_id(), ' _frmstrp_customer_id' )
Cancel subscriptions
By default, Stripe subscriptions will be canceled at the end of the period. Use the frm_stripe_cancel_subscription_at_period_end hook if you want to cancel subscriptions immediately.
Customize the subscription cancel link
If you show subscriptions for the current user, you can customize the cancellation link displayed with the subscription by following the example below.
add_filter( 'frm_pay_stripe_cancel_link', 'customize_stripe_subscription_cancel_link', 10, 2 );
function customize_stripe_subscription_cancel_link( $link, $subscription ) {
	   $entry = FrmEntry::getOne( $subscription->item_id );
		$link = str_replace( '>Cancel<', '>' . 'Cancel ' . $entry->form_name.' subscription '. '<', $link );
		return $link;
	}
Update credit card details
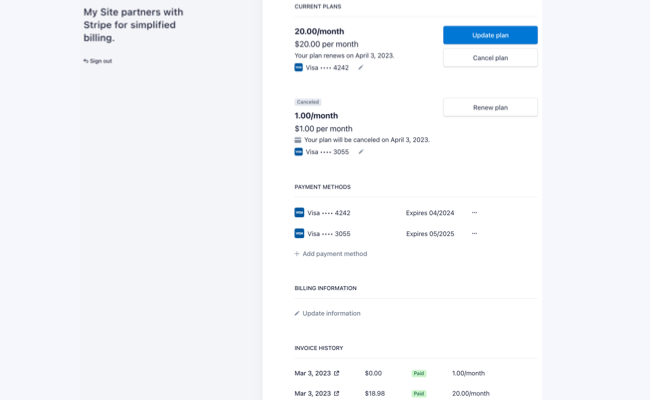
The Stripe customer portal lets users manage their subscriptions and billing details through a Stripe-hosted page. With the no-code Stripe customer portal link, you can configure the following settings:
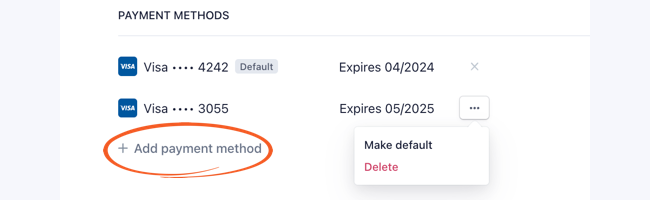
- Payment Method: Add or delete credit card payments.
- Subscriptions: Upgrade, downgrade, or cancel a subscription.
- Billing information: View and update billing information, such as name, address, and phone number. Note: Users can’t update their email address if they are using the no-code customer portal link.
- Invoice: View the invoice history.
If you want your users to update their payment method, such as credit cards, you can use the Stripe customer portal no-code link to set this up. Follow the instructions to get started.
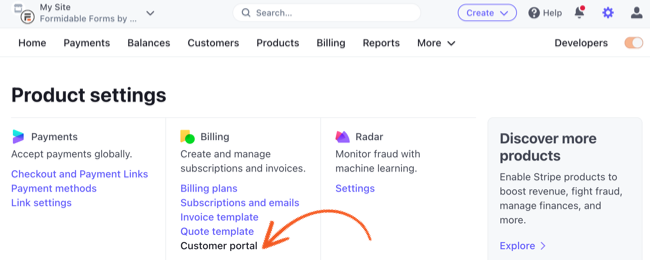
- Go to Stripe → Settings → Billing → Customer Portal.
- Select your configuration options for payment methods.
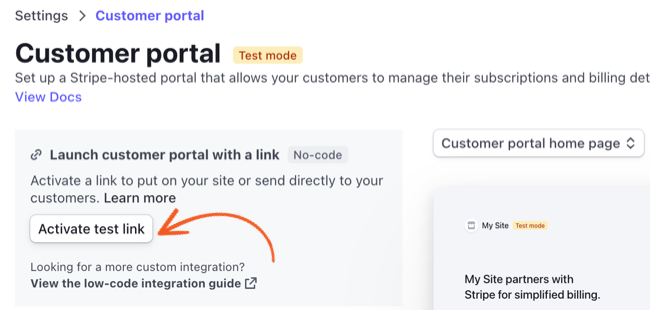
- In the Customer Portal link section, click the Activate link button and copy the customer portal link.
- Go back to your site. Create a new page, add a WordPress button block, and paste the customer portal link. (Optional) To show the subscriptions for the current user, you can insert the [frm-subscriptions] shortcode on the same page.
You could also use HTML to create the link.

Update payment method
- When the user clicks the link, it will redirect them to the Stripe Customer Portal page, where they can add or delete their payment method.
Frequently Asked Questions
What is the difference between Stripe Lite and Stripe add-on?
Although the Lite version could provide all the essential features to build your online payment form, upgrading to the Premium version can help you build a more robust application. Check out the table below to compare the features of each product.
| Stripe Lite | Stripe add-on | |
|---|---|---|
| Stripe link and additional payment methods | ✅ Included | ✅ Included |
| Refunds | ✅ Included | ✅ Included |
| Recurring payments | ✅ Included | ✅ Included |
| Conditional payments | - | ✅ Included |
| [frm-subscriptions] shortcode | - | ✅ Included |
| Capturing a payment later | - | ✅ Included |
| Before/After entry is created | - | ✅ Included |
| After payment settings | - | ✅ Included |
| Manually add payments | - | ✅ Included |
| Support for API keys | - | ✅ Included |
Are there any fees associated with using Stripe in my forms?
Yes. A 3% transaction fee will be charged for each payment processed if you use Formidable Forms Lite or your license does not use the Stripe add-on. It is in addition to the Stripe fees they may charge depending on how you use their platform. Please check out their pricing tiers for a breakdown of Stripe's pricing. The extra 3% charge is not included on Business or Elite plans. Upgrade to the plan that eliminates this fee.
How can I enable the additional payment methods?
The Stripe link and additional payment methods are enabled by default. Learn more about the different Stripe payment gateways.
Why is the Connect to Stripe button not working?
Only owners or administrators are granted permission to connect an account using Stripe Connect. If you need help completing the process, please verify your Stripe user role to ensure it meets the requirements. If you continue having problems connecting to Stripe, follow these troubleshooting steps.
Is my payment information stored in the form?
Rest assured that sensitive credit card information entered on your website is secure. Instead of sending the credit card information to your server, it will be hosted in an iframe by Stripe. Stripe will handle all the compliance measures, and your users' credit card details are never at risk on your server.
Are the Stripe keys stored in Formidable Forms?
With Stripe Connect as the default integration, users do not need to store their API key. We use generated passwords that only work when making requests through our API. It is more secure as it eliminates the need to manually handle or store your sensitive API Keys in plain text.
Why can't I set a default country in the Stripe form?
The Country dropdown in the Stripe Lite feature automatically defaults to the user's location based on their browser settings. You can't set a different country as the default. The user will always need to manually select a different country if their location is not correct.
Related developer hooks
- Retrieve the ID of a previously created PaymentIntent with the frm_payment_status_complete hook.
- Trigger an action on complete payment with the frm_payment_status_complete hook.
- Change the user role when payment is completed with the frm_payment_status_complete hook.
