Discover how to accept Stripe membership payments in WordPress. Follow our simple guide to set up Stripe and start processing payments effortlessly.
Approximate read time: 5 minutes
Setting up a website and accepting payments is a headache, especially when there are a million other tasks.
Worrying about security, handling recurring payments, and ensuring everything runs smoothly can be overwhelming. But with Stripe, a reliable payment processor, it's easy to streamline the process and focus on what matters most: growing the business.
Create a Stripe Membership Form!
So, I'll show you how to set up Stripe memberships in WordPress in a few easy steps. No code, no difficult payment setup — just easy membership payments.
Let's get started.
Why use Stripe for membership payments
Stripe is trusted by businesses worldwide.
It's well-known for security, has an easy-to-use interface, and is flexible. And when it comes to handling membership payments on a WordPress site, Stripe stands out for a few reasons:
- Security: Stripe's payments are secure, thanks to encryption and fraud tools that protect customers' payment information.
- Ease of use: Stripe's dashboard and guides are detailed. So, setting up and managing payments is beginner-friendly.
- Flexibility: Stripe supports multiple payment methods (like credit cards, Apple Pay/Google Pay, and ACH payments) and currencies, making catering to a global audience easier. Plus, it connects with WordPress for a smooth setup.
Stripe is a powerful, secure, and simple solution for membership payments. It simplifies everything for website owners and customers, allowing more time to focus on growing the business.
So, I'll show you how to set it up on any WordPress website.
How to accept Stripe membership payments in WordPress
Step 1: Install and activate Formidable Forms
First, I must install and activate Formidable Forms on my WordPress website.

Formidable Forms is the best WordPress form plugin. It also supports Stripe integration, which allows you to create a Stripe payment form and access more payment options.
There are alternative options, like membership plugins, but I recommend Formidable for its flexibility across an entire website. Plus, there are two options:
- Use the free plugin but get charged a small fee with each payment
- Use Formidable Forms Pro, and there's no fee
So, use the button below to grab a Formidable Forms Pro plan or download our free WordPress plugin.
I'll show how to handle WordPress memberships with Stripe using the Pro version today, but the process will be the same, except for installing and activating Formidable.
Step 2: Connect WordPress to Stripe
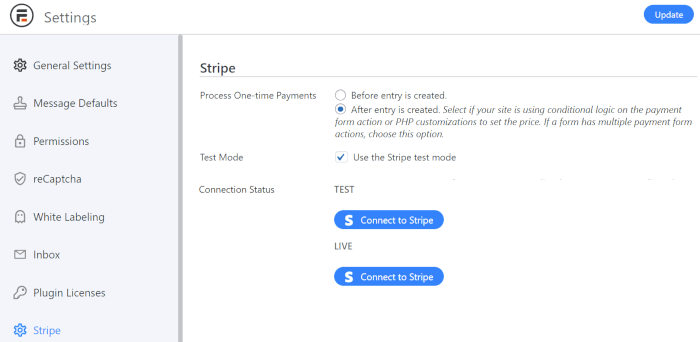
First, I'll go to Formidable → Global Settings → Stripe to connect Stripe payments.
I can start in Test mode or connect immediately with Live mode. I recommend starting in Test mode to test out a few payments beforehand to ensure everything's working.

So, I'll hit the Connect to Stripe button under Test. This will open the Stripe portal, where I'll connect my Stripe account or create one (if I don't already have one).
After creating the Stripe form (in the following steps), I must connect the Live status to process the payments.
Step 3: Create a Stripe membership WordPress form
In the WordPress admin, I'll go to Formidable → Forms. Next, I'll click the Add New button to create my form.
With Formidable Forms Pro, there are tons of pre-made WordPress form templates (like the Stripe Payment Form template) to speed up this process. But with the free version, I would click the Create a blank form button to start from scratch.
Then, the plugin opens its WordPress drag and drop form builder, which makes creating a form painless and fast.

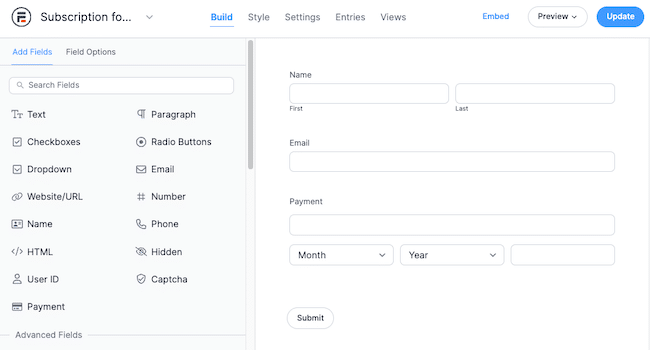
For a Stripe membership form, I only need fields like Name, Email Address, and Payment for card details.
So I can drag them to the form canvas to get my form planned out.

Since I have the basics, I'm fine with where it's at. When users click submit, it'll take them through the Stripe checkout for an easy experience. But feel free to stay here and customize the form to your needs.
Last, I'll hit the Save button to name my form and save my progress.
Step 4: Set up Stripe recurring payments
Next, in the form builder, I'll go to Settings → Actions & Notifications, then click the Collect a Payment button.

Then, I'll choose Recurring from the Payment Type dropdown to set up subscription payments. This ensures the subscription plan payments trigger regularly, which you can set under the Repeat Every option.
Additional options, such as the Currency, Trial Period, and more, can be set, but for now, the basics are set up.
Step 5: Publish the form on a page or post
Last, I'll go to the post or page where I want to show my Stripe membership form in WordPress.
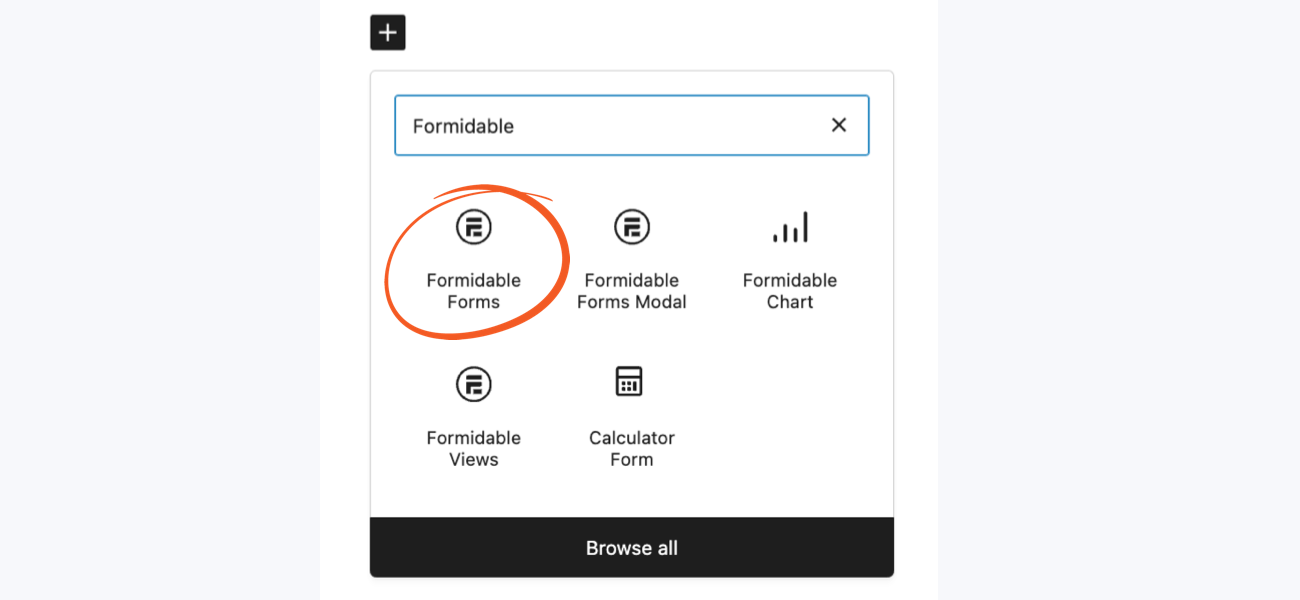
Next, I'll add a WordPress block and choose the Formidable Forms block from the search list.

Last, I'll choose the form from the dropdown menu, and my form will appear. Once I update/publish the page, my form will be live for anyone to fill out!
Accept Stripe payments easily
Setting up Stripe memberships in WordPress is just one of the many things Formidable Forms and the Stripe payment gateway can do.
I recommend checking out our guide on accepting Stripe payments in WordPress to learn more. But if you're ready to get the best Stripe payments plugin for WordPress, click the button below to start with 14 days risk-free.
Get Started with Formidable Forms!

 How To Add Stripe Checkout to WordPress [4 Steps!]
 Authorize.net vs Stripe: Which Is Right for Your Site?
 How To Make a WordPress Form with Payment Gateways
Leave a Reply