
Formidable Forms has made my life so much easier as an event planner.


Last updated on November 8, 2023 by Formidable Team
How To Create a Free Stripe Payment Form [4 Simple Steps]
Every time you bounce a buyer to a separate checkout page, some of them have second thoughts and never come back, and that lost sale is the real cost of an offsite payment flow. A free Stripe payment form built right into your WordPress page closes that gap. It takes cards, digital wallets, and one-time or recurring payments right on your page, and it's live in about 5 minutes with no code.

Approximate read time: 8 minutes
This guide walks you through building a Stripe payment form in WordPress in 4 steps, from connecting Stripe to designing the form, setting up the payment action, and publishing it live.
Upgrade your WordPress site with powerful, flexible forms.
Why Stripe plus Formidable Forms beats a full eCommerce setup
Stripe and WordPress are two of the most popular tools on the internet, and yet there's no official Stripe plugin for WordPress. WordPress doesn't ship with a form builder either. So to accept card payments on your site, you need something in the middle.
You could install a full eCommerce platform like WooCommerce, but that's a lot of moving parts for a single payment form. If you're selling a coaching session, taking a deposit on a custom order, or collecting one-time donations, a good form builder with a native Stripe integration does the job faster and cleaner.
Formidable Forms is an official Stripe partner with native Stripe payments for WordPress, which means the connection between your site and Stripe is handled inside the plugin. More than 300,000 sites already run it, with a 4.8 out of 5 rating from over 1,300 reviews. Once it's set up, you can:
- Complete payments right on your site, with no redirect to a Stripe-hosted checkout page
- Take one-time charges or recurring subscriptions
- Let customers pay with their preferred method, including Apple Pay, Google Pay, Link, Cash App, and iDEAL
- Show members their active subscriptions and offer easy cancellation
- Charge variable prices based on what the buyer selects, using calculations
- Trigger form actions like email and SMS notifications on a successful charge
The base Stripe connection and a working payment form are free with Formidable Forms Lite.
On Lite, Formidable Forms adds a 3% fee on top of Stripe's own processing rates. The Business and Elite licenses remove that 3% Formidable fee, though Stripe's own rates still apply.
The advanced features like recurring billing, subscription management, conditional logic, and calculations are part of Formidable Forms Pro.

From Idea to Reality in Minutes. Build Powerful Forms, Dashboards, Apps and More.
Formidable Forms makes advanced site building simple. Launch forms, directories, dashboards, and custom WordPress apps faster than ever before.
What you'll need
- A WordPress site you can install plugins on
- A Stripe account, or an email address to create one
- About 5 minutes
That's it. No coding, and no Stripe API keys to copy by hand.
Step 1: Install Formidable Forms and connect Stripe
If you don't have Formidable Forms installed yet, grab Formidable Forms Lite from the WordPress.org plugin directory and activate it like any other plugin.
Once it's active, go to Formidable → Global Settings → Stripe in your WordPress admin.
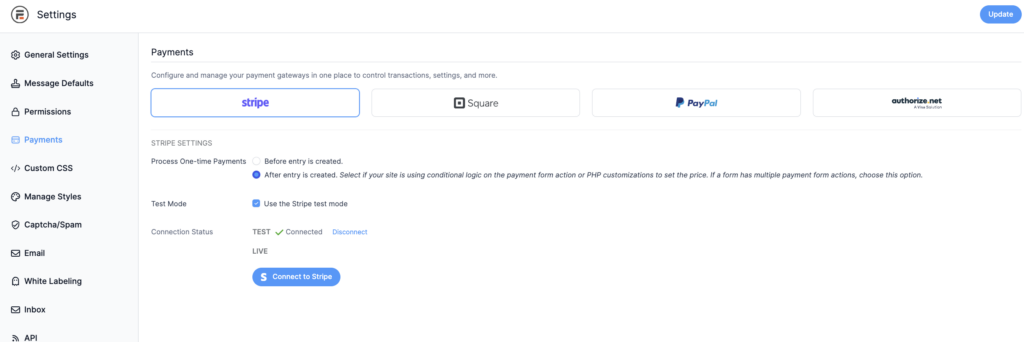
Click Connect to Stripe.
You'll be sent to the Stripe setup wizard. Since Formidable Forms is an official Stripe partner, you only need to enter your email address to sign in to an existing Stripe account or create a new one. If you don't have an account yet, the wizard guides you through setting one up.

When you finish, the wizard sends you back to your WordPress dashboard with the connection in place. You've just added a payment gateway to your site.
Step 2: Create your free Stripe payment form
With Stripe connected, let's build the form. Go to Formidable → Forms and click + Add New.

The fastest path is the free Stripe Payment Form template, which comes pre-wired with the fields most sellers need. If you want full control, pick Blank Form and build from scratch.
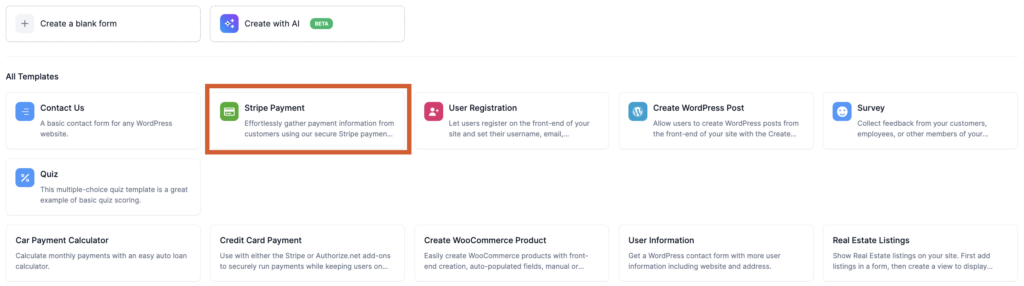
Name your form and click Create to open the code-free, drag and drop builder. At a minimum, a basic Stripe payment form needs 3 fields:
- A Name field
- An Email field
- A Payment field, where the buyer's card details go

When you add the Payment field, you'll see a warning that reads "This field is not set up yet." Ignore it for now. You'll wire it up in the next step.
If you're selling something at a set price, add a Dropdown or Radio Buttons field with each option set to its own amount. For totals that change based on what the buyer picks (a base service plus add-ons, for example), you'll want Formidable Forms Pro for conditional logic and calculations.
Once your fields are in place, click Update in the top right to save the form.
Step 3: Set up the Stripe payment action
Connecting Stripe and adding the fields isn't quite enough on its own. You also need an action that tells Formidable Forms to process the payment when someone submits the form.
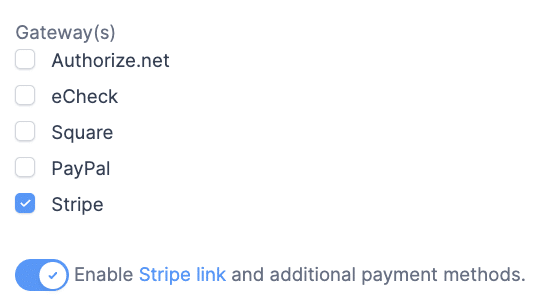
At the top of the form builder, click the Settings tab, then Actions and Notifications. Click Stripe.
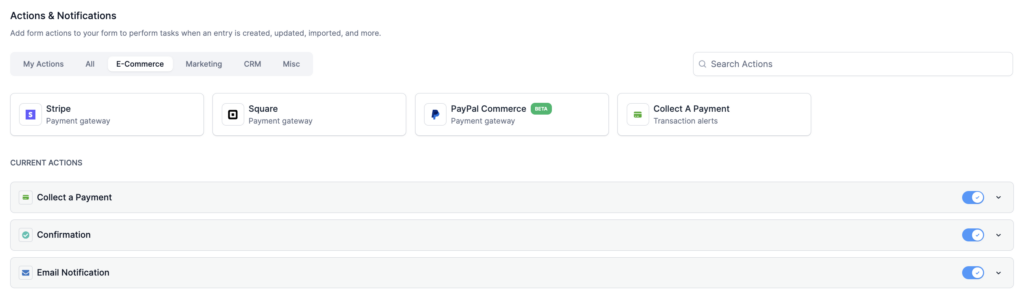
A panel opens with the payment settings. Set the following:
- Amount: a fixed amount, a field on the form, or a calculation
- Currency: the currency you'll accept, such as USD, EUR, or GBP
- Payment type: one-time or recurring
- Description: what the buyer sees on their Stripe receipt
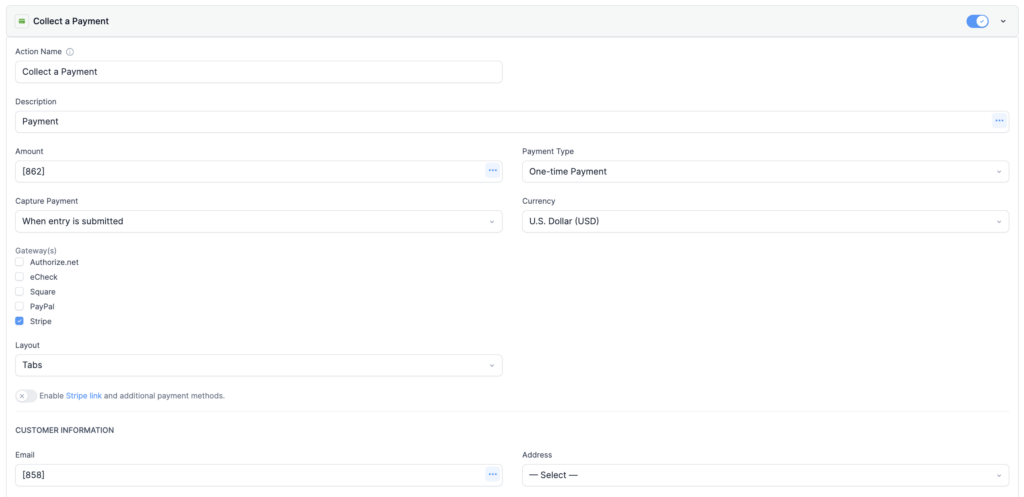
Then toggle on Enable the Stripe Link and additional payment methods. This is the setting most people miss, and it's the most useful one. With it on, your form automatically shows the payment methods Stripe supports for the buyer's region, including Apple Pay, Google Pay, Link, Cash App, and iDEAL. Link users don't even have to type in their card details. They get a one-tap checkout.
If you want recurring payments, switch the Payment type to Recurring and set the interval and any free trial period.

Recurring billing and subscription management are Formidable Forms Pro features. When the action is ready, click Update to save.
Step 4: Publish the form on your site
Head to the page or post where you want the form to live. In the block editor, click the + icon to add a new block and choose the Formidable Forms block, then pick your form from the dropdown.

Update or publish the page, and your form is live.
Before you go public, run a test transaction in Stripe's test mode so no real money moves. Submit the form, confirm the entry appears in Formidable Forms, check that the test charge shows up in your Stripe dashboard, and then switch Stripe out of test mode.
Want recurring payments, subscriptions, and conditional logic? Upgrade to Formidable Forms Pro and turn a simple payment form into a complete checkout.
Customizing your Stripe payment form
The 4 steps above get you a working form. Here's what to do next if you want more out of it.
Add a custom thank-you page
Open the Confirmation action under Actions and Notifications and set the form to redirect to a thank-you page after a successful payment. Pass the customer's name or order details through with the form's field IDs so the page reads "Thanks for your order, Priya" instead of a generic message.
Send order confirmation emails
Add an Email Notification action to send the buyer a receipt with their order details, and a second one to notify you when a payment comes in. Both are included in Formidable Forms Lite.
Offer multiple price points
Use a Radio Buttons or Dropdown field with each option set to a different price, then set the Amount in the Stripe payment action to that field. Buyers pick an option, and the form charges the matching amount.
This works in Formidable Forms Lite for simple cases. For totals that combine multiple fields, use calculations in Formidable Forms Pro.
Run subscriptions and let members cancel themselves
If you're charging monthly, set the payment action to Recurring. Pair it with a Formidable View to show each member their active subscriptions on a dashboard page, with a cancel button next to each one. No support ticket required.
Take donations
Swap the fixed price for an open Number field labeled "Donation amount" and let donors set their own gift, with a few suggested amount buttons above the field for one-tap giving. The same form takes one-time gifts and recurring monthly donations if you let the donor choose. For a full walkthrough, see our guide to building a WordPress donation form.
Every form is one step from a checkout
Once Stripe is connected, every form on your site is one payment action away from being a checkout. A pricing calculator becomes a quote-to-charge flow, a booking form becomes a paid reservation, and an order form runs without WooCommerce and without a third-party checkout page.
Build your first Stripe payment form today, run a test transaction, and start taking payments tomorrow.
Try Formidable Forms free and turn your WordPress site into a place that can accept payments.
- Is the Stripe integration free?
-
The Stripe connection in Formidable Forms Lite is free, and you can build and publish a working one-time payment form on it. On Lite, Formidable Forms adds a 3% fee on top of Stripe's own processing rates. Upgrading to a Business or Elite license removes that 3% Formidable fee, but Stripe's own rates still apply either way. Recurring payments, subscription management, conditional logic, and calculations require Formidable Forms Pro.
- Do I need an SSL certificate?
-
Yes. An SSL certificate encrypts the connection between your site and your visitors. It's what puts the padlock and "https" in the address bar, and Stripe requires it on any page that collects card details. Most WordPress hosts include one for free, and if yours doesn't, a plugin like Really Simple SSL will set one up.
- Can buyers pay with Apple Pay or Google Pay?
-
Yes. Turn on Enable the Stripe Link and additional payment methods in the payment action settings. Stripe handles the device detection and shows the right wallet buttons automatically.
- Does the buyer leave my site to pay?
-
No. The card form is embedded directly on your page. The buyer fills it out and pays without a redirect to a Stripe-hosted checkout. Stripe still handles the card data securely behind the scenes, so you stay out of PCI compliance scope.
- Can I take recurring payments and subscriptions?
-
Yes, with Formidable Forms Pro. Set the payment action to Recurring, pick the interval, and Stripe handles the rebilling. You can also show subscribers their active plans on a Formidable View and let them cancel without contacting support.
- What happens if a payment fails?
-
Stripe automatically retries failed recurring payments on a schedule, and Formidable Forms can fire an email or SMS notification to the customer if their card is declined so they can update it. The entry in Formidable Forms is flagged so you know which orders didn't go through.
- Can I use this for donations?
-
Yes. Set the Amount to pull from a Number field so donors enter their own amount, with optional suggested-amount buttons. Use a recurring payment action if you want to offer monthly giving. Many nonprofits run their entire donations page on a single Formidable Forms Stripe form.
This article may contain affiliate links. Once in a while, we earn commissions from those links. But we only recommend products we like, with or without commissions.

