
Formidable Forms has made my life so much easier as an event planner.


Last updated on June 25, 2025 by Formidable Team
How To Add Cash App to Your Website (In Under 5 Minutes!)
Wondering if you can add Cash App to your website? Good news, you can! And it’s really easy to set up too. Here’s how to take Cash App payments on your site.

Approximate read time: 5 minutes
Cash App has made sending and receiving money easier than ever before.
Now, people scan the QR code to instantly reimburse friends, donate to charity, or add money to their bank account. Open the app and link a card. Your banking services are right there!
It’s so convenient, and it's no wonder Cash App has over 50 million active monthly users.
So why not capitalize on the popularity by accepting Cash App payments on your website?
It will boost your bottom line and offer a streamlined checkout experience that will please your visitors. Oh, and did we mention it’s super simple to make a Cash App button for your website, too?
In this post, we’ll show you how to add Cash App to your website with Formidable Forms' Stripe Payments WordPress Plugin. No coding required!
All you need is the Formidable Forms plugin plus a Business or Elite plan.
Aren’t using Formidable Forms yet? Pick up the best WordPress form maker now to start building profitable online payment forms.
Upgrade your WordPress site with powerful, flexible forms.
How to add Cash App to your website

There are only four simple steps to add Cash App to a WordPress website:
⚠️ Before we jump in, make sure that you have the Formidable Forms on your WordPress site. If you need help installing and activating the plugin, this guide to getting started in Formidable takes you through it step by step.
Got Formidable? Good, let’s get started!
Step 1: Install and activate the Formidable Forms WordPress Stripe Plugin
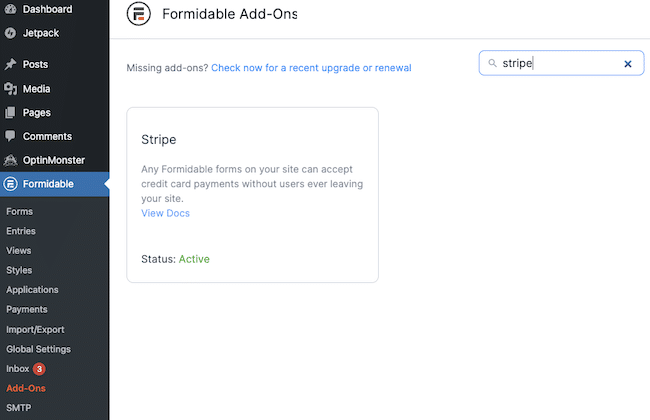
From your WordPress dashboard, head to Formidable → Add-Ons.
Search for the WordPress Stripe payments plugin, then click Install and Activate.
Step 2: Connect your website to Stripe
To connect your site to Stripe, head to Formidable → Global Settings → Stripe in WordPress.
Choose whether to use Stripe in test mode or as a live site, then click Connect to Stripe. We recommend starting out in test mode to ensure everything’s working before it goes live on the internet!
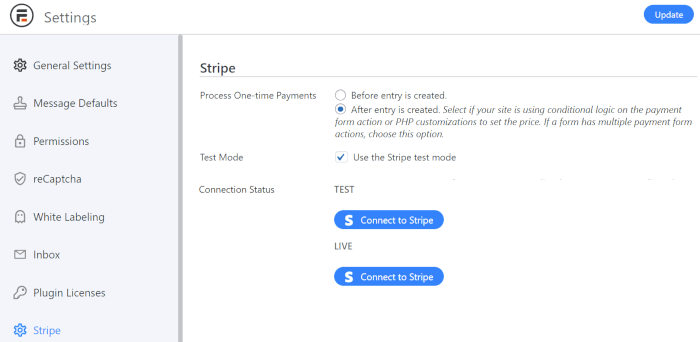
☝️ If you try test mode, note that you'll need to return to this page later to turn it off and link your site to Live Stripe.
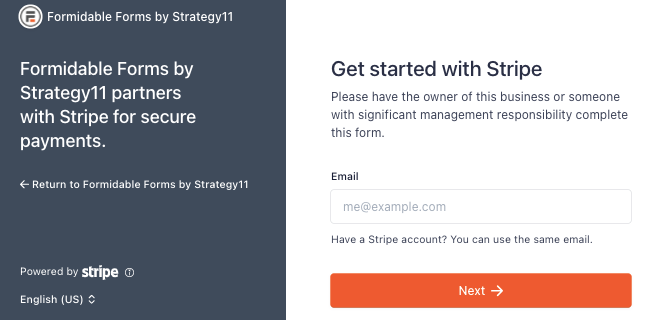
Next, it asks you to enter your email address to log into your Stripe account. If you don’t have one yet, you can create an account on the spot.
It does take a few minutes, but all you have to do is follow the instructions on your screen.
Step 3: Activate Cash App payments in Stripe
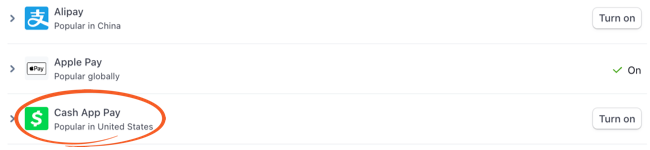
Click the gear icon in the upper right corner of your Stripe dashboard to access your account settings.
Select Payment Methods to view the Stripe payment options available in your country.
Don’t see the list? Pick your platform (Formidable Forms) from the dropdown menu, and it’ll magically appear!
Scroll through the list of payment methods until you reach the Wallets section. Then Turn On Cash App.
And now we can say so long to Stripe!
Time to return to WordPress to add a Cash App link to your website.
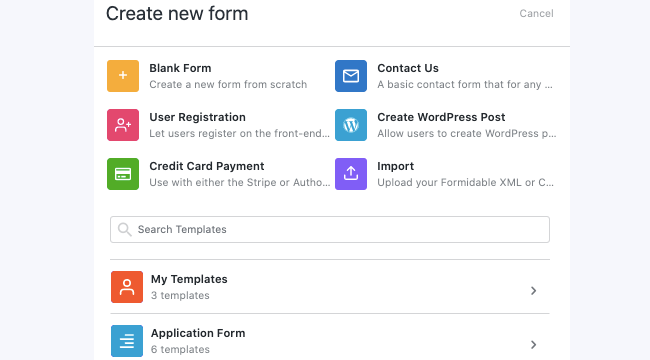
Step 4: Create a Cash App payment form
Back on your WordPress dashboard, go to Formidable Forms → Forms → Add New to make a new form.
Next, click to create a payment form from scratch by selecting Blank Form or use the Credit Card Payment form template to save time.
After you give your form a name, it’s time to build your custom payment form. All you have to do is click and drag!
Make your way over to the form field tab on the left side of your screen, select a field, and drag it into your form on the right. Easy, right?
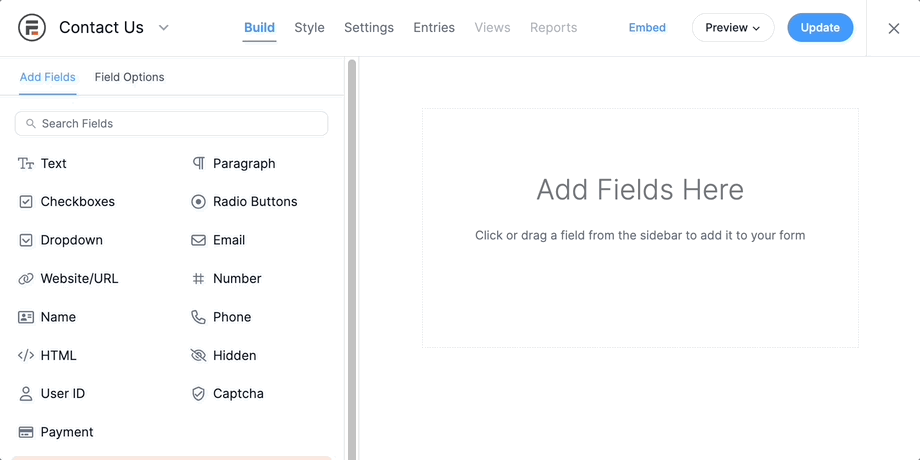
When you enable Cash App payments, an email field will automatically be added to your payment form. But you can also add fields such as phone number, address, etc. And don’t forget to add a Payment field to your form if you aren’t using our payment form template.
Need help making your form? Check out this post on creating a Stripe payment form in WordPress.
When you’re happy with your form, hit Update to save your changes.
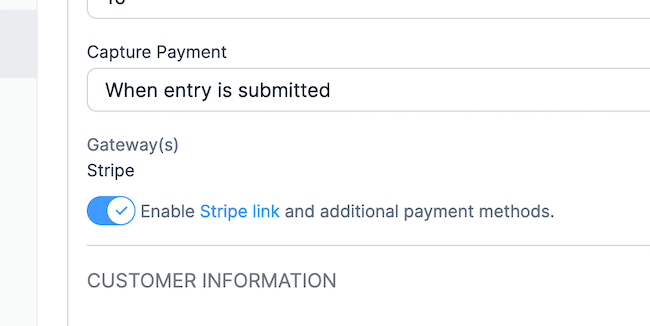
Next, go to Settings → Actions & Notifications and click the Collect a Payment option.
Switch on the Enable Stripe link and additional payment methods option, then hit Update one last time to save your form.
All that’s left is to publish your form on the post or page of your choice, and you’re good to go!
The result will look something like this:

Congrats! Your checkout page now has a Cash App button!
Users connect to their Cash App account by entering their email address. Then, they scan the code to make a Cash App Pay payment.
From Idea to Reality in Minutes. Build Powerful Forms, Dashboards, Apps and More.
Formidable Forms makes advanced site building simple. Launch forms, directories, dashboards, and custom WordPress apps faster than ever before.
Cash in by adding Cash App to your website
And that's a wrap on how to add Cash App to your website!
You can now accept Cash App payments with the Formidable Forms Stripe and Cash App integration. And it opens up another dozen different Stripe payment methods.
That includes debit cards, Cash App balances, buy-now-pay-later solutions, and bank transfers. This includes ACH payments in the US or SEPA payments in Europe. Plus, it works with WooCommerce, too.
Wow, that’s a lot of payment possibilities. We added all these new payment methods while streamlining your payment process. This makes it faster, easier, and more secure for your customers. We’d call that a pretty darn powerful plugin.
So, are you ready to earn more by accepting Cash App payments on your website? Get started now by grabbing our form maker plugin today!
Follow us on social media for more online payment pro tips. You can find us on Facebook, YouTube, and Twitter (X).
Read more from the Formidable blog
 Sell Products on Your WordPress Site for Free (No WooCommerce Needed)
 Introducing Virtual Fields: Keep Sensitive Data Off the Page
 Why Recurring Payments Fail in WordPress After Month 3
This article may contain affiliate links. Once in a while, we earn commissions from those links. But we only recommend products we like, with or without commissions.

