
Formidable Forms has made my life so much easier as an event planner.


Last updated on July 26, 2023 by Formidable Team
How To Embed a Mailchimp Contact Form in WordPress [4 Steps]
Trying to embed a Mailchimp contact form to collect emails and track leads? Engage your audience and integrate seamlessly with projects to grow your list.
Did you know email marketing has the highest return on investment for small businesses? 😲
Whether you’re a small business or not, there’s a lesson to be learned here: email marketing is essential for your website. Email campaigns and growing your mailing list should be important parts of your marketing strategy.
You created a form — way to go! — but now you're struggling to make it look the way you want and aren't sure how to embed the Mailchimp custom contact form into your website.
We're here to help! Today, we'll show you how to use Mailchimp to embed a contact form using a handy WordPress form builder plugin called Formidable Forms.
Let's dive in!
Upgrade your WordPress site with powerful, flexible forms.
Why make a Mailchimp contact form?
Don't overlook the effectiveness of a contact form if you want to grow your Mailchimp mailing list.
Your Mailchimp Contact Us form can generate leads in bunches if correctly set up. This can lead to more transactional emails in the future.
You can add a Mailchimp form to WordPress to make your life headache-free.
Rather than manually adding contacts to your audience, you can automatically add and tag them simultaneously.
Best of all, you can apply a tag based on the post or page where they signed up. This is key for segmenting your audience and filtering out what they don’t want to see.
Why send a product sale to them if they didn't sign up to see it?
Did you know?
You can have complete control over your Mailchimp email list. All it takes is this WordPress signup form plugin.
One idea is to subscribe visitors to an automated email marketing campaign based on form submissions. This automation can be made specifically for customers who use your Contact Us form for Mailchimp. Assigning groups is another form of segmenting.
A potential customer is different from a newsletter subscriber. Why treat them the same way? Segmenting contacts is a cheap and easy way to improve your customer experience today.
From Idea to Reality in Minutes. Build Powerful Forms, Dashboards, Apps and More.
Formidable Forms makes advanced site building simple. Launch forms, directories, dashboards, and custom WordPress apps faster than ever before.
How to create a Mailchimp contact form in WordPress

From start to finish, creating a Mailchimp embedded form for your WordPress site should take less than 10 minutes, and you’ll be off and running with growing your Mailchimp audience.
First, you’ll need to get Formidable Forms premium plan for integration with Mailchimp. Then, install and activate Formidable Forms, and you’re ready to go.

Here are four simple steps to follow:
Step 1: Find your Mailchimp API key
First, we have to integrate your contact forms from Mailchimp. We’ll do this by getting your Mailchimp API key.
To find your API key, log into your Mailchimp account and go to Account → Extras → API Keys.
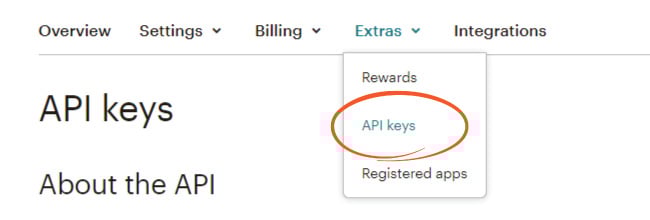
Click Create A Key if you don't have one already.
Keep your Mailchimp API key handy for a few minutes since you'll need it in the next step.
Step 2: Install the Formidable and add your API key
First, you must install and activate Formidable's Mailchimp WordPress Integration add-on. You'll find the Mailchimp plugin in the Formidable Add-Ons section.
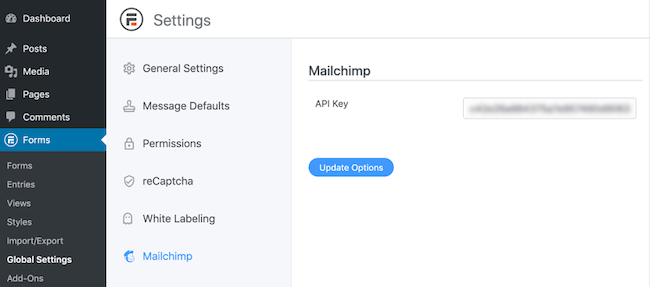
Next, from your WordPress dashboard, head to Formidable → Global Settings and click the Mailchimp tab. Paste your Mailchimp API Key from Step 1 and click the Update Options button. Your website is now connected to your Mailchimp account! 👏
Let's move on to Step 3.
Step 3: Create a Mailchimp form in Formidable
Now you'll need to create a contact form (or signup form). You can save time by using our Contact Form template if you'd like. In only a couple of clicks, your form will be ready to go!
You can then use our simple drag-and-drop form builder to customize the form template, or build one from scratch if you selected to use a Blank Form.
Add an email address field, checkboxes, and any other form fields for additional information you want, and save your form by clicking Update.
When editing your contact form, click on Settings → Form Actions. You’ll see the action Add to Mailchimp.

Select the Mailchimp list where you would like to add subscribers. And you're finished!
Now, whenever someone submits the contact form on your site, they'll automatically add to your list!
Step 4: Display your Mailchimp custom contact form
Now that we’ve created your form and learned how to connect Mailchimp to WordPress, it’s time to display your form ✨.
So, go to the web page where you want your form to appear.
Add a new WordPress block and then search for the Formidable block. Select the block, then choose your contact form from the dropdown menu.

Update your page, and your form is ready to start collecting emails! 🥳
Want to embed your contact form in another spot on your website such as footers, sidebars, or other widget areas? No problem, you can do that too with Formidable.
Simply go to Formidable → Forms and select the <> next to your form. Next, select Insert Manually copy the embed code for your page.
Then all you have to do is paste the shortcode into a Shortcode block wherever you want on your site. Update your page and your form will be there!
Why use Formidable for Mailchimp contact forms in WordPress?
Formidable is the most powerful form builder in the plugin world. Its features, WordPress-Mailchimp integration, and ease of use make it a Swiss Army knife in plugin form.
First, customization couldn't be simpler!
Unlike Mailchimp's lackluster form customizer, with Formidable, it's easy to style your Mailchimp form exactly how you want it. Borders, buttons, backgrounds; it’s all here.

Simply set the input type to hidden if setting up a password field. Or create a Likert Scale for a quick visitor survey.
Next are our amazing contact form templates. You have a pre-made form to save time on your setup process with a couple of mouse clicks. Contact, registration, payment, we’ve thought of it all.
And it’s easy to embed your Mailchimp contact form on your website.
Last, Mailchimp signup forms are easy with Formidable. You can even go beyond Mailchimp’s form abilities. As we mentioned above, Formidable offers segmenting options that Mailchimp doesn’t.
So extra data from your app for signup doesn’t have to go to waste. You can use it to learn more about your subscribers and help them better.
It even makes it easy to create a customized Mailchimp contact popup form.
This all makes Formidable Forms the best Mailchimp WordPress plugin on the market.
Embed the Mailchimp contact form on your WordPress site
Creating an embedded contact form for Mailchimp is just the start.
The next step is to embed the Mailchimp form in WordPress. All you need is the form code. You can start growing your email list once you embed your Mailchimp contact form on your site. And with Mailchimp features like behavioral targeting, your power is unlimited!
This post taught you how to connect WordPress to Mailchimp so you can get emails today. And you learned how using Mailchimp with WordPress is even easier with Formidable Forms.
Last, if you have social media, follow us on Facebook, Twitter, and YouTube for more from our marketing library!
Read more: Using Mailchimp with Formidable
 How To Add a Mailchimp Signup Form to WordPress [4 Steps!]
 MailPoet vs. Mailchimp [Which is Better for You?]
 How To Style Mailchimp Forms in WordPress [2 Methods!]
This article may contain affiliate links. Once in a while, we earn commissions from those links. But we only recommend products we like, with or without commissions.

