
Powerful forms for data collection and Wide API to merge automation using the best wokflows such as N8N, Zapier. Excellent tool for data collection. Recommended 100%. Furthermore, support is awesome.

Last updated on September 26, 2023 by Formidable Team
How To Create a Members-Only Area in WordPress
Want to put your best content behind a login and start charging for access? With a membership plugin and a form builder working together, you can do it in an afternoon with no developer and no code. In this guide, we'll show you how to create a members-only area in WordPress, step by step.

Approximate read time: 9 minutes
This guide walks you through the whole build, from deciding whether you even need a membership plugin to gating your content and adding a directory.
Upgrade your WordPress site with powerful, flexible forms.
What is a membership website?
Let's be clear on some terms. A member-only area is an area on a website that restricts access to members. Usually, these are paid members. Typically, if a site has a member-only area, the entire site is referred to as a membership site.
The idea is that the best content is created as members-only content. Of course, that's not always the case. But for our purposes today, we will assume you want to create a significant member-only area.

From Idea to Reality in Minutes. Build Powerful Forms, Dashboards, Apps and More.
Formidable Forms makes advanced site building simple. Launch forms, directories, dashboards, and custom WordPress apps faster than ever before.
What a members-only area actually needs
Before you install anything, it helps to know what you're assembling. Every membership site has four working parts.
Gated content. The posts, pages, downloads, videos, or courses you want to restrict. Anything WordPress can publish can be gated.
A registration system. A way for people to create an account and link that account to a paid membership level. WordPress has user accounts built in, but the native version isn't enough on its own. It can't handle membership tiers, trials, expirations, or payment.
Signup and payment forms. A form to collect member info and a checkout to collect their money. These can come from a membership plugin, a form builder, or both working together.
A payment gateway. Stripe, PayPal, or Authorize.Net is the service that lets your forms collect recurring payments. PayPal often works fine, but fewer people have a PayPal account than have a credit card, so a card-friendly gateway like Stripe usually removes more friction.
That's the whole architecture. Once those four pieces are in place, you have a membership site.
Do you actually need a membership plugin?
It's worth asking before you buy one.
If you just want to lock a few pages behind a login and collect signups through a form, Formidable Forms can do that on its own. Formidable Forms handles user registration, restricts content based on login status, and connects to Stripe and PayPal for one-time or recurring payments. For a simple gated area with a flat fee, that's often enough.
You want a dedicated membership plugin once you need more than gating, like:
- Content dripping, where posts unlock on a schedule after signup.
- Detailed rules that restrict content by category, tag, or custom field.
- Multiple membership tiers with different access rules.
- A built-in learning management system (LMS) for courses.
- Automated emails tied to membership actions like renewal or cancellation.
If any of that sounds like what you're building, keep reading. MemberPress is what you want, and Formidable Forms fills in the gaps MemberPress leaves open. The two are made to work together.
How to create a members-only area in WordPress
The full setup is six steps. Plan for an afternoon if you already have a WordPress site, a full day if you're starting from scratch.
Step 1: Get your WordPress site ready
If your site is already live, skip ahead. If not, a couple of things matter before you go further.
- Pick a domain that has search potential and resonates with your potential members. A name that signals what the membership is about will pull people in better than a generic one.
- Choose a WordPress-friendly host. Many WordPress-centric hosts will install WordPress for you automatically, which saves you the manual setup.
Once WordPress is installed and your domain points at it, you're ready to add the membership layer.
Step 2: Install MemberPress
MemberPress is the membership plugin we reach for first. It creates member signup and login forms, accepts payments, gates content, streamlines email marketing, and even acts as a complete learning management system (LMS), all without touching a line of code. It integrates with the major payment gateways and email services, and because it was built for WordPress, you can say goodbye to theme conflicts and WooCommerce struggles.
To get started, head to the MemberPress website and pick a plan. Then install and activate the plugin on your WordPress site the same way you would any other.

A MemberPress menu now lives in your WordPress dashboard. Everything else happens from there.
Step 3: Create your membership levels
Membership levels define what people pay and what they get. MemberPress calls them Memberships.
From your WordPress dashboard, open MemberPress → Memberships → Add New.
Name your membership, set the price, and choose the one-time or recurring payment option. For a subscription, set the billing interval as well.
At the bottom of the screen, customize the signup form by adjusting permissions, writing a short description, and adding a list of plan benefits. This is what members see when they sign up. When you're done, click Publish.
Repeat for each tier. Two or three levels is plenty for most sites, since more than that usually confuses members rather than helping them choose. As you set the price, MemberPress connects to the major payment gateways like Stripe, PayPal, and Authorize.Net, so pick whichever one your members are most comfortable using.
Step 4: Add rules to restrict content
Rules are how MemberPress decides what is locked and who can unlock it.
Go to MemberPress → Rules → Add New.
Select the categories, tags, or other content you want to reserve for members. Then, under Access Conditions, choose the membership the rule should apply to, and publish the rule.
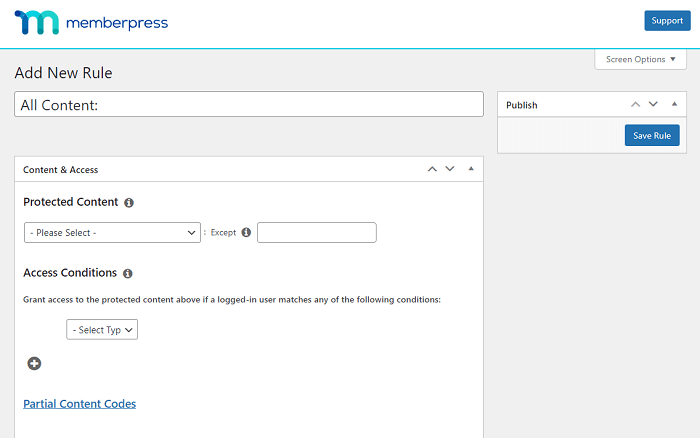
Tag-based rules are the easiest to maintain. Create a "members-only" tag, write one rule that restricts everything with that tag, and from then on you just add the tag to any new post you want to gate. After you publish a rule, double-check that the correct tag or category is assigned to your members-only content, since MemberPress only restricts content that matches what the rule looks for.
Step 5: Add custom forms and a member directory with Formidable Forms
MemberPress runs the membership engine, the signup, the checkout, and the access rules, but two things it doesn't do are custom-built forms and a member directory. That's where Formidable Forms comes in.
If you want a registration or login form with your own fields and styling rather than the default MemberPress screens, Formidable Forms builds those with drag and drop, then hands the new account back to MemberPress to manage. Trusted on more than 300,000 active WordPress sites, it's built to sit alongside a membership plugin rather than compete with it.
The directory is the bigger win. A directory turns your membership from a content subscription into a community. Members can find each other, search by location or specialty, and stay subscribed for reasons that have nothing to do with this week's blog post. That is real retention value.
Formidable Forms' drag and drop application builder makes it simple to add a directory to a MemberPress site. You collect member profiles with a form, display the entries in a Formidable View as a searchable directory, and use front-end editing so members can update their own listings without touching your WordPress dashboard.
Formidable Forms Lite is free on WordPress.org, while Views and front-end editing come with the Business license or higher. You can start from the ready-made member directory template, then drop the View on a page and add a MemberPress rule that restricts the page to active members.

That page becomes your directory. Members fill out a profile once, the View updates automatically, and the rule keeps non-members out.

Step 6: Create content worth gating
The technical setup is the easy part. The hard part is having something inside the wall that people want to pay for.
A few things that separate membership sites that grow from ones that quietly die:
- Pick a clear topic. "Weekly sourdough technique deep dives" beats "exclusive baking content."
- Publish on a schedule. Even a slow schedule beats an unpredictable one. Members renew when they trust new content is coming.
- Make the signup page specific. Answer the one question every visitor has: what do I get inside that I can't get for free somewhere else?
- Plan for the first 90 days. Most cancellations happen in the first three months. Front-load the value so new members feel the win before the first renewal hits.
If you're also adding a directory, that helps with retention on its own. Members who have a profile filled out and connections inside the community churn at a much lower rate than members who just consume content.
Pages every membership site needs
Beyond the gated content, a few pages do the unglamorous work of running the site.
| Page | What it does |
|---|---|
| Signup page | Lists tiers, explains benefits, lets visitors subscribe |
| Login page | Easy to find, easy to use |
| Account page | Where members update info and manage subscription |
| Billing terms | Clear, plain language about what gets charged when |
| Cancellation policy | Spelled out so members do not feel trapped |
MemberPress generates most of these automatically. Edit the copy on each one so it sounds like your site, not like a default template.
Two plugins, one members' area
Building a members-only area in WordPress comes down to assembling two plugins and WordPress itself. WordPress runs the site, MemberPress runs the membership logic, and Formidable Forms handles registration forms and the member directory MemberPress doesn't include. Connect a payment gateway, write a few rules, and start publishing the content people are paying you for.
If your membership runs on subscriptions, our guide on how to set up recurring payments for memberships covers the billing side in detail. And if you want the directory, the front-end editing, and the application-style features that turn a membership site into a real community, try Formidable Forms with the 14-day money-back guarantee.
- Can I build a members-only area with just Formidable Forms?
-
For a simple gated area, yes. Formidable Forms handles user registration, login-restricted content, and Stripe or PayPal payments. If you just need to lock a few pages and collect a flat fee, that's enough. If you need content dripping, multiple tiers, LMS features, or automated membership emails, pair Formidable Forms with MemberPress.
- What payment gateways work with MemberPress?
-
MemberPress integrates with all the major payment gateways, including Stripe, PayPal, and Authorize.Net. Stripe processes credit cards on your site without redirecting members away, while PayPal sends members to PayPal to complete payment. Authorize.Net is a solid choice for businesses already using it.
- Do I have to charge for membership?
-
No. You can run free or paid membership sites, or mix the two. Many sites offer some free content in exchange for an email address and reserve their best content for paying members. When you create a membership in MemberPress, you set the price and choose a one-time or recurring payment, so the billing structure is up to you.
- How do I gate some posts but keep others public?
-
Use rules with tags or categories. Add a "members-only" tag to any post you want to restrict, then write one rule that gates everything with that tag. New posts get the tag and inherit the restriction automatically. Everything without the tag stays public.
- Can members edit their own profiles?
-
Yes, when you use Formidable Forms for member profiles. Formidable Forms supports front-end editing, which lets logged-in members update their own form submissions from a normal page on your site. They never see the WordPress dashboard.
- How does content dripping work?
-
MemberPress can release content a set number of days after a member signs up. New members see lesson one immediately, lesson two a week later, lesson three the week after, and so on. This works especially well for courses, where pacing matters and giving everyone everything on day one defeats the structure.
- Do I need to know how to code?
-
No. MemberPress creates the signup forms, login, payments, and content rules without a line of code, and because it was built for WordPress, you avoid the theme conflicts and WooCommerce struggles that come with patching membership features onto a generic setup. Adding a member directory with Formidable Forms is drag and drop too.
This article may contain affiliate links. Once in a while, we earn commissions from those links. But we only recommend products we like, with or without commissions.

