
Formidable Forms has made my life so much easier as an event planner.


Last updated on December 29, 2025 by Emma Wells
How to Setup Recurring Payments for Memberships in WordPress Without Coding
Need to accept recurring membership payments on your WordPress site but don't know how to code? You're in the right place! I'm going to show you how to set up automated membership billing without writing a single line of code.

Approximate read time: 7 minutes
Whether you're running a gym, coaching business, online course platform, or exclusive community, recurring membership payments are essential for sustainable growth. I've seen countless site owners set up membership payments using Formidable Forms, and I can tell you — it's way easier than most people think.
No complicated code. No hiring developers. Just a simple, no-code solution that works.
Let me walk you through exactly how to create a seamless membership payment system that runs on autopilot.
Upgrade your WordPress site with powerful, flexible forms.
Why recurring payments are perfect for memberships
Membership sites thrive on predictable, recurring revenue. But manually processing payments each month? That's a recipe for disaster.
Here's why automated recurring payments are a game-changer for membership businesses:
No more payment headaches: Members don't have to remember to pay each month. Their membership automatically renews, keeping them engaged with your content or services without interruption.
Predictable cash flow: Know exactly how much revenue to expect each month. This makes budgeting, planning, and scaling your membership business so much easier.
Reduced member churn: When the payment process is seamless, members are less likely to cancel. Friction-free renewals mean fewer lost subscribers due to expired credit cards or forgotten payments.
Professional member experience: Automatic billing shows you're running a legitimate, professional operation. Members appreciate the convenience and trust the process.
More time for what matters: Stop chasing payments and focus on creating amazing content and experiences for your members instead.
Bottom line? Recurring payments aren't just convenient — they're essential for any serious membership site.
From Idea to Reality in Minutes. Build Powerful Forms, Dashboards, Apps and More.
Formidable Forms makes advanced site building simple. Launch forms, directories, dashboards, and custom WordPress apps faster than ever before.
What you'll need to get started
Before we jump into the setup process, let's make sure you have everything you need.
For Stripe membership payments
Good news! You can accept credit card payments for free with Formidable Forms Lite and Stripe. However, there's a catch: a 3% fee is added on top of standard Stripe fees if you use the Lite version.
To avoid the extra 3% charge and unlock advanced features, you'll want to upgrade to Formidable Forms Business or Elite.
What you'll need:
- Formidable Forms (Lite or Pro)
- A Stripe account (free to create)
- An SSL certificate on your site (required for live payments, but you can test without it)
For PayPal membership payments
To collect PayPal payments, you'll need Formidable Forms Pro. The PayPal add-on is only included in Business and Elite plans.
What you'll need:
- A Formidable Forms Business or Elite license
- A PayPal Business account
- The PayPal Standard add-on (included with your license)

Once you have Formidable Forms installed and activated, you're ready to start building your no-code membership payment system.
How to set up Stripe recurring membership payments
Stripe is one of the most popular payment processors for membership sites, and for good reason. It's secure, reliable, and integrates seamlessly with WordPress through Formidable Forms.
You can accept credit card payments for free with Formidable Forms Lite and Stripe. However, there's a catch: a 3% fee is added on top of standard Stripe fees if you use the Lite version.

To avoid the extra 3% charge and unlock advanced features, you'll want to upgrade to Formidable Forms Business or Elite.
Now, I'll walk you through the entire setup process step by step.
Step 1: Connect WordPress to your Stripe account
The first thing we need to do is link your WordPress site to Stripe. This connection is secure and only takes a minute to complete.
Navigate to Formidable → Global Settings → Payments → Stripe in your WordPress admin.

Before processing real payments, I recommend testing everything first. Check the Use the Stripe test mode option. This allows you to simulate transactions without actually charging anyone, which helps you catch any issues before going live.
Now click the blue Connect to Stripe button. You'll be redirected to Stripe's website where you can either log into your existing account or create a new one. Creating an account is free and straightforward.
Once you've logged in, authorize the connection. Stripe will automatically redirect you back to your WordPress site. Look for a green checkmark with "Connected" next to Connection Status. That confirms the connection was successful.
Step 2: Create your membership signup form
Now we'll build your membership form using Formidable's visual form builder. This is where the no-code approach really shines.
Go to Formidable → Forms and click Add New to create a fresh form. Or, use our Stripe Payment form template and customize it to your liking.
In the form builder, you'll see a list of available fields on the lee ft side. Click on any field to add it to your form. For a basic membership signup, you'll typically want:
- Name field so you know who's joining
- Email field for member communication and Stripe authentication (this is required)
- Payment field
Depending on your membership site, you might also add:
- Phone number
- Membership tier selection using Radio Buttons or a Dropdown
- Address information
- Custom questions about your members
The visual builder lets you customize field labels, add help text, and rearrange fields by dragging and dropping. Set everything up the way you want it.
When your form looks good, click Update in the upper right corner to save your work.
Step 3: Configure your Stripe membership payment settings
This is where we configure the recurring payment functionality. All of this happens right in WordPress, so you won't need to log into Stripe separately.
Click the Settings tab at the top of the form builder, then go to Actions & Notifications and click Collect a Payment.
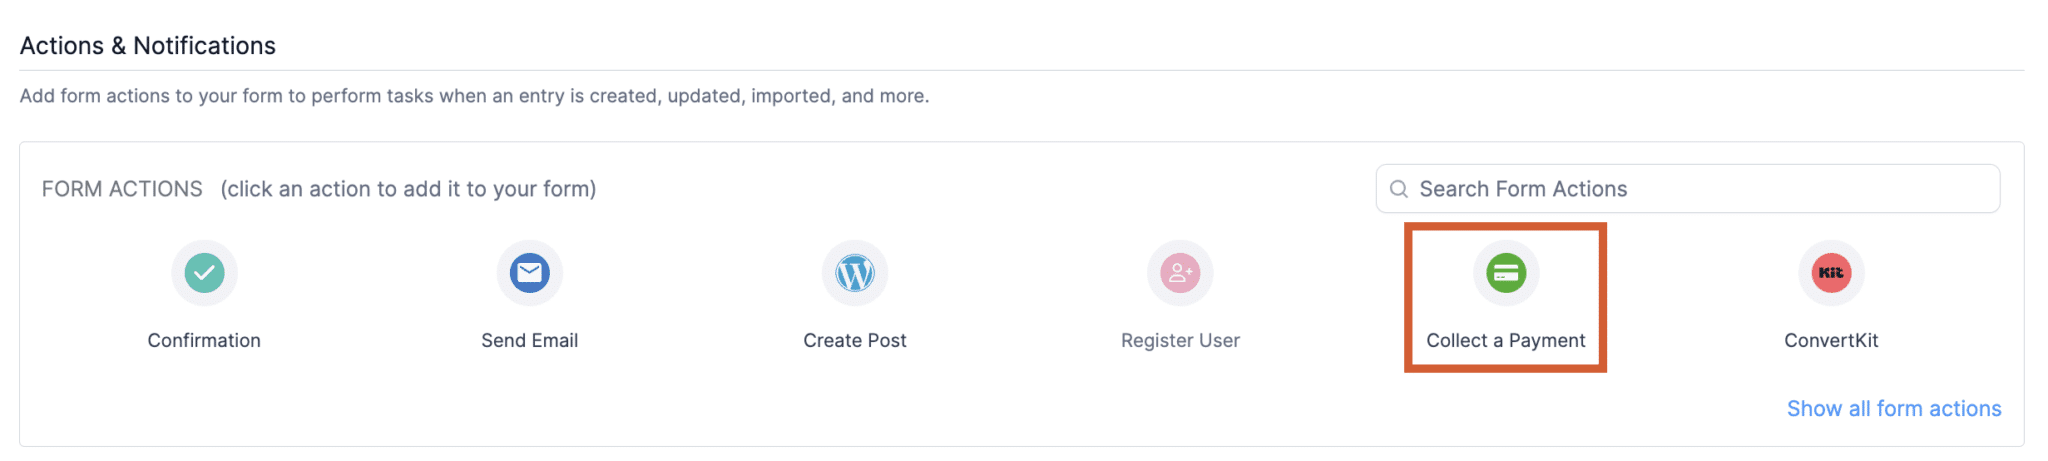
You'll see a screen with several settings that control how your payments work. Here's what each one does:
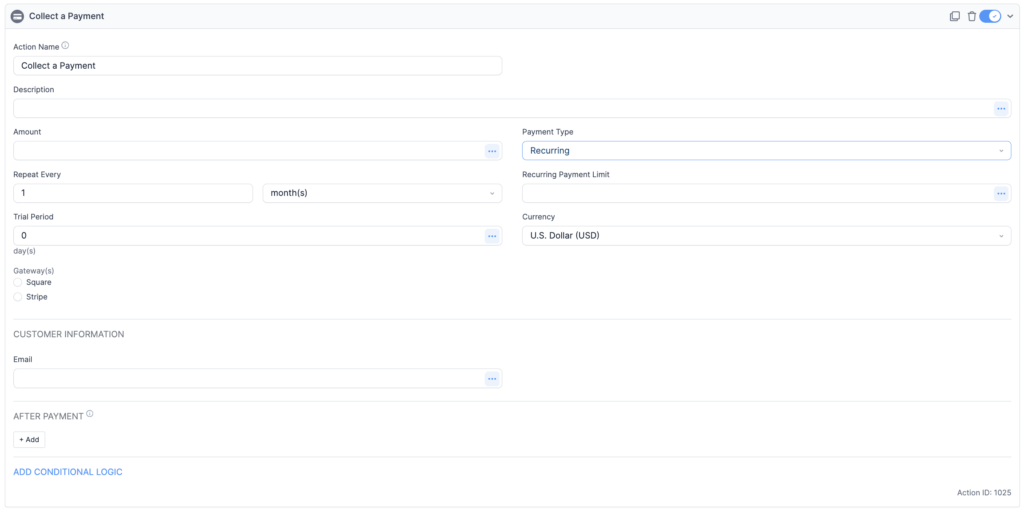
Action Name: Give this action a descriptive name like "Monthly Membership Payment" or "Premium Member Subscription." This is just for your reference on the backend, so make it something you'll recognize later.
Description: This text appears on the Stripe payment receipt your members will see. Enter something like "Premium Membership - Monthly Access" or use a field from your form to make it dynamic based on what the member selected.
Amount: Enter your membership price. You can type in a fixed amount like 29.99, or use a field from your form if you offer multiple membership tiers at different prices. Using a form field makes the amount dynamic based on what tier your member selects.
Payment Type: This is the crucial setting. Select Recurring from the dropdown menu to enable subscription payments.
Once you select Recurring, several new options will appear:
Repeat Every: This determines your billing frequency. Choose how often members will be billed:
- Monthly (most popular for memberships)
- Yearly (great for annual memberships with a discount)
- Weekly
- Custom intervals like every 3 months or every 6 months
Recurring Payment Limit: Use this if you want memberships to automatically cancel after a certain number of payments. For example, entering "12" for a monthly subscription means it will automatically cancel after 12 payments (one year). Leave this blank if you want subscriptions to continue indefinitely.
Trial Period: This lets you offer a free trial to new members. Set the number of days before the first payment is charged. For example, setting "7 days" gives people a free week to try your membership. This is a powerful way to reduce signup friction and attract more members.
Currency: Set your preferred currency like USD, EUR, GBP, etc. By default, this uses your global Stripe settings.
Gateway: Select the Stripe gateway. This ensures your form uses Stripe's payment processing system.
Enable Stripe Link and additional payment methods: Toggle this ON to enable one-click payments with Stripe Link and accept digital wallets like Apple Pay, Google Pay, and ACH bank transfers. This significantly improves the checkout experience for your members.
Customer Information: Map your form fields to Stripe customer information. At minimum, connect your email field here. This tells Stripe which email address to associate with each payment.
When everything looks right, click Update to save your payment action.
You'll notice a Payment Method field has been automatically added to your form. This field is required for payments to process correctly, so don't delete it.
Step 4: Test your membership payment form
Before going live, always test your form to make sure everything works as expected. Testing helps you catch configuration issues before real customers encounter them.
Since you enabled test mode earlier, you're ready to run a test transaction. Publish your form on a test page or post so you can view it like a regular visitor would.
Visit the page where your form is published and fill it out using these test credentials:
- Credit card number: 4242424242424242
- Expiration date: Any future date
- CVC: Any three digits
- Amount: At least $0.50
Submit the form. If everything is configured correctly, you'll see a success message.
To verify the test payment went through, go to Formidable → Payments in your WordPress admin. You'll see your test payment listed with "Test" in the Mode column.
I recommend running 2-3 test payments to make sure everything is working smoothly before accepting real payments.
Step 5: Go live with real membership payments
Once you've tested everything and you're confident it works correctly, it's time to start accepting real payments.
Go back to Formidable → Global Settings → Stripe and uncheck the Use the Stripe test mode option.
Click the Connect to Stripe button again to connect your live Stripe account if you haven't already done so.
Make sure you have an SSL certificate installed on your site. This is required for secure payment processing. Most modern hosting providers include SSL certificates for free.
Click Update, and you're officially ready to accept recurring membership payments.
How to set up PayPal recurring membership payments
PayPal is another popular choice for membership sites, especially if your members prefer not to enter credit card information or don't have credit cards.
Let me show you how to set up PayPal recurring payments.
Step 1: Install and configure the PayPal add-on
From your WordPress dashboard, navigate to Formidable → Add-Ons.
Find the PayPal Standard add-on and click Install, then Activate if needed.

Once activated, go to Formidable → Global Settings → PayPal and click the PayPal tab.
Here's what you need to configure:
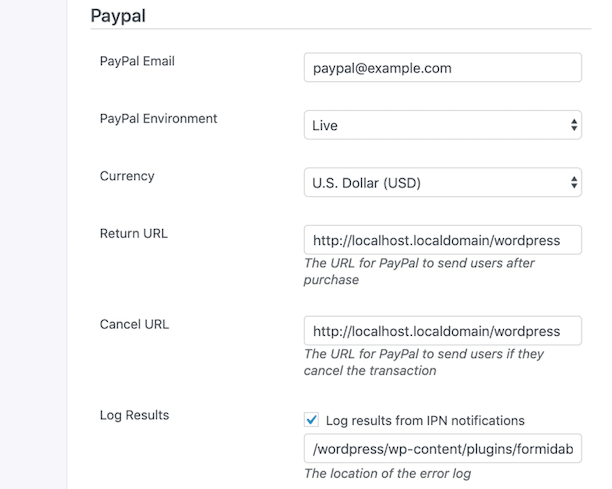
PayPal email address: Enter the email associated with your PayPal Business account. This is where payments will be sent.
PayPal Environment: Make sure this is set to Live (not Sandbox) for real payments. This is important because if it's set to Sandbox, your members will be prompted to create PayPal Sandbox accounts, which creates confusion and won't actually process payments.
Configure any other settings as needed, then click Update Options to save.
One more critical step: You need to set up Instant Payment Notification (IPN) in PayPal. This ensures PayPal correctly notifies WordPress when payments are received. Without this, payment statuses won't update properly in your WordPress dashboard.
Log into your PayPal account, go to Account Settings → Notifications, and enable IPN. The IPN URL will be shown in the Formidable PayPal settings page. Copy that URL and paste it into PayPal's IPN settings.
Step 2: Build your PayPal membership form
In your WordPress admin, hover over Formidable and select Forms.
You can create a new form from scratch or use a template to save time. Formidable offers a PayPal Donation Form Template that works well as a starting point for memberships.
Add the fields you need for member signups:
- Name
- Membership tier selection (optional)
- Any other custom fields you want to collect
If you want to offer both one-time and recurring membership options, add a Radio Button field with options like:
- One-time payment
- Monthly subscription
- Annual subscription
Customize everything to match your brand and membership offerings, then click Update to save your form.
Step 3: Configure PayPal recurring payment settings
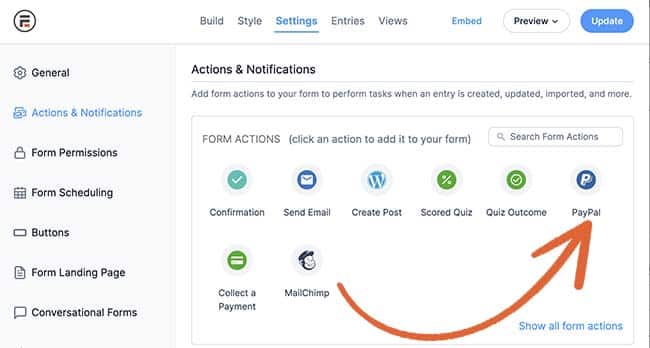
Still in the form builder, click Settings → Actions & Notifications → PayPal.
Find the Payment Type field and select Subscription. This is what makes the payment recurring instead of a one-time charge.
Once you select Subscription, you'll see new options appear:
Repeat Every: Choose the billing frequency:
- Monthly
- Yearly
- Weekly
- Custom intervals
Trial Period: If you want to offer a free trial, specify the number of days before the first payment is taken. For example, "14 days" gives new members two free weeks to try your membership before being charged.
Amount: Set your membership price. You can use a fixed amount or pull the price from a form field if you offer multiple membership tiers at different price points.
Configure any other settings like currency, notifications, and redirect URLs based on your specific needs.
Pro tip: If you added a field to let members choose between one-time and recurring payments, you'll need to set up conditional logic. This requires Formidable Forms Pro, but it's still completely no-code. You just select when the PayPal action should trigger based on what option the member selects.
Click Update when you're finished. Your membership form is now ready to accept recurring PayPal payments.
Step 4: Test and publish your form
Just like with Stripe, you should test your PayPal form before going live.
PayPal offers a Sandbox environment for testing, but if you've set your environment to Live (which I recommended), you can simply process a small real payment to yourself and then issue a refund.
Once you're confident everything works correctly, publish your form on your membership signup page.
Pro tips for managing your membership site
Now that you have recurring payments set up, here are some additional strategies to make your membership site even better:
Set up automated email notifications
Configure email notifications to trigger at key moments:
- When a member successfully joins (welcome email)
- When a payment is completed (receipt/confirmation)
- When a payment fails (so you can follow up)
- When a subscription is canceled (exit survey opportunity)
Go to your form's Settings → Actions & Notifications and add email actions with different triggers.

You can use Successful Payment, Failed Payment, and Canceled Subscription triggers to automate your member communication.
Save payment status in your forms
Add a hidden field to your form called "Payment Status." Then, in your payment action, scroll to the After Payment section and configure it to update this field to "Completed" when payment is successful.
This gives you a clean record of each member's payment status right in your form entries, making it easy to see at a glance who has paid and who hasn't.
Create multiple membership tiers
Want to offer Basic, Premium, and Elite memberships? Here's how:
Add a Radio Button or Dropdown field to your form with your tier options. Then create multiple payment actions (one for each tier) with conditional logic that triggers the correct payment amount based on what the member selects.
It's all point-and-click setup through the form builder. No coding required.
Pro tip: To make this process even easier, you can use our Tiered Pricing Application Template. This template comes pre-configured with a tiered pricing structure, saving you time on setup and giving you a professional starting point for your membership tiers.
Set up membership expiration
Use the Recurring Payment Limit setting to automatically cancel memberships after a certain number of payments. This is perfect for fixed-term memberships or courses.
For example, set it to "12" for a monthly subscription to create an annual membership that automatically expires after one year.
Track everything in WordPress
View all your payments in one place by going to Formidable → Payments. You can see:
- Payment amounts
- Member information
- Payment status (completed, pending, failed)
- Subscription details
- Test vs. live payments
This means you don't need to constantly log into Stripe or PayPal to check on your payments. Everything is accessible right from your WordPress dashboard.
Ready to launch your membership site?
Setting up recurring payments for memberships in WordPress doesn't require any coding skills. With Formidable Forms, you can build a complete membership payment system using visual, drag-and-drop tools.
Whether you choose Stripe, PayPal or a combination of these, you can manage everything directly from your WordPress dashboard. No bouncing between different platforms. No hiring expensive developers. Just straightforward, no-code setup.
So what are you waiting for? Start building your membership site today and create a reliable source of recurring revenue for your business.

Remember, we offer a 14-day 100% money-back guarantee, so you can try Formidable risk-free. If it doesn't work for your membership site, simply request a refund with no questions asked.
Your thriving membership community is just a few clicks away!
Learn more about WordPress payments
 Sell Products on Your WordPress Site for Free (No WooCommerce Needed)
 How a WordPress Payment Approval Workflow Works
 Why Recurring Payments Fail in WordPress After Month 3
This article may contain affiliate links. Once in a while, we earn commissions from those links. But we only recommend products we like, with or without commissions.

