
Powerful forms for data collection and Wide API to merge automation using the best wokflows such as N8N, Zapier. Excellent tool for data collection. Recommended 100%. Furthermore, support is awesome.

Last updated on July 15, 2025 by Formidable Team
How to Create an Online Restaurant Menu in WordPress
Are you looking for a responsive WordPress restaurant menu plugin? Formidable Forms has you covered!
 Five star restaurant websites have unique needs. From making reservations to accepting reviews, your WordPress website may have a lot of functionality. An easily-accessible restaurant menu is therefore a very important feature.
However, you may not want to invest in a dedicated WordPress menu plugin that can't do much else. Fortunately, you don't have to settle. By choosing Formidable Forms as your WordPress restaurant menu plugin, you can get a flexible yet powerful option for your website.
In this article, we'll explore why Formidable Forms is an effective way to show off your stunning food and drink menu. Then we'll take you through two simple steps to get your online menu up and running. Let's get started!
Five star restaurant websites have unique needs. From making reservations to accepting reviews, your WordPress website may have a lot of functionality. An easily-accessible restaurant menu is therefore a very important feature.
However, you may not want to invest in a dedicated WordPress menu plugin that can't do much else. Fortunately, you don't have to settle. By choosing Formidable Forms as your WordPress restaurant menu plugin, you can get a flexible yet powerful option for your website.
In this article, we'll explore why Formidable Forms is an effective way to show off your stunning food and drink menu. Then we'll take you through two simple steps to get your online menu up and running. Let's get started!

Upgrade your WordPress site with powerful, flexible forms.
Why Formidable Forms is a powerful WordPress restaurant menu plugin
When it comes to WordPress restaurant menu plugins, you have many options. Some programs decide to specialize. As such, they might be excellent for creating menus, but not useful beyond that. This may help you get the job done, but it also has some downsides. For example, too many plugins can slow down your site. As such, choosing new specialized software for everything your restaurant page needs can result in a less than speedy site. Furthermore, buying many plugins can be expensive. Quality programs often come with a price tag. So, you might not have the budget to afford a new plugin for every purpose. Fortunately, you don't need to specialize. Instead, you can choose a single tool that solves many problems. Formidable Forms is one such option: Formidable Forms is a powerful form builder at heart, but it can also do much more. With the use of the grid views, you can easily create a beautiful display of your restaurant menu.
Additionally, that's not all it can do. Since our tool is flexible and easy to use, it can support your restaurant in many other ways. Tasks like collecting Stripe payments for reservations are simple. They also don't require a single line of code!
As such, you don't need to get an individual WordPress food menu plugin. Instead, you can stick to a single effective tool to meet countless website needs.
Formidable Forms is a powerful form builder at heart, but it can also do much more. With the use of the grid views, you can easily create a beautiful display of your restaurant menu.
Additionally, that's not all it can do. Since our tool is flexible and easy to use, it can support your restaurant in many other ways. Tasks like collecting Stripe payments for reservations are simple. They also don't require a single line of code!
As such, you don't need to get an individual WordPress food menu plugin. Instead, you can stick to a single effective tool to meet countless website needs.
From Idea to Reality in Minutes. Build Powerful Forms, Dashboards, Apps and More.
Formidable Forms makes advanced site building simple. Launch forms, directories, dashboards, and custom WordPress apps faster than ever before.
How to use Formidable Forms as a WordPress restaurant menu plugin
Creating a stunning and responsive menu for mobile devices doesn't have to be hard. Here's how you can use Formidable Forms to do so in two easy steps.What to skip the tutorial and have it done for you? Check out our restaurant menu template.
Step 1: Create a data form to list menu items
First, you'll need to create a data form. This will be where you upload your menu information. To get started, navigate to Formidable → Forms → Add New. You'll then be able to choose a template: You may choose to start with the Recipe Catalog option. We recommend this because it comes with many fields you might want for a menu, such as a dish category and cuisine. However, you can also start from scratch with a blank form. After you make your choice, click on Create.
For our purposes, we'll be including four important fields for each item: the name of the dish, a brief description, an image, and the price. We'll also add a dish category to keep things organized:
You may choose to start with the Recipe Catalog option. We recommend this because it comes with many fields you might want for a menu, such as a dish category and cuisine. However, you can also start from scratch with a blank form. After you make your choice, click on Create.
For our purposes, we'll be including four important fields for each item: the name of the dish, a brief description, an image, and the price. We'll also add a dish category to keep things organized:
 Once you're happy with your form, hit Update in the upper-right corner to move on.
Next up, we'll populate the data form with the menu information. You can do this either manually or through the import function. We recommend using the import function if you have a lot of items, as this can save you time. You can upload a Formidable XML or any CSV file.
To start this process, stay on the page where you've just created the form. Navigate to the Entries tab at the top, and select either Add New or Import depending on your preferences. If you decide to do this manually, you'll see your new form:
Once you're happy with your form, hit Update in the upper-right corner to move on.
Next up, we'll populate the data form with the menu information. You can do this either manually or through the import function. We recommend using the import function if you have a lot of items, as this can save you time. You can upload a Formidable XML or any CSV file.
To start this process, stay on the page where you've just created the form. Navigate to the Entries tab at the top, and select either Add New or Import depending on your preferences. If you decide to do this manually, you'll see your new form:
 Fill out the fields with the correct information and click on Submit. If you don't fill in the Entry Key field, it will be automatically generated. Repeat these steps for each of your menu items. Once you've uploaded all of your food items, you can move on to step two.
Step 2: Add a new grid view to display the restaurant menu
Formidable Forms had a lot of potential before, but our new grid views make it a top-tier WordPress responsive menu plugin, and practically a page builder. You can create a view to display your information stylishly and easily. To get started, navigate to Formidable → Views → Add New. Select the Grid option: You'll then see a drop-down menu titled Use Entries from Form. You'll want to use that data form that we created in step one. Select that as your data source and click on Create a view. That will take you to a new creation screen:
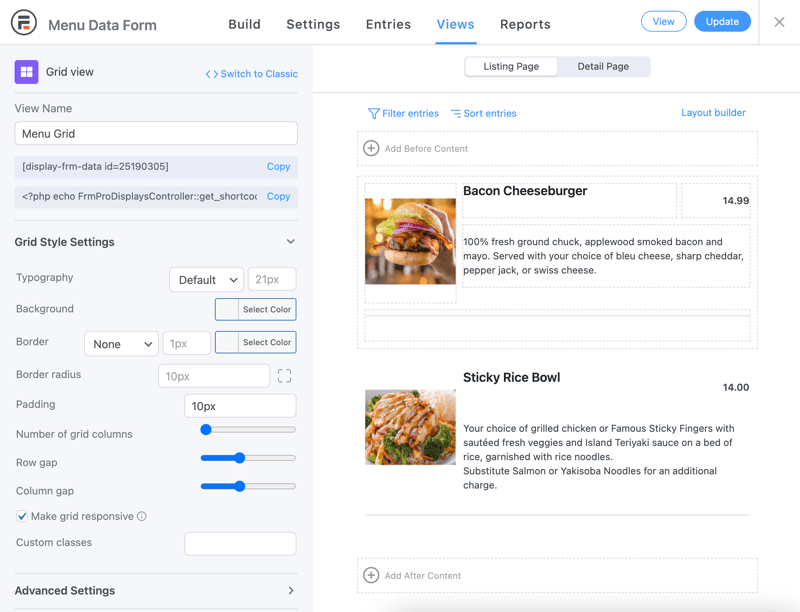
 We'll begin by changing a few settings. You can start by navigating to Advanced Settings and setting Page Size to anything under 50. You might also choose to change the menu's design under Grid Style Settings.
Next, head over to the right side of the screen. Click on Layout Builder and drag and drop rows to create the layout you would like:
We'll begin by changing a few settings. You can start by navigating to Advanced Settings and setting Page Size to anything under 50. You might also choose to change the menu's design under Grid Style Settings.
Next, head over to the right side of the screen. Click on Layout Builder and drag and drop rows to create the layout you would like:
 Now, click on each box to add the content. From there, you can drag and drop the fields where you want them.
 If you'd like to include images, you'll need a quick extra step to make sure they display correctly. From the right-hand Customization box, select Advanced and find the Show image option. Drag that onto your form where you want the image.
After you're done, click on Update view. You should now be able to preview what your menu will look like with your settings applied.
If you'd like to include images, you'll need a quick extra step to make sure they display correctly. From the right-hand Customization box, select Advanced and find the Show image option. Drag that onto your form where you want the image.
After you're done, click on Update view. You should now be able to preview what your menu will look like with your settings applied.
 If you like what you see, go to edit any page or post and add a View block. Here's an example of our end result:
 If you want to edit any of your work, you can always go back to your new grid view and tweak it to fit your needs.
Wrapping up
Running a restaurant can be a huge challenge. You might not want to add finding a WordPress menu plugin on top of your other responsibilities. Fortunately, you can use Formidable Forms to easily create a beautiful menu (and a lot more!). Here are a few more features that may help with a restaurant website:- How to make a food order form (add delivery options).
- How to create a recipe database.
- Create a data form and add your food options.
- Add a new grid view to display your information.
More posts about Formidable Views
 How to Build Custom Database Applications in WordPress
 The Complete Guide to Building Web Apps in WordPress (30+ Examples)
 How to Build a Custom Booking System in WordPress
This article may contain affiliate links. Once in a while, we earn commissions from those links. But we only recommend products we like, with or without commissions.

