
What a pleasure to have support within minutes. Brillant, accurate answer, and solved the question. Thanks to the Formidable Team. Eric


Last updated on August 12, 2026 by Formidable Team
How to Create a WordPress Registration Form With Payments
If someone can register without paying, someone will. Formidable Forms fixes that: one WordPress form that takes the signup and the payments together, no code required. The setup takes minutes, and we'll walk through it below.
Approximate read time: 7 minutes
Upgrade your WordPress site with powerful, flexible forms.
What you need to collect payments at signup
You'll need two things before you start: the Formidable Forms plugin and a payment gateway account.
Formidable Forms
Formidable Forms is a WordPress form builder with payment collection built in. Here's exactly what each tier gets you for this tutorial:
- Lite (free): One-time payments through Stripe, PayPal Commerce, or Square. That covers the entire event registration build below. A 3% transaction fee applies on top of the gateway's own processing rates.
- Basic and Plus: More fields, templates, and features, but the 3% transaction fee still applies.
- Business: The User Registration add-on (required if you want the form to create WordPress accounts), recurring subscription payments, and the 3% fee is removed.
- Elite: Everything in Business, plus the Authorize.Net and WooCommerce integrations.
So the honest summary: an online registration form with payments for an event costs you nothing to build. A registration form that also creates paid user accounts on your site is a Business plan workflow.
A payment gateway (or several)
Formidable Forms connects your forms to Stripe, PayPal Commerce, and Square, with Authorize.Net available on Elite. All of them accept credit and debit cards; Stripe and Square also handle digital wallets like Apple Pay and Google Pay based on the visitor's device.
We'll use Stripe in this tutorial because it's the fastest to connect. If you'd rather use another gateway, the form setup is identical. Only the connection step changes. Our guide to accepting credit card payments in WordPress covers each gateway's connection steps in detail.
From Idea to Reality in Minutes. Build Powerful Forms, Dashboards, Apps and More.
Formidable Forms makes advanced site building simple. Launch forms, directories, dashboards, and custom WordPress apps faster than ever before.
Build a registration form that collects payments
This guide covers two types of forms. The first is an event registration form with payments, and the second is a user registration form that includes payments and also creates a WordPress account.
The setup is the same either way until Step 2, where you'll choose the template that fits.
Formidable Forms Lite handles the whole build unless you need account creation, which requires Business and is called out where it applies.
Step 1: Connect a payment gateway
From your WordPress dashboard, go to Formidable → Global Settings → Payments → Stripe.
Choose how you want to process one-time payments, flip on test mode so you can run a practice transaction first, and click Connect to Stripe.
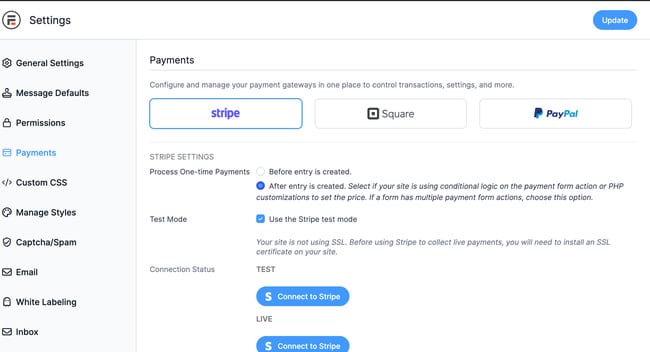
Sign in to your Stripe account in the window that opens, and the connection is done.
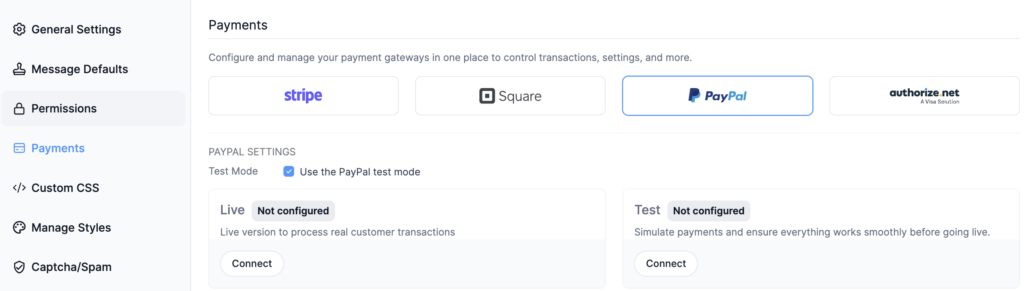
Using PayPal Commerce or Square instead? Head to Formidable → Add-Ons, install the one you need, then connect your merchant account from the same Global Settings screen.
Step 2: Start your form from a template
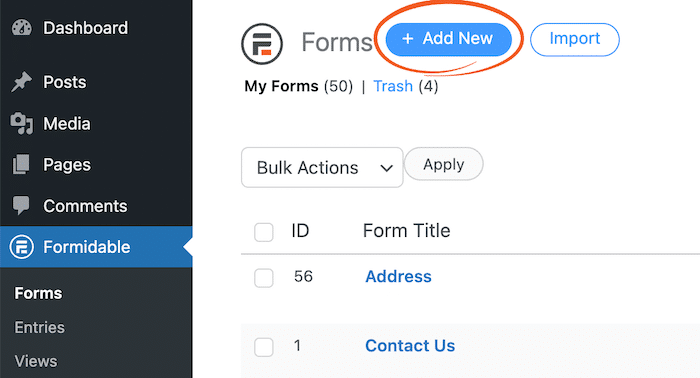
Go to Formidable → Forms and click + Add New.
The template gallery is the fastest way to get a payment-ready form. Pick based on what you're building:
- Selling event spots, tickets, or class registrations only? Search Conference Registration and click Use Template.

- Also creating a WordPress user account for each signup, like a paid membership or client portal? Search User Registration instead. This template requires the Business plan's User Registration add-on, which you'll set up in Step 3.

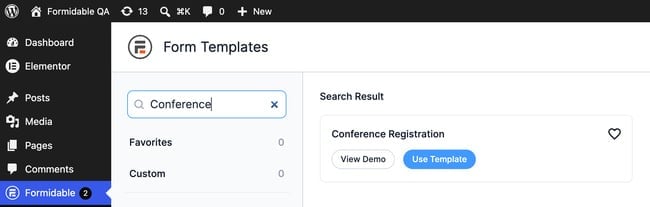

Both templates open in the drag-and-drop builder with their core fields already in place. From here, add, remove, or rearrange fields until the form matches your event or membership.
Every version of this form needs a way to charge: either a Payment field, or a Product and Total pair. If you started from scratch instead of a template, drag one in now.
For the event form, a few extra fields are worth adding:
- Dropdown or radio buttons for ticket types at different prices
- Quantity field so one person can register a group
- Checkbox for add-ons like a workshop, meal, or t-shirt
For the account version:
- Click any field to mark it required
- Add conditional logic to show the payment field only when a paid membership level is selected
- Adjust labels to match your membership tiers
Click Save when the form looks right.
Step 3: If you're creating user accounts, add the Register User action
Skip this step for event-only registration and go straight to Step 4.
First, install the add-on: go to Formidable → Add-Ons, search for User Registration, and turn it on.
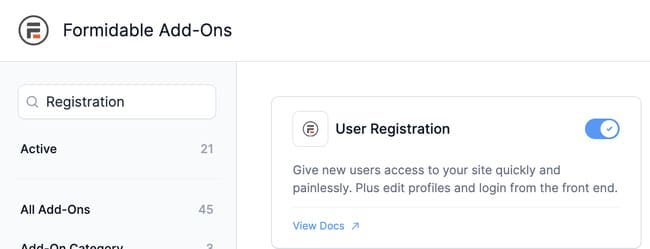
Then open the Settings tab at the top of the builder, choose Actions & Notifications, and click Register User.
Map your form's fields to the WordPress user profile: username, email, password, first and last name. Then choose the role new users get, such as Subscriber. If you want to hold accounts until payment clears, set the action to activate the user only after a successful payment.
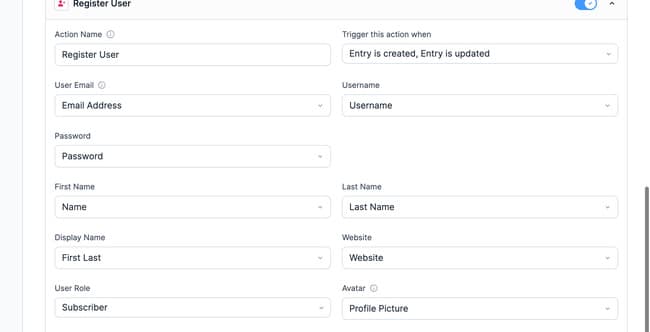
The User Registration docs cover every option on this screen.
Step 4: Add the Collect a Payment action
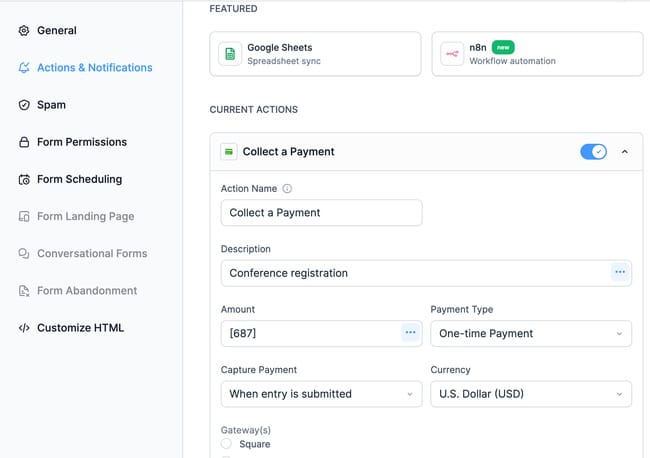
Still in Actions & Notifications, click Collect a Payment.
Set the amount to pull from your payment or total field, choose your currency, and map the customer's name and email from your form fields.
For event registration, leave the payment type on one-time. For a membership or subscription, set the payment type to recurring and choose the interval instead.
Stripe charges the saved payment method automatically each cycle, and on the Business plan there's no 3% fee eating into each renewal.
If subscriptions are your model, our guide to recurring payments in WordPress goes deeper on failed charges and payment retries.
Click Update to save.
Step 5: Publish and test
Open the page where you want to take registrations, add a block, and pick the Formidable Forms block. Select your form from the dropdown and publish the page.

Run a test registration in Stripe test mode. For event registration, confirm the entry and the payment both show up.
For account registration, confirm three things: the payment went through, the user account was created with the right role, and the confirmation email arrived. Flip off test mode and you're live.
Every registration from here on collects payments at signup, and Formidable → Entries doubles as your paid attendee (or member) list.
You now have a WordPress registration payment system: signup, optional account creation, and billing in one form, with no separate membership plugin to maintain.
Which registration form setup do you need?
Quick decision guide, since "registration form" covers a lot of ground:
| You want to... | Build this | Plan you need |
|---|---|---|
| Sell spots for an event, class, or league | Event registration form with a one-time payment action | Lite (free), 3% fee applies |
| Take event registrations without the 3% fee | Same form, upgraded license | Business or Elite |
| Charge for a user account or membership | User Registration add-on + payment action | Business |
| Bill members monthly or yearly | User Registration + recurring payment action | Business |
| Run payments through Authorize.Net | Either form + Authorize.Net gateway | Elite |
If you're not sure, start free with the event-style form. Your form, entries, and gateway connection all carry over when you upgrade, so nothing gets rebuilt.
One form, one list, everybody paid
Whether you're filling seats at an event or creating paid accounts on your site, a registration form with payments leaves you with a single list where everyone's already paid.
Start with the free event form. When you're ready for user accounts, subscriptions, or fee-free processing, Business covers all three.
From calculated pricing to front-end order dashboards, there's a lot more you can build once payments are flowing. Browse the Formidable Forms payments hub, or check out the user registration feature page for the account side of things.
And with a 14-day money-back guarantee, there's no risk in trying Business.

Can I make a WordPress registration form with payments for free?
Yes, for event-style registrations. Formidable Forms Lite includes one-time payments through Stripe, PayPal Commerce, or Square at no cost, with a 3% transaction fee on top of the gateway's rates. Creating WordPress user accounts from a form requires the User Registration add-on, which is part of the Business plan.
How do I remove the 3% transaction fee on payments?
The 3% fee applies on the Lite, Basic, and Plus plans and is removed only on Business and Elite. If you process steady payment volume, the removed fee usually covers the cost of the Business plan on its own.
Can I charge a recurring fee when someone registers?
Yes. On the Business plan, set the Collect a Payment action to recurring and choose the billing interval. Stripe charges the saved payment method automatically each cycle, which is how most membership and subscription sites run on Formidable.
What happens if someone registers but their payment fails?
Formidable Forms logs the entry with a failed payment status and shows the visitor the gateway's error message. For user registration forms, you can hold account activation until payment succeeds, so nobody gets access without paying. You can also set up a separate email notification for failed payments.
This article may contain affiliate links. Once in a while, we earn commissions from those links. But we only recommend products we like, with or without commissions.