
Powerful forms for data collection and Wide API to merge automation using the best wokflows such as N8N, Zapier. Excellent tool for data collection. Recommended 100%. Furthermore, support is awesome.

Last updated on June 3, 2026 by Formidable Team
How to Export an HTML Table to Excel in WordPress
Picture a table of 200 event signups sitting on your site, and a colleague who needs all of it in a spreadsheet by lunch, while you're clicking down the rows copying names into Excel one cell at a time. With Formidable Forms and the Table View to CSV Converter add-on, you can export an HTML table to Excel in WordPress without touching code, either with a download link, a shortcode, or an export that runs on its own schedule.

Approximate read time: 7 minutes
Upgrade your WordPress site with powerful, flexible forms.
What you'll need
- Formidable Forms Pro on a Business license or higher
- The Table View to CSV Converter add-on (installed from Formidable → Add-Ons)
- A form with entries you want to export
If you haven't built the form yet, do that first. Any field type works. The export pulls whatever data your table View displays.
1. Create a table View
To control what data gets exported to Excel, you can create a regular Formidable table View.
We'll assume you've already created a form with Formidable Forms that has data you want to export. If you haven't, you can follow these instructions.
Fortunately, it only takes a few simple clicks to set up a Table with Views.
To create a table View, go to Formidable → View → Add New.
Then, you'll need to choose the form you want the data pulled from.
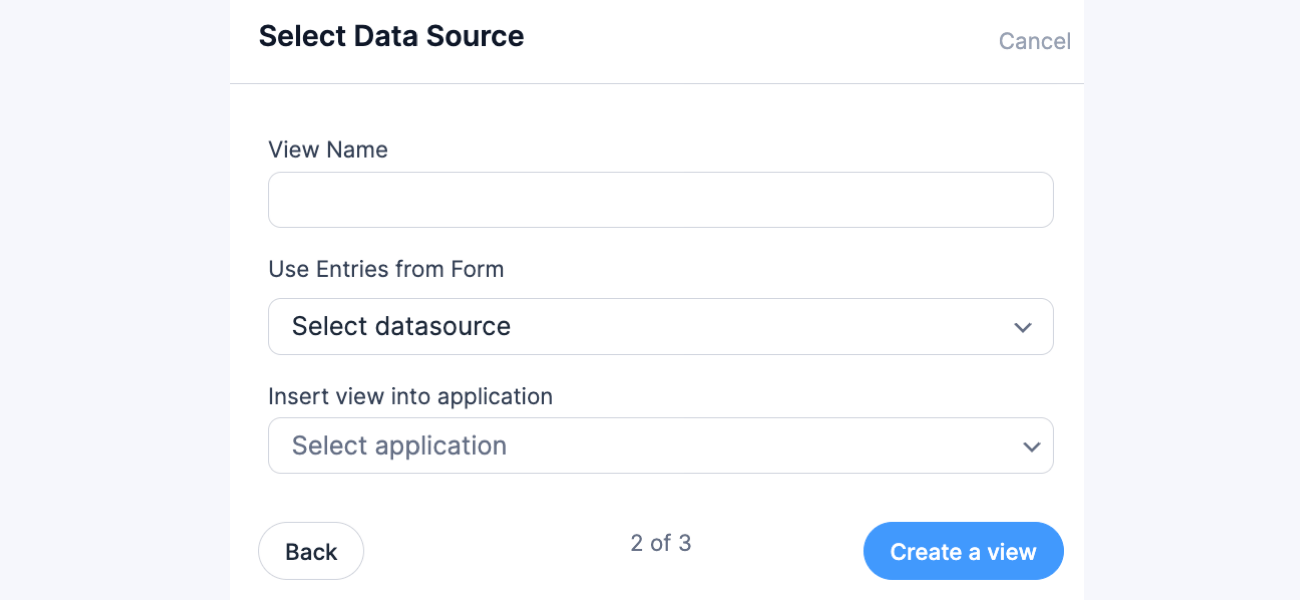
Next, look for the Basic Settings box and check the boxes you want included for your custom fields:

You can then rename columns and rows and use the drag-and-drop feature to customize how they will be displayed on your page.
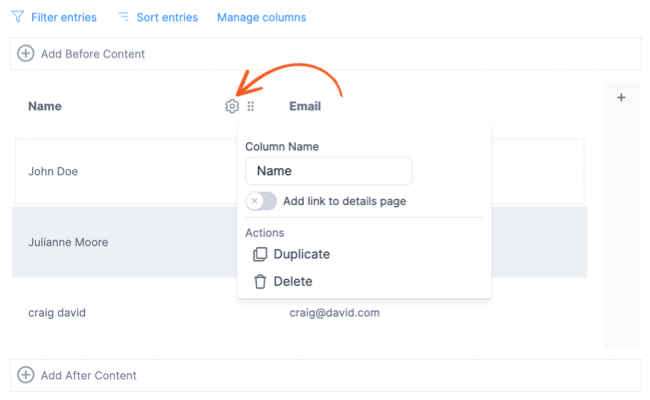
Finally, click the Create a View button. The Table View will be automatically generated.
Now, you're ready to add the ability to export that data as an Excel file.
You can also add filters to show only certain entries, make the table searchable, or sort by any column. The export will respect whatever filters you've applied, so users only download what they're allowed to see.
From Idea to Reality in Minutes. Build Powerful Forms, Dashboards, Apps and More.
Formidable Forms makes advanced site building simple. Launch forms, directories, dashboards, and custom WordPress apps faster than ever before.
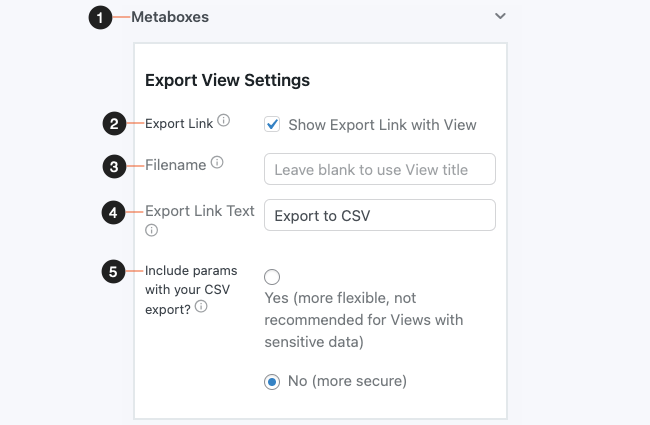
Step 2: Turn on the export link
Next, you'll scroll down to the Metabox → Export View Settings section in View Settings. Click the Show Export Link with View to add a link to export the table to CSV. This link will appear directly after the View as an export button in the form of hyperlinked text.
You can learn more about these settings in the Table View to CSV knowledge base article.
Now, when users click the link you created, a file download will automatically start and all the data from your View will be there when opened in Excel:

That's the whole setup for the most common use case. Everything from here is optional.
Step 3: Add an export link anywhere with a shortcode
Sometimes you want a download link on a page that doesn't show the table. A dashboard. An email notification. A footer. A members-only resource page. Anywhere a shortcode runs, the export link can go.
Use this shortcode:
[frm-export-view view=25 label="Download this data in Excel"]Replace 25 with your View's ID, and change the label text to whatever you want the link to say. Drop it into a page, a post, a widget, or a form email notification. The shortcode generates the CSV on demand, even if the table itself isn't on that page.

This is the one to use when you want a download button on a landing page but the actual table lives somewhere else, or when you want to send a fresh export attached to a confirmation email every time someone submits a form.
Step 4: Schedule automatic exports
For backups, daily digests, or any workflow where you want a file to land somewhere without anyone clicking anything, set up an automatic export.
- Go to Formidable → Global Settings → Export View
- Pick the View or Views you want to export
- Choose how often (in days or months)
- Set the character encoding and column separator if you need something other than the defaults
- Enter a custom directory on your server where the files should land

From there, Formidable handles it. Each export is a fresh CSV snapshot dropped into the folder you chose. Pair it with a backup tool or a cron job that emails the file, and you have a fully automated data pipeline that doesn't require anyone to remember it's running.
Why this approach beats the alternatives
WordPress has plenty of other table plugins, and most of them come with an export feature, but two problems tend to consistently appear.
First, they export what's visible on the page. If your table has a thousand rows and only twenty render at a time, you get twenty rows. For most real datasets, that's useless.
Second, the front-end export usually ignores permissions. A logged-in customer should see only their own entries. A staff member should see their team's. Bolt-on export tools don't always respect those rules, which is how private data ends up in the wrong CSV.
On the other hand, the Formidable Forms export reads from the View, which already knows your filters and user permissions. If the View is configured to show one user their own entries, that's what their export contains. Nothing else.
All three delivery methods come from one add-on: a link under the table, a shortcode you can drop anywhere, and a scheduled file drop. No stacking plugins, no custom code, and no third-party service holding your form data. That all-in-one dependability is part of why Formidable Forms has earned a 4.8 out of 5 rating across 1,369 reviews and more than 300,000 active installations.
CSV or Excel: which one are you actually exporting?
The Table View to CSV Converter generates a .csv file, a plain text format that every spreadsheet program on earth understands.
When someone clicks the download link, the file opens in Excel by default on most computers. Excel reads CSV natively and shows it as a normal spreadsheet. Prefer Google Sheets or Numbers on Mac? Import the same file there, no conversion needed.
So when people ask how to export an HTML table to Excel in WordPress, that's the answer: the format is CSV, and Excel just opens it.
Three ways, zero copy-paste
Three options, one add-on, zero copy-paste. Add a download link under your table, drop a shortcode wherever you need one, or let WordPress export the file on a schedule. Whichever method you pick to export an HTML table to Excel in WordPress, the data your users see is the data they download.
Since the export reads from a View, it's worth getting comfortable with everything Views can do, from filtering and sorting to building a full WordPress application around your form data. When you're ready, Get Formidable Forms Pro and turn any table on your WordPress site into a one-click export.
- Do I need to be on a specific Formidable Forms plan?
-
Yes. The Table View to CSV Converter add-on is available on the Business license and above. The Lite and Basic licenses don't include it. You can install the add-on from your Formidable dashboard or from Formidable → Add-Ons in your WordPress admin.
- Can I export only the data I've filtered on the front end?
-
Yes. The export reads from your View, so any filters, search queries, or user-specific permissions you've set apply to the file that downloads. If a user is filtering to show only entries from last month, that's what their CSV will contain.
- Will the scheduled export overwrite previous files?
-
Each scheduled run creates a fresh file in the directory you choose. You can manage retention yourself or pair it with a backup tool that handles versioning. The exports don't pile up automatically, but they also don't delete the older ones, so set up cleanup if you don't want a folder full of CSVs from last March.
- Can I use the shortcode inside email notifications?
-
Yes. The
[frm-export-view]shortcode runs wherever WordPress shortcodes are processed, including form email notifications. You can send a download link in a confirmation email so recipients always get the latest data when they click. - What if I want a different file format, like XLSX?
-
The add-on outputs CSV, which Excel opens directly. If you specifically need a native
.xlsxfile with formatting, formulas, or multiple sheets, you'd need a custom solution. For the vast majority of use cases, CSV is the right answer because it's portable, universal, and easy to automate.
This article may contain affiliate links. Once in a while, we earn commissions from those links. But we only recommend products we like, with or without commissions.

