
Formidable Forms has made my life so much easier as an event planner.


Last updated on October 3, 2024 by Formidable Team
How To Create a WordPress Form With a Datepicker [3 Steps!]
Learn how to create a WordPress form with a datepicker in just a few steps. This guide helps you add date selection to your forms for a smooth user experience.

Approximate read time: 6 minutes
Creating a WordPress form with a datepicker usually takes a lot of code...and a lot of time.
But, with the right tools, it doesn't have to take a lot of code or time. And using a datepicker can save a lot of time and avoid confusion for users. It's a simple feature, but setting it up can feel tricky if you're unsure where to start.
So that's what this post is for. In this post, we'll show you step-by-step how to create a datepicker WordPress form.
Let's get started.
Upgrade your WordPress site with powerful, flexible forms.
Why add a WordPress datepicker form to your website?
A datepicker is a small calendar that makes it easy for users to select a date and time.
Many people find navigating a calendar easier than using a text box or similar date or time field. This is very important if you rely on forms to run your business.
First, it prevents errors. Typing in a date can lead to mistakes, like entering the wrong format or an invalid date. For example, if you have an appointment booking form, users can easily select their preferred dates.
It also improves the user experience. Instead of manually typing in a date, users easily pick one.
Lastly, it saves time for both you and the user. No back-and-forths with a user. No need to code a datepicker form. Just a simple way to add options for date/time on any form.
From Idea to Reality in Minutes. Build Powerful Forms, Dashboards, Apps and More.
Formidable Forms makes advanced site building simple. Launch forms, directories, dashboards, and custom WordPress apps faster than ever before.
How to create a WordPress form with a datepicker calendar
The easiest way to create a WordPress form with a datepicker is with a form WordPress plugin.
And that's Formidable Forms.
No matter the form you're creating — contact form, appointment form, and more — Formidable Forms makes it easy. To get started, grab our Business or Elite plan to get access to the calendar features using the button below.
Then, here’s how to create a form with a calendar in three steps:
Step 1: Install Formidable Forms on your site
Once you've got our WordPress form maker, go ahead and install and activate the plugin on your website.
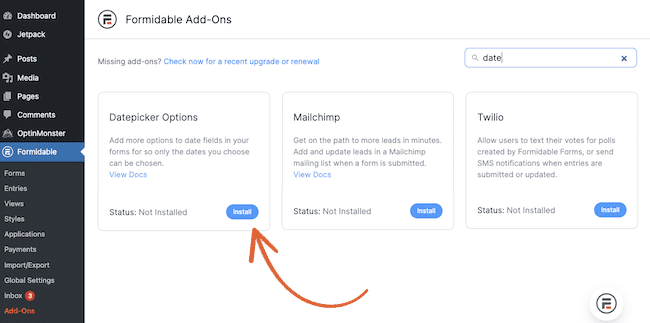
Next, go to Formidable → Add-Ons and find the Datepicker Options add-on. Click the Install button to activate it.
Once that's activated, it's time to create the WordPress form.
Step 2: Create a form with a basic inline calendar datepicker
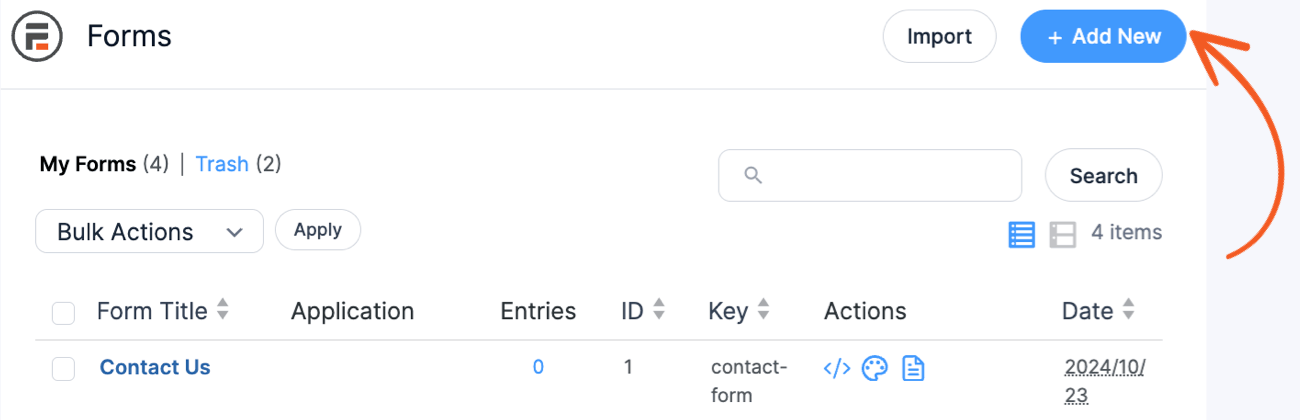
We’ll start by making a basic form. Go to Formidable → Forms → Add New.
You have a few different choices here:
- Create a blank form
- Use a pre-built WordPress form template
- Use the AI form builder
Next, the plugin will take you to the drag and drop form builder. Add whatever form fields you need here. But. for the datepicker, locate the Date input field in the left-hand menu. Then, add it to the form.

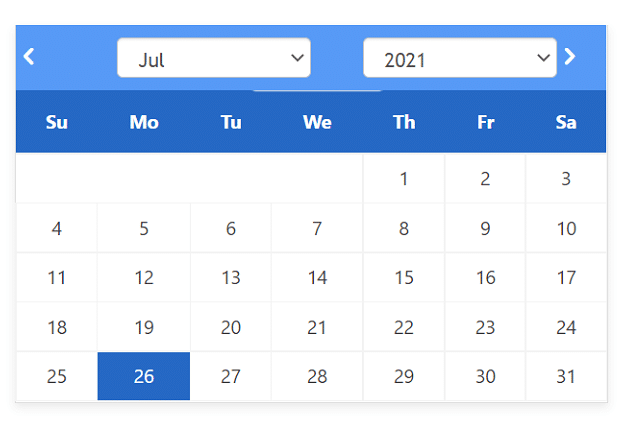
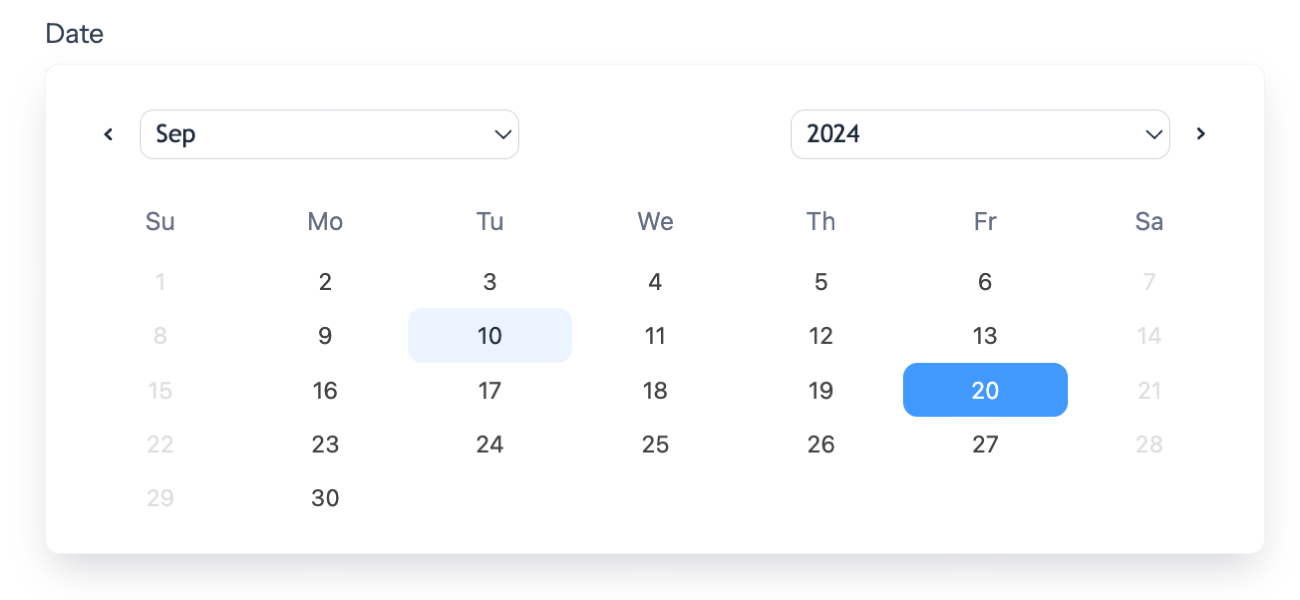
The date field looks like a text box, but don't worry — it shows up as a calendar to users on the front end.
Let’s dive into the different date/time picker field options.
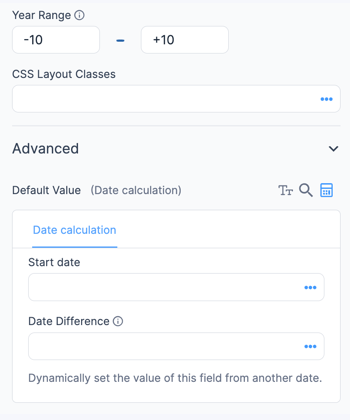
- Default Value (Date calculation): clicking the calculator icon lets you create a date calculator
- Year Range: The period that users can select from
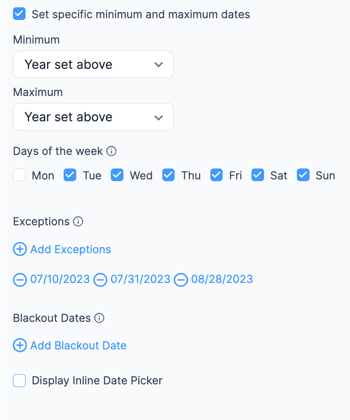
- Set specific minimum and maximum dates: Allows you to set a more specific date range, rather than just the year (great for event registration forms or other booking forms where you want to disable past dates or disable specific dates)
- Days of the week: This specifies which days of the week are available on your calendar
- Blackout Dates: Specific dates when you aren't available (ideal for vacations, holidays, or previous dates)
Customizing these fields lets you set how the datepicker looks and acts. Plus, you can ensure users don't choose invalid or out-of-range dates.
We recommend checking the Display Inline Date Picker box to ensure users don't miss the calendar.
There's also the Time field, which allows users to choose a specific time for an event. So pairing the Date and Time fields is great for the Calendar view (check out step 4).

Step 3: Publish your form
Once you're happy with your form, click Update in the upper right corner of your screen to save your changes and give it a name.
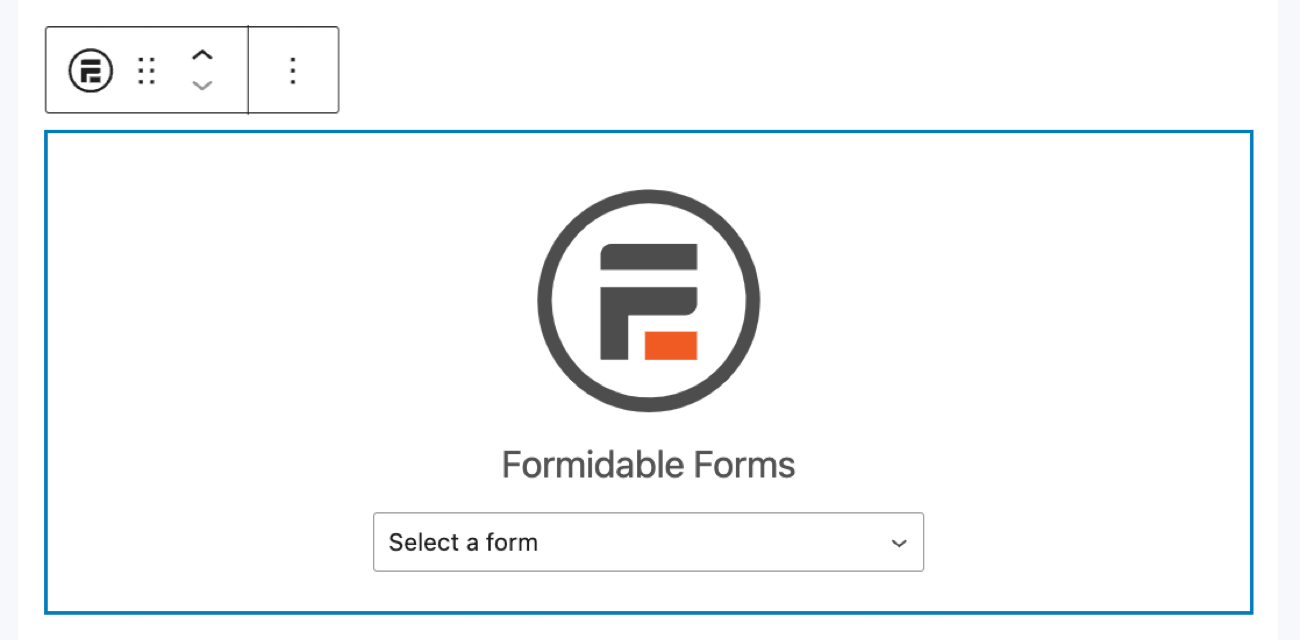
Finally, go to the WordPress post or page where you want to display your form. Add a new WordPress block, and find the Formidable Forms block. Next, choose your form from the dropdown menu.
Then, Update or Publish the page. And that's it! Your datepicker form is now online!
Formidable Forms inline datepicker makes it easy for users to choose any date or time they need.
Step 4: Display a calendar on the website (optional)
Formidable Forms Views feature also shows calendars, too.
For example, you can create an events calendar in WordPress in a few steps with Formidable Views.
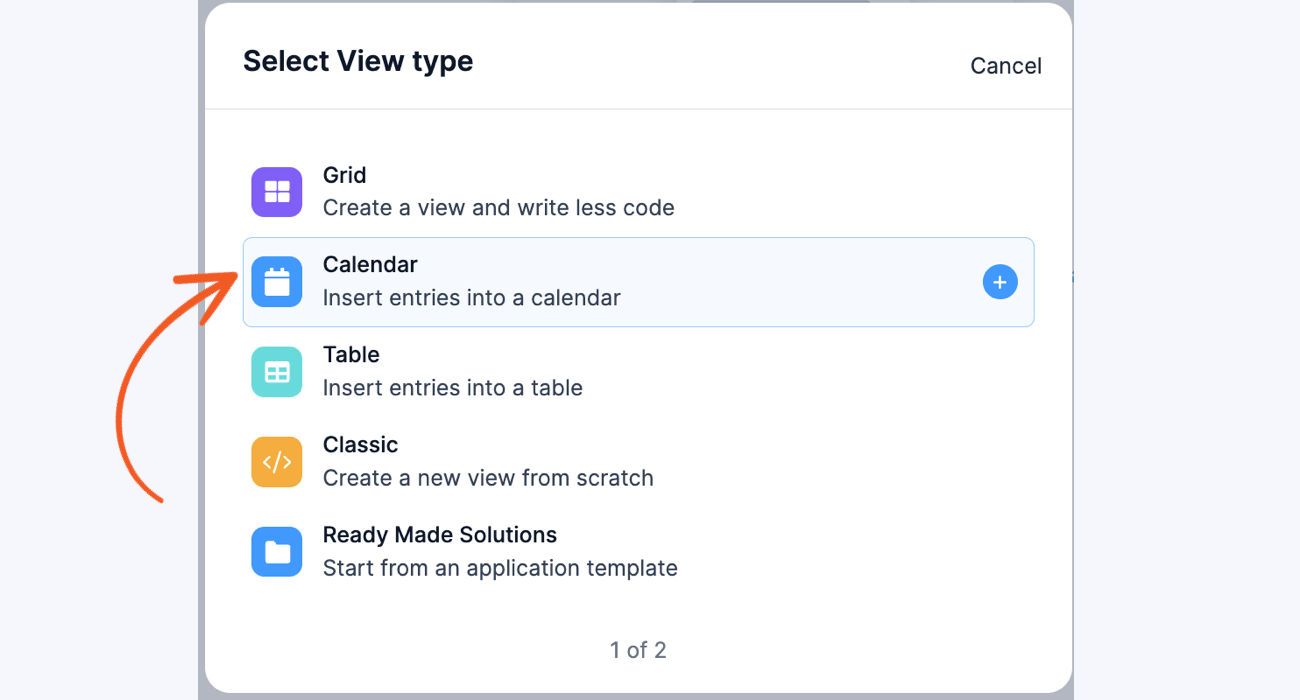
Just go to Formidable → Views and click Add New. Then, choose the View type, which will be Calendar.
Next, choose the form you created under the Use Entries from Form dropdown, and click Create a view.
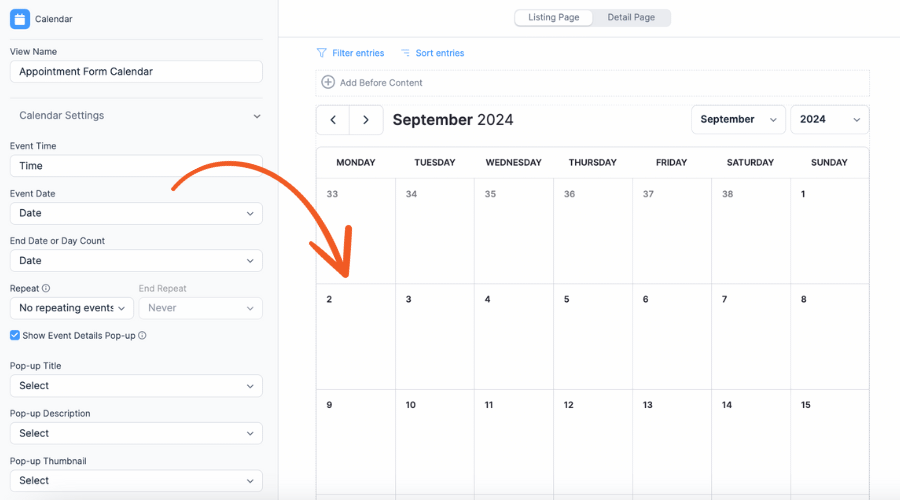
Next, you will pair the fields from the form to the calendar view. Feel free to connect the other fields, but pair the Event Date, End Date or Day Count, and Time dropdowns. This is how it shows on the calendar.
Click Create a view to advance.
Note: You must create a test entry under the Entries tab to see what it will look like.
Next, click the calendar in the View Editor and edit how it appears on the calendar using information from the form.
For example, you can add a name, appointment type, and time at a dentist's office for easy viewing.
Even better, if you know a bit of CSS and HTML, you can customize this calendar further and show the information differently. But this is what the default calendar looks like.
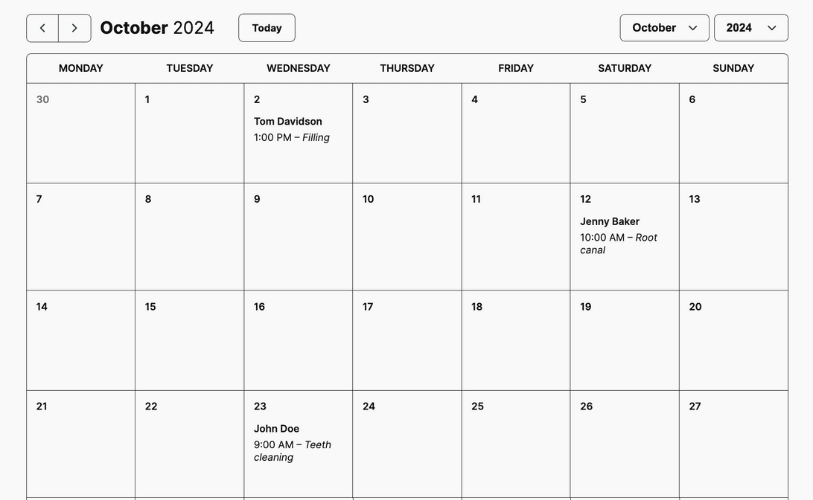
Regardless of how you use it, this is an easy way to pair a calendar with the WordPress datepicker form.
Ready to add a WordPress datepicker to your forms?
It doesn't have to be difficult to create a WordPress form with a datepicker.
But with a tool like Formidable Forms, it is. Whether it's event or reservation forms, you can quickly and easily create them with Formidable. (You can even calculate the difference between two dates!)
But adding effective inline calendars is only a fraction of what Formidable Forms can help you do. Learn more about our other great online form features and pick up our form maker plugin today!
For more WordPress tips and tricks, follow us on Facebook, Twitter, LinkedIn and YouTube.
Read more about form datepickers
 The Complete Guide to Building Web Apps in WordPress (30+ Examples)
 How to Build a Custom Booking System in WordPress
 9 Best WordPress Events Plugins [Compared Side-by-Side!]
This article may contain affiliate links. Once in a while, we earn commissions from those links. But we only recommend products we like, with or without commissions.

