
The Quiz Maker plugin allows you to automatically score quizzes and show possible results based on the outcome. These online quizzes are great for online courses, teachers who want to go paperless, and more.
- Create a trivia quiz using Scored quizzes.
- Create an interactive viral quiz using Outcome quizzes.
You can also add a quiz timer to set a time limit for completing a scored quiz.
Upgrade your WordPress site with powerful, flexible forms.
Download and install
- If you haven't already, install and activate the current version of Formidable Forms Premium on your WordPress site.
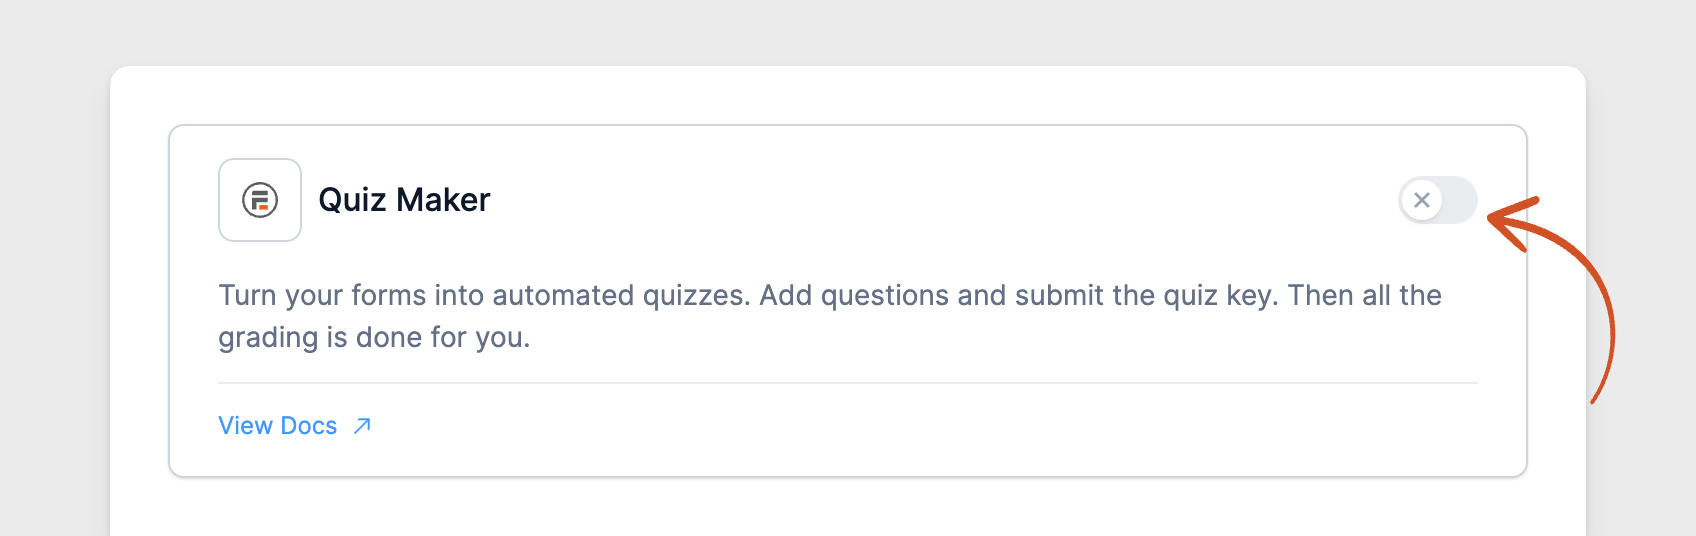
- After confirming your Formidable Forms license, go to Formidable → Add-Ons and toggle on the WordPress Quiz Maker plugin.

From Idea to Reality in Minutes. Build Powerful Forms, Dashboards, Apps and More.
Formidable Forms makes advanced site building simple. Launch forms, directories, dashboards, and custom WordPress apps faster than ever before.
Create a scored quiz
When a scored quiz action is selected, you can mark the correct answer and assign points to each option. By default, each correct answer is worth 1 point.
Step 1: Create a quiz form
Set up the scored quiz form by adding the necessary questions and answer choices in the form field.
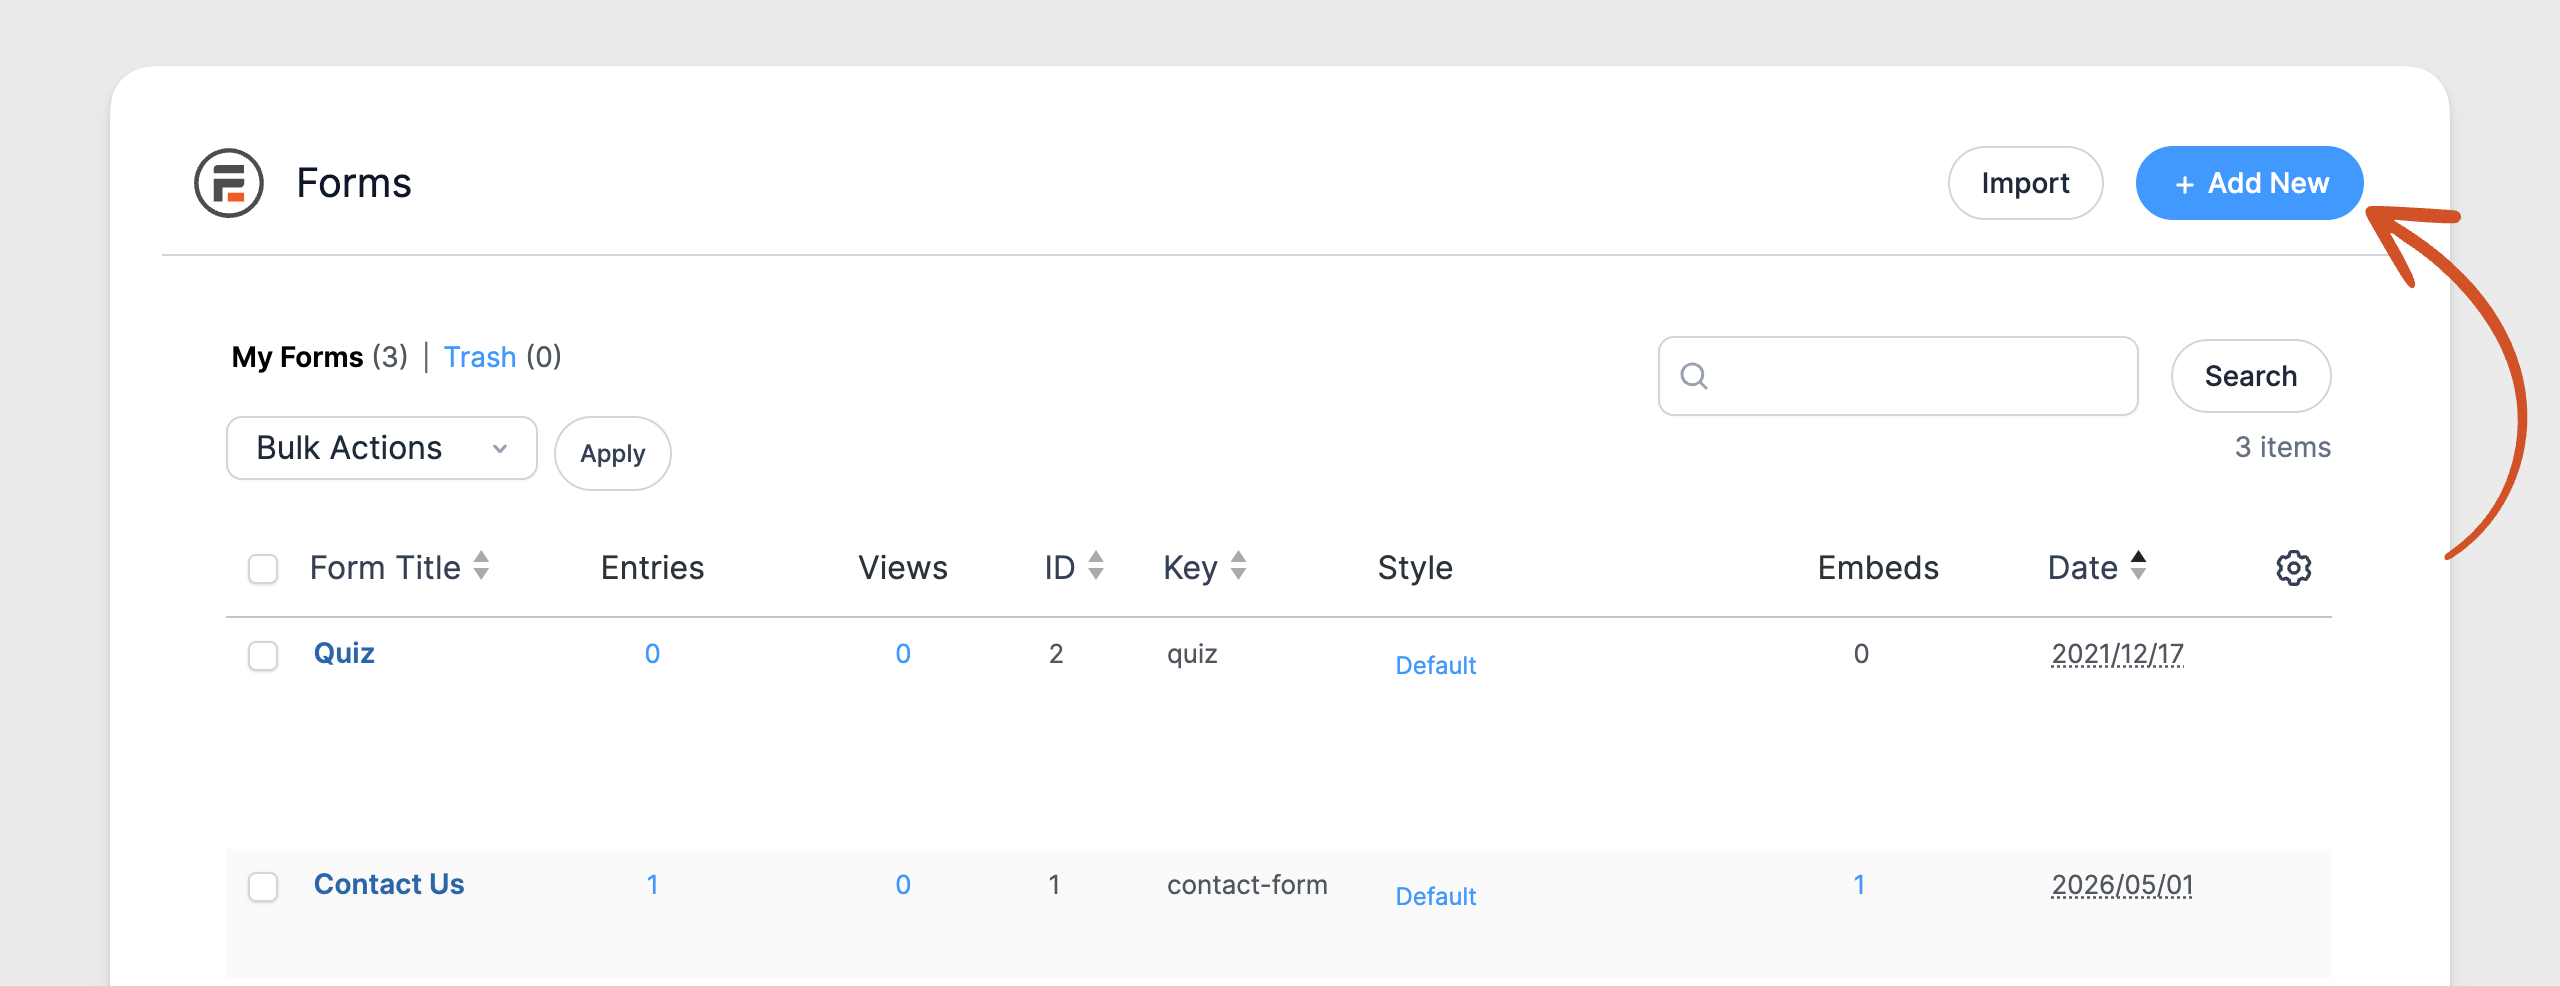
- Go to Formidable → Forms and click the Add New button in the top-right corner of the Forms list to start creating your quiz form.
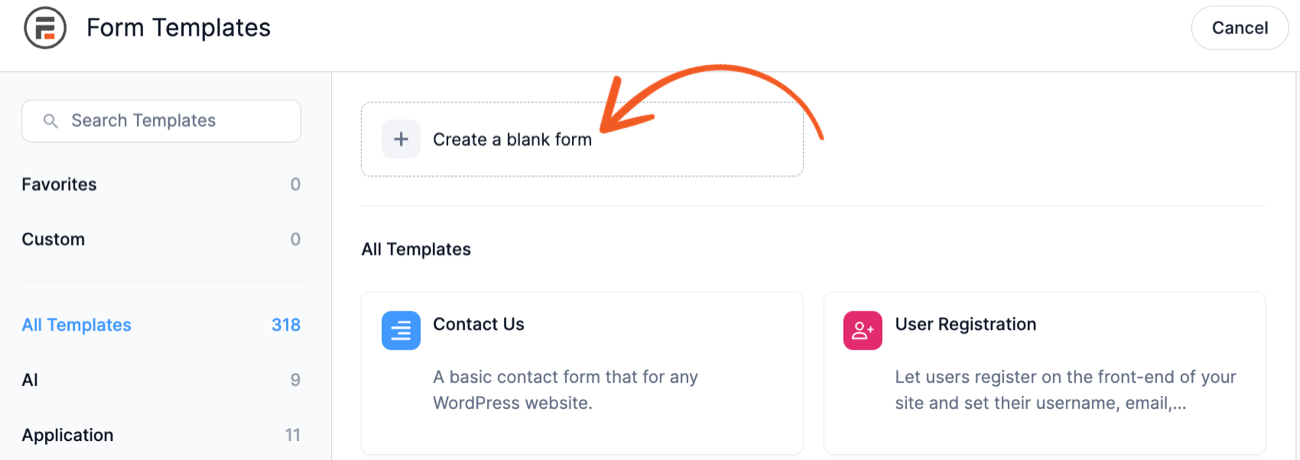
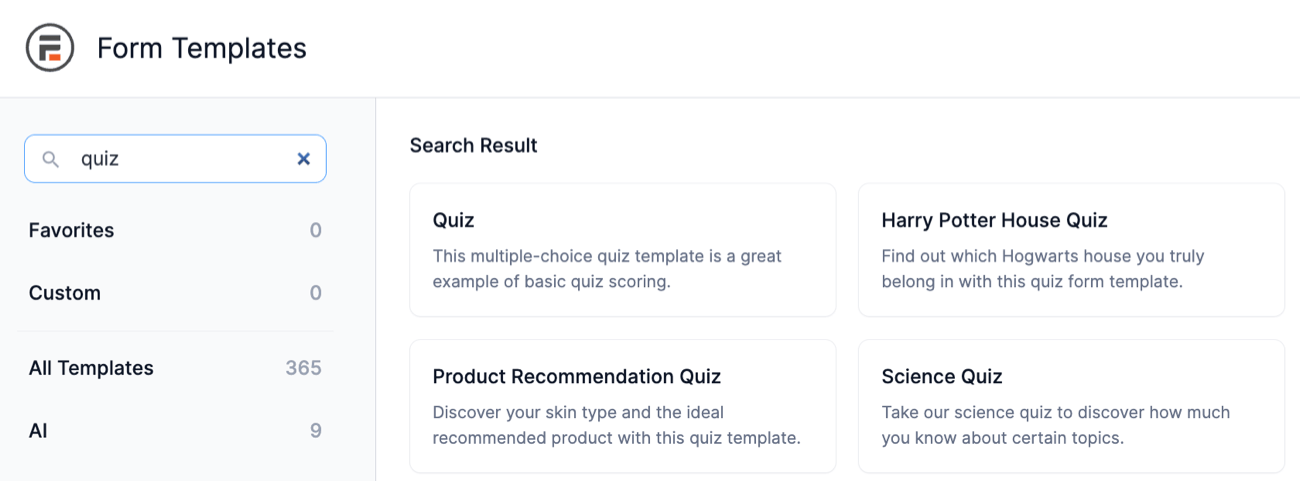
- You will be redirected to the form templates page. Click the Create a blank form option to build a quiz form from scratch.
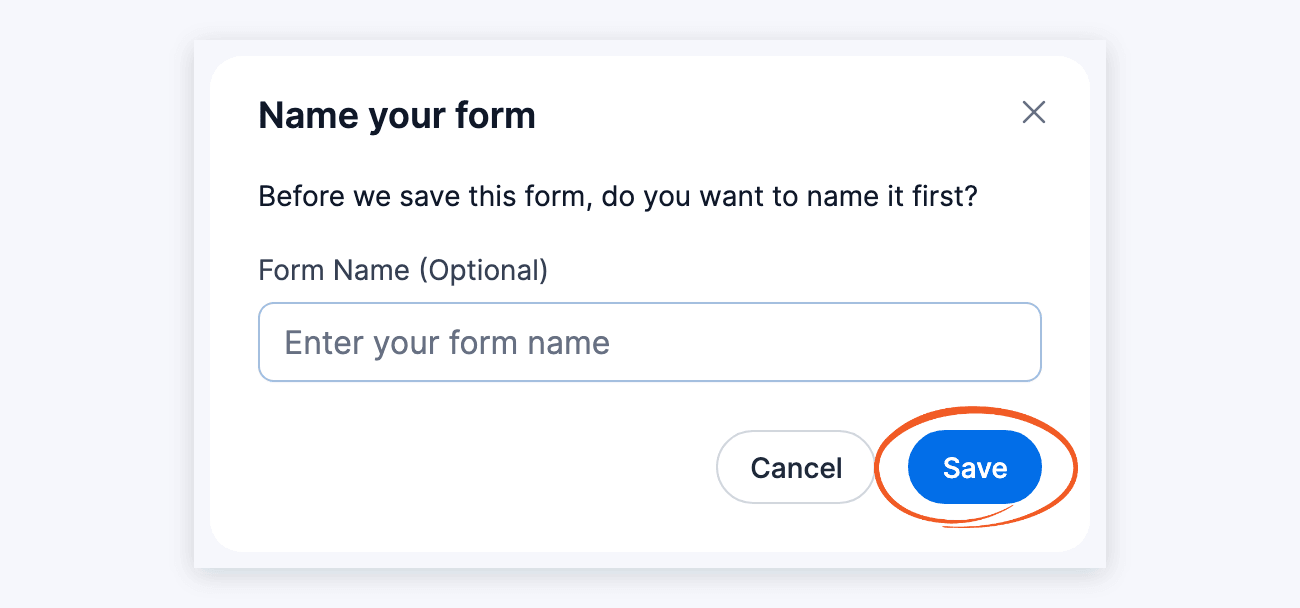
If you prefer a quiz form template, select the Quiz category or search for Quiz. Learn more about how to use form templates. - In the form builder, click the Save button. In the Name your form window, enter a name for your quiz form and click Save.
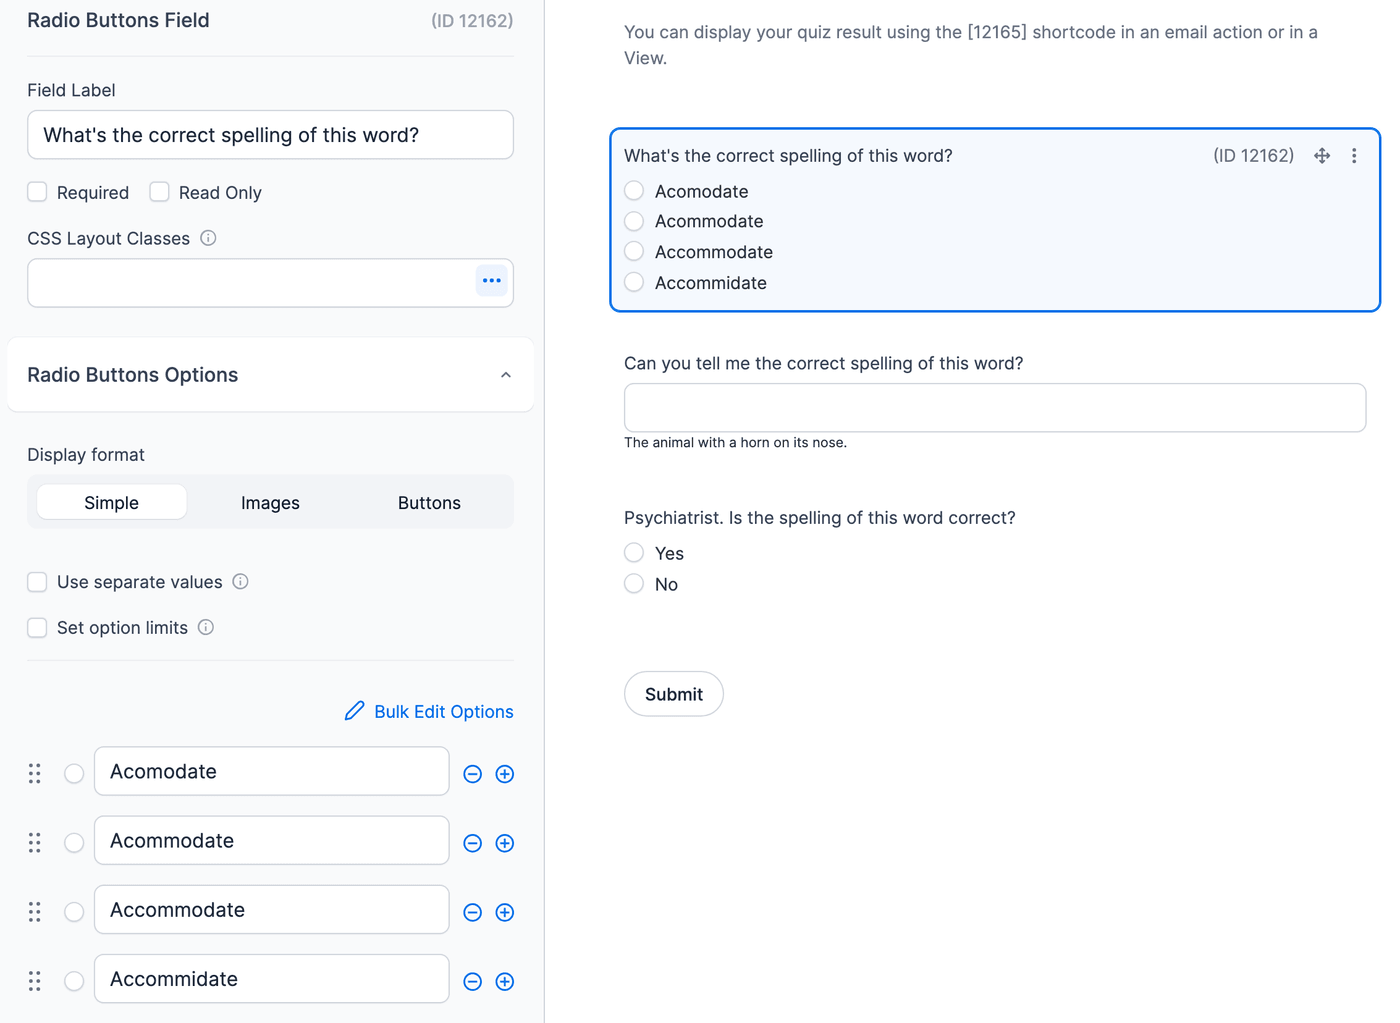
- Create your quiz using form fields to add the question and answer choices. For example, add a checkbox, dropdown, or radio field into the form to make a multiple-choice quiz. In the field settings, type your question as the field label and answer choices as the options.
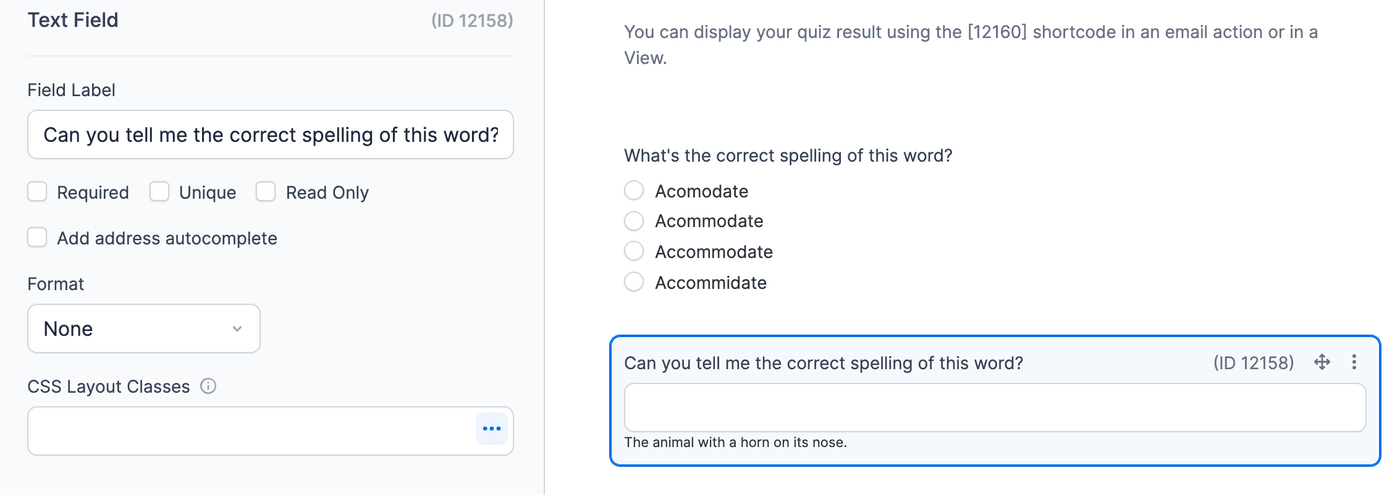
Add a single-line text or paragraph field to the form if you plan to build a text-based question. In the field settings, type your question as the field label.
Click Update to save the form.
Step 2: Choose quiz type
Add the Scored Quiz action to your form to turn it into a scored quiz.
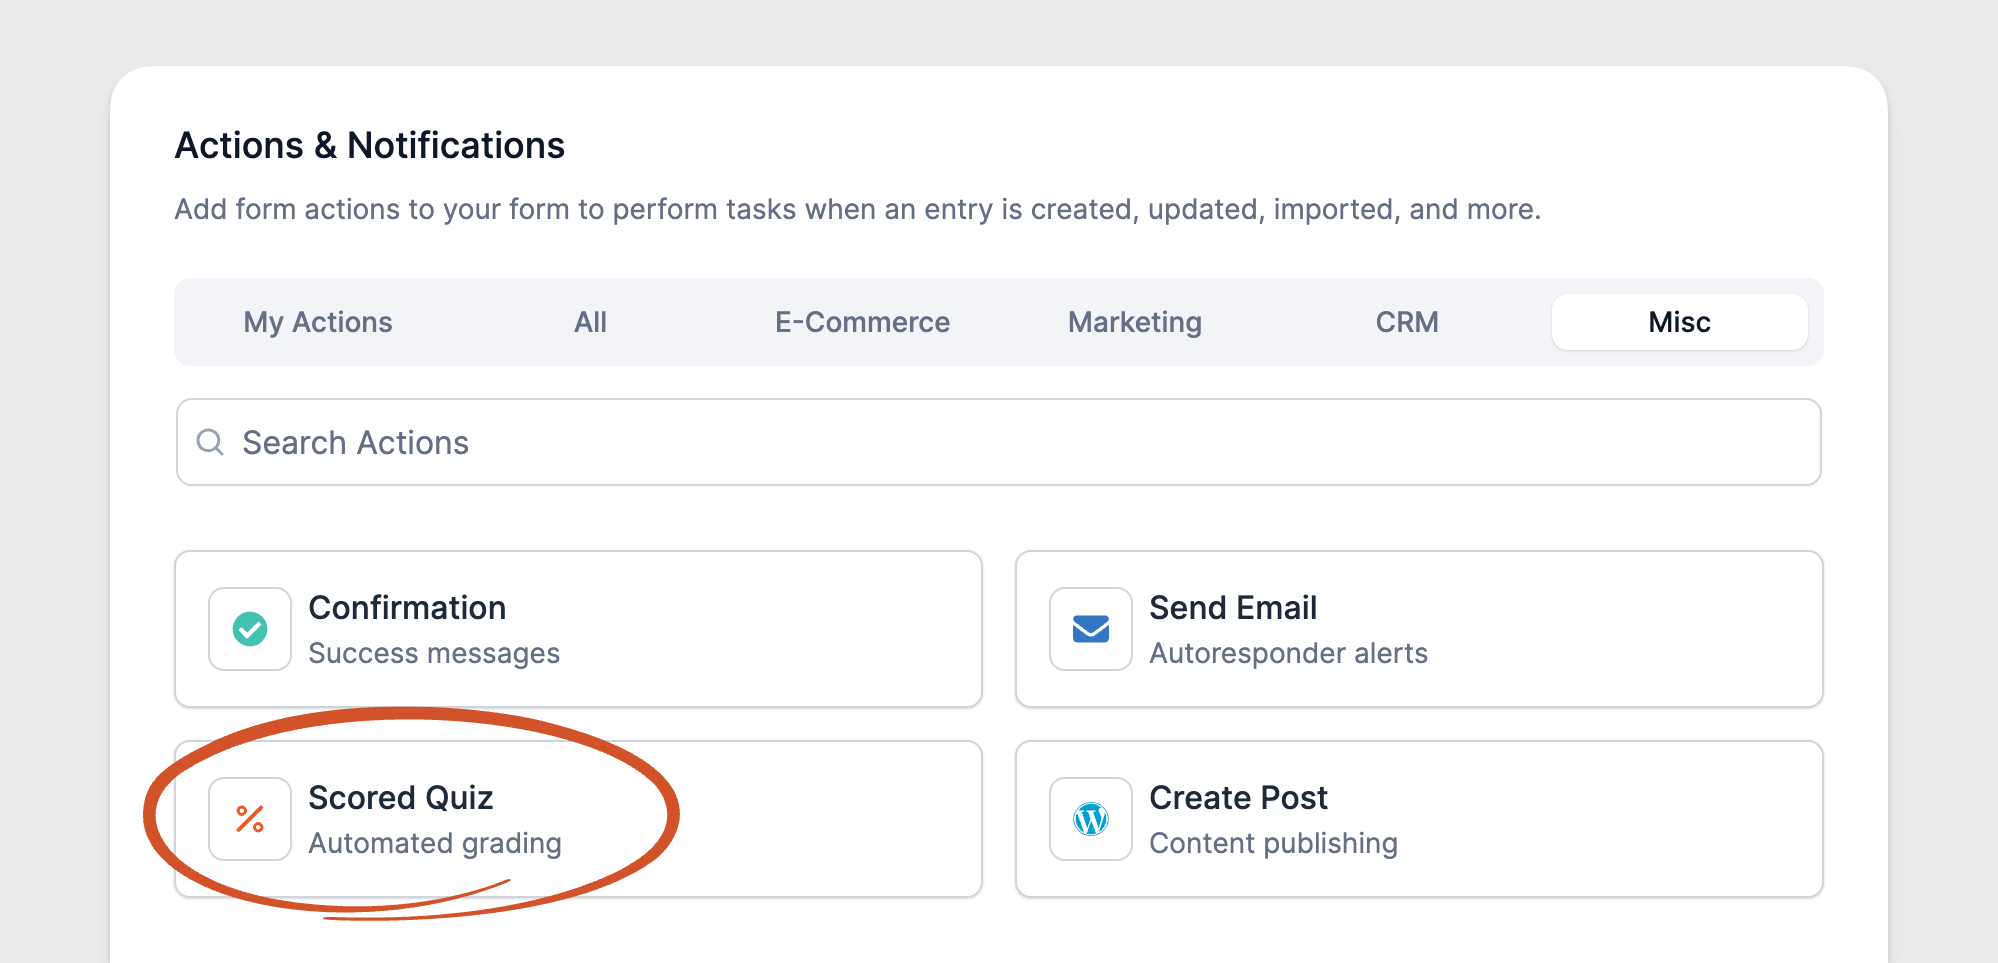
- Go to your form Settings → Actions & Notifications.
- Select the Misc tab, or search for Scored Quiz if needed. Then hover over the Scored Quiz action and click + Add.
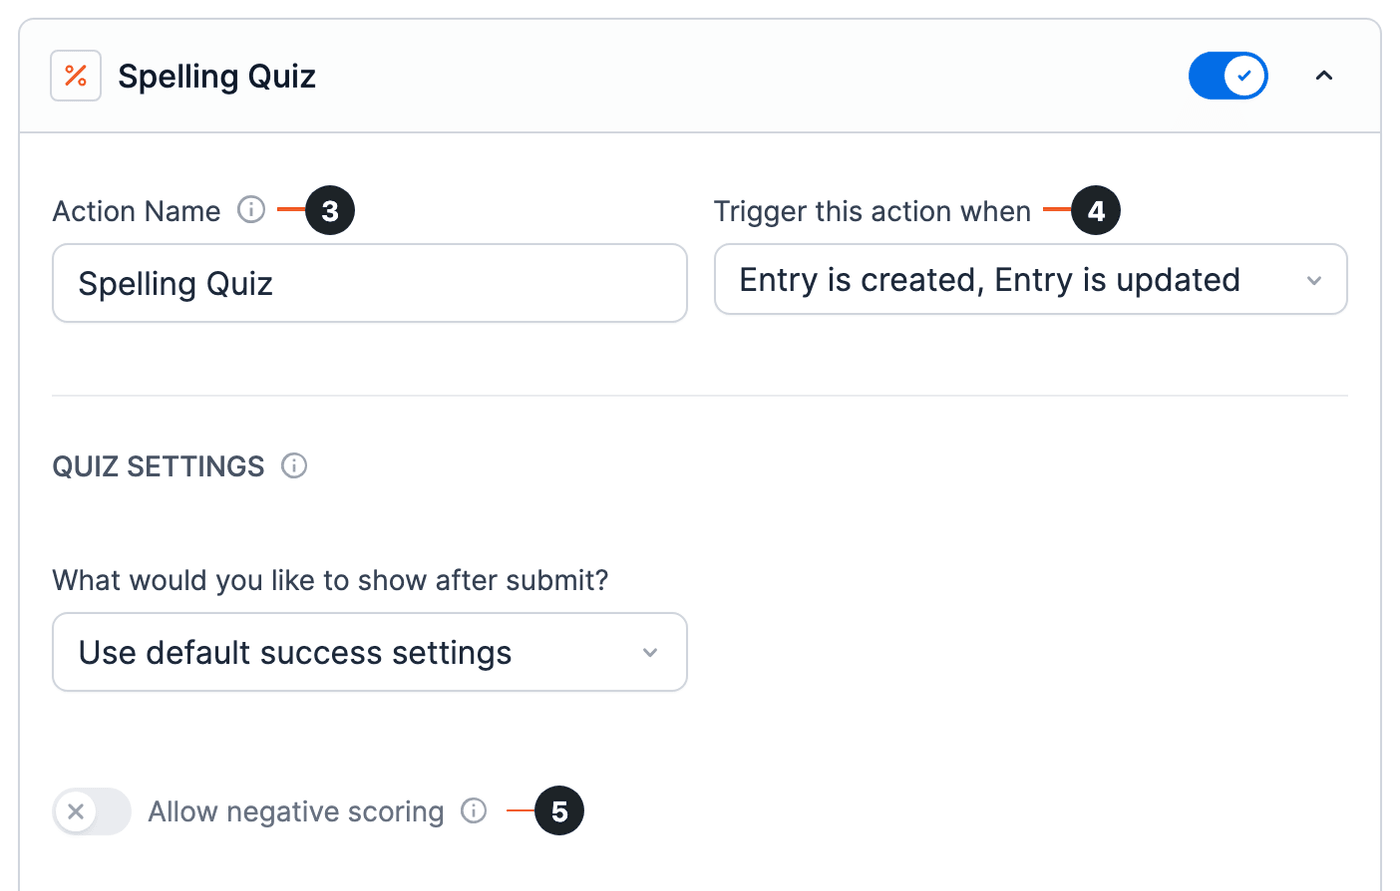
- Add an Action Name for easy reference. The name will only be visible on the backend.
- Choose when this action runs: Entry is created, Entry is updated, or Entry is imported. By default, it runs when an entry is created or updated.
- The Scored Quiz action has different settings you can choose from.
- Allow negative scoring: Applicable only for questions with advanced scoring. It's off by default. If you have a checkbox field that offers 4 answer choices, assigning scores of +1 or -1 to each option is possible. For instance, if the options are scored as 1, -1, -1, and 1, respectively, the entire question is worth 2 points. Wrong answers can result in a deduction of 2 points. When this setting is off, a question can't score below 0 points.
Step 3: Choose the results display
To show the quiz taker their score right after submission, click the What would you like to show after submit dropdown. Then choose one of the options below. By default, Use default success settings is selected.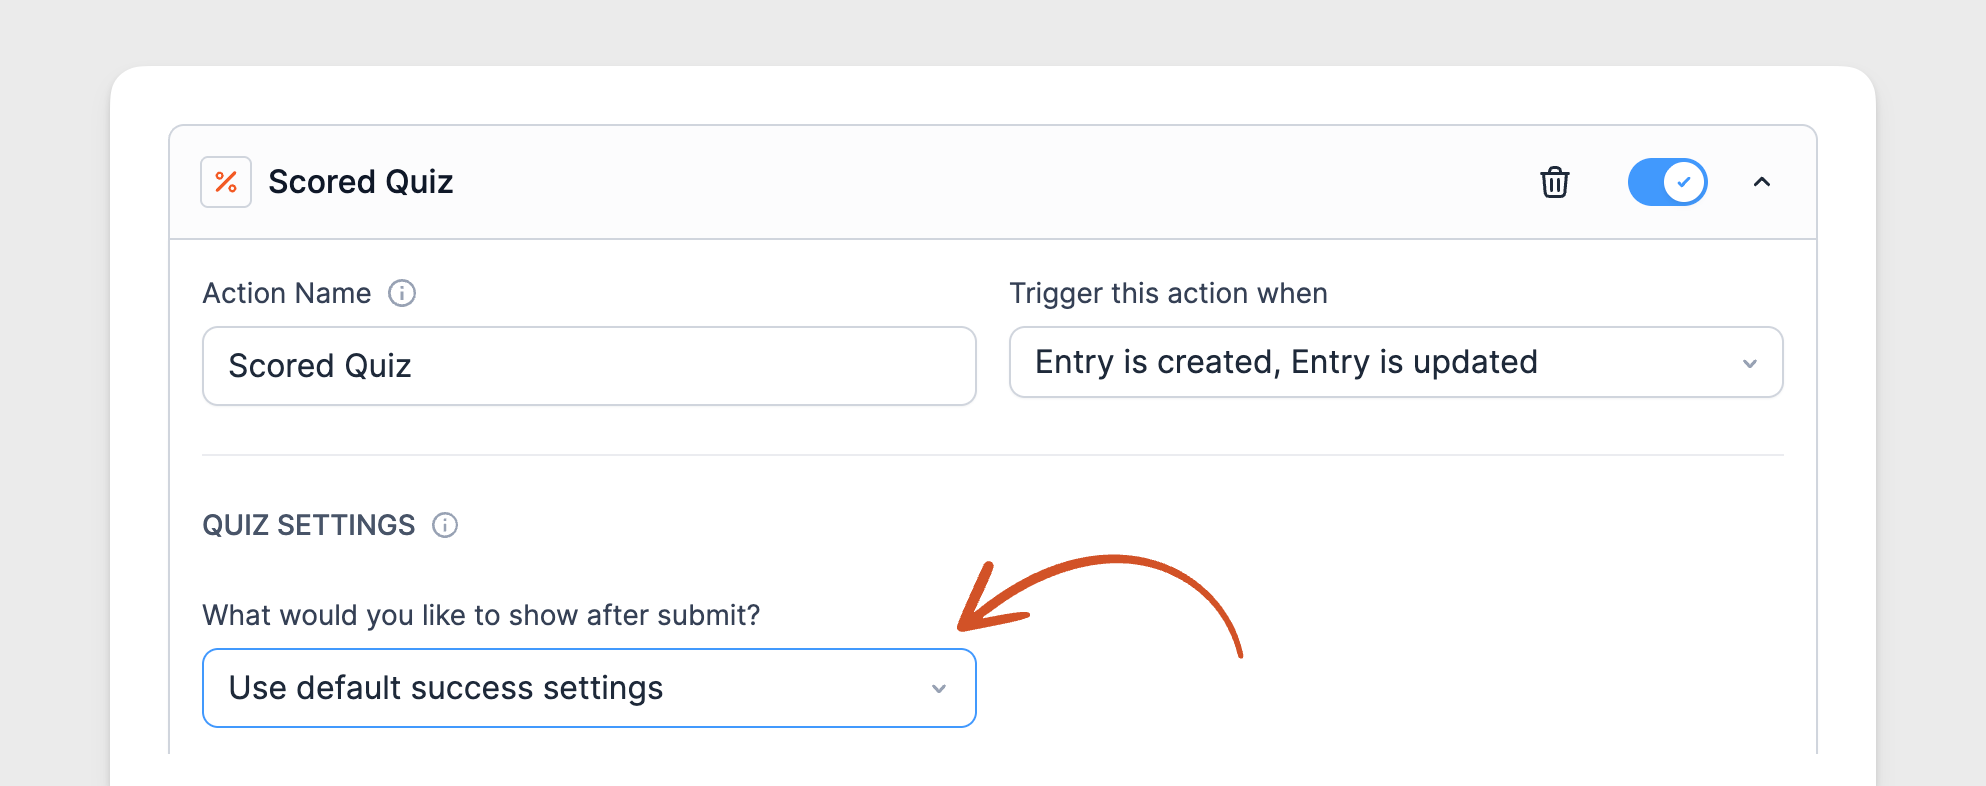
Use default success settings: Displays the default submit message. To change the default message included with the user’s score, edit it in your Confirmation action.
Show the score: Displays the default submit message with the total score and correct answer count. Using this option with manually scored fields is not recommended, as the score will be zero.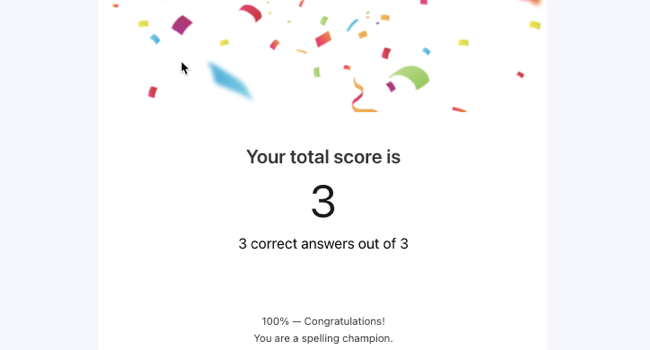
Show user's answers: Displays the default submit message with the quiz score and the submitted answers of the user.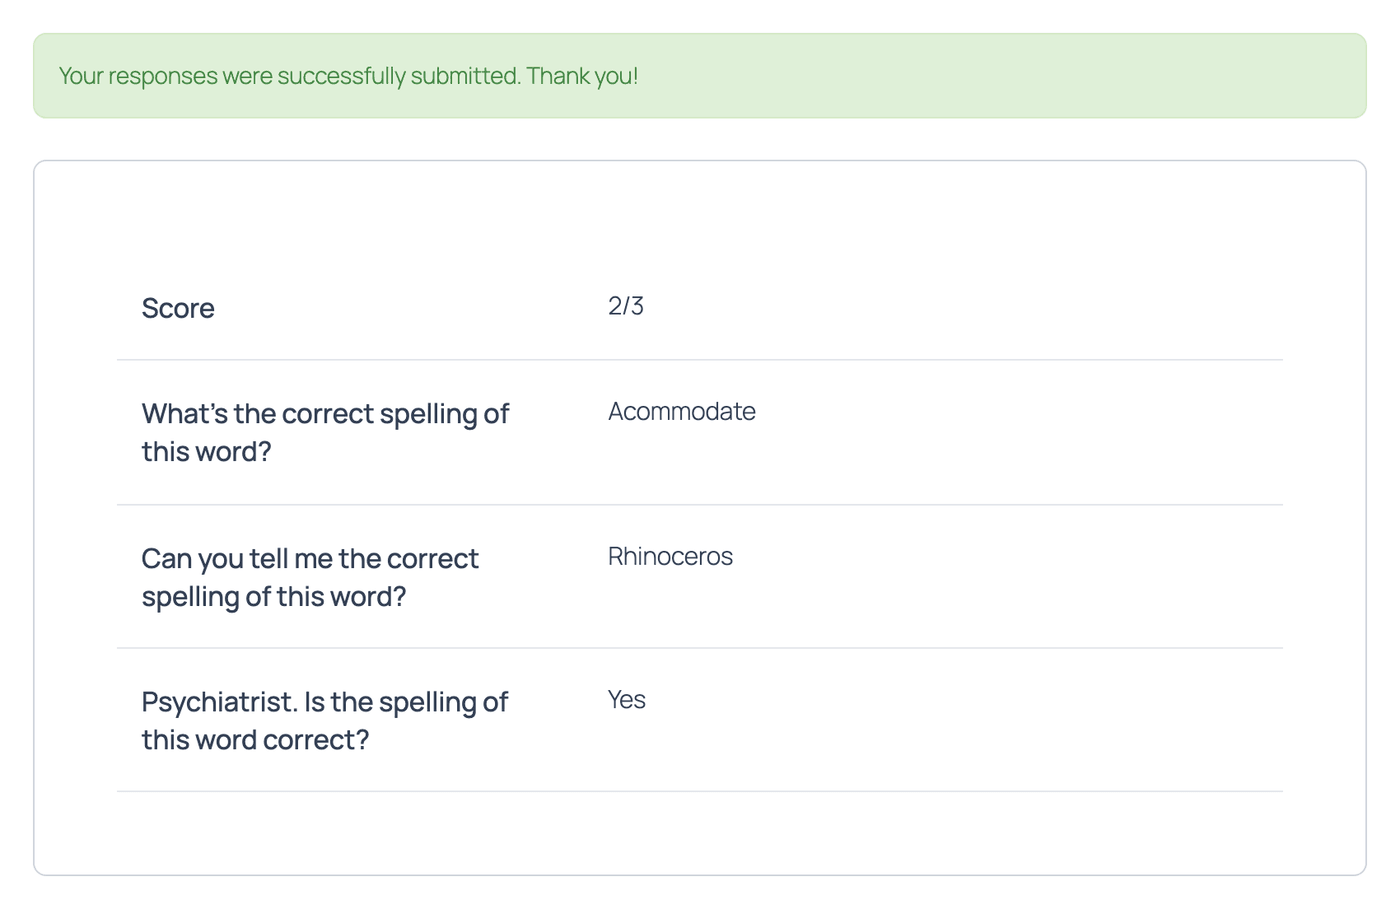
Show correct answers: Displays the default submit message and the submitted answers of the user. If the answer is incorrect, the correct answer will be shown.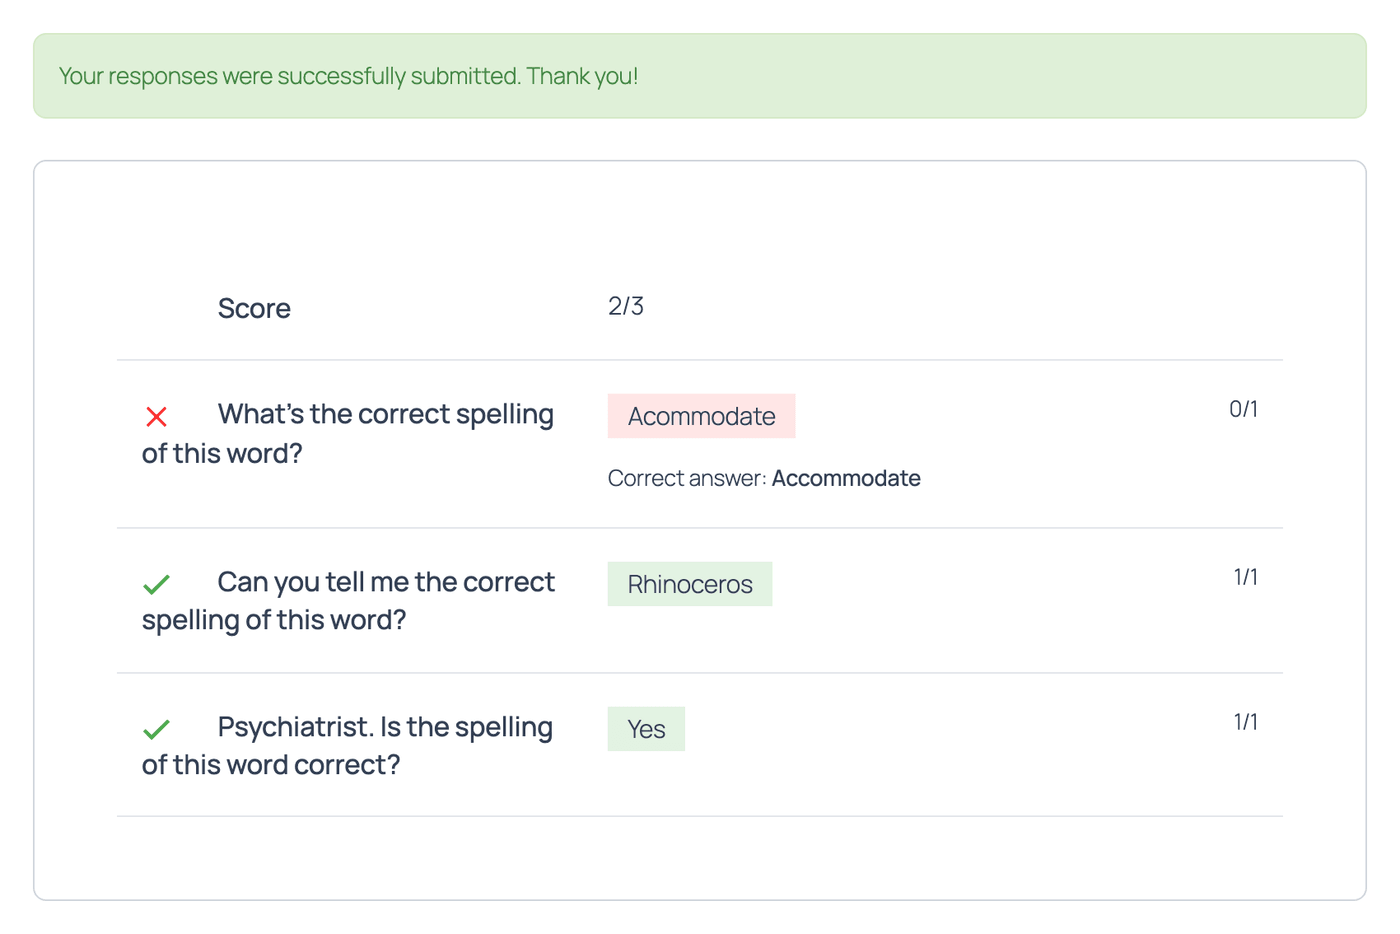
Step 4: Set correct answers
Mark the correct answer for each question so the quiz can be scored automatically.
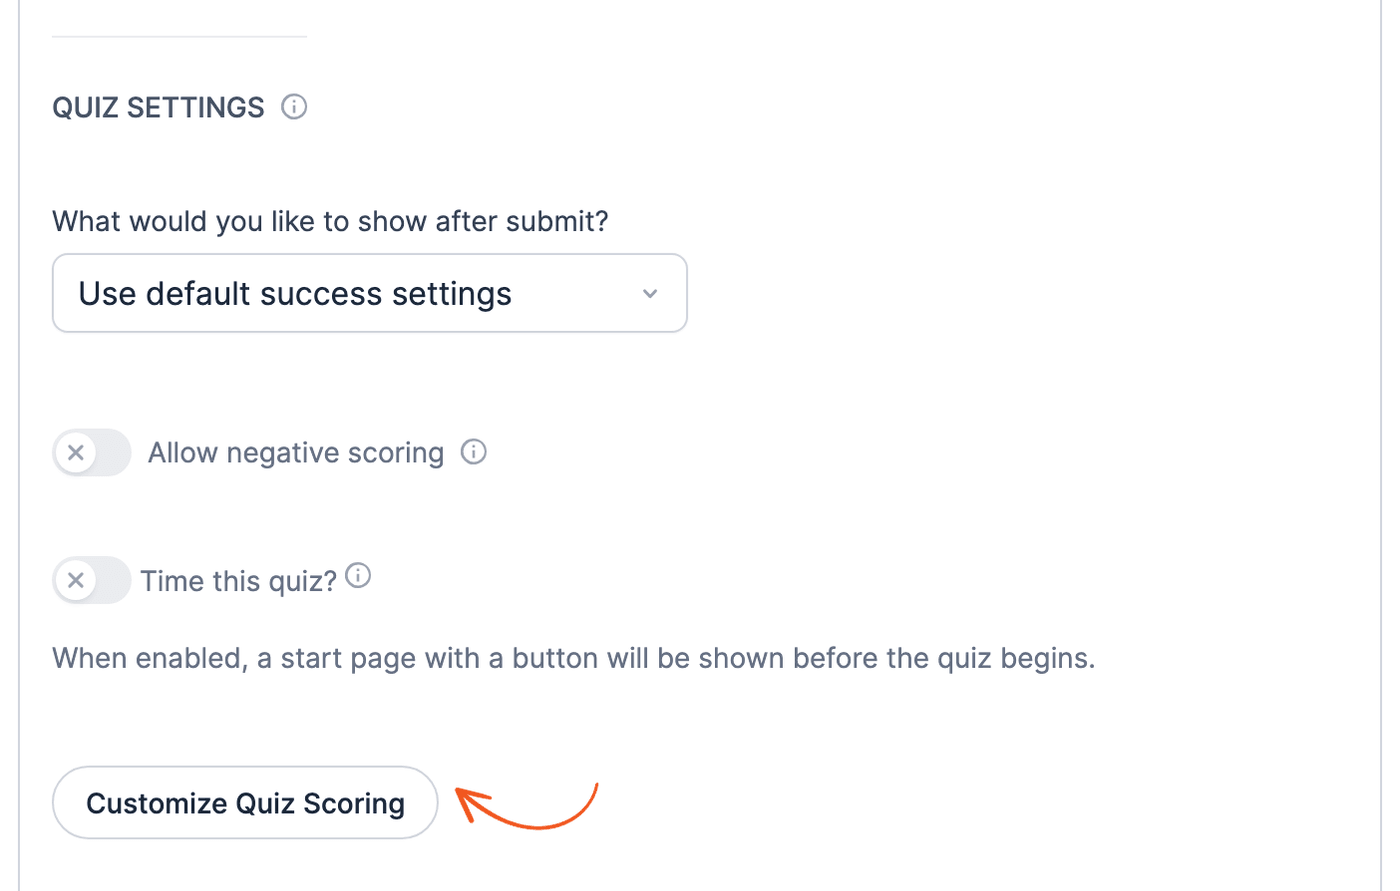
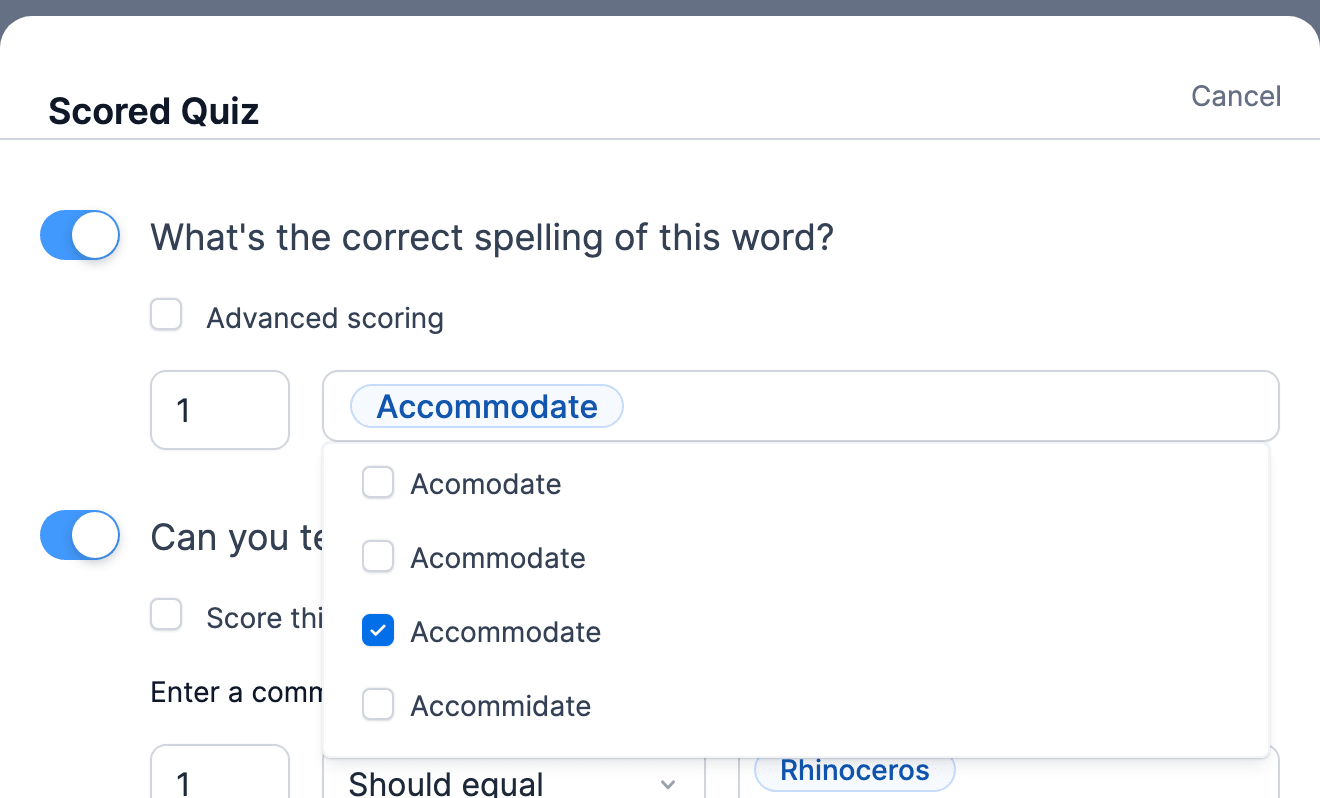
- In the Scored Quiz action, click the Customize Quiz Scoring button.
- Set the correct answer by clicking the toggle button next to the question. Each correct answer is worth 1 point by default.
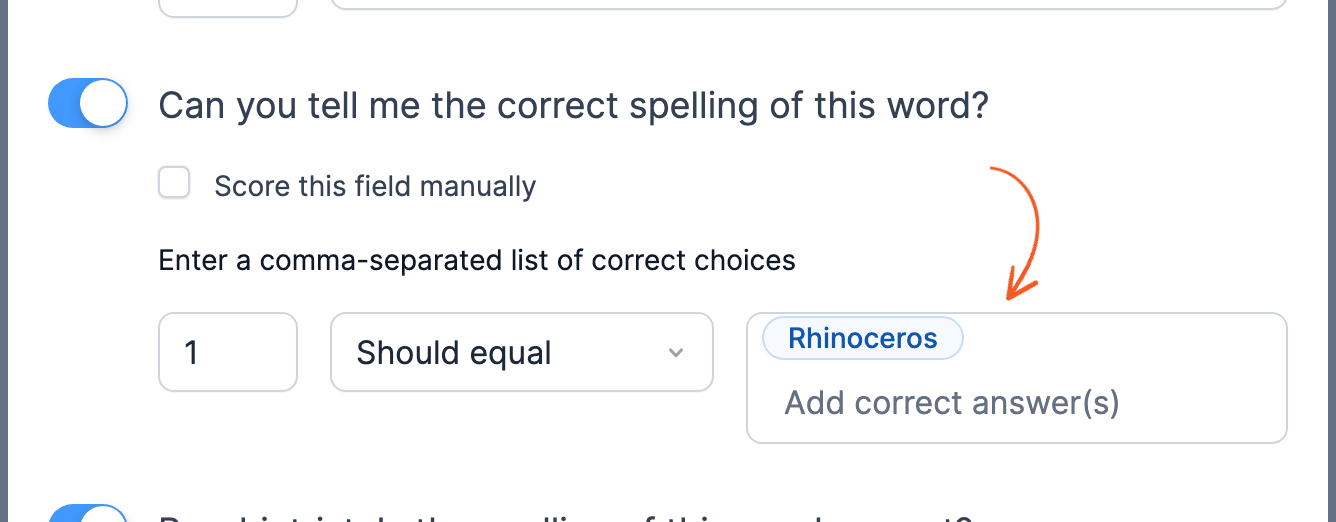
- Type the correct answer for text or paragraph questions in the field. You can filter the correct choices or score the field manually.
- Choose the correct option(s) from the dropdown, radio, or checkbox fields to provide accurate answers for multiple-choice questions. You can assign point values to each answer choice by selecting advanced scoring.
- Click Done to close the window. Then click Update to save your changes.
Step 5: Display the scored quiz
After building your quiz, you can start collecting and automatically grading quizzes.
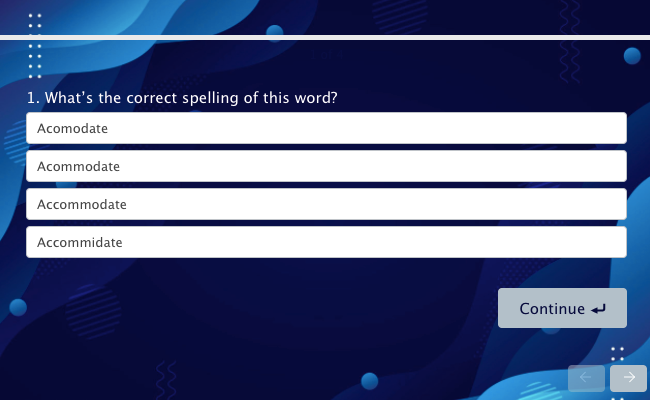
- Publish the quiz on any page or post. In the form builder, click Embed to add it to a page. You can also use a form block or the shortcode
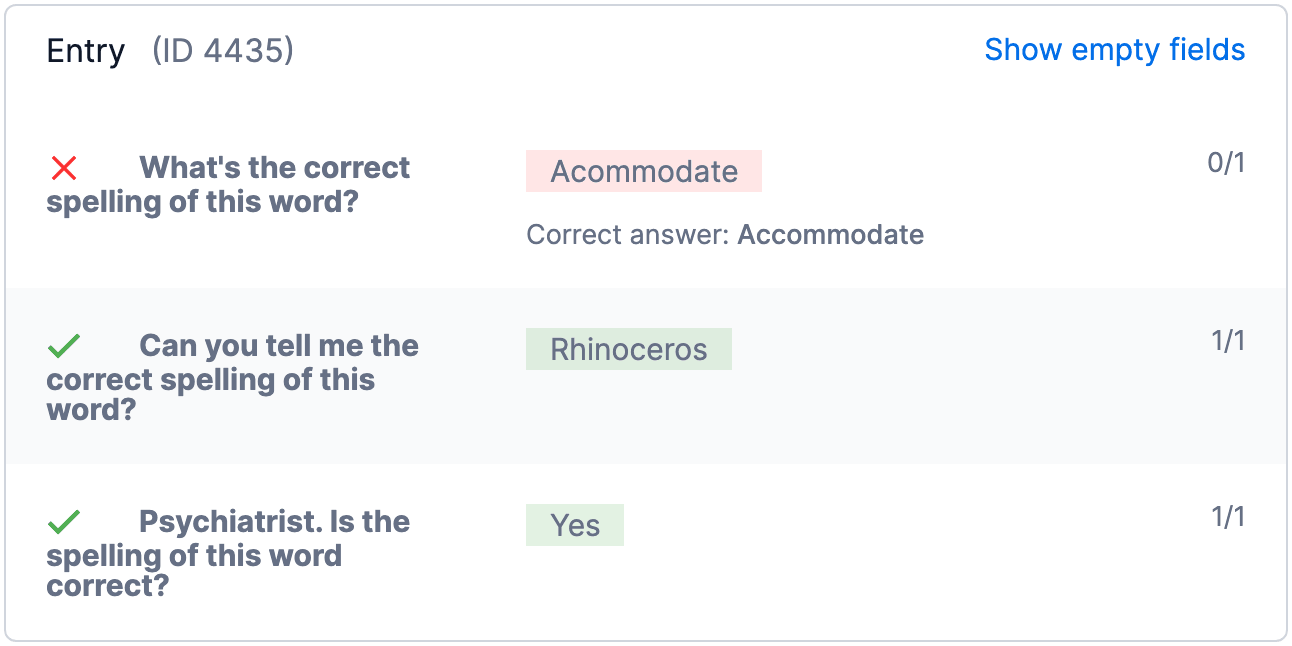
[formidable id=x], with x replaced by your form ID. - When a quiz is created or updated, the score received is automatically saved and stored in the designated Quiz Score field of the respective entry. When you view the entry, each answer shows whether it is correct and the points it earned.
Step 6: Randomize the scored quiz
Use quiz randomization to show questions or answer choices in a different order each time the form is loaded. Both options are in your form Settings → General, under Quiz Settings, and both are off by default. When they're off, the questions and options appear in the order you set in the form builder.
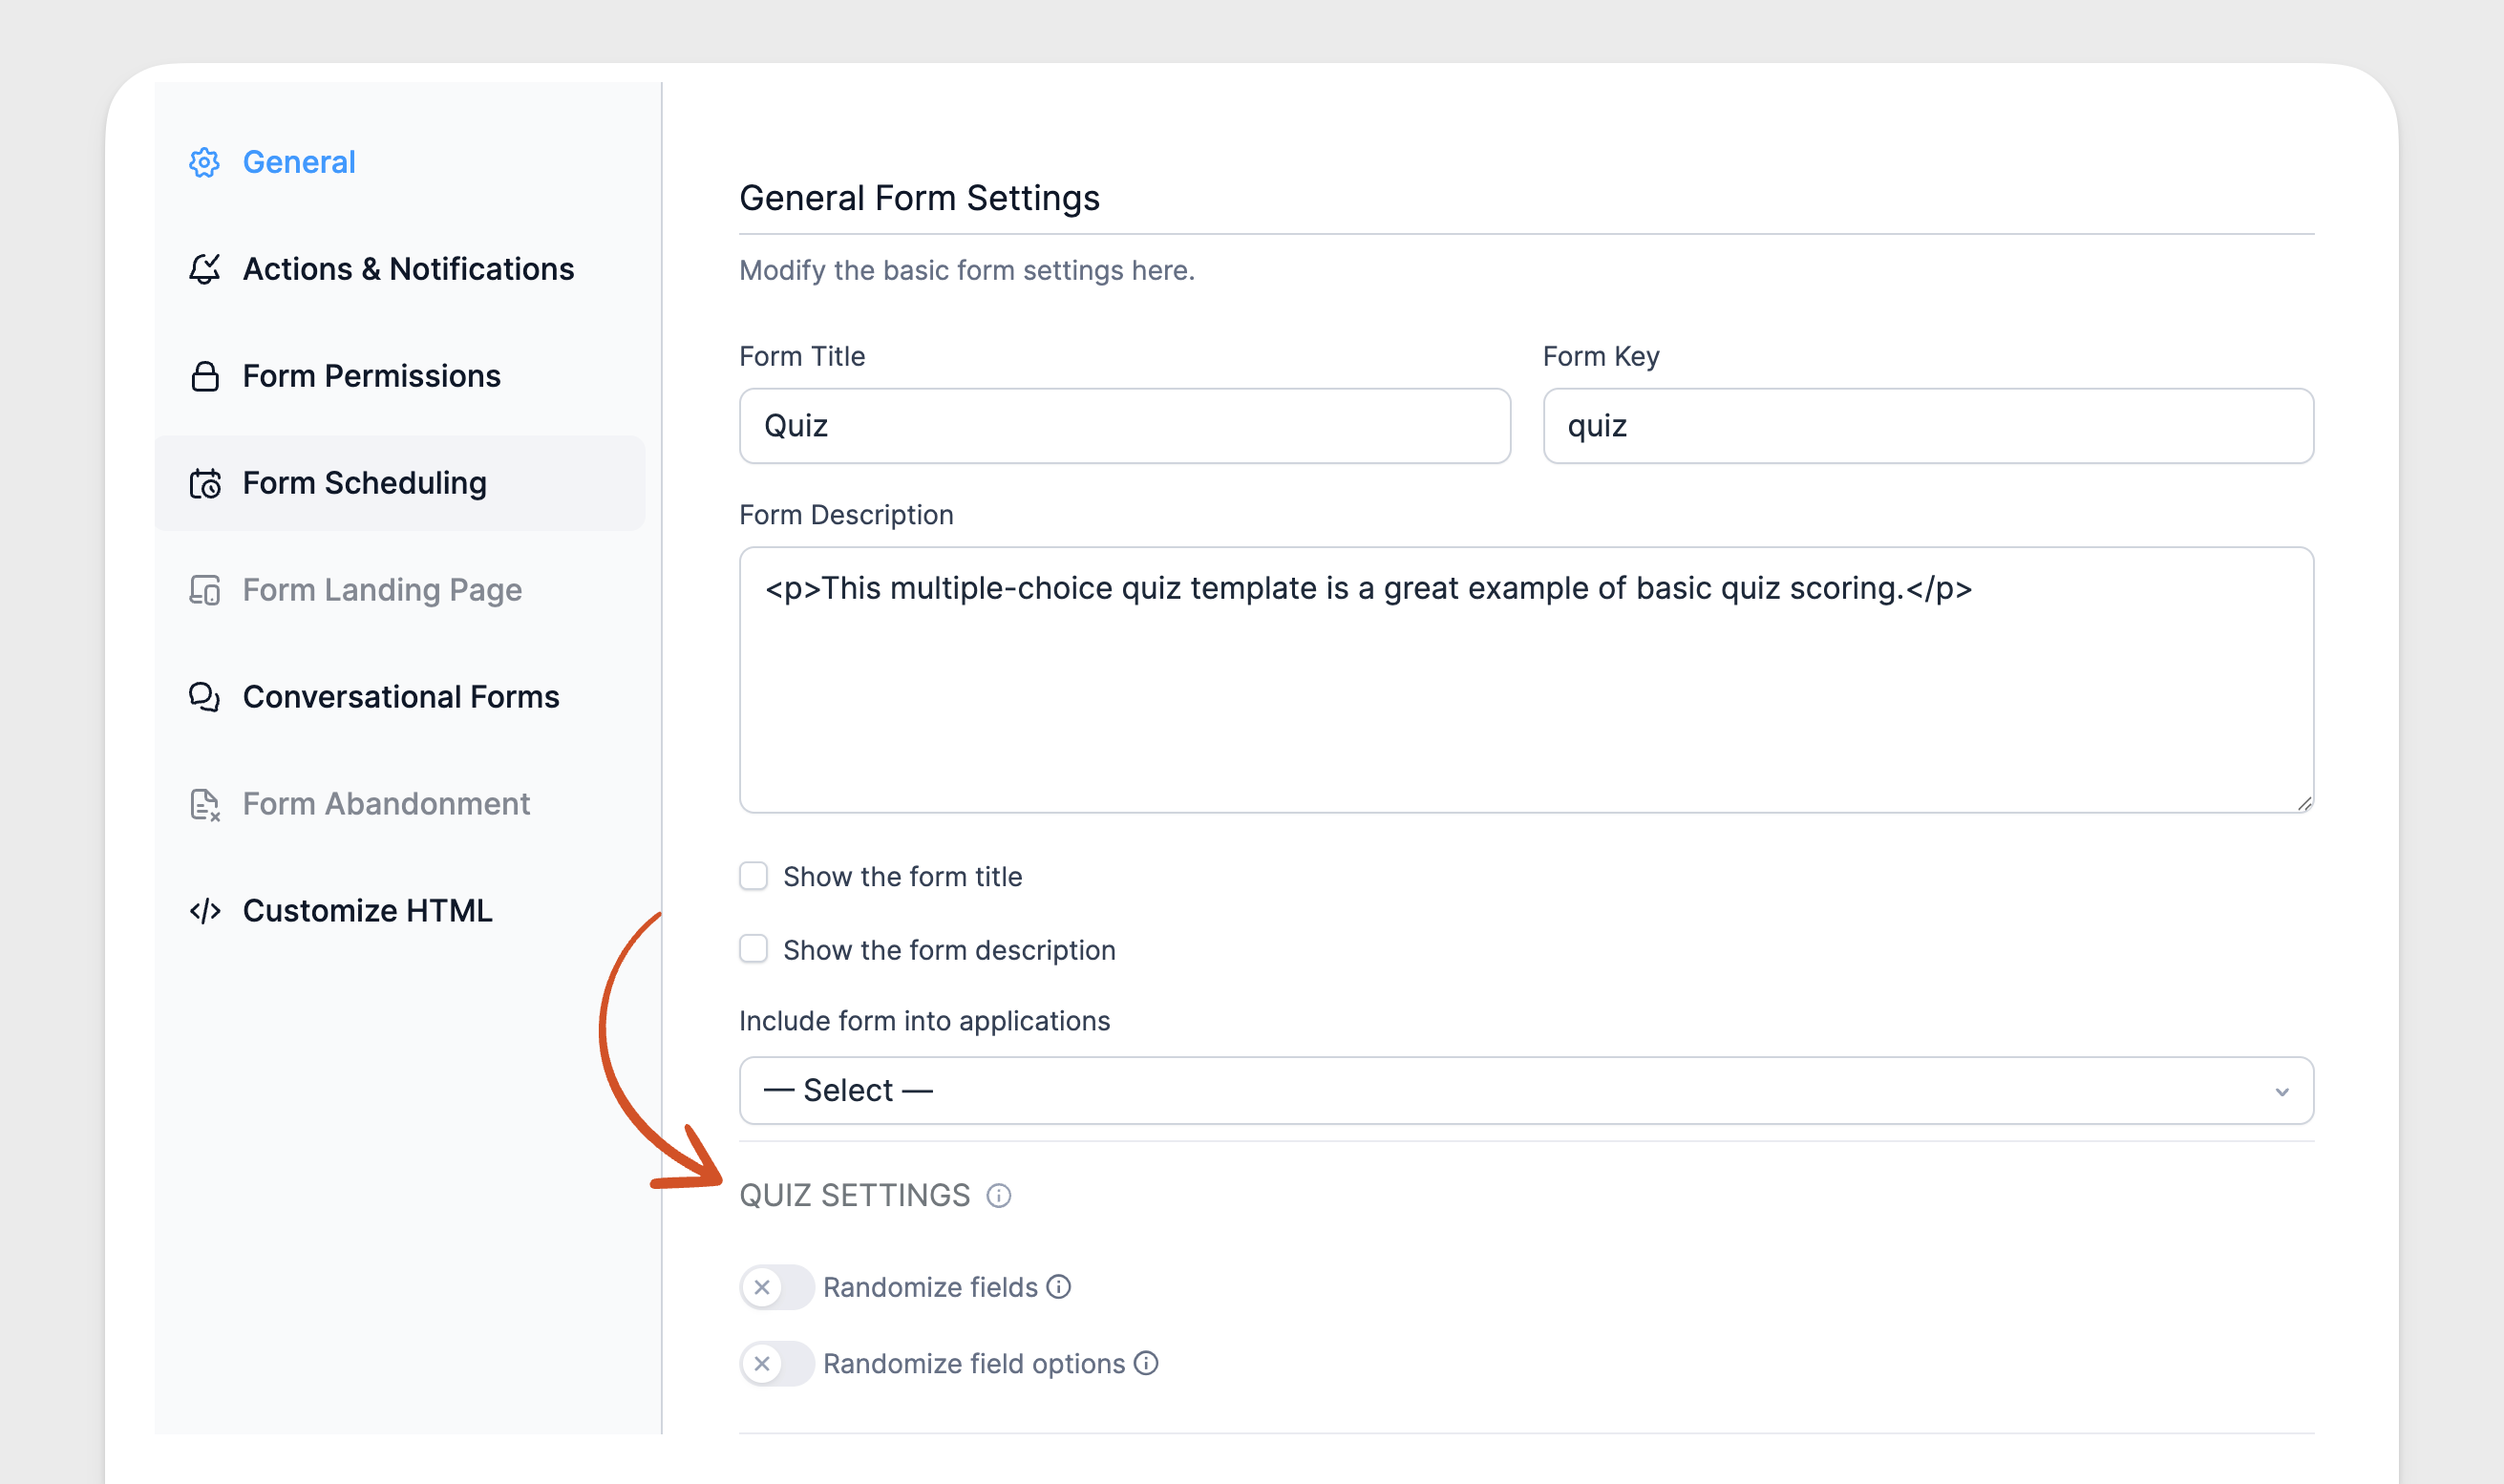
- Randomize fields: Shuffle the order of the questions each time the form is loaded.
- Randomize field options: Change the order of options in a field with multiple options (radio, checkbox, select).
Add a quiz timer
You can add a countdown timer to your scored quiz to set a time limit for completing the questions. When the time runs out, the quiz is submitted automatically with the answers the user has entered.
Set up the quiz timer
Set the time limit in the Scored Quiz action of your quiz form.
- Go to Formidable → Forms and edit your quiz form.
- Go to your form Settings → Actions & Notifications and open the Scored Quiz action.
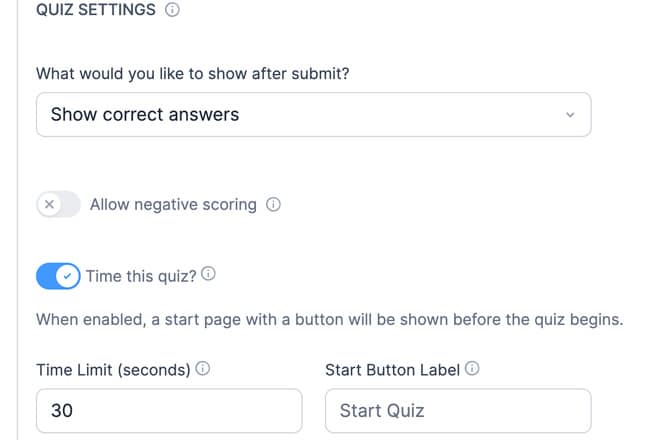
- Turn on the Time this quiz? toggle.
- Enter the time limit in the Time Limit (seconds) field. For example, enter 30 to allow 30 seconds to complete the quiz.
- To customize the text on the start button, enter a Start Button Label. Leave this field blank to use the default Start Quiz label.
- Click Update to save your changes.
Display the timed quiz
Before starting the quiz, the user will see a start screen with the time limit and a Start Quiz button. If you have added a custom Start Button Label, that text will be shown instead.

When the user clicks the start button, the quiz is displayed and the countdown begins. By default, the countdown bar appears at the top of the form, above the first question, and shows the time remaining.
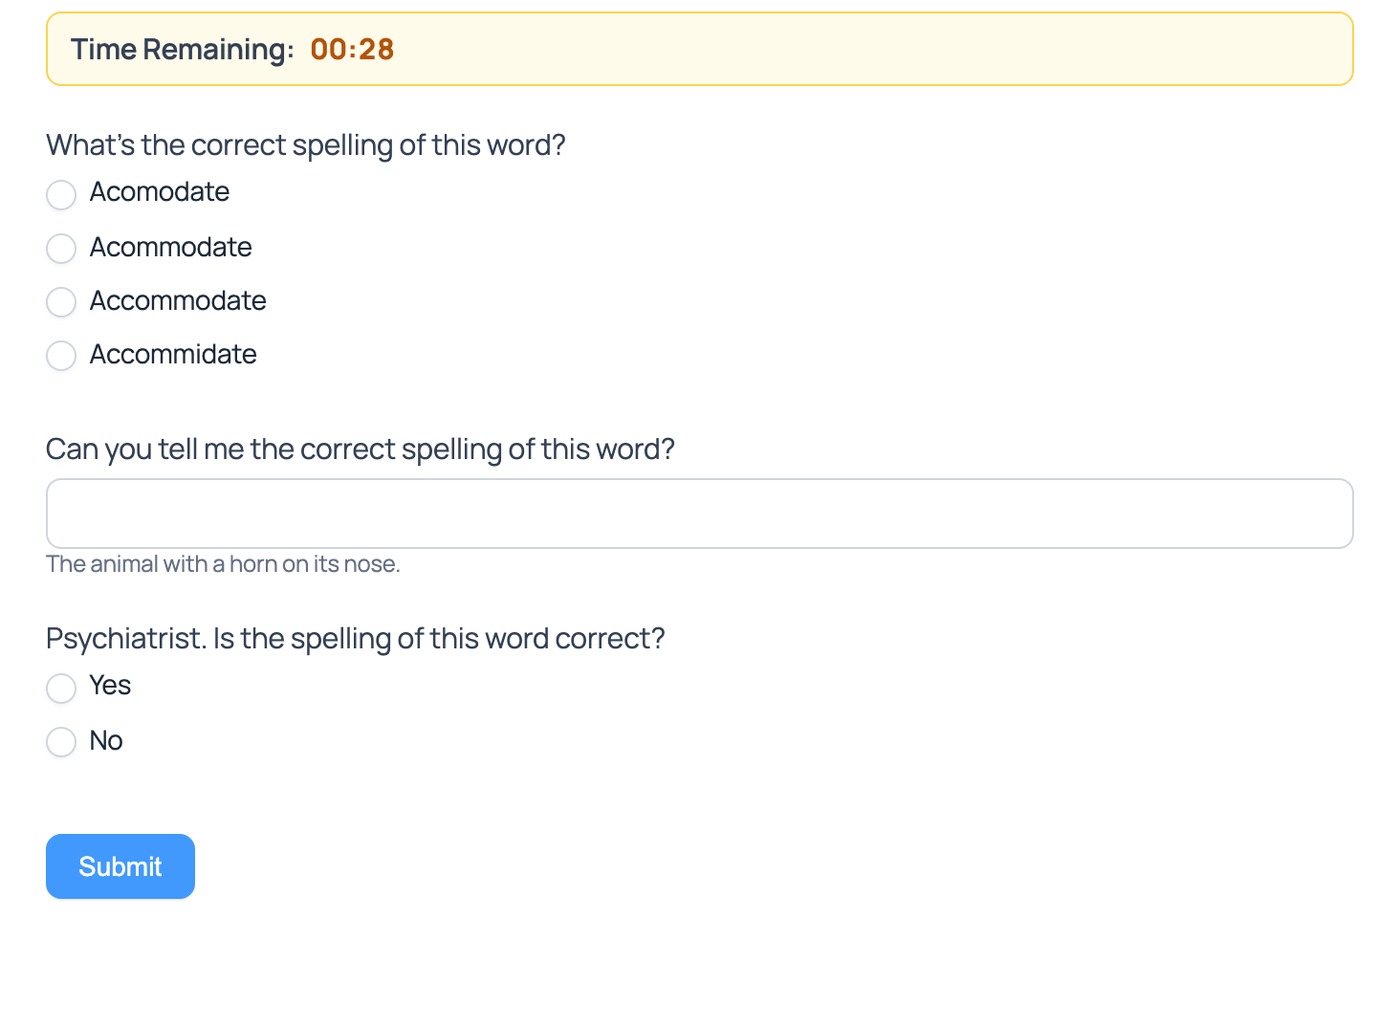
The quiz timer has the following behavior:
- If the time runs out before the user submits the quiz, the quiz is submitted automatically with the answers entered so far.
- If a submission returns a validation error, the timer continues running while the user corrects the error.
- The timer works with multi-page quizzes and with JavaScript validation and AJAX submission enabled.
- Saving a draft with the draft or Save & Continue button stops the timer.
Change the timer position
By default, the countdown bar is displayed at the top of the form, above the first question. To display it in a different position on the page, use the shortcode below. Replace x with the ID or key of your quiz form.
[frm-quiz-timer form=x]
If you use this shortcode, use the frm_quizzes_auto_render_timer hook to turn off the countdown bar in its default position. This prevents the timer from being displayed twice. The time limit will still be shown on the start screen.
For example, the following code turns off the default countdown bar for a form with the key timed-quiz. Replace timed-quiz with your quiz form key.
add_filter( 'frm_quizzes_auto_render_timer', function( $auto_render, $form ) {
    return 'timed-quiz' === $form->form_key ? false : $auto_render;
}, 10, 2 );Display the quiz completion time
When the timer is enabled, a Timer field is added to the quiz form. This field records the time in milliseconds between clicking the start button and submitting the quiz.
To view the completion time, open the entries for your quiz form and find the Timer column next to the Score column. Times under 1 second are displayed in milliseconds, such as 85 ms. Longer times are displayed in seconds. For example, a completion time of 19,516 milliseconds is displayed as 19.516 s.
To display the completion time in an email notification or a View, add the Timer field shortcode.
- Go to Formidable → Forms and edit your quiz form. In the form builder, find the Timer field.
- Copy the field shortcode shown in the Timer field description. For example, if the Timer field ID is 50912, the shortcode is [50912].
- Insert the shortcode into your email notification message or View content where you want the completion time to appear.
You can also use the shortcode below. Replace x with the ID of the Timer field in your form.
[x]
Create an outcome quiz

When outcome form action is selected, the form action will include options to create the possible results. It is where each answer is mapped to a result. Each will be counted as 1 point toward the result.
- If you haven't yet, create a form the same way as other Formidable forms. From the Forms list, click Add New in the top-right corner. Then click Create a blank form, as in Step 1: Create a quiz form.
- Drag and drop the fields you need and add any options you want to include. For example, to create a multiple choice question, you can use a radio button field in your form. This method is also good for true/false questions. You can use different form fields to create your quiz questions.
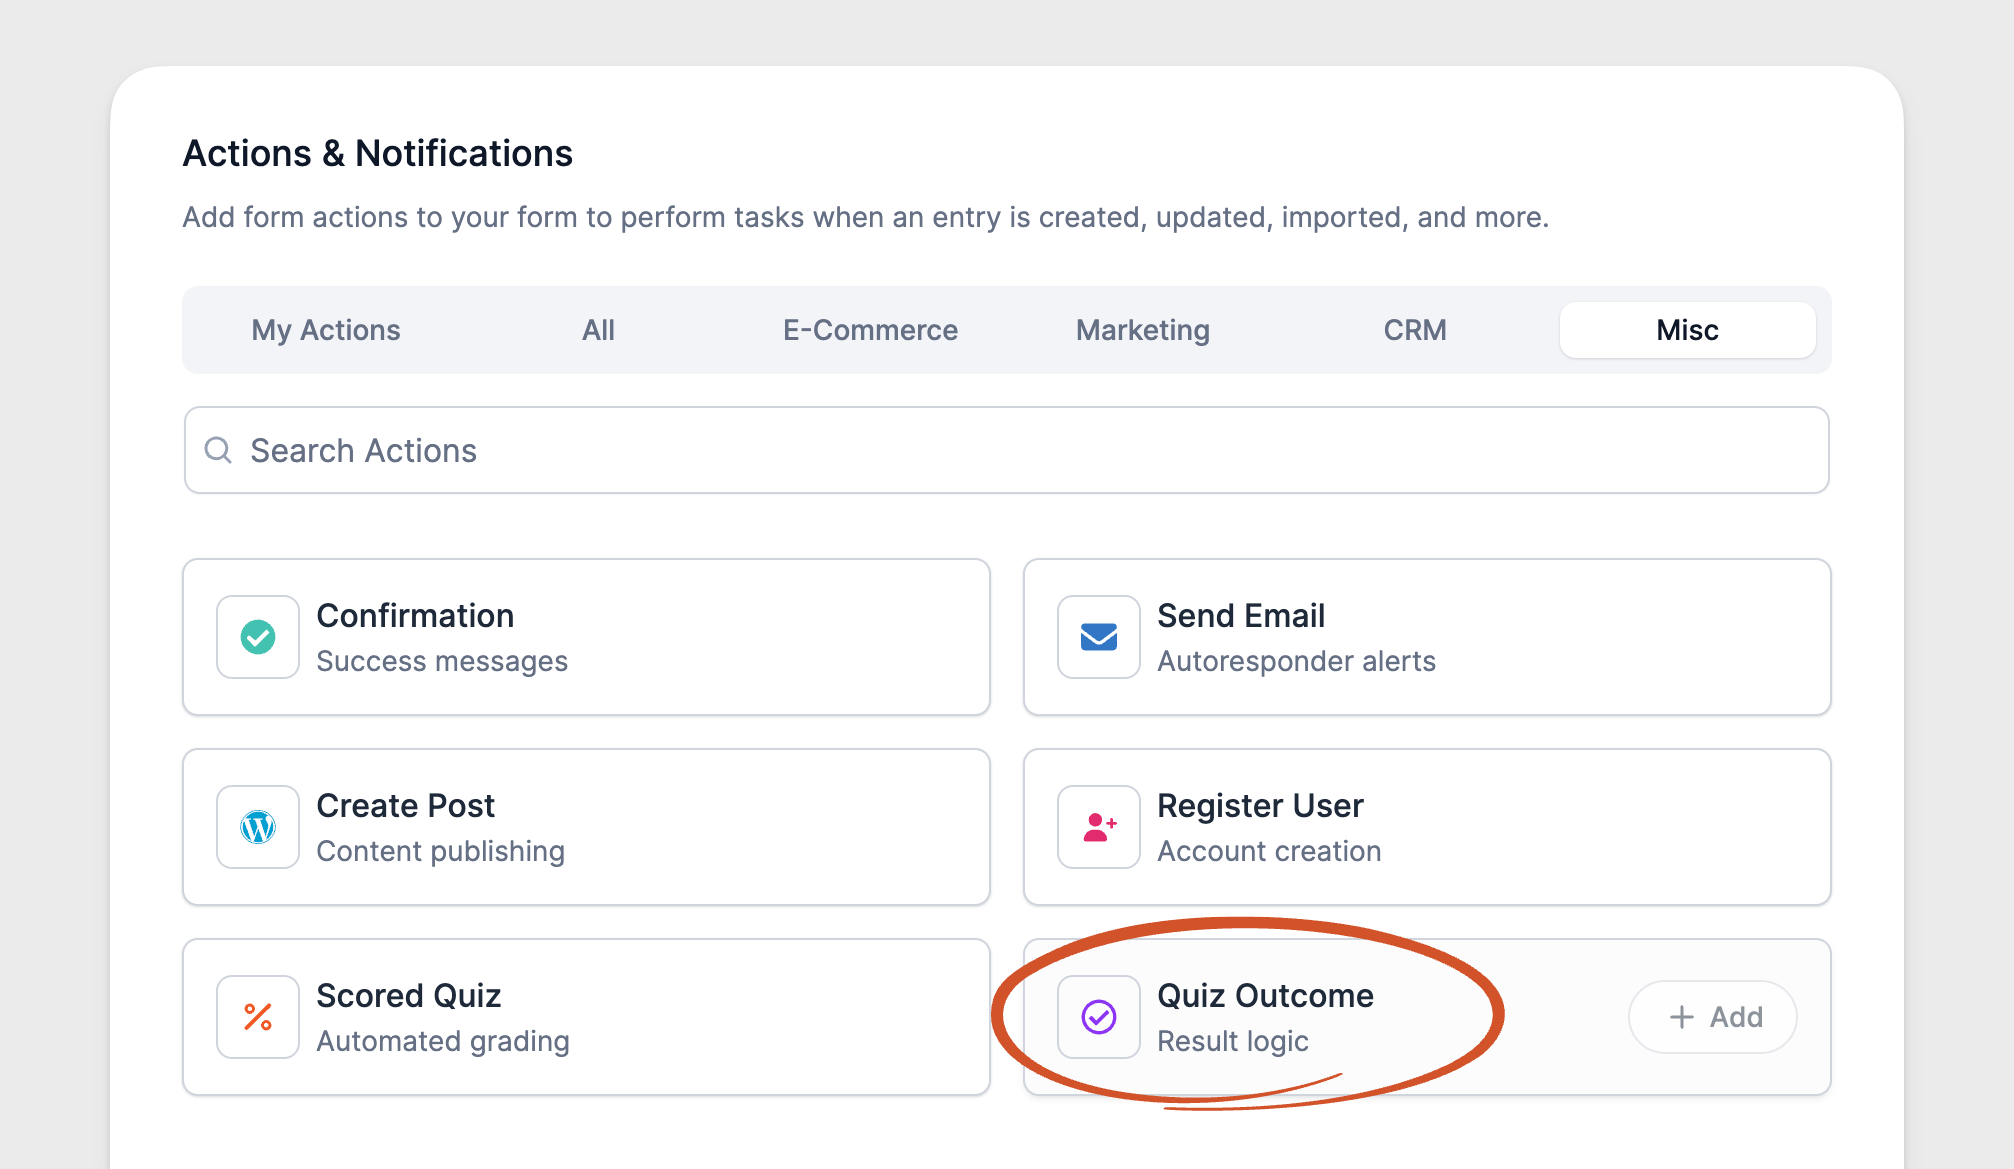
- Go to the form you want to use with the Quiz Maker and click Settings → Actions & Notifications. Select the Misc tab, or search for Quiz Outcome if needed. Then hover over the Quiz Outcome action and click + Add.
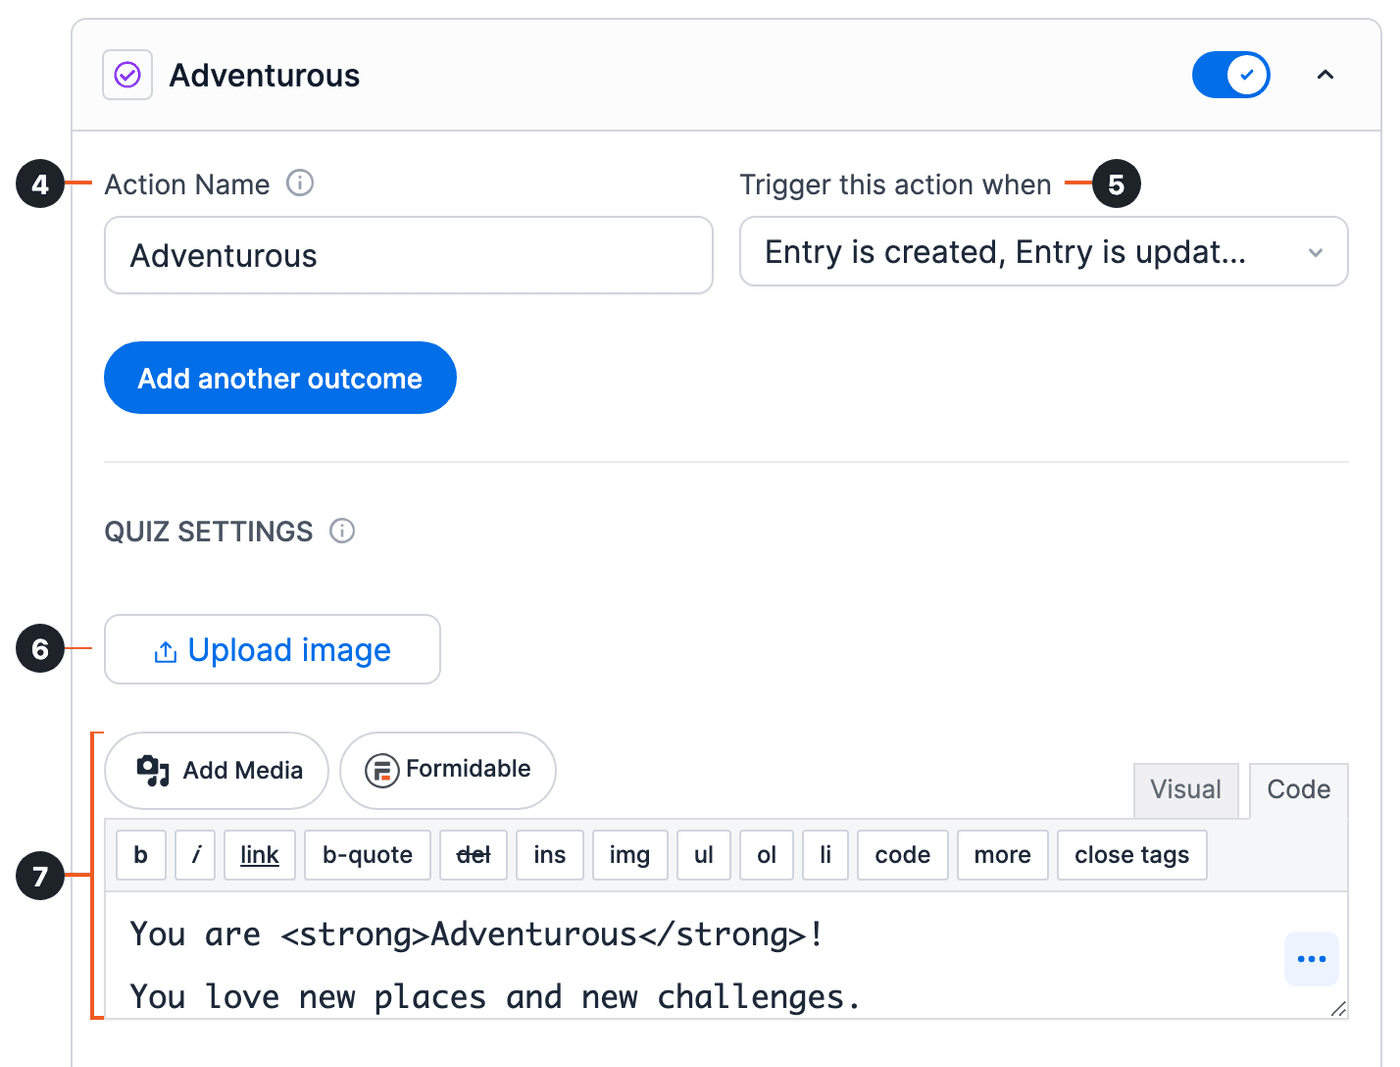
- Give your Outcome Quiz action an Action Name for easy reference. This name will only be seen on the back end.
- Choose when this action runs: Entry is created, Entry is updated, or Entry is imported. By default, it runs when an entry is created or updated.
- Under Quiz Settings, click the Upload image button to display a featured image with the outcome results. This image will be shown above the text results.
- In the editor, add the results you want to display. It uses the WordPress rich text editor, so you can add bold text, links, ordered lists, blockquotes, and more.
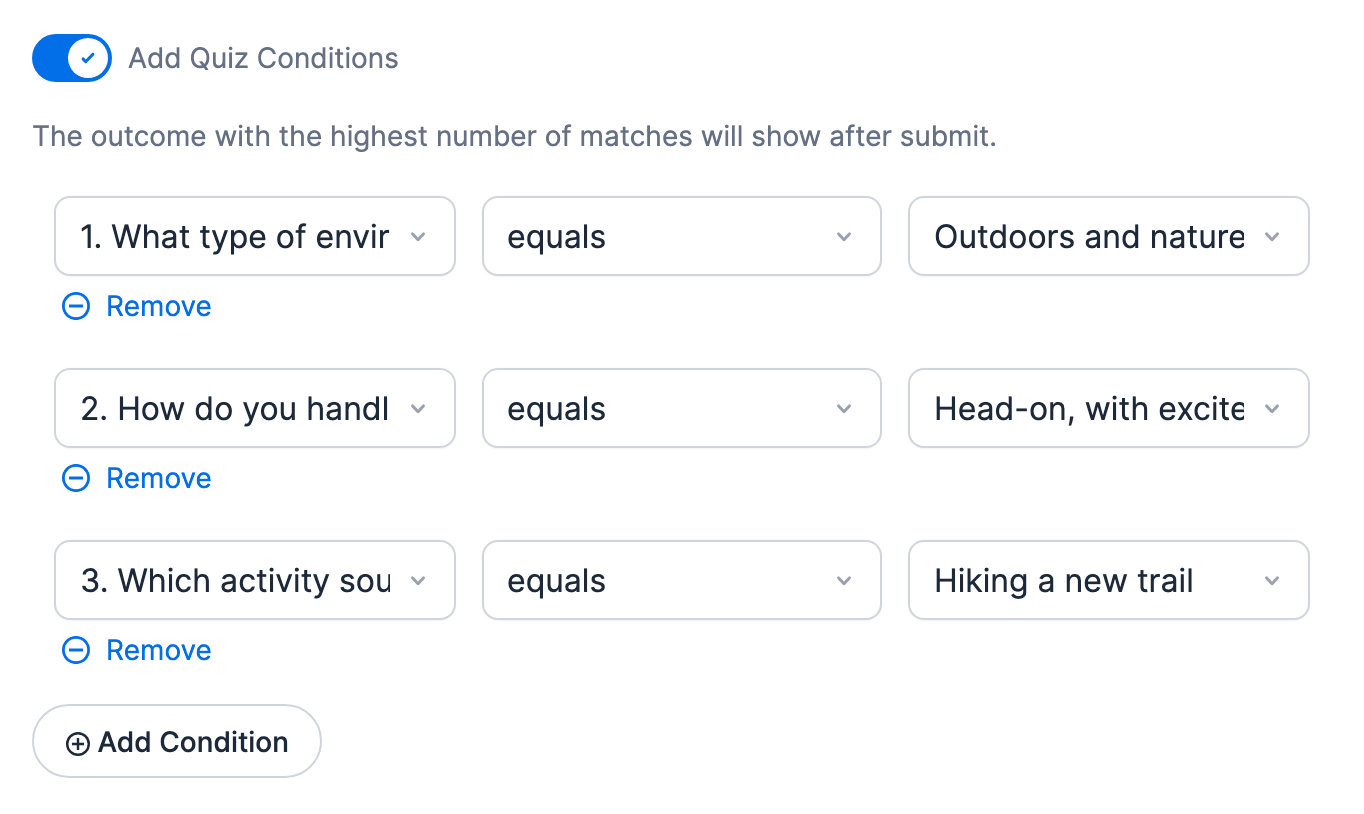
- Toggle on Add Quiz Conditions. Set it up to trigger the results when a certain outcome condition has been set.
Notes:
- The outcome with the highest number of matches will show after form submission. When there is a tie, it shows the outcome with the lower ID.
- An outcome with no conditions will be the default if none of the other outcomes match.
- An outcome with no image and no content will not be used.
- To add the next result, click the Add another outcome button under the trigger. It adds another Quiz Outcome action. Repeat steps 4 to 8 for it.
- Click Update to save your outcomes.
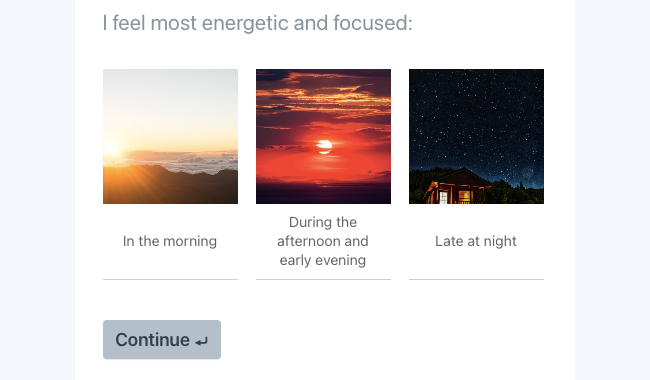
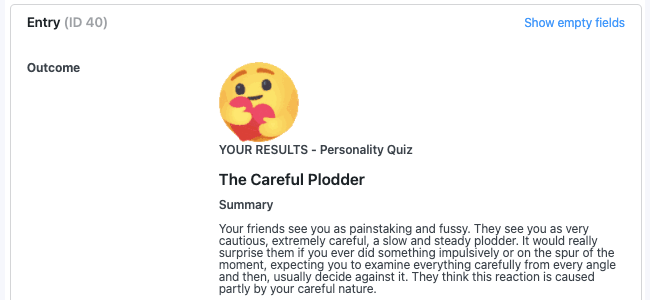
- Your quiz form is ready to start collecting and automatically displaying outcome results. When a quiz is created or updated, the result is saved in the Outcome field in that entry.
Scoring a quiz
Scoring a quiz can be customized by clicking the Customize Quiz Scoring button in the Quiz form action settings. By default, each correct answer is worth 1 point. The following field types are excluded from the scoring:
- User ID field
- Hidden field
- Rich text field
- File upload fields
- Signature fields
Filtering correct choices
Single-line text and Paragraph fields can enter a comma-separated list of correct choices.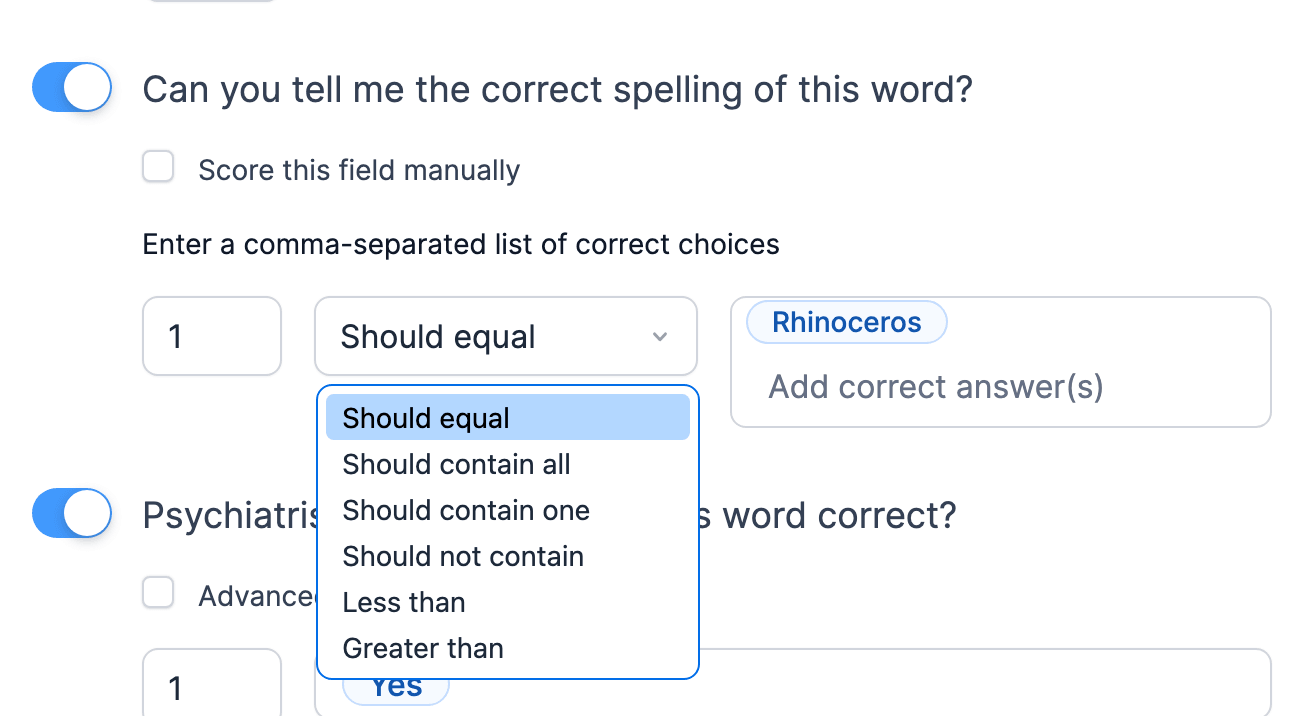
When filtering the correct answers, the following options are available:
- Should equal: Requires an exact answer to be correct.
- Should contain all: Requires answer to contain all choices to be correct.
- Should contain one: Requires answer to contain at least one of the choices to be correct. For example, if the correct choice is today, answers like It is Today will be accepted.
- Should not contain: Requires answer not to contain any of the choices to be correct.
- Less than: Requires answer to be less than the correct answer.
- Greater than: Requires answer to be greater than the correct answer.
Advanced scoring
Click the toggle button next to the question and select the Advanced scoring checkbox to add points for each option.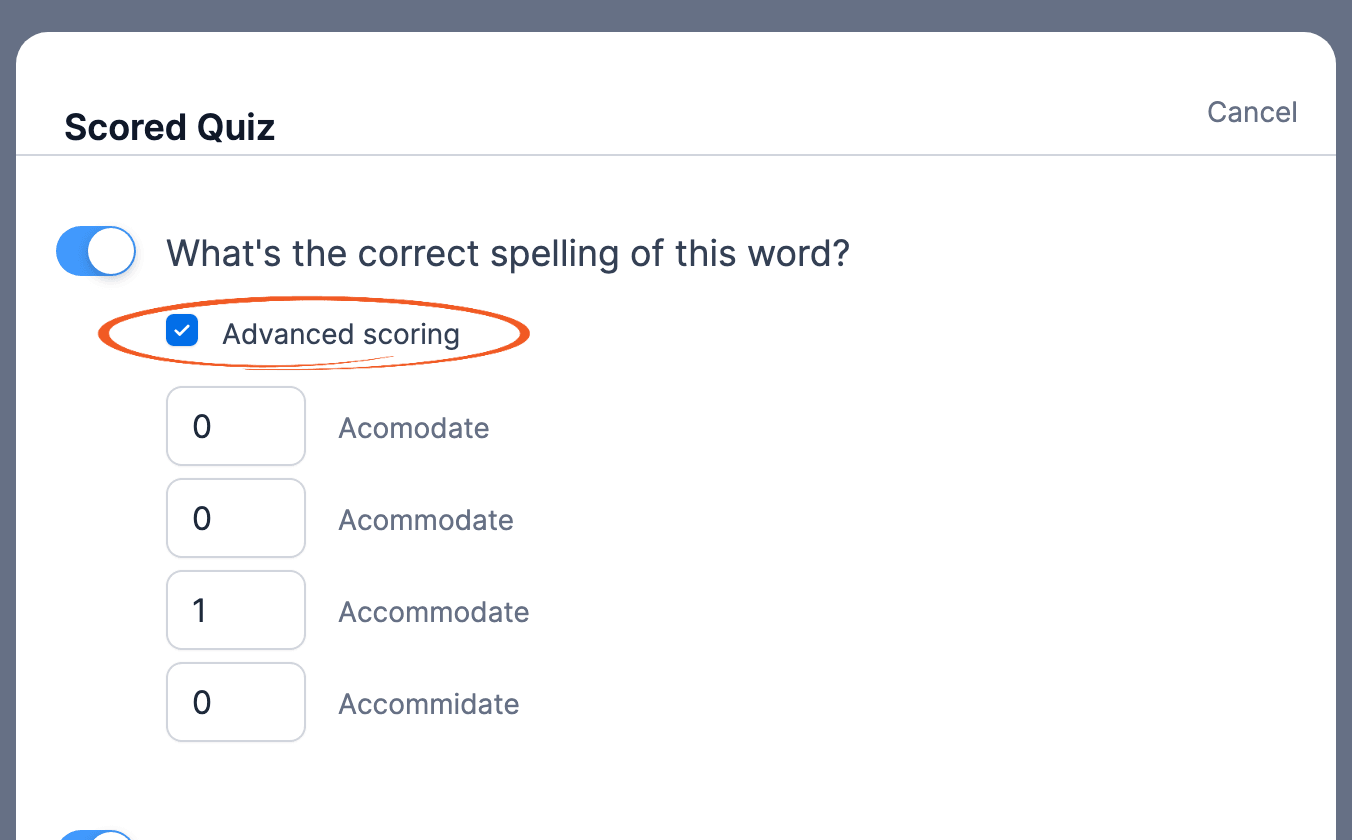
Manual scoring
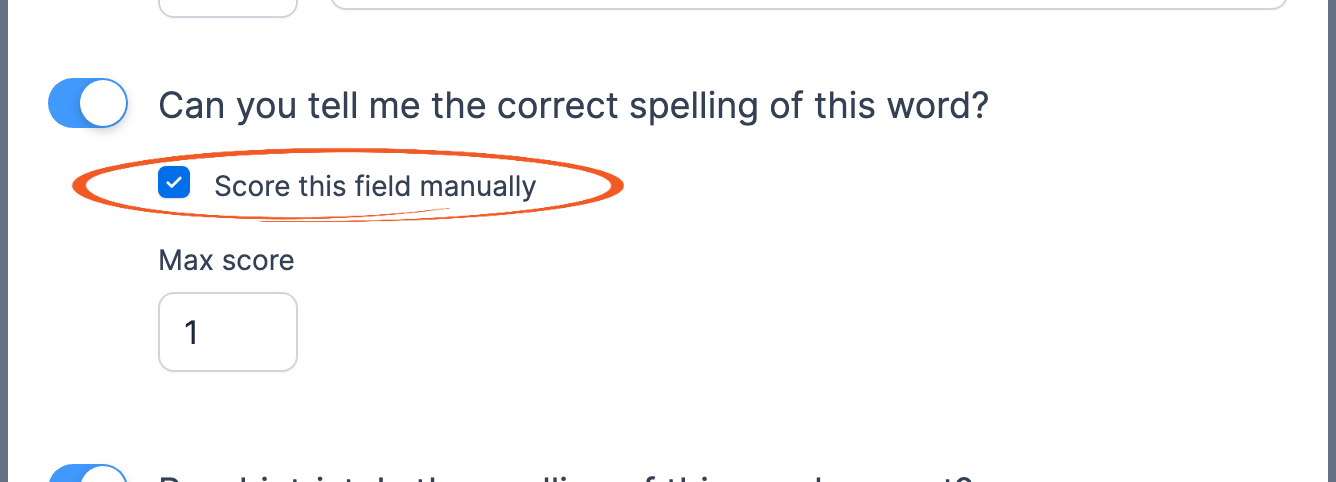
Text fields and paragraph fields include an option to Score this field manually.
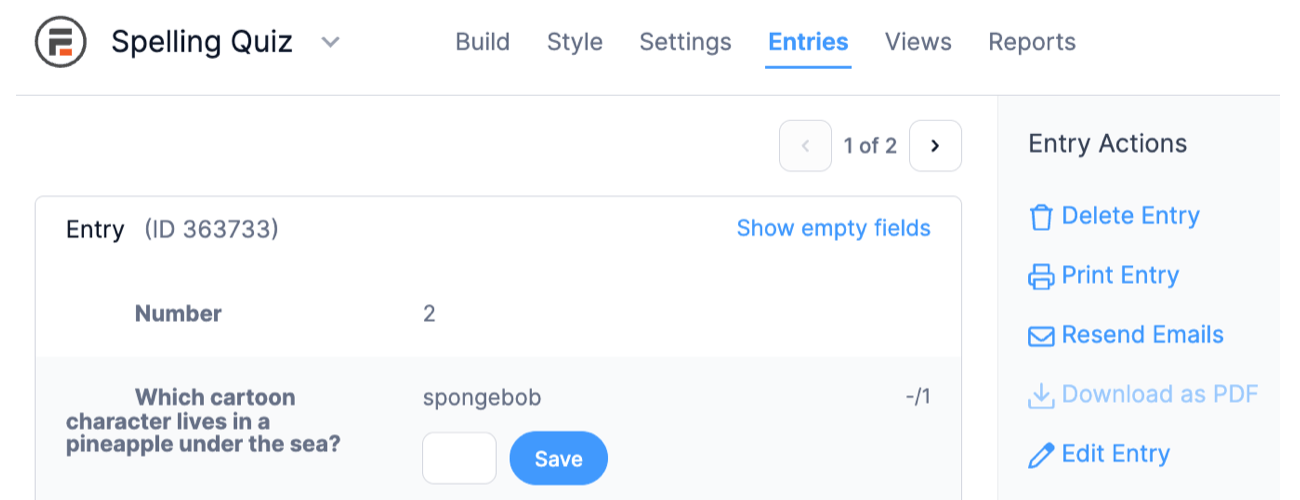
- Select the Score this field manually checkbox to set a maximum score for this field. After a quiz is submitted, it will be unscored until the manual portion is graded.
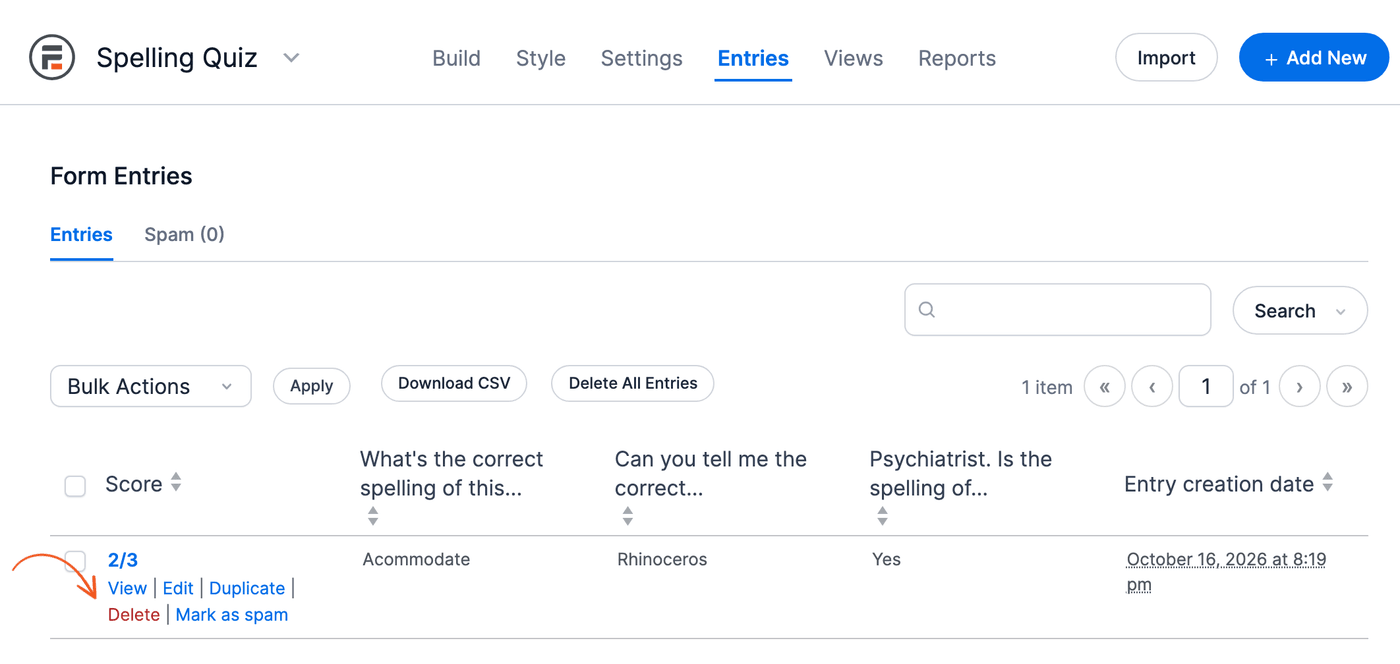
- To score a submitted quiz, go to the Formidable → Entries page and click the link to view that entry.
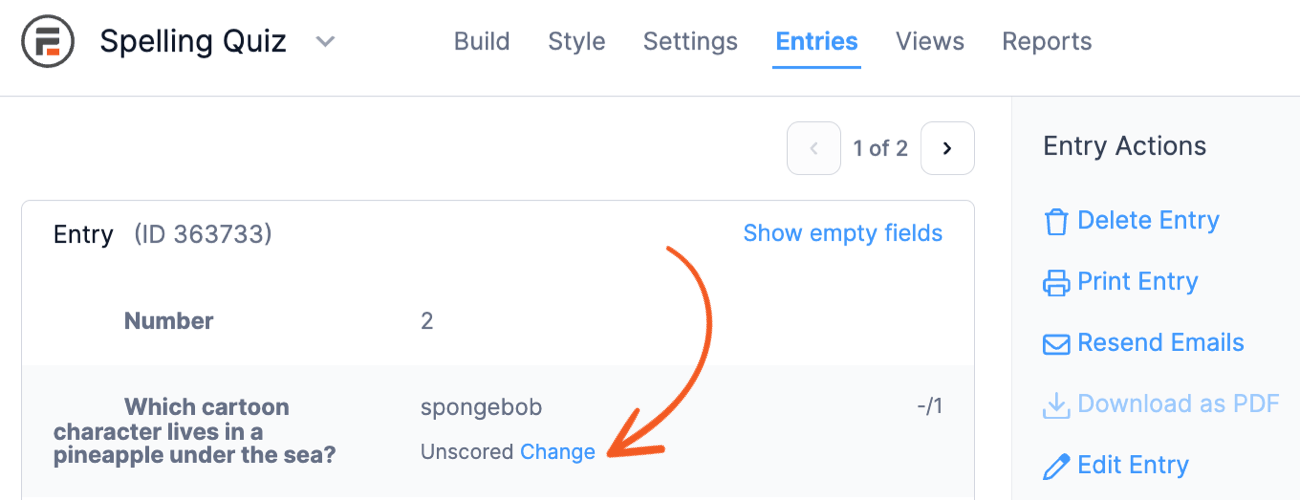
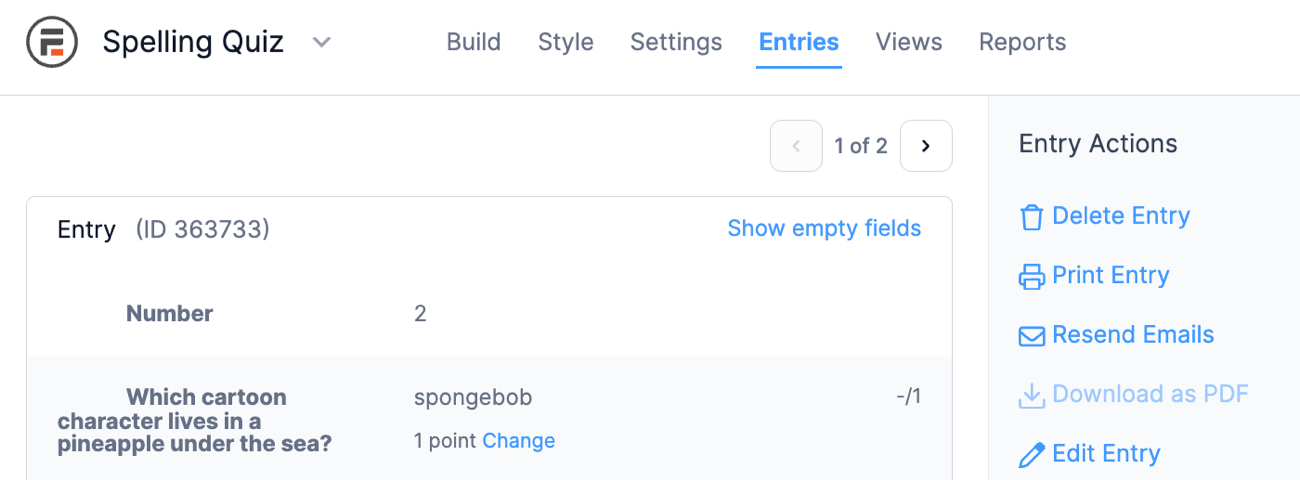
- Any fields that need to be scored will include a Change link below the answer.
- Click Change, enter the score, and click the Save button.
- The field now shows the score you entered. The quiz score for the entry is also updated to include it.
Set a custom grading scale
The default grading scale includes only letter grades (A, B, C, D, and F).
To customize this scale, go to the Formidable → Global Settings → Quizzes page. Under Grading Scale, enter each grade's name in Letter Grade and its range in Start % and End %. Next, use the plus and minus buttons to add or remove grades. Then click Update to save your changes.
Any numbers that are not covered by the scale settings will not show a letter grade when the score is displayed. To show the grade, use [x show=grade].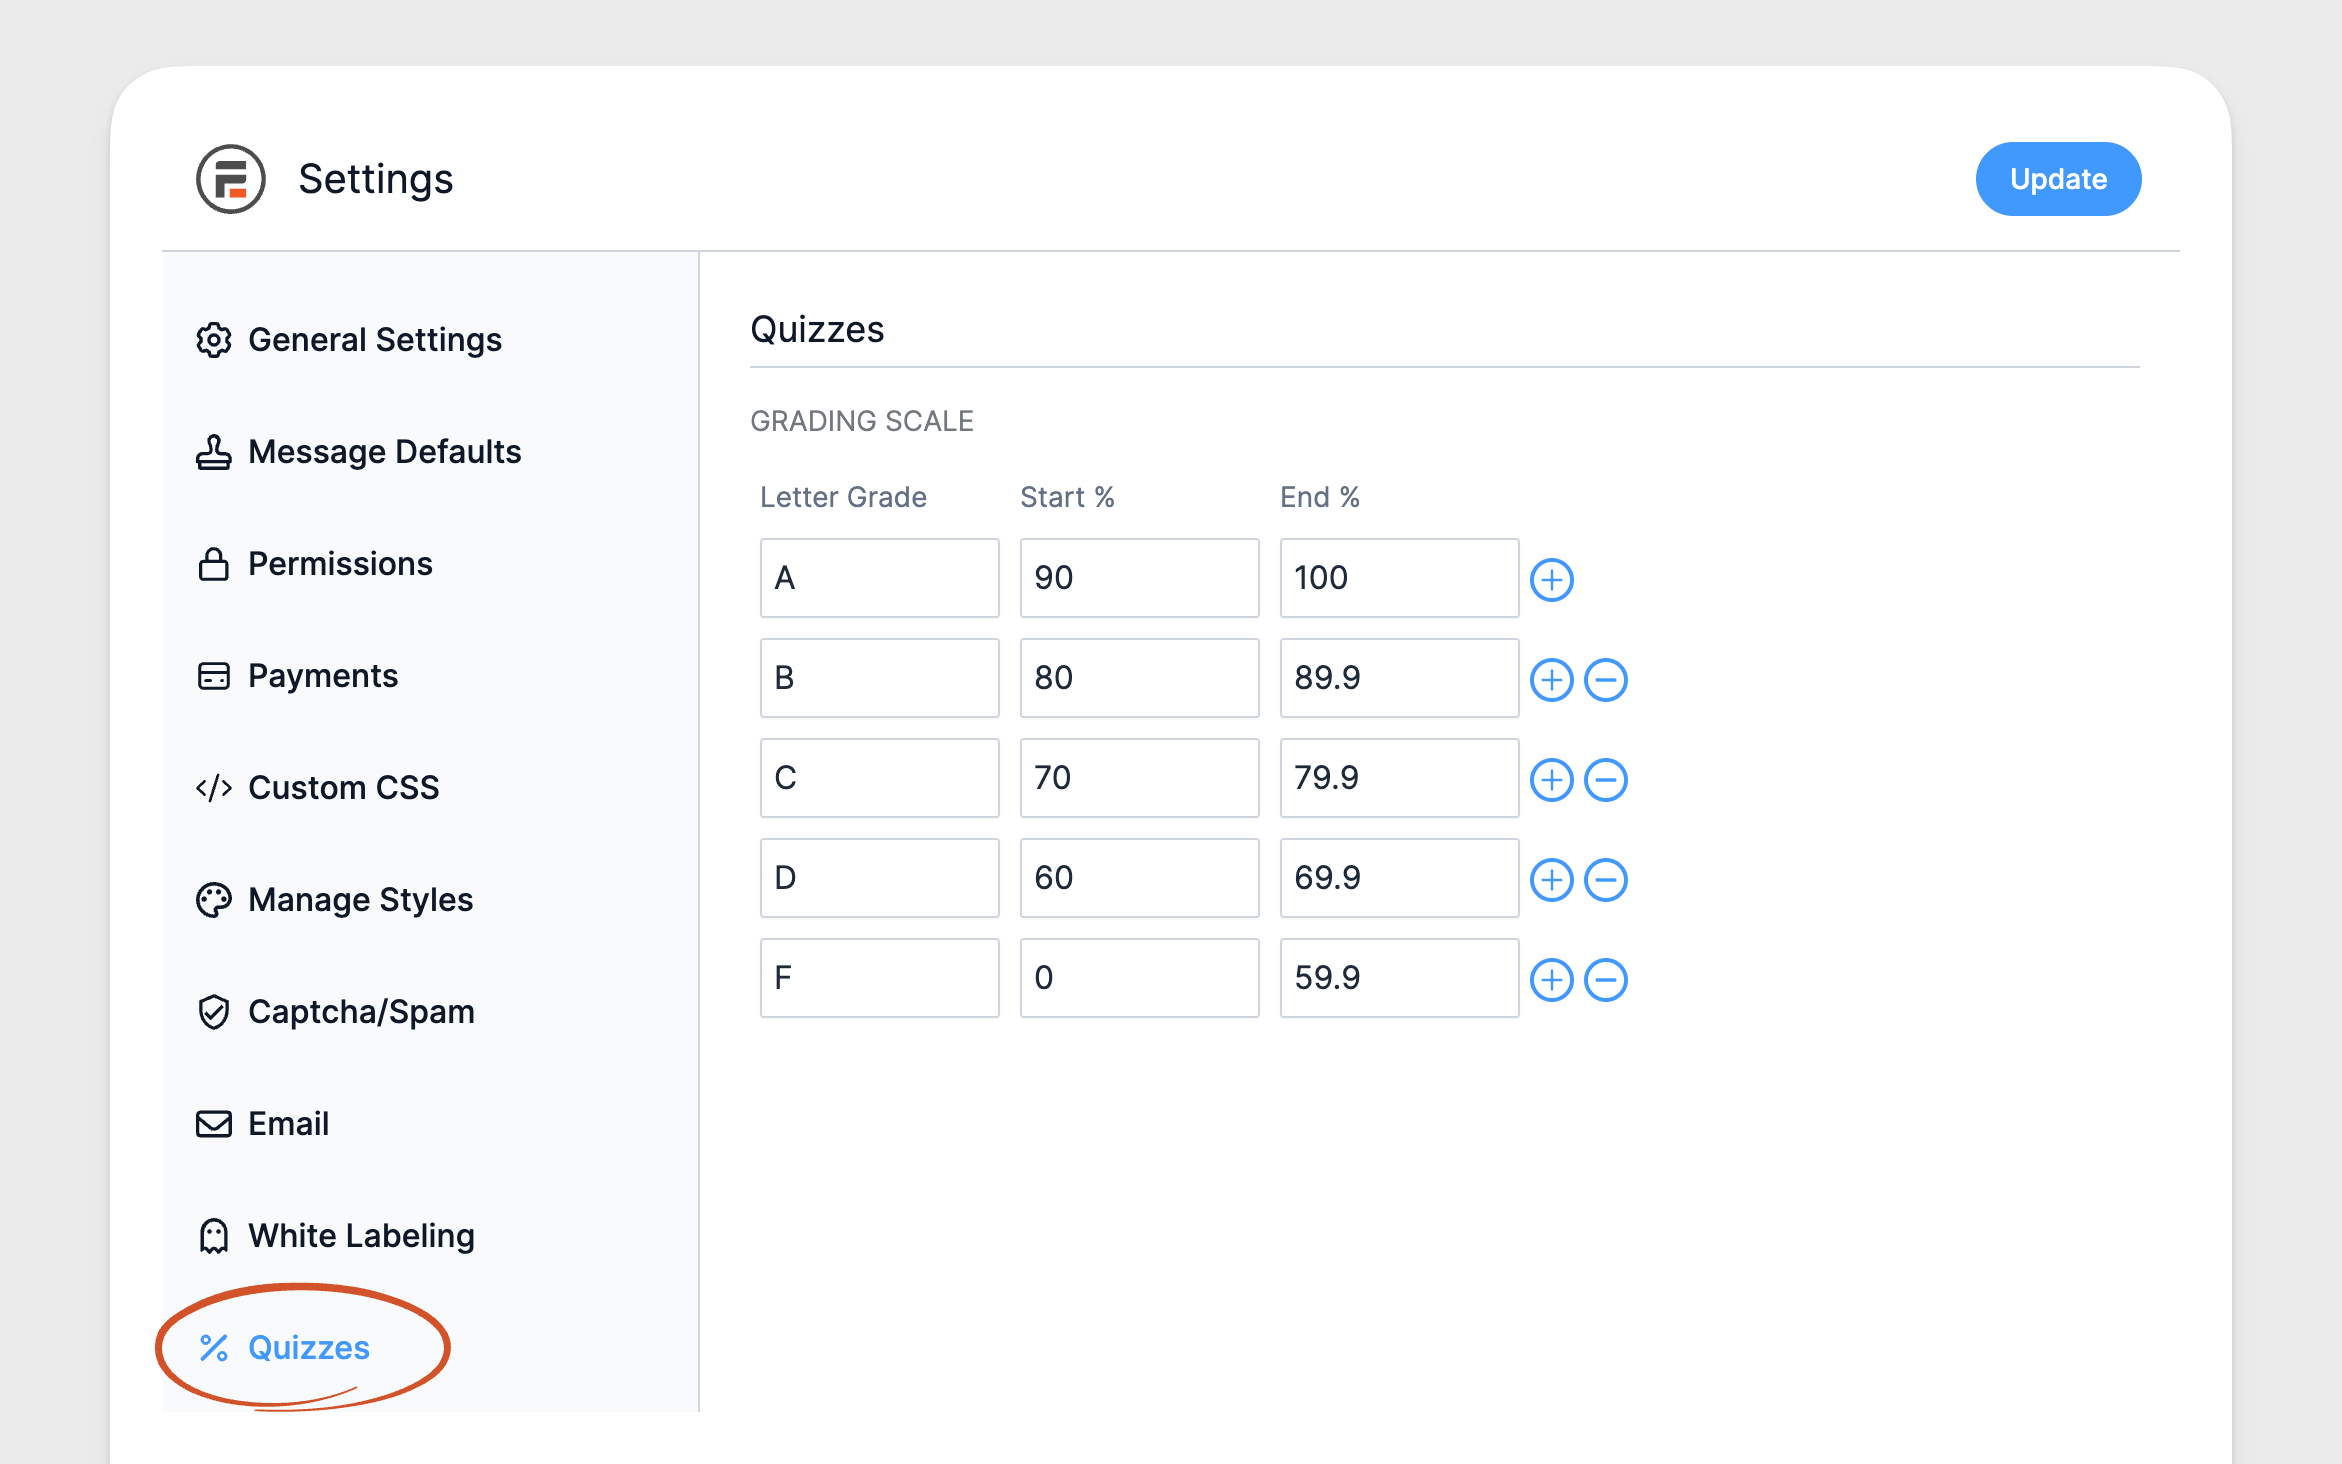
Display the quiz
Display the quiz score
By default, the quiz score is displayed as the fraction of correct answers (for example, "9/10"). The formatting options are listed below.
In these examples, replace 'x' with the ID or field key of the Quiz Score field in the form. You can use these examples in a View, Email Notification, success message, or other Formidable contexts where field shortcodes work.
- Fraction correct (default). Example: 9/10
[x]
- Correct answer count. Example: 9
[x show=total]
- Percentage correct. Example: 90%
[x show=percent]
- Percentile correct. Example: 75
[x show=percentile]
Displays what percentile the score is in a range of 0-100.
- Letter grade. Example: A
[x show=grade]
If a user is logged in when they submit a quiz, you can add a User ID field to the form. With this, it's easy to add the quiz score anywhere with:
[frm-field-value field_id=x show=percent user_id=current]
Display the quiz outcome

You can display the quiz outcome with shortcodes and conditional statements. Use the show attribute with the outcome field shortcode to display different results.
- Entry results of the outcome (default).
[x]
- ID of the outcome.
[x show=id]
- Shows the count for each outcome. It works in the outcome content or in a View.
[x show=totals]
- Image HTML for the uploaded image used in the outcome.
[x show=image]
- Post_title of the outcome action.
[x show=title]
- Post_content description of the outcome action (wysiwyg).
[x show=message]
- Quiz score in fractions. Example: 2/4
[x show="score"]
- Quiz score in percentage. Example: 50%
[x show="percent"]

Display multiple results in the quiz outcome
With the Outcome quiz, you can allow multiple results to be displayed either as a score or a percentage. For example,
You have the following skin type:
50% Combination Skin
20% Dry Skin
0% Normal Skin
30% Oily Skin
To set this up, use the outcome parameter in the shortcode like this:
[x show="percent" outcome="5301"] Combination Skin
[x show="percent" outcome="5302"] Dry Skin
[x show="percent" outcome="5303"] Normal Skin
[x show="percent" outcome="5304"] Oily Skin
Replace x with the Score field ID. Replace 5301, 5302, 5303, and 5304 with the Outcome form action ID.
Display the quiz score in emails
When using the [default-message] shortcode in the email message, it will show the quiz score with the submitted answers of the user. If the answer is wrong and you want to show the correct answer, use the shortcode below.
[default-message format="quiz_correct_answers"]
Using conditionals based on quiz
Show content based on quiz score
To display a block of content when the quiz score has a specific correct answer count, use this shortcode. Replace x with the ID of the Quiz score field.
- Equals
[if x equals="2"]Scored 2[/if x]
If the quiz score equals '2', then the content between the opening and closing if statements will be displayed.
- Not equal
[if x not_equal="2"]Did not score 2[/if x]
If the quiz score is NOT equal to '2', then the content between the opening and closing if statements will be displayed.
- Greater than
[if x greater_than="8"]Congratulations! You passed.[/if x]
If the quiz score is greater than '8', then the content between the opening and closing if statements will be displayed.
- Less than
[if x less_than="7"]You failed. Take the quiz again.[/if x]
If the quiz score is less than '7', then the content between the opening and closing if statements will be displayed.
Show content based on quiz score grade
When using a custom grading scale, you can display a block of content if the quiz score has a specific grade with this shortcode. Replace x with the ID of the Quiz score field.
- If the quiz score letter grade equals 'A', then the content between the opening and closing if statements will be displayed.
[if x show=grade equals="A"]Scored an A[/if x]
- If the quiz score letter grade is NOT equal to 'A', then the content between the opening and closing if statements will be displayed.
[if x show=grade not_equal="A"]Did not score A[/if x]
Show content based on quiz score percent
To display a block of content when the quiz score has a specific percentage, use this shortcode. Replace x with the ID of the Quiz score field.
- If the quiz score percent equals '100%', then the content between the opening and closing if statements will be displayed.
[if x show=percent equals="100%"]Scored 100%[/if x]
- If the quiz score percent is NOT equal to '100%', then the content between the opening and closing if statements will be displayed.
[if x show=percent not_equal="100%"]Did not score 100%[/if x]
Show content based on quiz outcome
To display a block of content when the quiz outcome has a specific ID or text, use this shortcode. Replace x with the ID of the Quiz Outcome field.
- Equals
[if x equals=26]Match by outcome ID[/if]
If the quiz outcome ID equals '26', then the content between the opening and closing if statements will be displayed.
[if x show="title" equals="My outcome title"]Match by outcome title[/if x]
If the quiz outcome matches the outcome title, then the content between the opening and closing if statements will be displayed.
Send quiz results by email
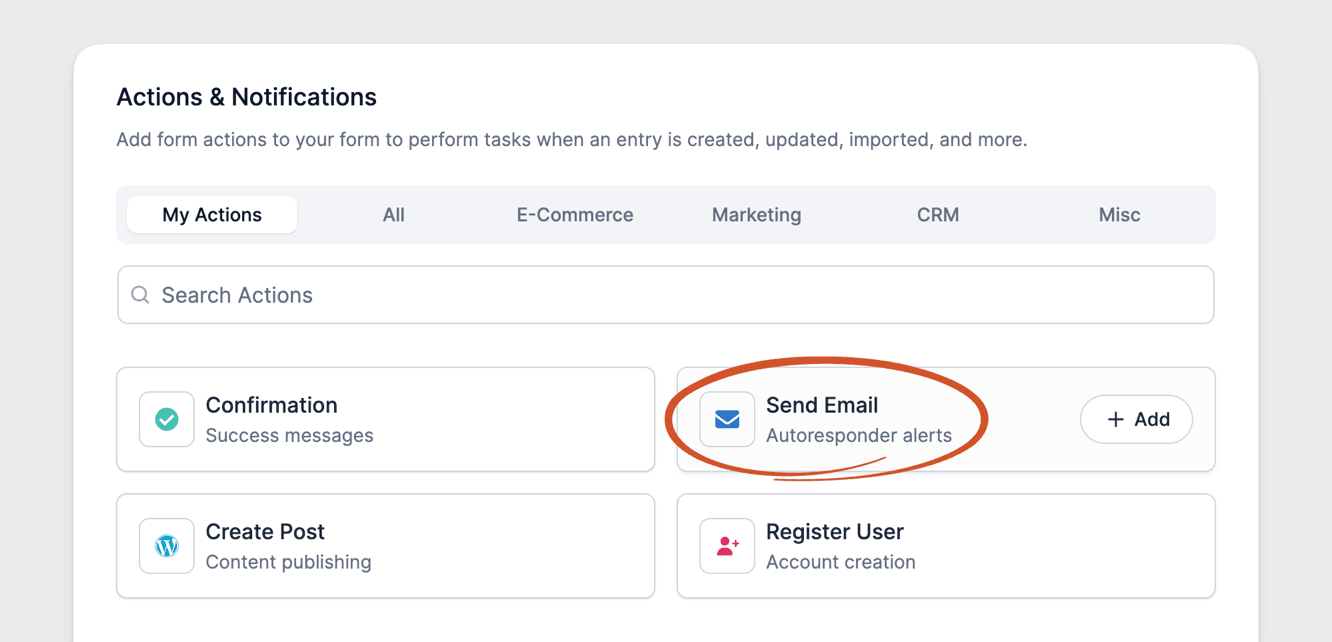
By default, the results are immediately shown upon completion of the quiz. To send a copy of the results to the quiz taker by email, add the score to the Send Email action.
- Go to Formidable → Forms and edit your quiz form. Then go to Settings → Actions & Notifications and select the Send Email action.
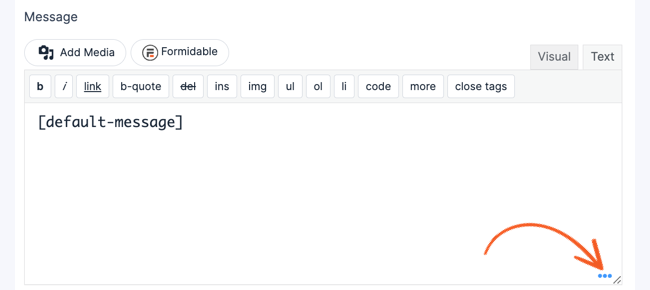
- In the Messages box, the [default-message] shortcode is inserted by default. Learn more about how to show the correct answers.
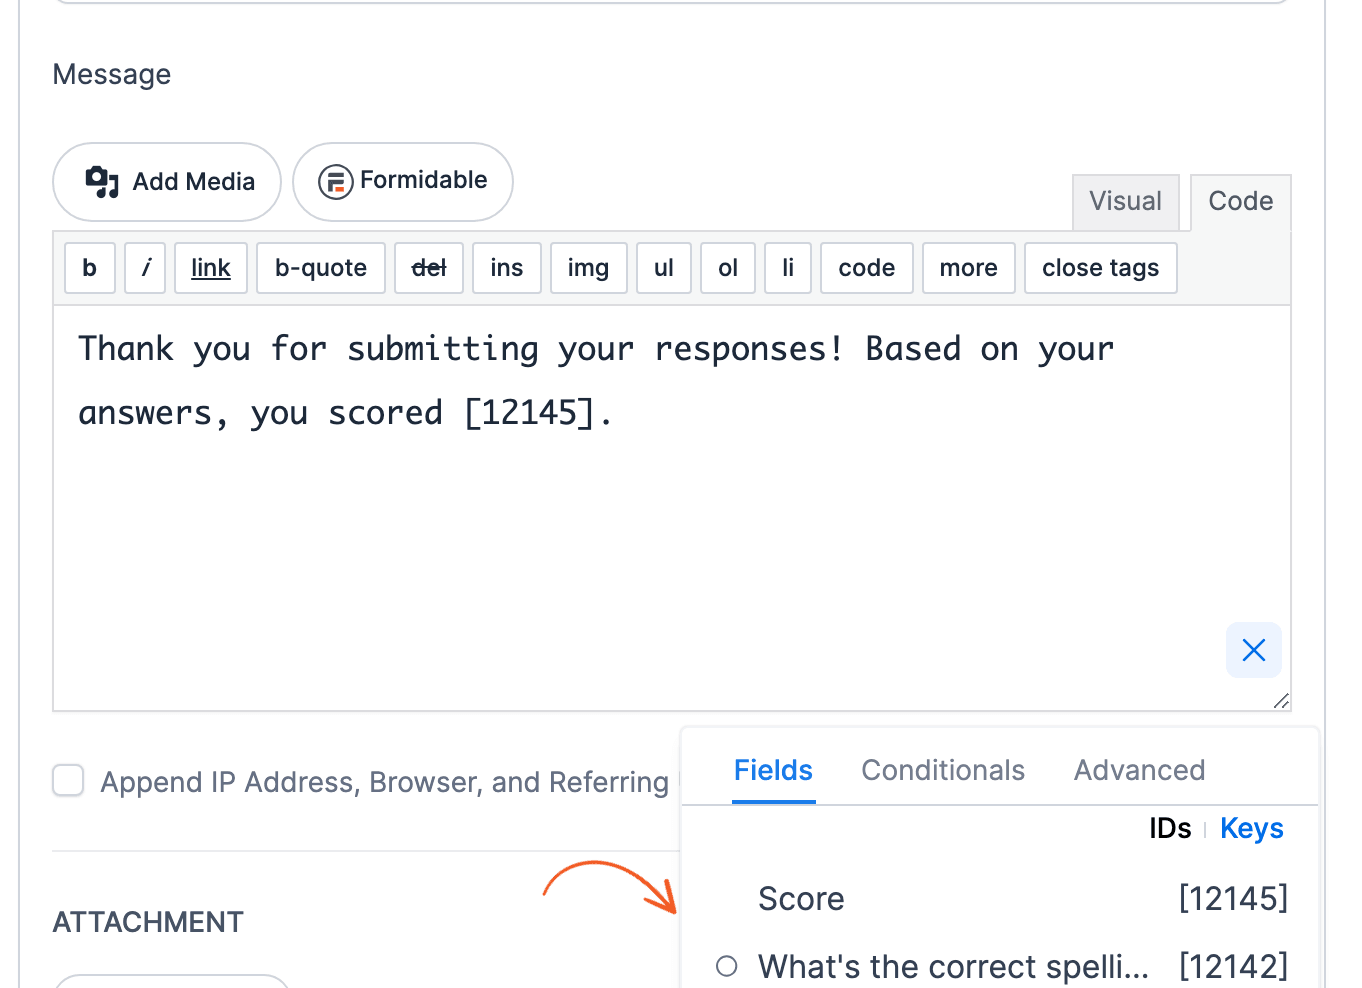
- To customize the email message, click the dotted icon at the bottom right corner of the Message text editor.
- Find the Score field from the list of options and click it. It will automatically insert the Score quiz ID/key in the text editor.
- Type in any text or HTML that you want in the Message box. For example, your message can read, "Thank you for submitting your responses! Based on your answers, you scored [18668]." Replace 18668 with the Score quiz ID/key.
Read more on how to customize the email message.
Related developer hooks
- Allow extra time for a submission to reach the server before it is rejected with frm_quizzes_timer_grace_period.
- Control whether the countdown bar is displayed automatically at the top of the form with frm_quizzes_auto_render_timer.
- Set which fields or field types are included in the score with frm_quiz_score_field.
- Set if an answer is correct or not with frm_quiz_is_correct.
- Customize the border radius of the uploaded image in an Outcome Quiz with frm_quiz_outcome_image_border_radius.
- Increase the limit in an Outcome Quiz with frm_quiz_outcome_action_options.
- Display a form HTML in an Outcome Quiz results with frm_main_feedback.
