
Use the Form Action Automation add-on to schedule your form notifications, API actions, and Twilio SMS messages. Each entry can have its very own set of scheduled form actions.

Upgrade your WordPress site with powerful, flexible forms.
Download and install
- If you haven't already, install and activate the current version of Formidable Forms Premium on your WordPress site.
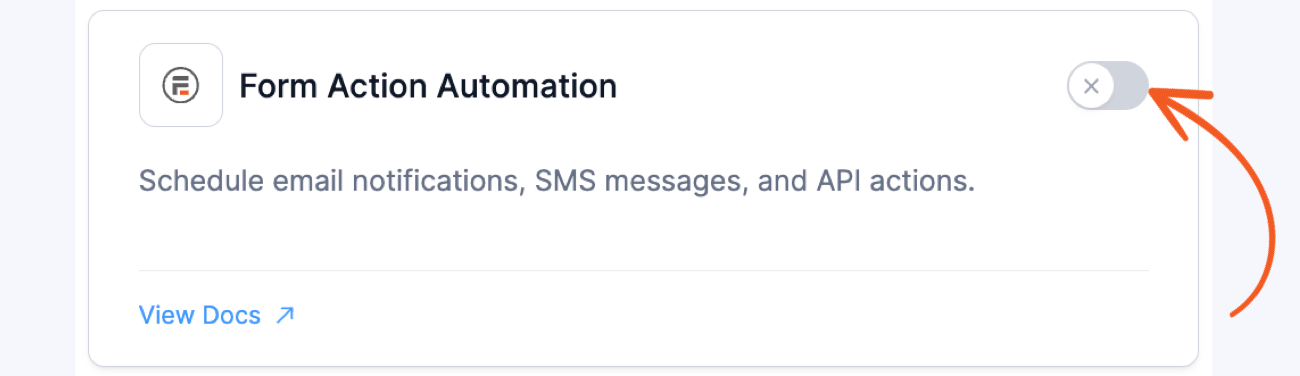
- After confirming your Formidable Forms license, proceed to the Formidable → Add-Ons page and toggle on the Form Action Automation plugin.

From Idea to Reality in Minutes. Build Powerful Forms, Dashboards, Apps and More.
Formidable Forms makes advanced site building simple. Launch forms, directories, dashboards, and custom WordPress apps faster than ever before.
Set up a form action
- Create a new form or go into edit an existing form.
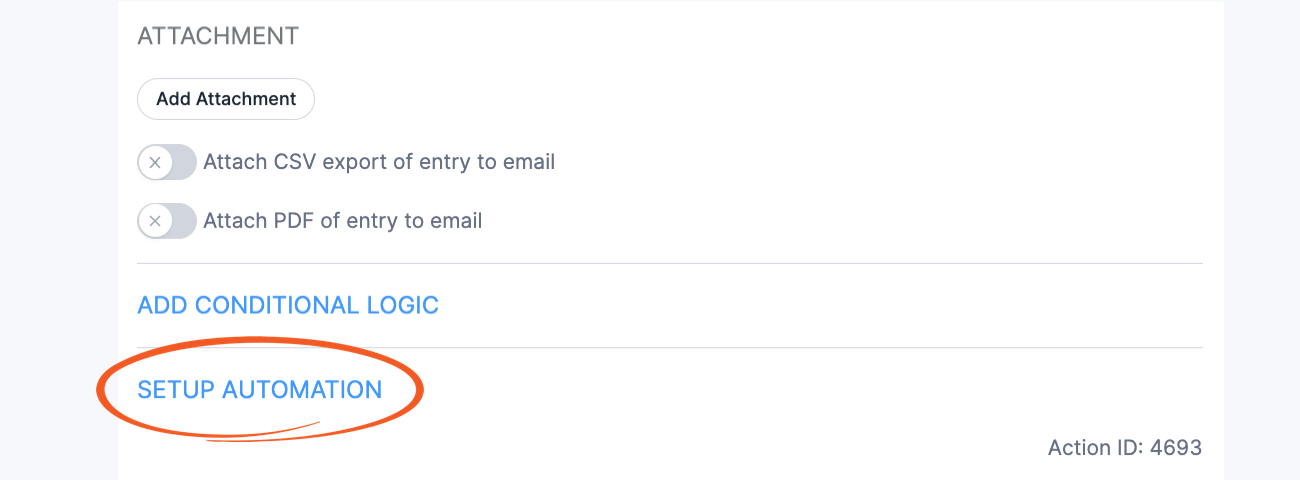
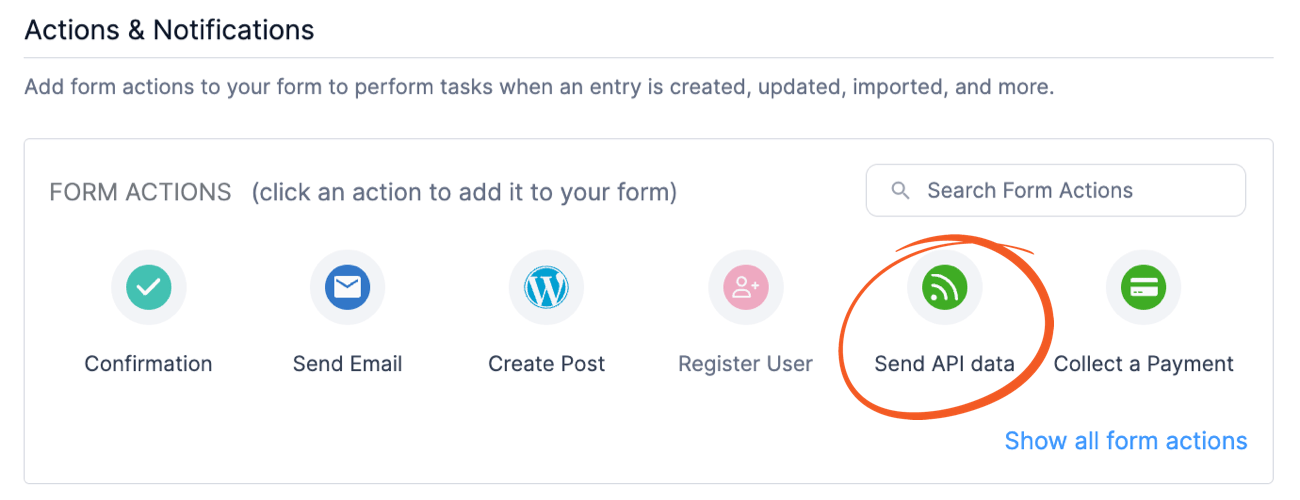
- Go into your form's Settings → Actions & Notifications. Set up an email notification or a Twilio text.
- Click the Setup Automation link. This will reveal all of the settings that you'll need to configure.
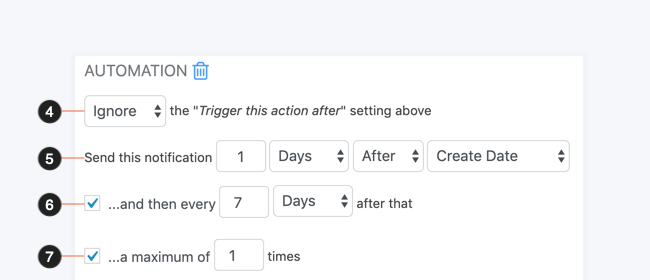
- The first setting you'll see is a dropdown allowing you to ignore or respect the 'Trigger this action after' setting in the form action.
By default, the Form Action Automation will ignore this setting. This means that when an entry is created (and/or updated, deleted or saved as a draft depending on your settings) the form action will not be triggered. The form action will ONLY be triggered when the form action tells it to send. If you 'Respect' the setting, then the notification will send whenever the 'Trigger this action after' event occurs AND when the form action tells it to send.
Tip: If you are importing entries, select the trigger Entry is imported and set the Form Action Automation settings to Respect the Trigger this action after setting above.
- Determine when your form actions should trigger. Set the number of years, months, days, hours, or minutes after the entry creation date, update date, or a date entered in your form. This determines when the initial form action will be triggered. If you use a date field from your form as the reference date, you can actually set the form action automation to send some amount of time before the entered date.When the form includes date and time fields, they will appear as options in this dropdown in the format of "Date field + Time field". To trigger based on a time selected in your form, select a date and time field combined in one choice.
- You can also choose to repeat the mailer by checking the "…and then every" checkbox. This will allow you to specify the number of years, months, days, hours or minutes to wait to trigger the form action again.
You can also use a Number field from your form to specify the number of years, months, days, hours, or minutes to wait to trigger the form action again.
- Lastly, you can set a maximum number of times that the form action will be triggered.
 By default, the Form Action Automation will ignore this setting. This means that when an entry is created (and/or updated, deleted or saved as a draft depending on your settings) the form action will not be triggered. The form action will ONLY be triggered when the form action tells it to send. If you 'Respect' the setting, then the notification will send whenever the 'Trigger this action after' event occurs AND when the form action tells it to send.
 You can also use a Number field from your form to specify the number of years, months, days, hours, or minutes to wait to trigger the form action again.

Reading the current queue
Once you have a form action set up, every entry that is submitted will be added into the current queue. There is a current queue for each form action that has the automation set up. You can view the current queue by going to the form action in question.
 If you would like to remove an entry from the queue before the email notification or text is sent, you can click the trash can to the right of the entry, as seen below.

Examples
Create a weekly text reminder
One thing that most people have to do every week is take the trash out. You can follow these instructions to learn how to send users a weekly reminder text to take out the trash.
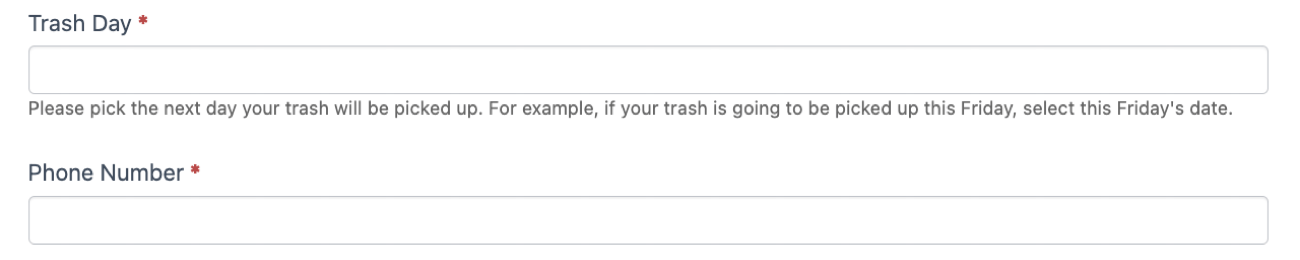
- First, create a form. We'll name it Weekly Trash Reminder.
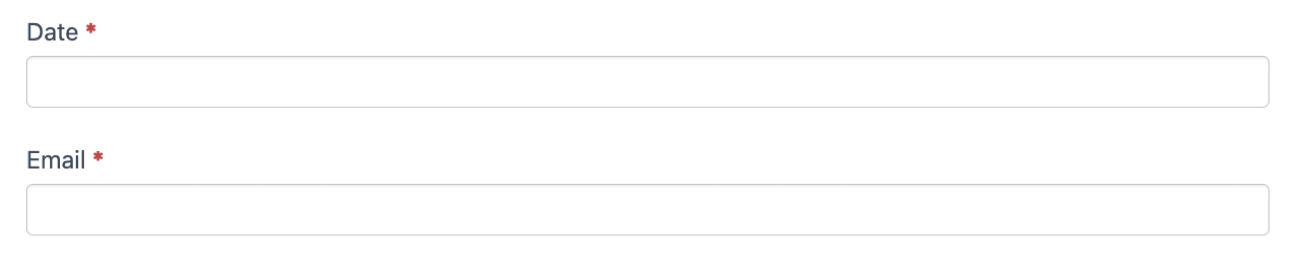
- Add a Date Field for users to select their trash day.
- Add a Phone Number field and then update your form. It should look something like the image below.
- Go into the form's Settings → Actions & Notifications and click on the Twilio icon. Please note that you must have the Twilio add-on installed.
- Insert your Phone Number field ID in the To box.
- Insert your Twilio phone number into the From box. If it is an international number, you must include the country code.
- Customize the message that you would like to be sent via text.
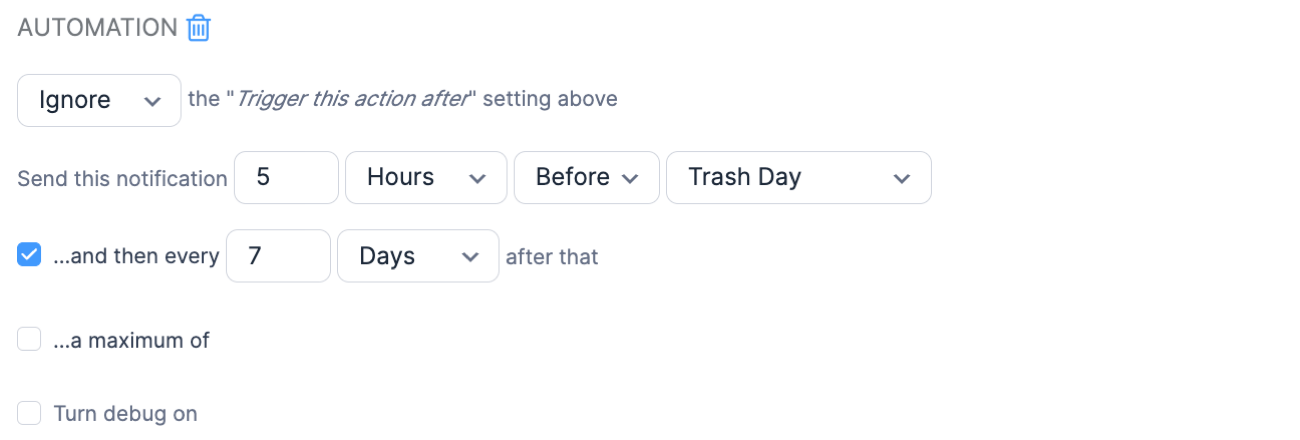
- Click the Setup Automation link.
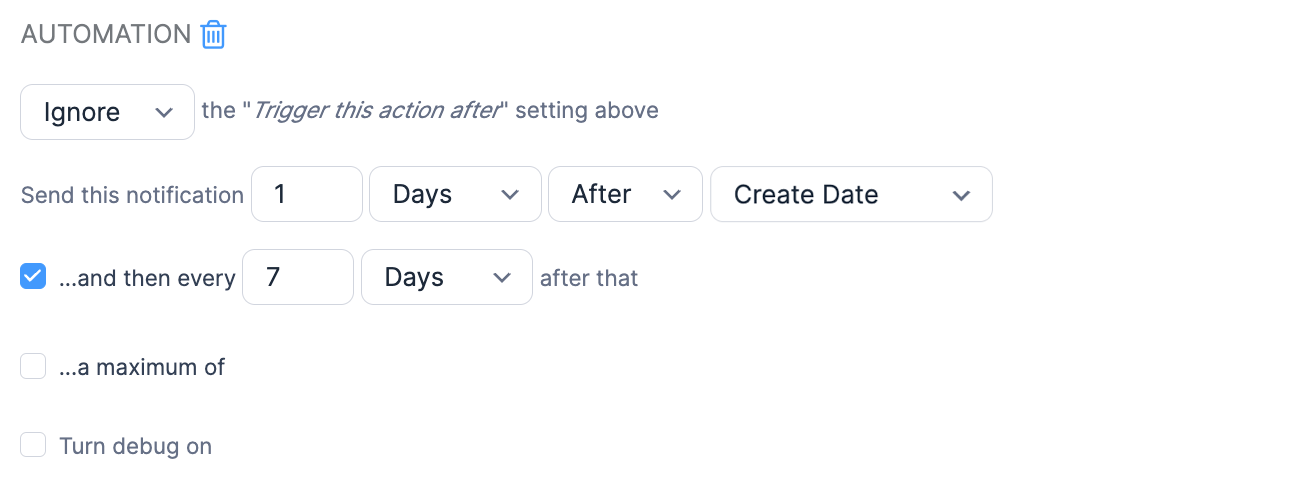
- Set up the form action automation to send '5 hours before your Date field' and then 'every 7 days after that'. This way, they will get the text at 7pm the night before trash pickup.
- Lastly, update your form settings. Now you have a form that will send users a reminder text at 7PM (for your site's timezone) the evening before trash day.
Create a yearly email
There are many instances where sending an email reminder might be helpful from wishing someone happy birthday to reminding someone it's time to get a health screening. For this example, we will send out a Happy Birthday email. Follow these simple instructions to learn how to set up your own yearly email notification.
- First, create a form with a date field (for the user's birthday) and an Email field (so we know where the email is going).
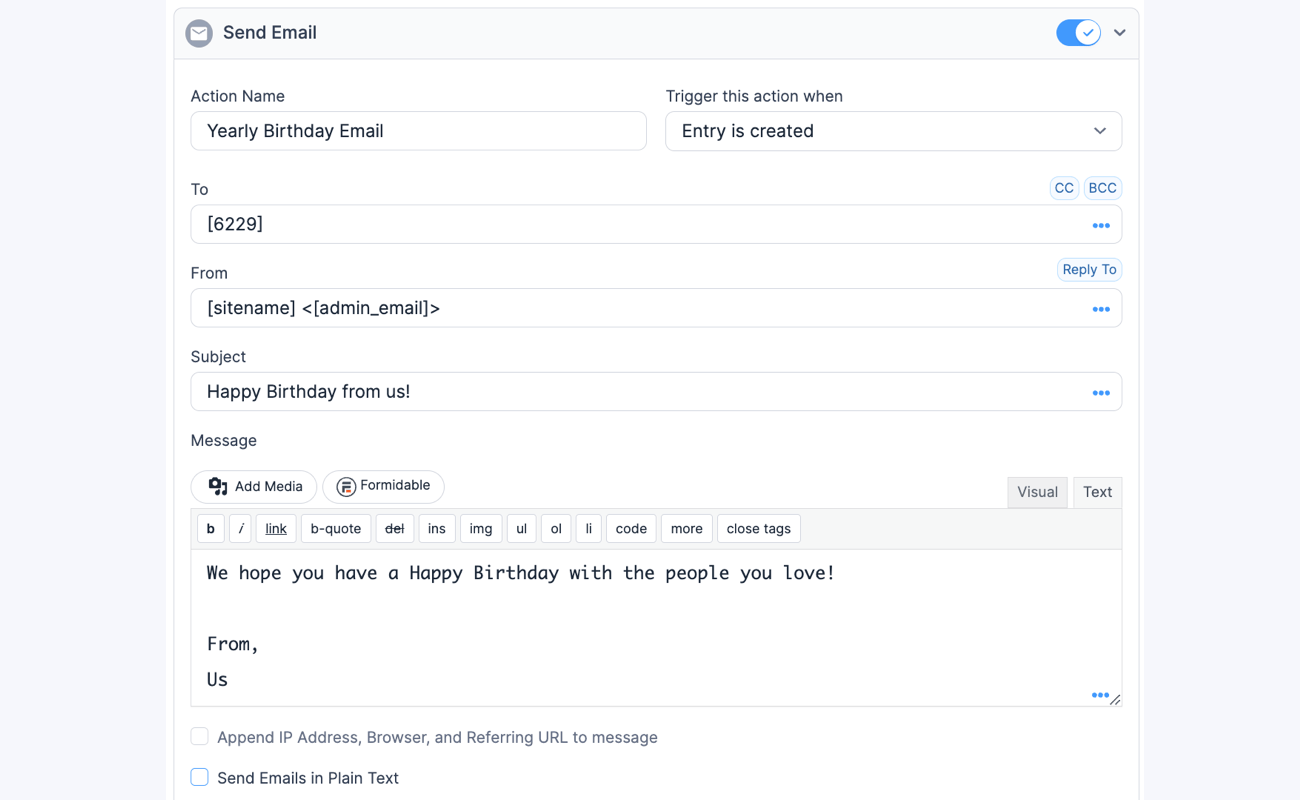
- Next, go into your form's Settings → Actions & Notifications and customize your Email Notification. If you need help customizing your email notification, you can review the email instructions.
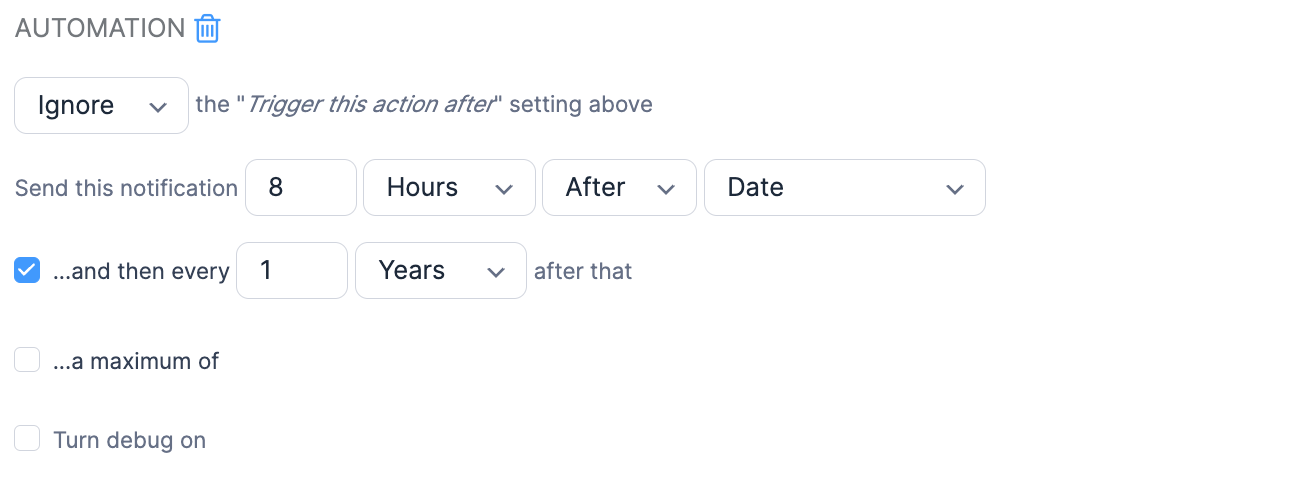
- Click the Setup Automation link.
- Set the notification to send '8 hours after your Date field' and then 'every 1 year after that'. This way, they will get the email notification at 8am on their birthday each year (if they are in your site's timezone).
- Lastly, update your form settings. Now you have a form that will automatically send users a birthday email!
Send reminder until status is updated
This example will send a reminder email, using the Form Action Automation, until a status field is updated. This is particularly helpful if you have a form that gets submitted and another user needs to approve the entry. Follow the instructions below to set up a reminder based on conditional logic. Please note that Conditional Logic is only available in the premium version of Formidable Forms.
- Create a form or go into edit an existing form.
- If needed, add a dropdown or radio field and set the field label to Status. Then, you can set the choices to Approved, Pending or any other choices you would like to use. Save your form.
- Go into the form's Settings → Actions & Notifications and create an email notification. If you need help customizing your email notification, you can review the email instructions. For the email, set it to Trigger this action when Entry is created and Entry is updated.
- Add conditional logic to your Email Notification so that the email sends if the Status field is Pending. This will make it so that the form action only sends if the status field is still set to Pending.
- Click the Setup Automation link and configure your automation settings. For this example, set the Form Action Automation to Ignore the email notification above and trigger the form action 7 days after the Create Date of the entry, and every 7 days after that.


Send all entries in a Weekly Email
Is managing emails for every entry too much to manage? You can set up a digest of all entries for the day, week, or month.
- First, let's create the content for your email. You'll need a view for this. You can format the view however you'd like, but some email providers are picky about what styling they will use. It might be best to use a table. Click here for more detail on setting up your view. Any CSS you add will need to be inline (i.e. style="color:#666666").
- Now you've got a view setup that shows all entries in your form. Next, let's filter it down. You'll want to filter by the Entry Creation Date. Something like: Entry Creation Date is greater than first day of last month or maybe Entry Creation Date is greater than Sunday this week
- Next we'll need to send it out. Create a new form for handling the automated actions.
- Add a date field to this form to select the day you would like the digest email to start. Add any other fields to the form that you would like to change. This may include a field for the email recipient, ID of the view, or a number field for the repetition span.
- Go to the form's Settings → Actions & Notifications and customize the email notification. Replace the default message with your view shortcode.
- Click the Setup Automation link.
- Set the notification to send '1 minute after your Date field' and then 'every 1 week after that'. This way, the email notification will send right after midnight each week, and include all the right submissions.
- Bonus: With a scheduled email like this, you'll want to be sure it comes at the right times in order to not miss entries. By default, WordPress fires off the wp-cron when your site is visited. We recommend adding a real cron to your site to trigger hourly or daily. You may need to find instructions from your host for more specific details.
Delete Entry after 30 Days with API
Sometimes, it may be helpful to use the Formidable API to edit your entries after some time has passed. Follow these instructions to learn how to automatically delete entries after 30 days has passed. Note: This example requires the Formidable API add-on.
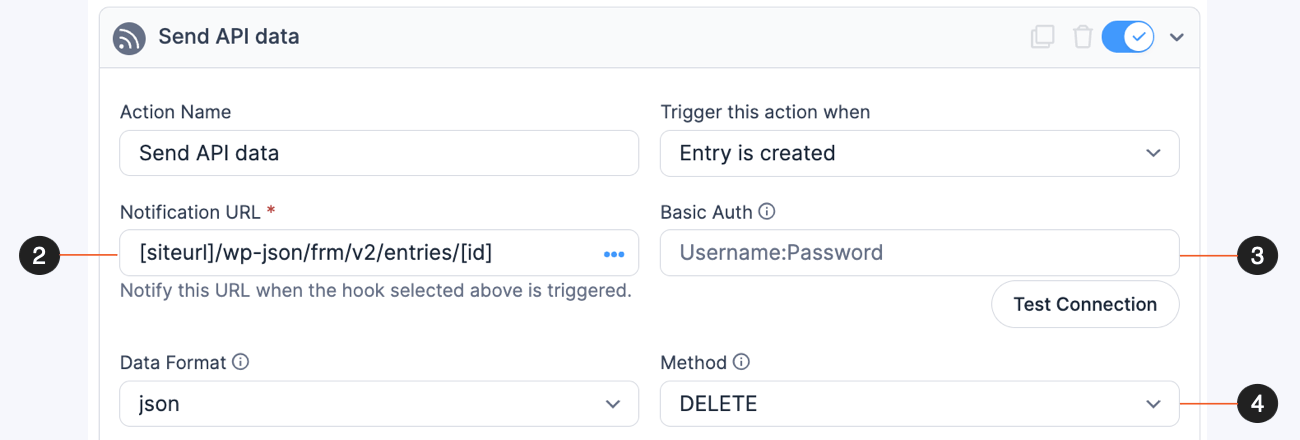
- Create a form or go into edit an existing form and go into the form's Settings → Actions & Notifications and create an API notification.
- Set the Notification URL to the following:
[siteurl]/wp-json/frm/v2/entries/[id]
- Next, enter your API Key into the Basic Authentication field. You can find your API Key in your Formidable Global Settings → API.
- Set the method to DELETE.
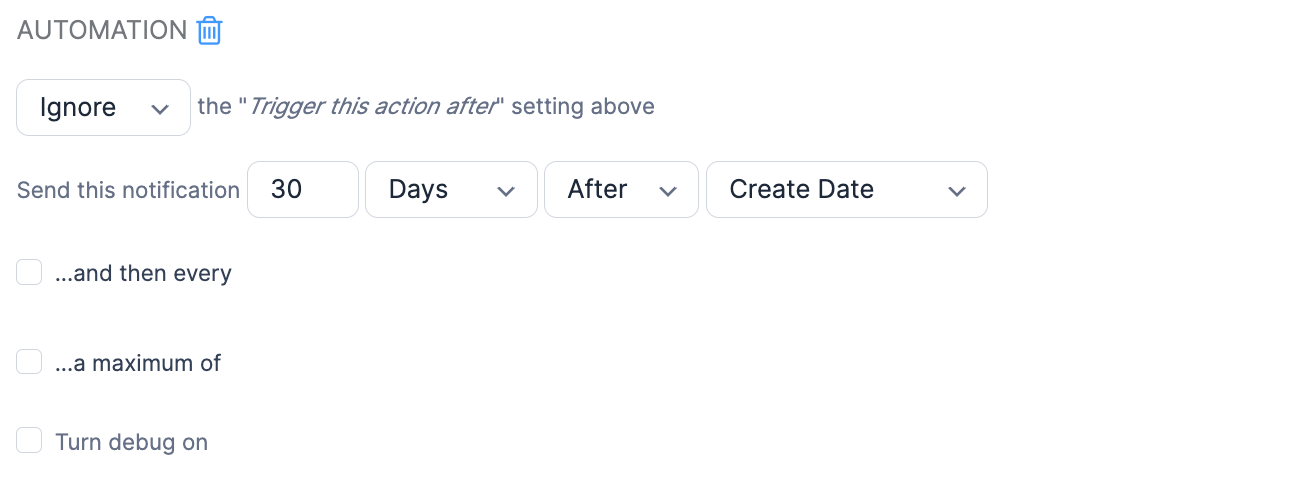
- Now that the API Notification is setup, set up the Form Action Automation. Click the Setup Automation link and configure your automation settings. For this example, set the Automation to Ignore the action above and trigger the form action 30 days after the Create Date of the entry.
- Lastly, update your form settings.
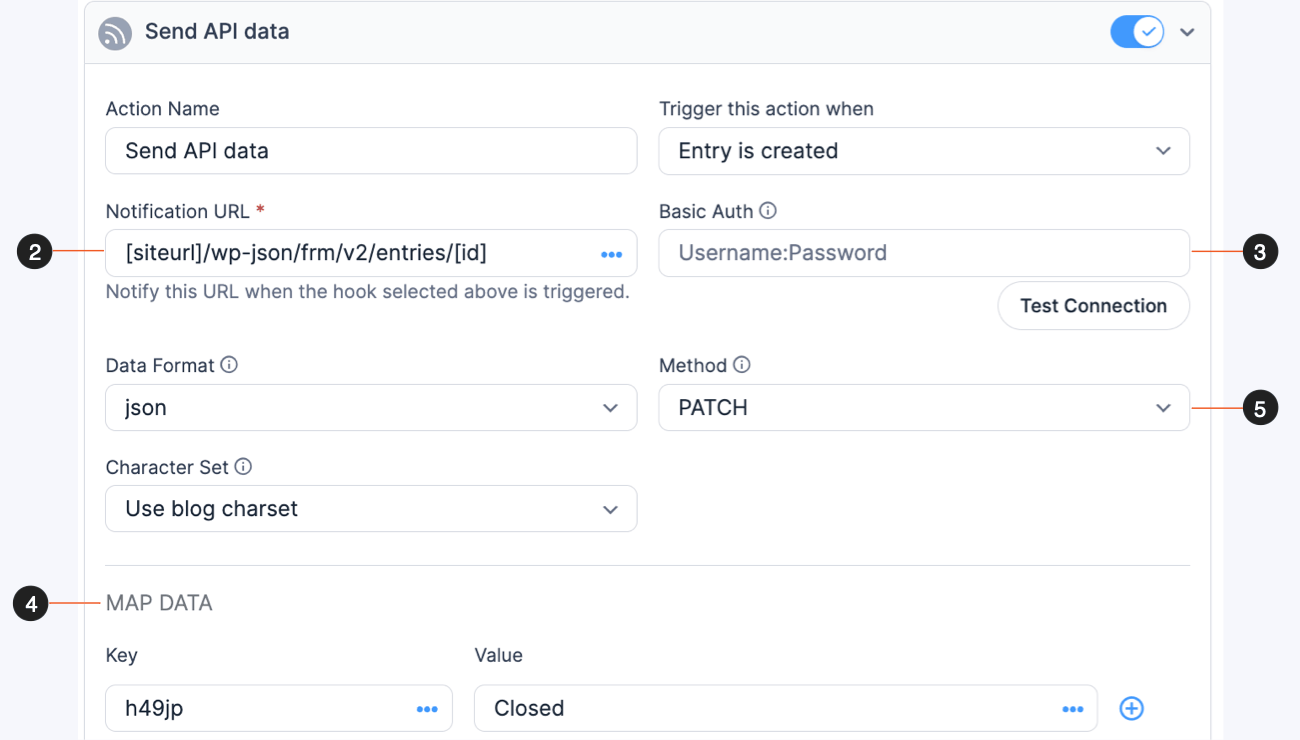
Change Entry with API
You may find that changing an entry after a certain date passes is helpful in certain situations. In our example below, we have a form that allows users to create an event and set the date of the event. All new events have Status field set to Active. The API & Form Action Automation will be used to change the Status to Closed after the set date has passed. Note: This example requires the Formidable API add-on.
- Create a form or go into edit an existing form and go into the form's Settings → Actions & Notifications and create an API notification.
- Set the Notification URL to the following:
[siteurl]/wp-json/frm/v2/entries/[id]
- Next, enter your API Key into the Basic Authentication field. You can find your API Key in your Formidable Global Settings → API.
- Set up the key and value that should be changed. For the key, use the Field Key of the field you want to update. For the Value, you can put in any value you would like.
- Set the method to PATCH.
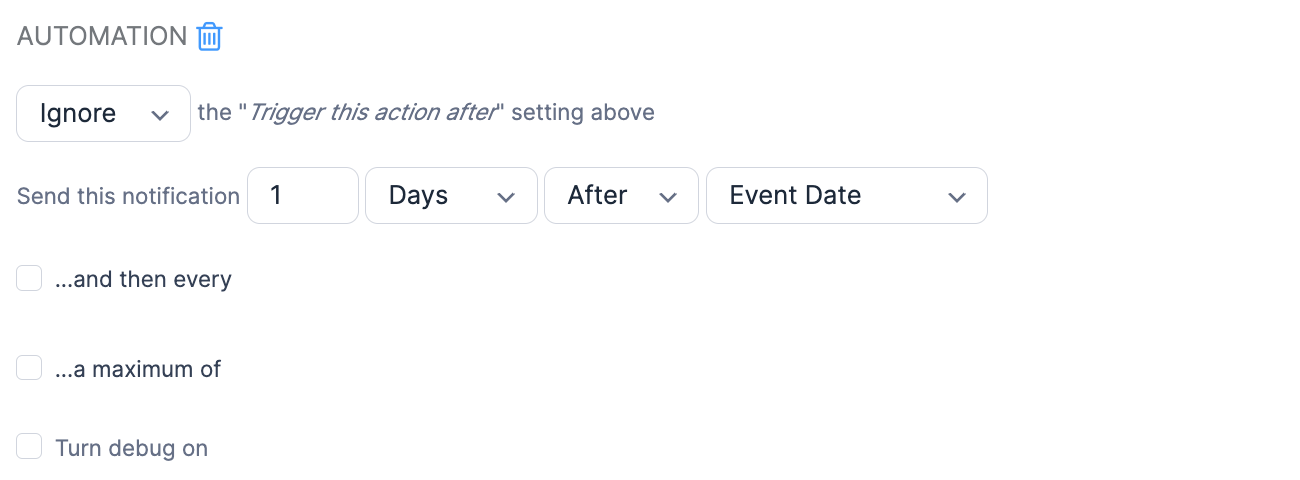
- Now that the API Notification is setup, set up the Form Action Automation. Click the Setup Automation link and configure your automation settings. For this example, set the Form Action Automation to Ignore the action above and trigger the form action 1 days after the Event Date of the entry.
- Lastly, update your form settings.
Triggering WP Cron
By default, the WordPress cron is triggered only when your site is visited. The most efficient and reliable way of keeping your form actions on schedule is to switch the WP Cron to a real cron triggered on the server side. Depending on your web host, this will need to be done differently. Siteground has some detailed instructions on setting up a cron.
Troubleshooting
Debugging tools
If you are having trouble with the Form Action Automation, turn on debugging. This will create a log file created for every form action that the Form Action Automation triggers. NOTE: All log files will be located in the wp-content/uploads/formidable-autoresponder/logs/ folder.
To turn on debugging, simply check the option for 'Turn debug on' on update your form.
 Once there are log files to see, you can click on them to View the log files, or click on the trash can to the right of the log file to delete it.

Test WP Cron
If the form actions are going past their scheduled times with no sign of being triggered, chances are good they are not getting triggered. Install the WP Crontrol plugin to get a look at the scheduled events. If old events show here, there is a problem with your site and you should contact your web host.
If you have tried our debugging tools and the WP Crontrol plugin shows events are being triggered, feel free to create a ticket in our help desk.
Additional customizations
Change default time
To change the default action trigger time from midnight to 10 AM, use the example to change default time.
Adjust time for specific form action
To allow for the autoresponder for a single Form Action be based on a Time field in a form, use the example to adjust time for specific form action.
Unschedule an Autoresponder cron event
Use the following code to unschedule an Autoresponder cron event with entry id and action id.
function unqueue_autoresponder( $entry_id, $action_id ) {
     $args  = compact( 'entry_id', 'action_id' );
     $queue = new FrmAutoresponderQueue( $args );
     $queue->unschedule();
}

add_action(
     'init',
     function() {
        unqueue_autoresponder( 58051, 46488 );
     },
     1
);
