
Integrate Formidable Forms with your Salesforce account using the WordPress Salesforce integration plugin. Add the data submitted from your WordPress forms as Contacts or Leads in your Salesforce account.
You can send data to any custom object in Salesforce.
Custom objects allow you to save extra data to Salesforce that is collected in your form, but isn't standard on the Salesforce side. These serve as custom database tables that allow you to store information unique to your organization. This includes accounts, announcements, assets, campaigns, cases, groups, contacts, contracts, email messages, events, ideas, leads, notes, orders, products, tasks, goals, and more.
Upgrade your WordPress site with powerful, flexible forms.
Download and install
You must have API access to your Salesforce account to use this integration.
- If you haven't already, install and activate the current version of Formidable Forms Premium on your WordPress site.
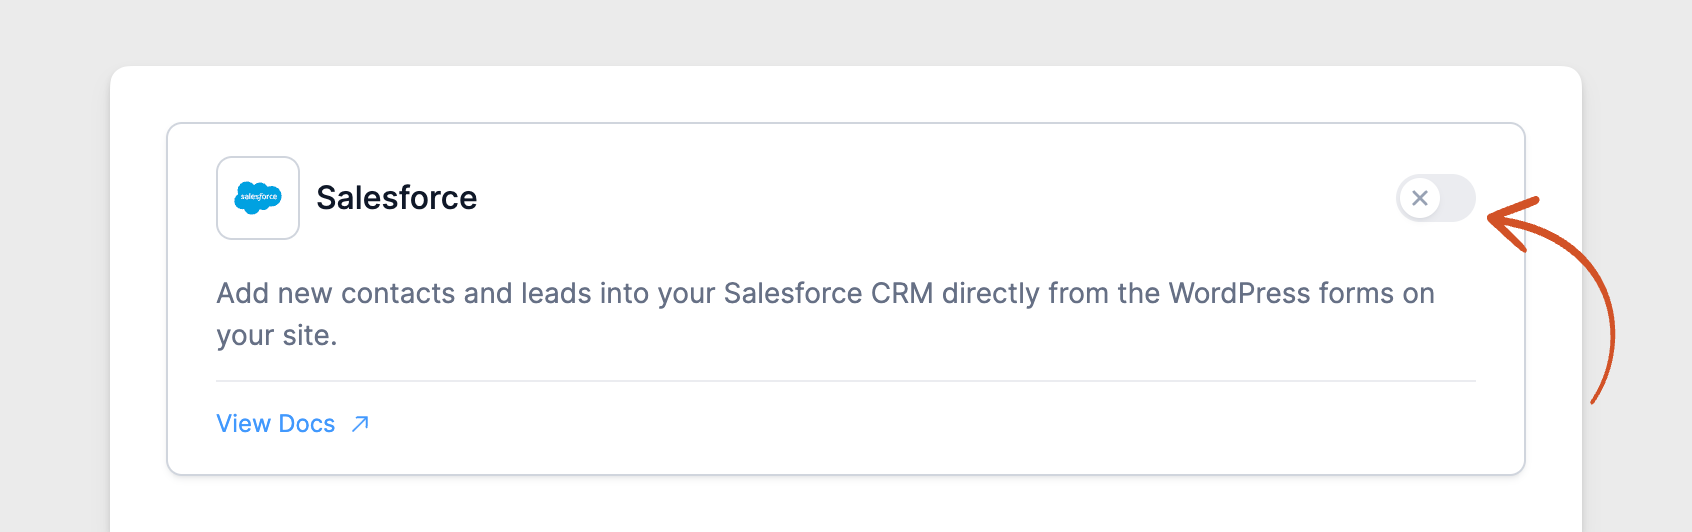
- After confirming your Formidable Forms license, go to Formidable → Add-Ons and toggle on the WordPress Salesforce integration plugin.

From Idea to Reality in Minutes. Build Powerful Forms, Dashboards, Apps and More.
Formidable Forms makes advanced site building simple. Launch forms, directories, dashboards, and custom WordPress apps faster than ever before.
Integrate Formidable Forms with Salesforce
Formidable needs a Consumer Key and a Consumer Secret Key to talk to Salesforce. You get both from an External Client App in your Salesforce account. Then you save them in your WordPress dashboard.
Step 1: Create an External Client App
Create the app in Salesforce first. It holds the Consumer Key and Consumer Secret Key.
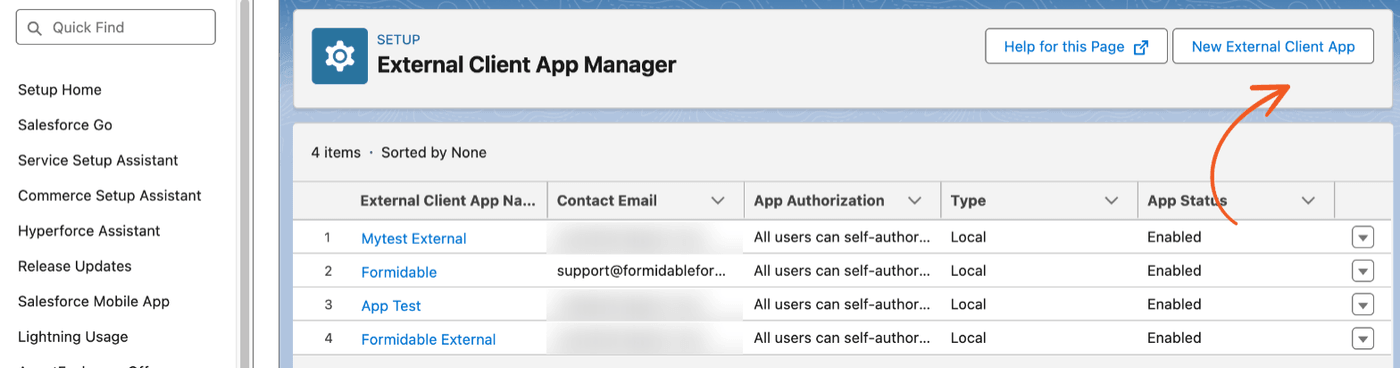
- In your Salesforce dashboard, go to Setup → Platform Tools → Apps → External Client Apps → External Client App Manager and click New External Client App.
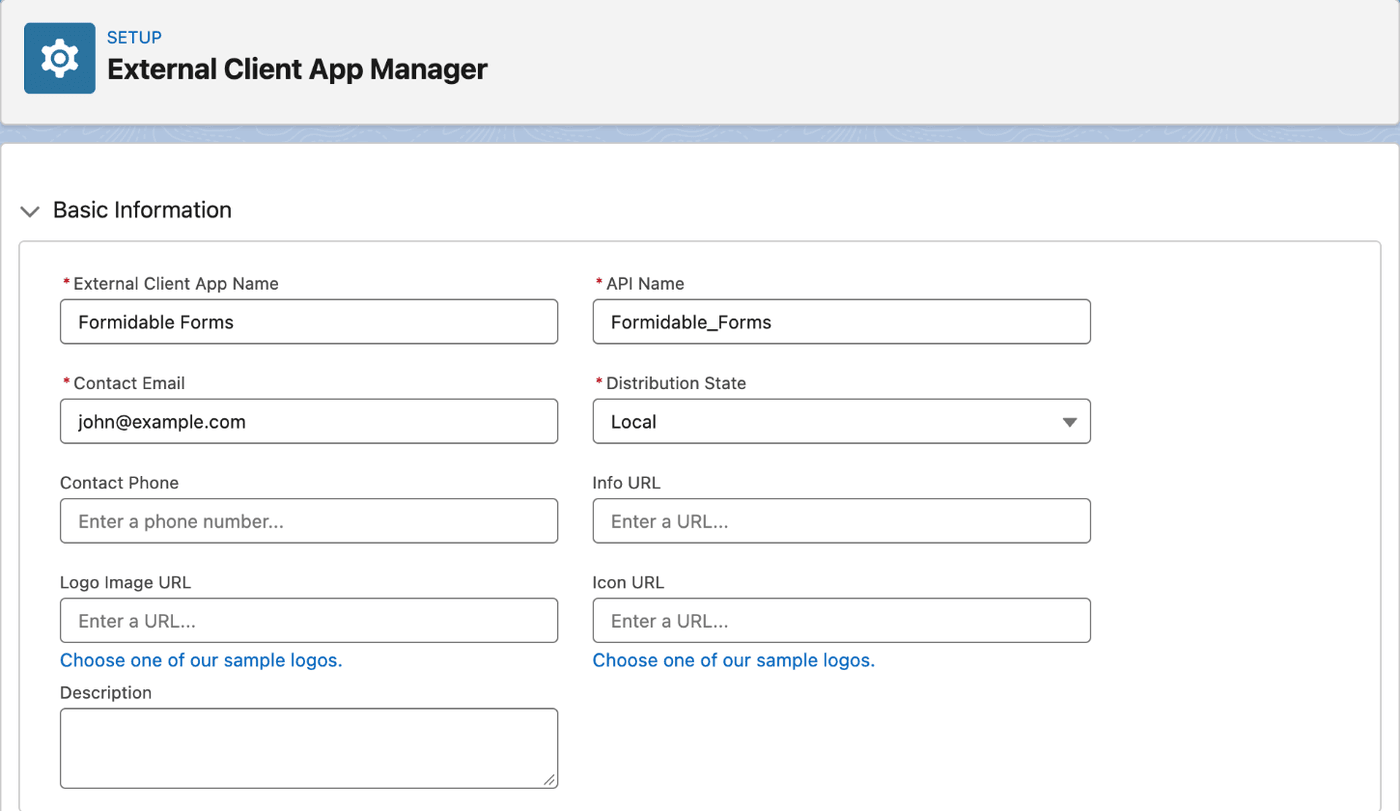
- Fill out the required Basic Information. Contact Phone, Info URL, Logo Image URL, Icon URL, and Description are optional.
- External Client App Name: a name you will recognize later, such as Formidable Forms.
- API Name: this fills in automatically from the External Client App Name. You can change it.
- Contact Email: the email address of the user creating the app.
- Distribution State: keep the default, Local.
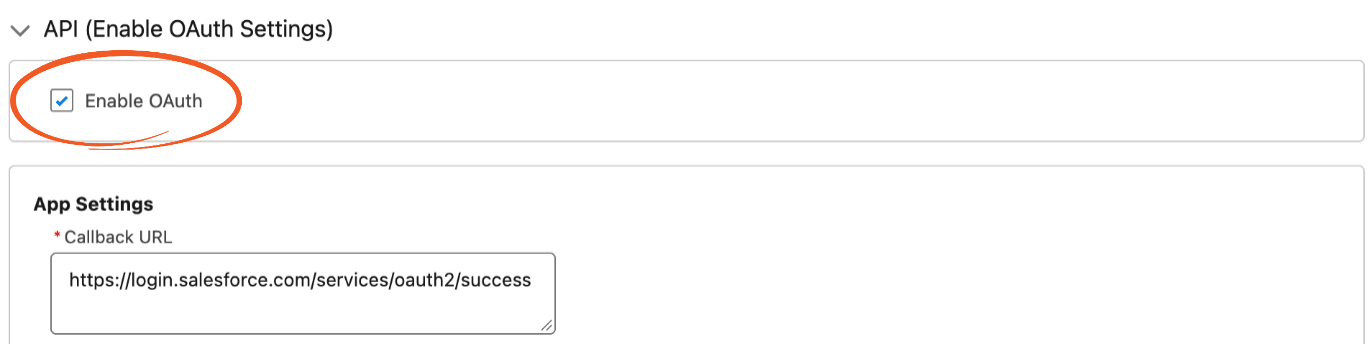
- Under API (Enable OAuth Settings), check the Enable OAuth box. Then, under App Settings, enter this URL in the Callback URL box.
https://login.salesforce.com/services/oauth2/success
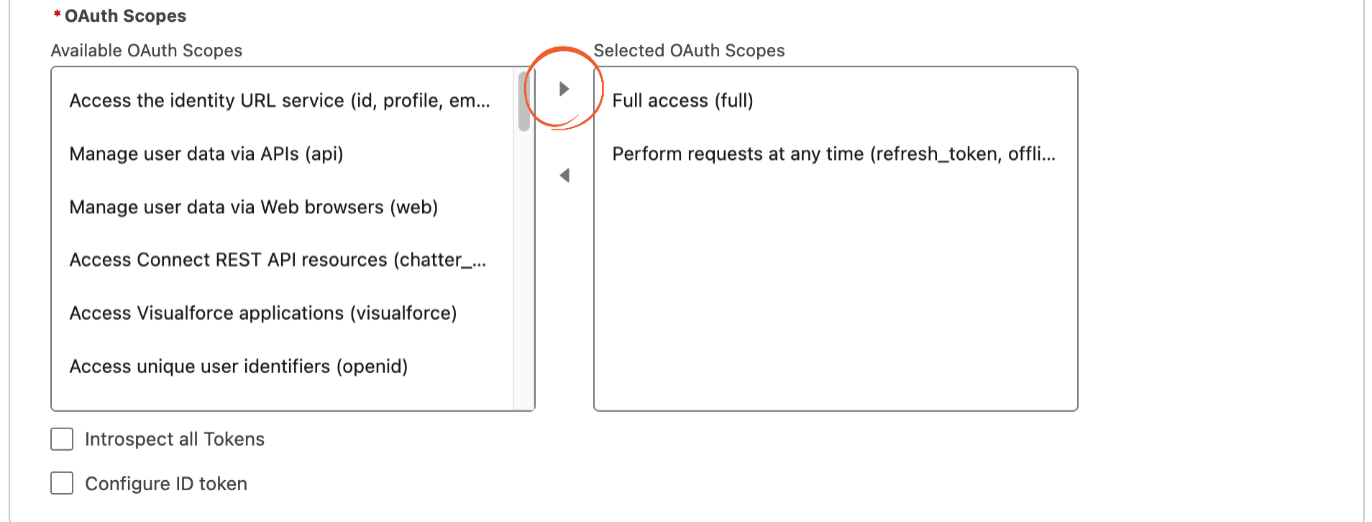
If you are using a Salesforce sandbox, use this instead.https://test.salesforce.com/services/oauth2/success - The OAuth Scopes decide what the app is allowed to do. Add each of these scopes: select it in the Available OAuth Scopes list and click the right arrow to move it to Selected OAuth Scopes.
- Full access (full)
- Perform requests at any time (refresh_token, offline_access)
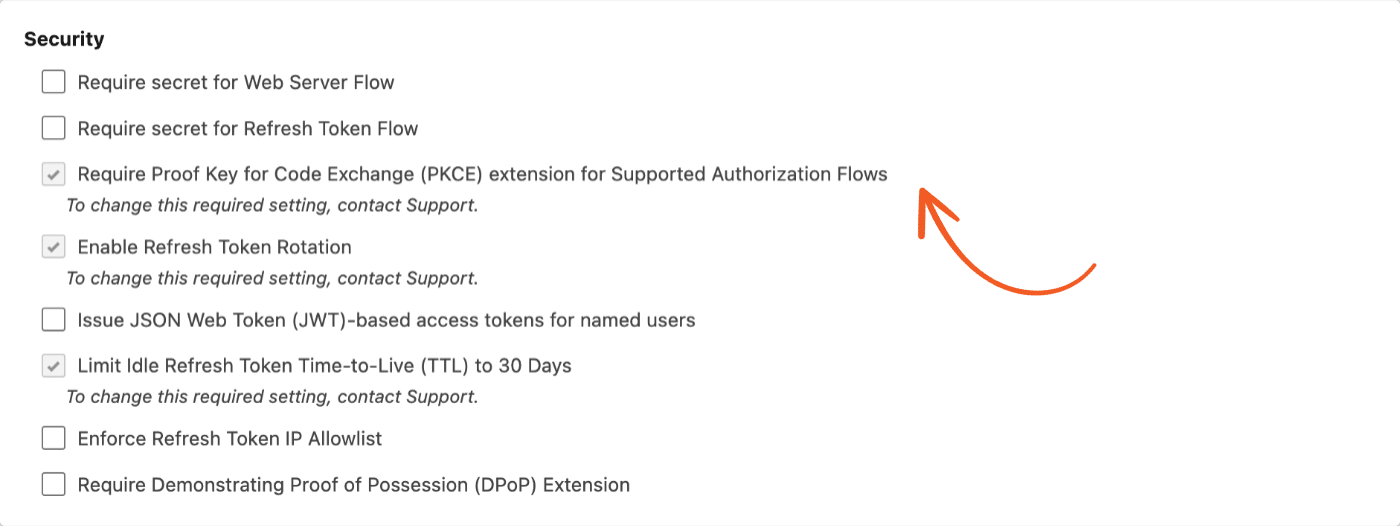
- Scroll down to the Security section. On a new app, Salesforce checks Require Proof Key for Code Exchange (PKCE) extension for Supported Authorization Flows and greys it out. It shows the message "To change this required setting, contact Support." Learn more in Missing required code challenge.
- At the bottom of the page, click Create.
Step 2: Connect to Salesforce
With the app created, copy its keys into Formidable and authorize the connection.
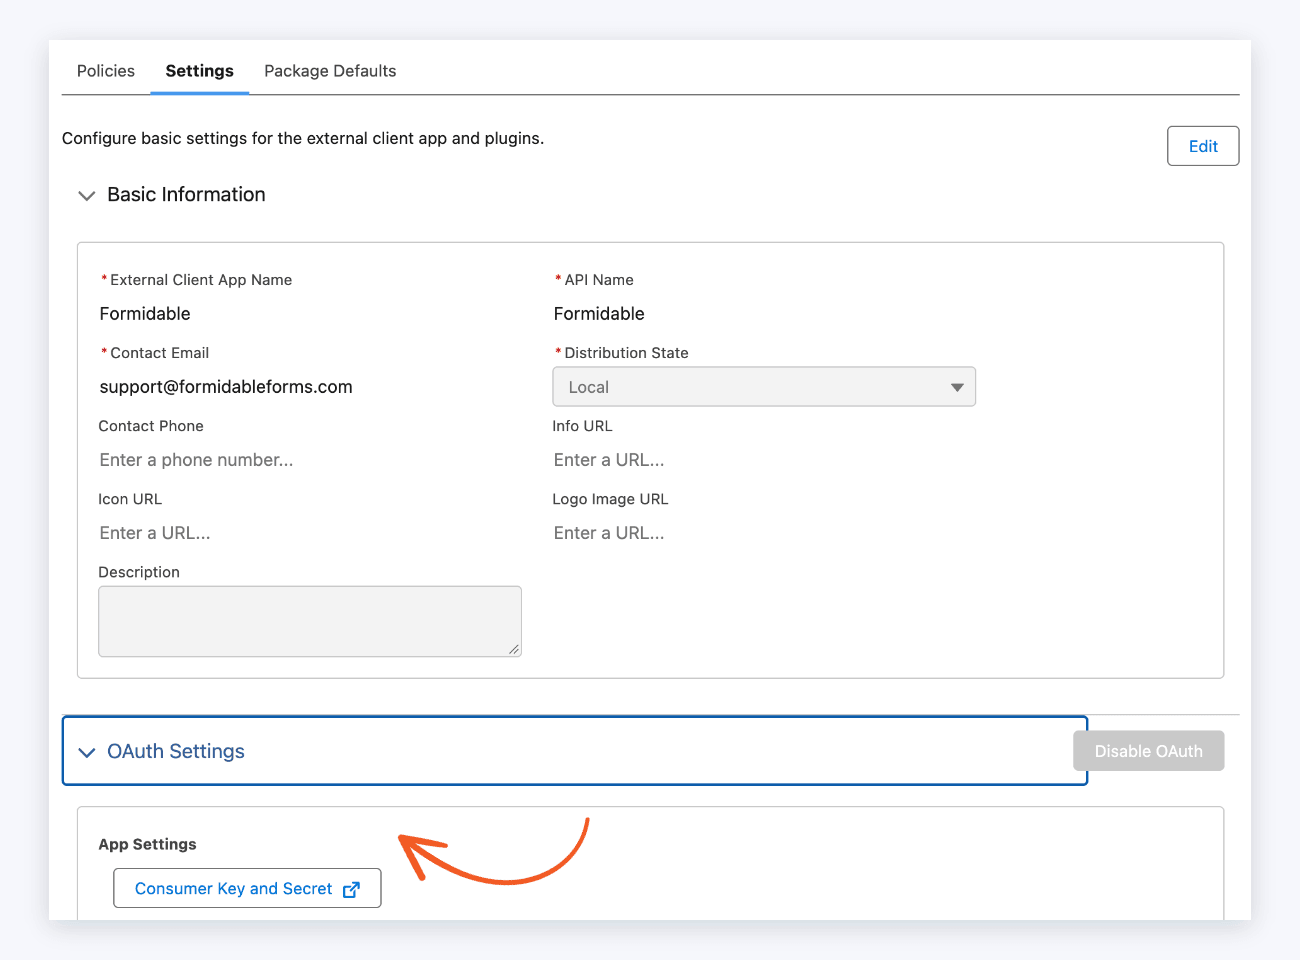
- In Salesforce, open your app from the External Client App Manager by clicking its name. Then click the Settings tab.
- Under OAuth Settings → App Settings, click Consumer Key and Secret. It opens in a new window, and Salesforce may ask you for a verification code first.
- Copy your Consumer Key and Consumer Secret.
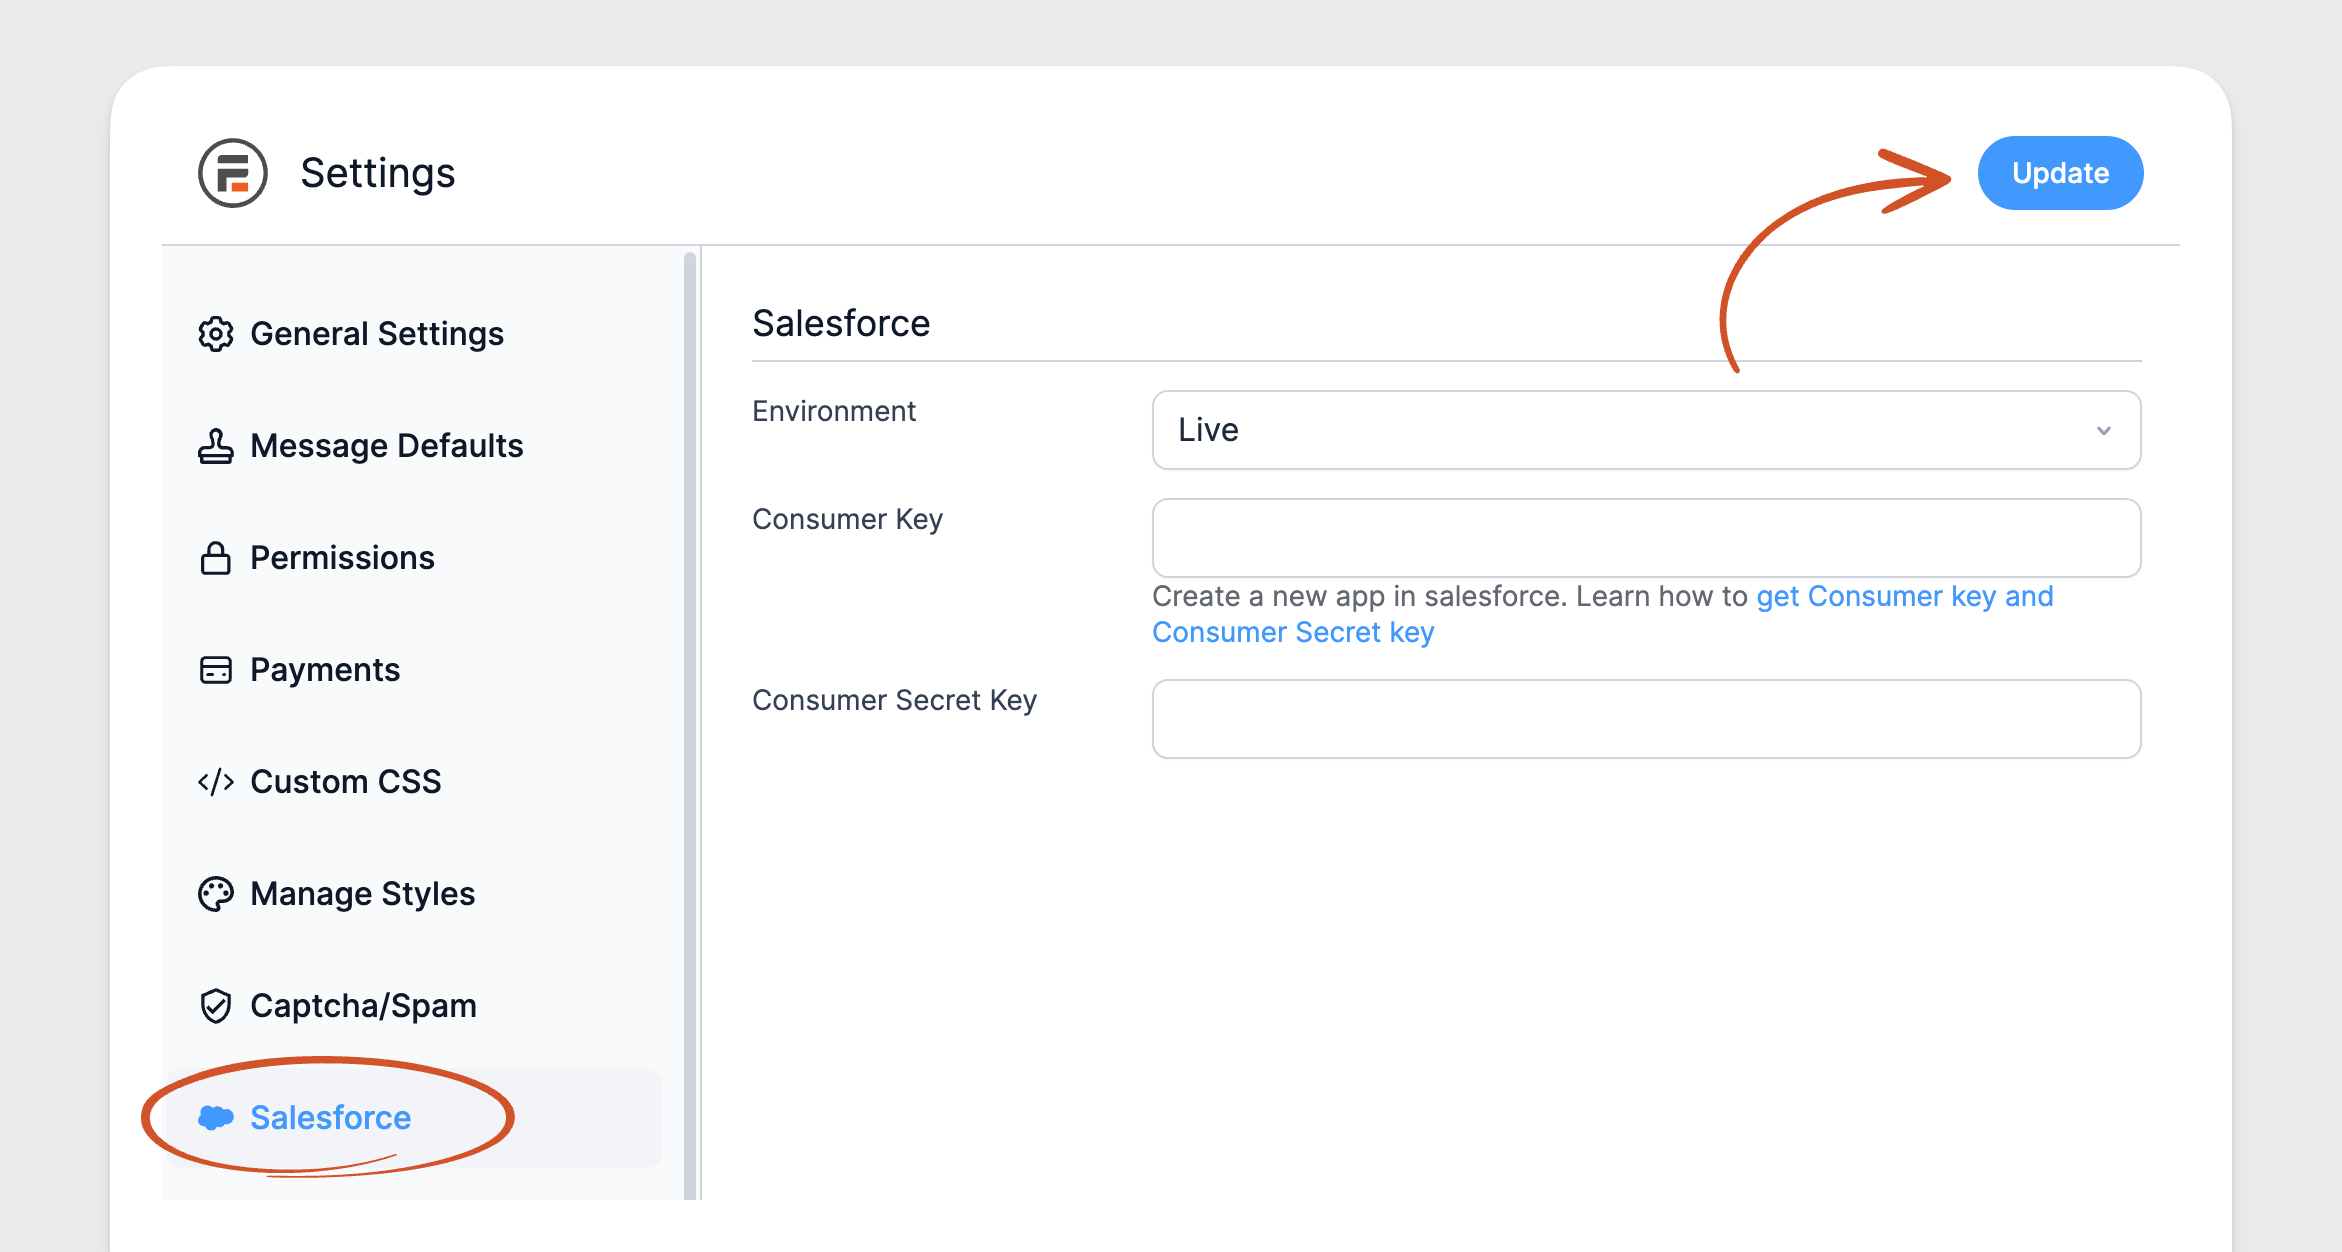
- Return to your WordPress dashboard and go to Formidable → Global Settings → Salesforce. Paste the Consumer Key into the Consumer Key box and the Consumer Secret into the Consumer Secret Key box. Then click Update to save your settings.
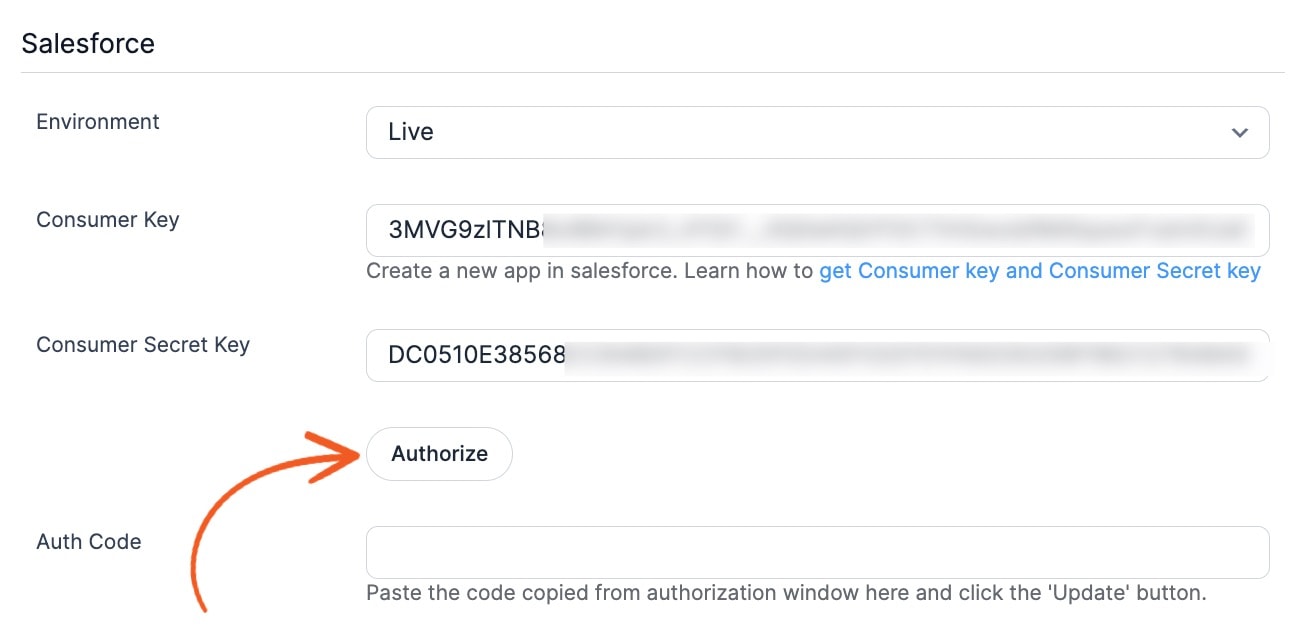
- Once you have entered your Consumer Key and Consumer Secret Key, the Authorize button and Auth Code field appear. Click Authorize to start the connection.
- Next, a popup appears, asking you to log in with your Salesforce credentials. To finish the setup, click Allow.
- The popup then shows the Remote Access Application Authorization message. Look for ?code= in the URL in the address bar. Copy the string of characters that follows this part of the URL, and close the popup.
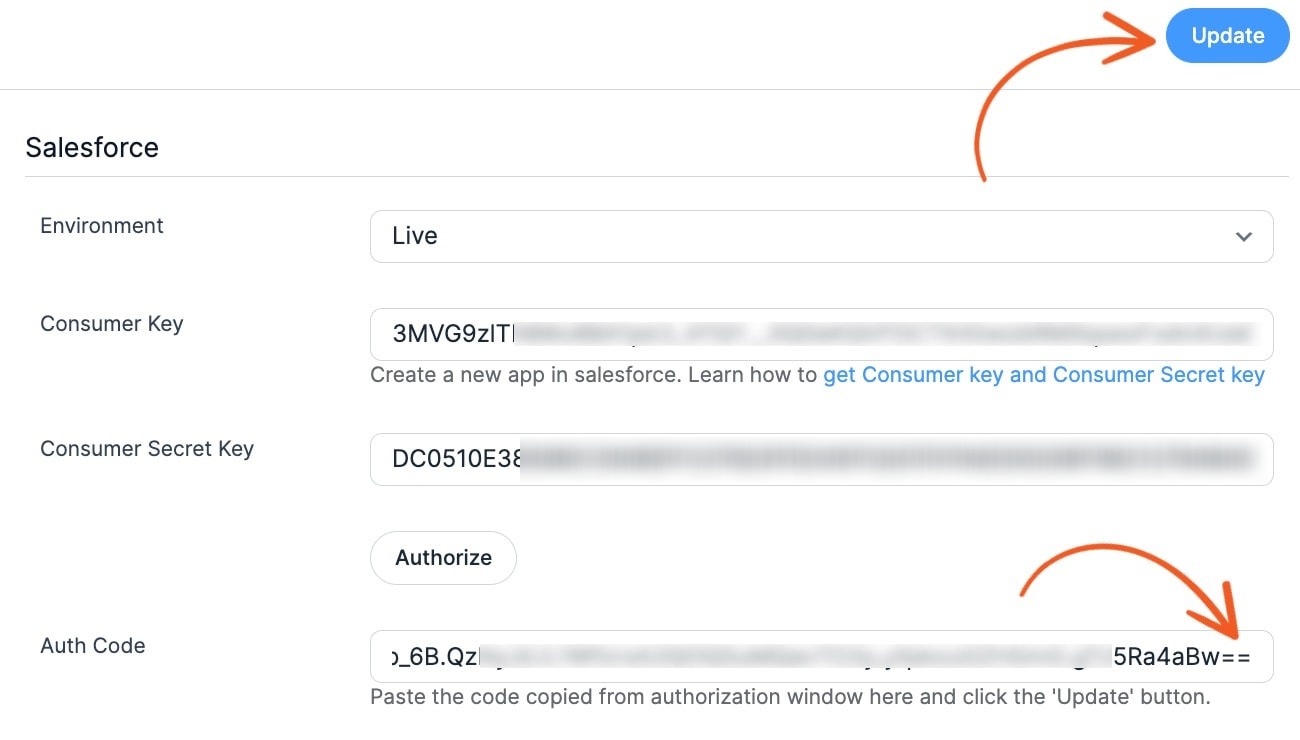
- Return to the Formidable → Global Settings → Salesforce page and paste the code into the Auth Code field. Change the %3D%3D at the end of the code to ==. Then click Update to apply your changes.
- You're now all set to create your Salesforce forms! The Deauthorize button on the page confirms that the authorization is complete.


Step 3: Create a Salesforce form
Now that your WordPress site is connected to your Salesforce account, it's time to create your Salesforce forms.
- If you haven't already, create a form to collect your customers and leads.
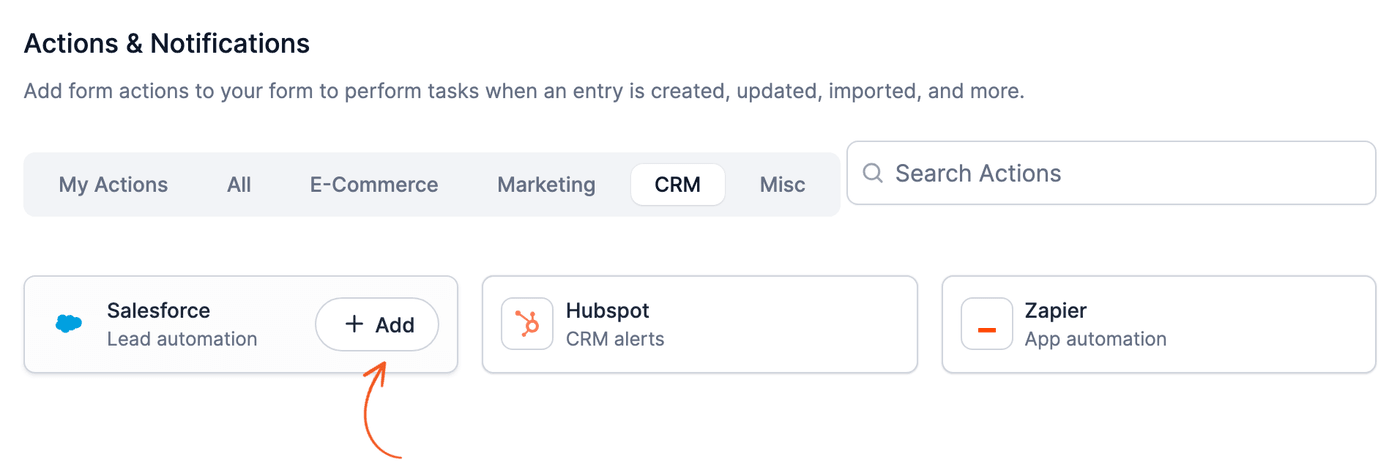
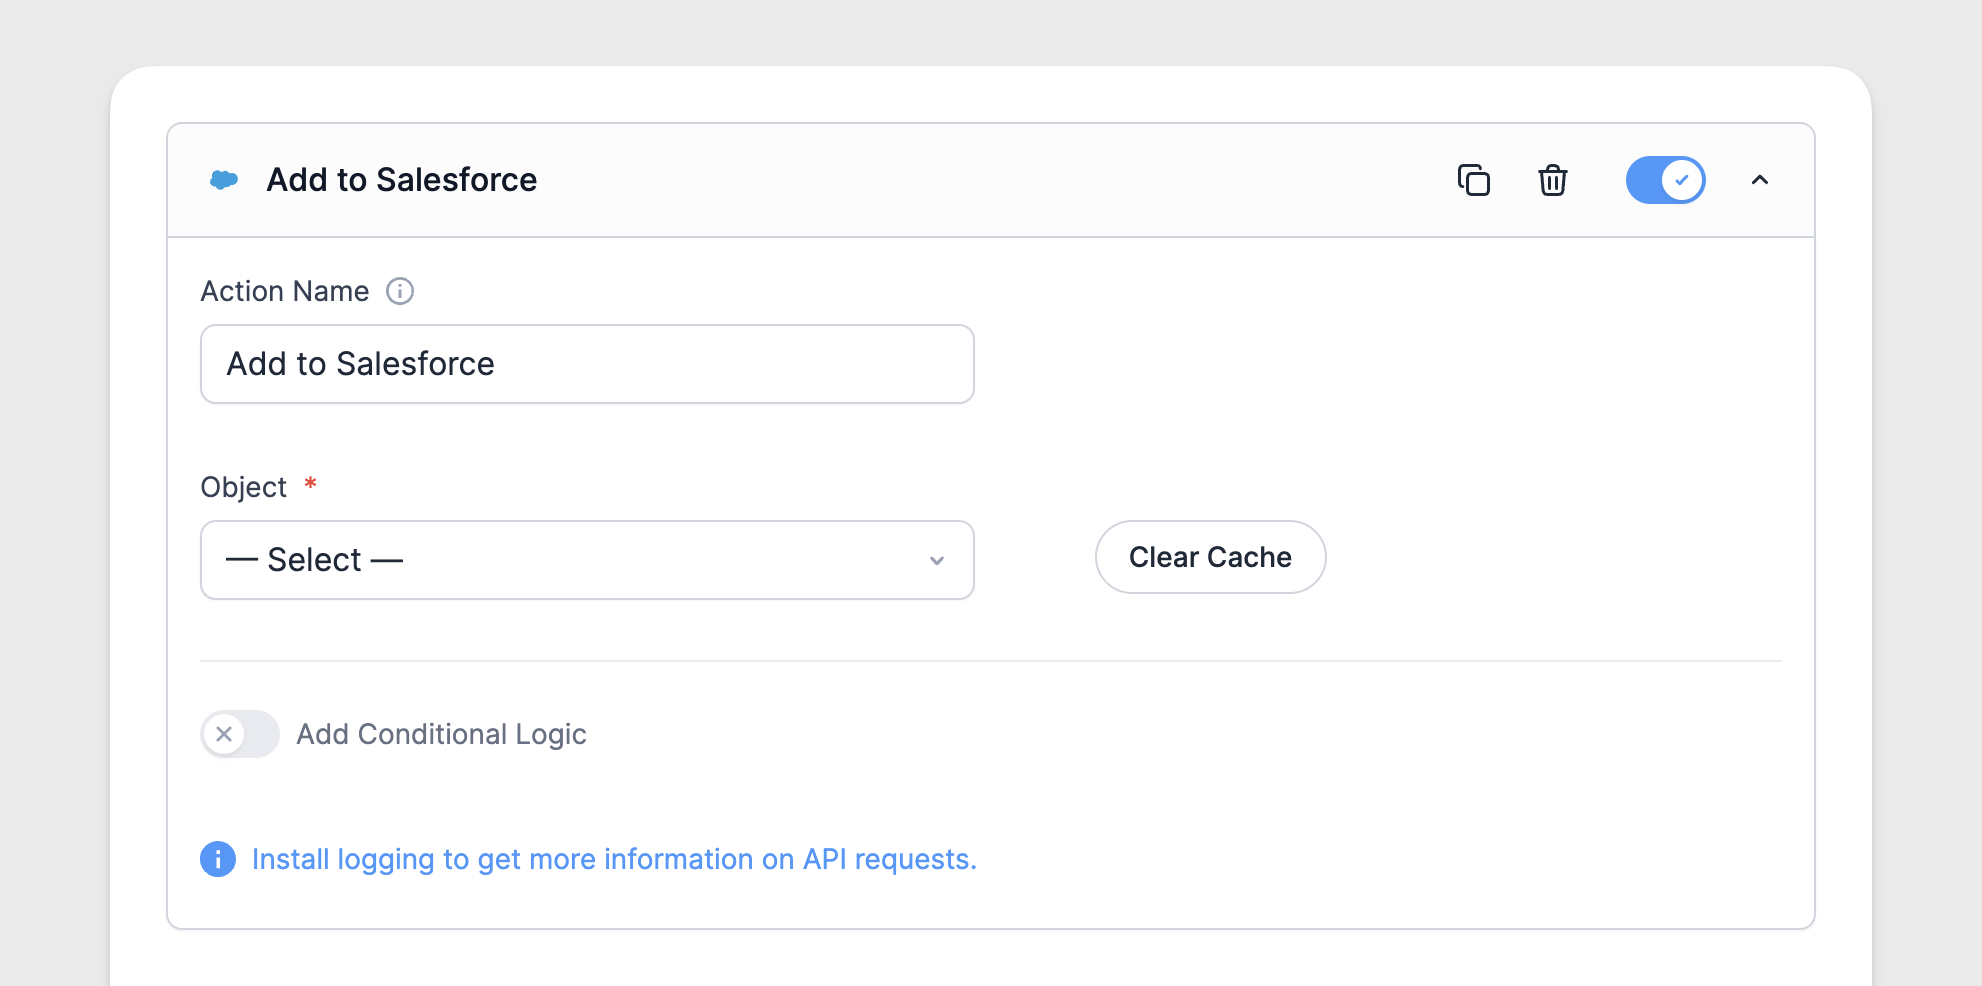
- To link your form to Salesforce, go to Formidable → Forms and edit the form. In the form builder, go to Settings → Actions & Notifications. Open the CRM tab or search for Salesforce. Hover over the Salesforce card and click Add.
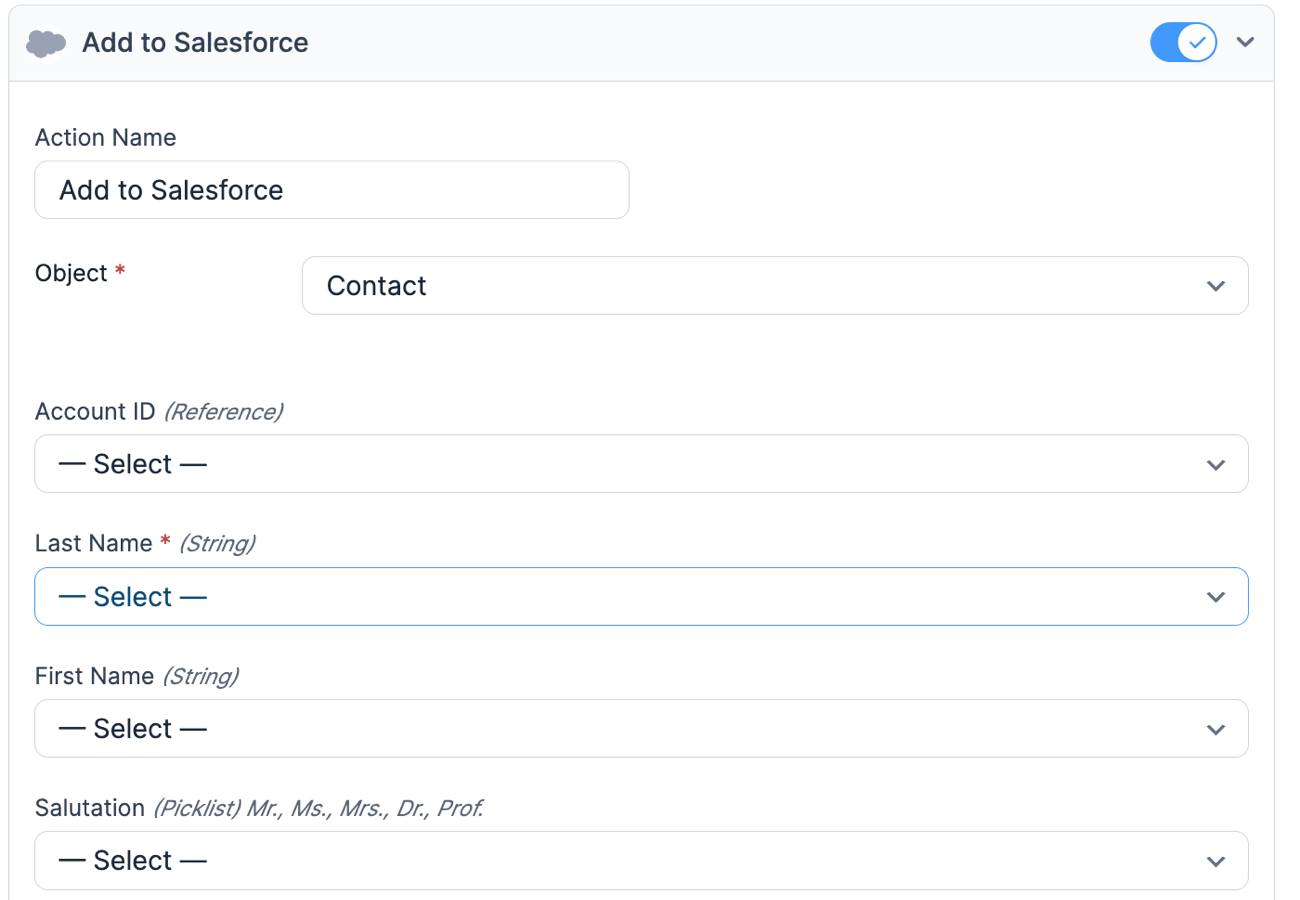
- This opens the mapping settings for your Salesforce form. Begin by selecting the type of Salesforce Object you want to create, such as contacts, leads, events, and many more.
- Selecting an object (Contact or Lead) in the Salesforce action automatically retrieves all the relevant fields. Your current form fields are available as dropdown options, so you can match them with the corresponding Salesforce fields. Each required Salesforce field must be mapped to a form field.
- After you save your changes and submit the form, a new item is added to the selected object in Salesforce.
Update an existing record
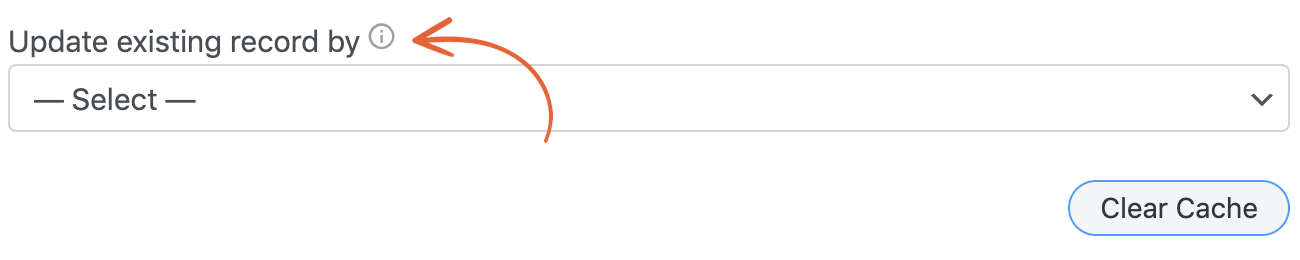
Your Salesforce form action can update existing records as well as add new ones. To do this, select a unique Salesforce field, such as Email, in the Update existing record by dropdown. Then map that Salesforce field to a form field.
When an entry is submitted, the record with the same value in that field is updated. If more than one record matches, only one of them is updated. If no record matches, a new one is created.
Allow duplicate records
To allow duplicate records when a new entry is submitted, customize the duplicate rules in your Salesforce settings.
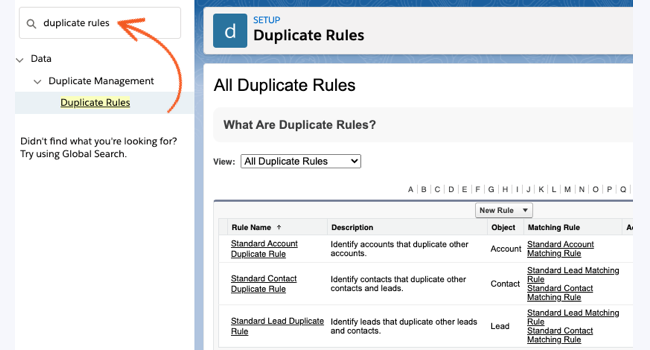
- Use the Quick Find box to find Duplicate Rules.
- Click the rule name to edit a rule.
- To keep records with a unique identifier, such as an email address, from being blocked, create a condition in your duplicate rule with Lead: Email EQUALS ______(leave blank). Leaving the value field blank will flag records for duplicate matching without the unique identifier.
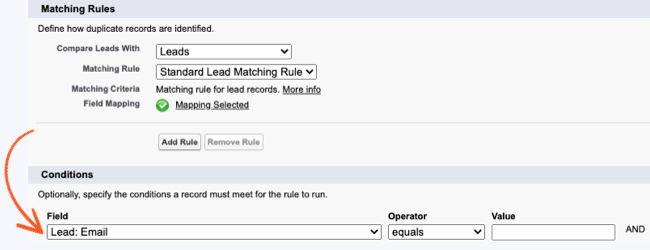
If duplicates are still blocked, check whether you have more than one active rule for your object. You can either deactivate the existing rule or reorder the rules.
Refer to the Salesforce docs for information on how to customize the duplicate rules.
Salesforce field data types
These are the data types that Salesforce expects to receive when Formidable sends data to an object. Each one lists the Formidable field type most often used for it.
String
This field requires a simple string of text, typically using a Text or Hidden field from Formidable.
Textarea
This field requires a long text string, with or without line breaks. A paragraph field is typically used in Formidable.
Picklist
This field requires one of an enumerated list of values. For example, the options may be "Web", "Phone Inquiry", and "Other" in a Salesforce LeadSource field. The value sent to this field must be exactly one of the options specified in Salesforce.
Double
This field expects a number, with or without decimal. A number field is typically used.
Phone
This field expects a phone number. A phone number field is typically used.
This field expects a valid email address. An email field is typically used.
Url
This field expects a valid URL. A Website/URL field is typically used.
Currency
This field expects a currency value, formatted as decimal. A number or product field is typically used.
Int
This field expects an integer value, without decimal. A number field is used.
Reference
This field expects to be either left blank, or provided a Lookup ID of the correct object ID. For example, if it is Owner ID, then an associated Owner ID must be sent.
Boolean
This field expects a True or False value, either as "True" or "False", or "1" or "0". A Toggle field is often used.
Datetime
This field expects a date and time combination timestamp. A text or hidden field with a timestamp is typically used.
Date
This field expects a date string, without time. A date field is typically used.
Multipicklist
This field is like a picklist, but expects one or more valid options. A checkbox or dropdown field with multiple select enabled is typically used.
Time
This field expects a timestamp. A time field is typically used.
Limitations
- The Salesforce add-on doesn't currently support two-way sync. The information is 1-way from Formidable to Salesforce.
- File URLs can be passed to Salesforce, but the files are not sent.
- The Salesforce add-on doesn't currently support updating existing records by the object ID. It can only be updated by the fields associated with the object.
Troubleshooting
No options in the form action
When a Salesforce form action is added, it includes a dropdown filled with all the possible Salesforce objects. If this dropdown is empty, there is a connection error between your site and Salesforce.
The form action shows "Unable to call Salesforce with an access token. Please set up Salesforce in Global Settings." when your site isn't authorized yet. In this case, finish Step 2: Connect to Salesforce.
- Confirm that your Salesforce account type includes API access.
- Go to Formidable → Global Settings → Salesforce. Salesforce checks your keys and the code only when you paste an Auth Code and click Update. If Salesforce rejects them, its error message appears on this page. A common one is 'expired authorization code'. In this case, click Authorize to get a new code, paste it in the Auth Code field, and click Update. If you see 'invalid_client_id: client identifier invalid', check the Consumer Key. Also check that the Environment setting (Live or Sandbox) matches the Salesforce org where you created the app.
- If the API keys are all correct, and no error messages appear, return to the form action. Click Update to save the form first, because Clear Cache reloads the page and an unsaved new action is lost. Then click the Clear Cache button.
- After the cache is cleared, open the form action again. If an error message appears, take action to resolve it. For example, if you see an error message like 'The REST API is not enabled for this Organization', your Salesforce account will need adjustment.
- Turn on logging and check for any error messages. For example, if you see an error message like 'cURL error 35: SSL connect error', this usually means that the cURL version on your site needs to be updated. Reach out to your web host to let them know what the error message says.
Logging
To see messages after any API calls, install the Formidable Logs add-on and follow the instructions on that page.
Owner ID: id value of incorrect type
If you map an incorrect Owner ID in the form action settings, you will get a MALFORMED_ID error.
The owner ID does not have to be mapped to a field, and it can be left out. If you choose to include the owner ID, it must be the ID of a user on the account.
Refer to the Salesforce docs for information on how to find the user ID.
Required fields are missing
When adding a new Lead to Salesforce, there are a few fields that Salesforce requires to create the object. If any of these fields are missing, you will get a REQUIRED_FIELD_MISSING error, along with a list of the required fields that were left blank or not mapped to. These required fields must be sent to create the object.
Session expired or invalid
If you get the INVALID_SESSION_ID error code when sending an object to Salesforce, you may have strict IP settings enabled on your Salesforce account. Turn "Lock sessions to the IP address from which they originated" OFF, and select the IP relaxation policy "Relax IP restrictions". If that doesn't solve the issue, try re-entering the Salesforce auth code in the Formidable global settings.
Owner ID: owner cannot be blank
If you map a field to Owner ID but do not enter anything in the field when the form is submitted, you may get an INVALID_CROSS_REFERENCE_KEY error. Don't map a form field to Owner ID and leave it blank. Either leave Owner ID unmapped so Salesforce fills it in automatically, or enter the correct cross reference value in the field.
No such column on sobject of type Lead
You will get an INVALID_FIELD error if your form action maps to a custom Salesforce field that was later removed from Salesforce. This can happen on a Lead or any other Salesforce object.
In this case, go to your Formidable Salesforce form action and click the Clear Cache button. Then check that the removed field is no longer mapped in the form action.
Opportunities are not added
If Opportunities are not added to your Salesforce account, check that you have mapped the form fields to the required Salesforce fields. These include Opportunity, Name, Stage, Close Date, and Owner ID.
Cannot deserialize instance of currency
If you get the error message "Cannot deserialize instance of currency from VALUE_STRING value" when sending an object to Salesforce, you may be passing an incorrect value format. The value used must be in a number field as the amount and not formatted as currency.
Duplicates detected
If you get the DUPLICATES_DETECTED error code when sending an object to Salesforce, you may be sending a duplicate entry for the same object. In this case, you can either choose to allow duplicate records or update an existing record.
Missing required code challenge
Salesforce shows this message when your app requires Proof Key for Code Exchange (PKCE).
If your app was created before 9 July 2026, turn PKCE off in the app.
- Go to Setup → Platform Tools → Apps → App Manager in your Salesforce dashboard.
- Find your app name and select Edit from its dropdown.
- To allow Salesforce authentication, uncheck the Require Proof Key for Code Exchange (PKCE) Extension for Supported Authorization Flows checkbox.


Salesforce requires PKCE for apps created after 9 July 2026, and the setting can't be turned off in the app. To change it, contact Salesforce Support.
Redirect_uri_mismatch
The redirect_uri_mismatch error happens when the Callback URL in your Salesforce app settings is not set up correctly. The URL in the request doesn't match the one in your app, so Salesforce blocks the connection.
- Use the standard Salesforce URL instead of a custom or modified URL.
- Check for any typos or extra characters in the Callback URL.
- If you find any differences, update the Callback URL to match the standard format in your app settings.
- If you use a sandbox environment, the Callback URL must match the sandbox URL in Step 1.
If the error continues, review your app settings or contact support for more help.
