
You can enhance Radio Buttons and Checkboxes with images. Image options can be customized for an image survey, quiz, poll, purchase form, and many more. This option will replace the radio button or checkbox with images you select.
By default, text labels are shown with images but can be hidden. Choose the image size that works best for your form. Then set the colors and other styling features in the visual form styler.
Upgrade your WordPress site with powerful, flexible forms.
Add radio or checkbox with images
To add images in a Checkbox or Radio Button field:
- Add a Radio button or Checkbox field to your form.
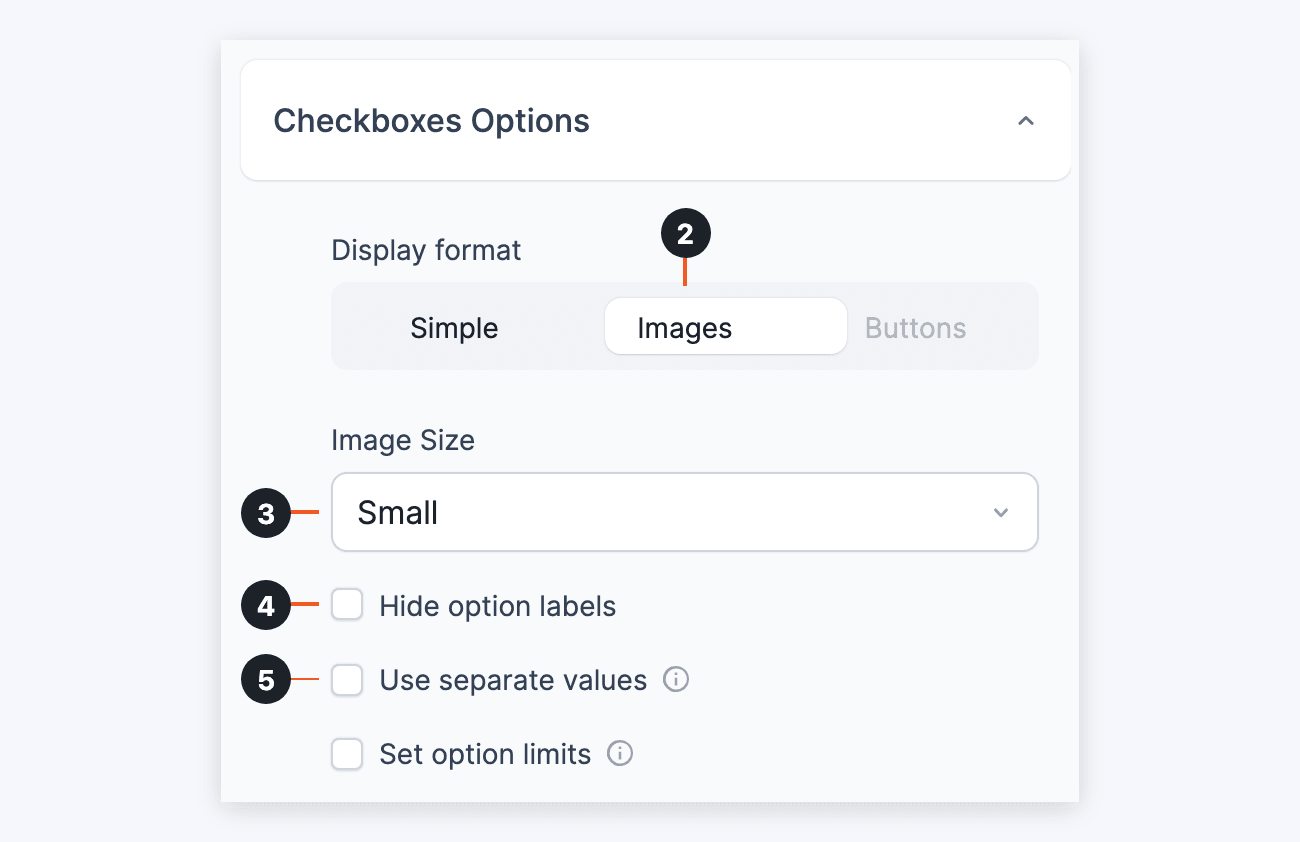
- Select Images as the Display format. The Buttons format needs the Surveys add-on.

- Select a size for the images in the Image Size dropdown.
- Select the Hide option labels box if you don't want the labels to show. With the Surveys add-on active, this box is named Hide option text.
- Select the Use separate values box to save a value that is different from the option label. Read more about separate values.
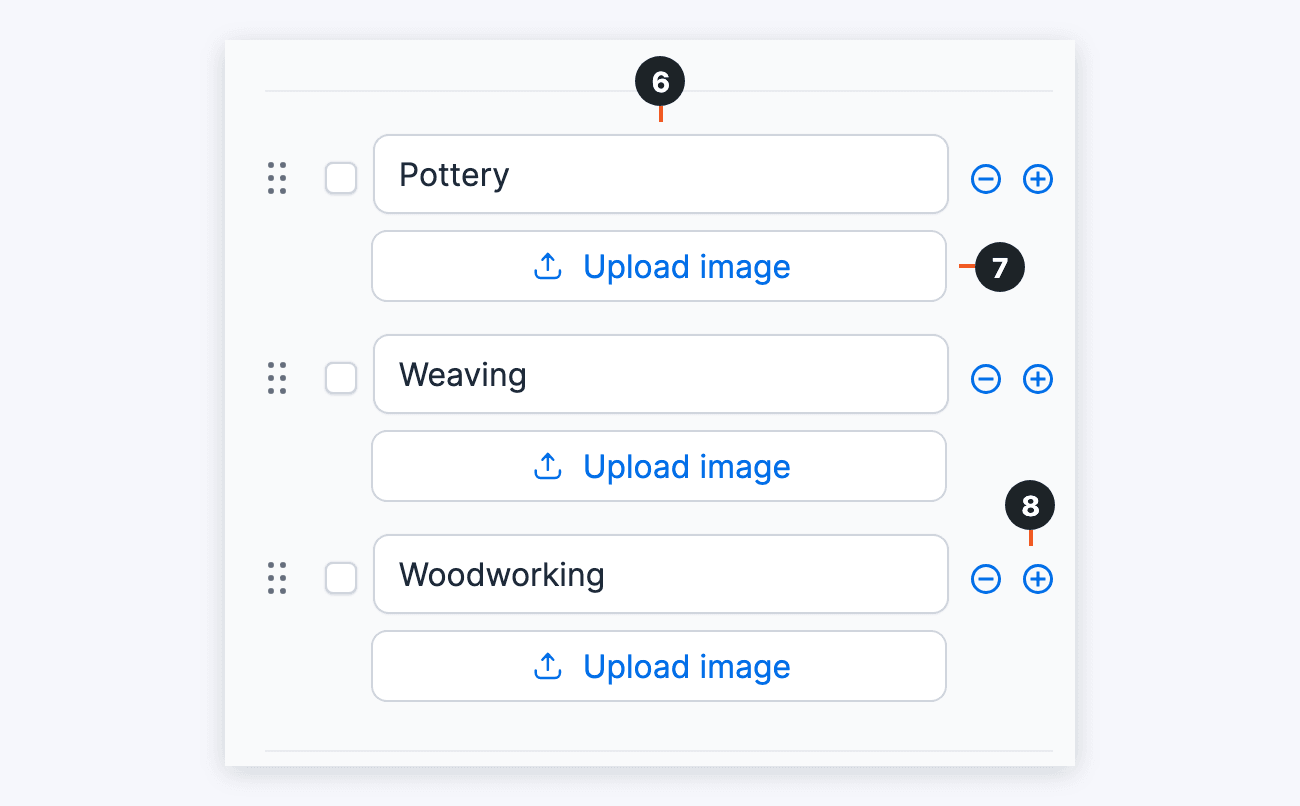
- Each option includes an image and a text label. Fill in a text label. Each option must have a text label, even if you're not showing it in the form. If you checked Use separate values, the top box is the label and the box below it is the saved value.
- Click the Upload image button to choose an image. You can upload a new image or select an image that already exists in the Media Library.
- Click the plus icon (+) next to an option to add another option below it.
- Click Update to save the form. On a new form, this button is Save, and the first save opens a Name your form box. Enter a form name and click Save.
Replace selected image
To change a radio button or checkbox image:
- Click Delete to remove the currently selected image.
- Click the Upload image button to select a new image.
Image sizes
All image sizes are displayed as a square. The size options are:
- Small: 150px (the default size)
- Medium: 250px
- Large: 320px
- Extra large: 400px
To set a custom size, go to Formidable → Global Settings → Custom CSS and add this CSS:
#frm_field_160_container.frm_image_options {
--image-size:100px;
}
Replace 160 with the ID of the field to change, or remove #frm_field_160_container to apply to all fields.
Show images in Lookup and Dynamic fields
Lookup and Dynamic fields can show these images too. Set the field's Display Type to Radio Buttons or Checkboxes, and get its options from a field with image options. The field then shows the same images automatically.
It also shows images when the options come from a File Upload field and most of the uploaded files are images.
Learn more about images in Lookup fields and Dynamic fields.
From Idea to Reality in Minutes. Build Powerful Forms, Dashboards, Apps and More.
Formidable Forms makes advanced site building simple. Launch forms, directories, dashboards, and custom WordPress apps faster than ever before.
Styling image options
Image options use values from your form styling settings. You can change the appearance of image options in the visual form styler.
Open your form and click the Style tab. Click Edit style at the bottom of the form preview. The style opens on its Quick Settings.
Scroll to the bottom of the settings and click Show advanced settings. The Field Colors and Field Settings sections hold these settings:
- Default border: Field Colors → Border
- Border hover/selected color: Field Colors → Active → Border
- Checkmark background color: (same as Border hover/selected color)
- Border width: Field Colors → Border Width
- Border radius/corners: Field Settings → Corner Radius
Display image choices
Display selected images in a form confirmation message, email, or View.
Shortcode options
- Show image and label: By default, images will be displayed. Labels will be displayed if labels are displayed in the field. You can override these defaults with the show_image and show_label params.
[x]
Replace x with the ID of the radio/checkbox field. - Hide image: Hide the image and show only the label:
[x show_image=0]
Replace x with the ID of the radio/checkbox field. - Hide label: If the label is set to show in the form, it will show by default here. To hide it, use:
[x show_label=0]
Replace x with the ID of the radio/checkbox field. - Show label: If the label is set to be hidden in the form, it will be hidden by default here. To show it, use:
[x show_label=1]
Replace x with the ID of the radio/checkbox field. - Add link: Link to the full-sized image.
[x add_link=1]
Replace x with the ID of the radio/checkbox field. - Open link in new tab: Open the link to the image in a new browser tab. The new_tab=1 parameter must be used in conjunction with the add_link=1 parameter.
[x add_link=1 new_tab=1]
Replace x with the ID of the radio/checkbox field. - Image size: Set the image display size using either size=thumbnail, size=medium, or size=full. The default size displayed is the thumbnail. In WordPress, the default thumbnail size is a 150x150 image. Specify a different size to show a bigger image.
[x size=full]
Replace x with the ID of the radio/checkbox field. - Show attachment ID: Display the attachment ID of the selected image.
[x show=id]
Replace x with the ID of the radio/checkbox field.
You can display a field that has image options using field shortcodes like [100] or the frm-field-value shortcode.
Default email message
By default, images selected in radio buttons and checkboxes will be shown with the default-message shortcode in HTML emails and the frm-show-entry shortcode.
In plain text emails, the labels will be shown without images.
To hide images in the default-message or frm-show-entry shortcodes, add show_image_options=0.
For example:
[default-message show_image_options=0]
Limitations
- The bulk editor is not available for use with image options.
- Image options aren't designed to work with Add "Other" options.
