
Send your Formidable Forms data to Google Sheets when a user submits the form on your site. Each form sends its entries with its own Google Sheets action, and each entry is added to the sheet you choose as a new row.

Upgrade your WordPress site with powerful, flexible forms.
Download and install
- If you haven't already, install and activate the current version of Formidable Forms Premium on your WordPress site.
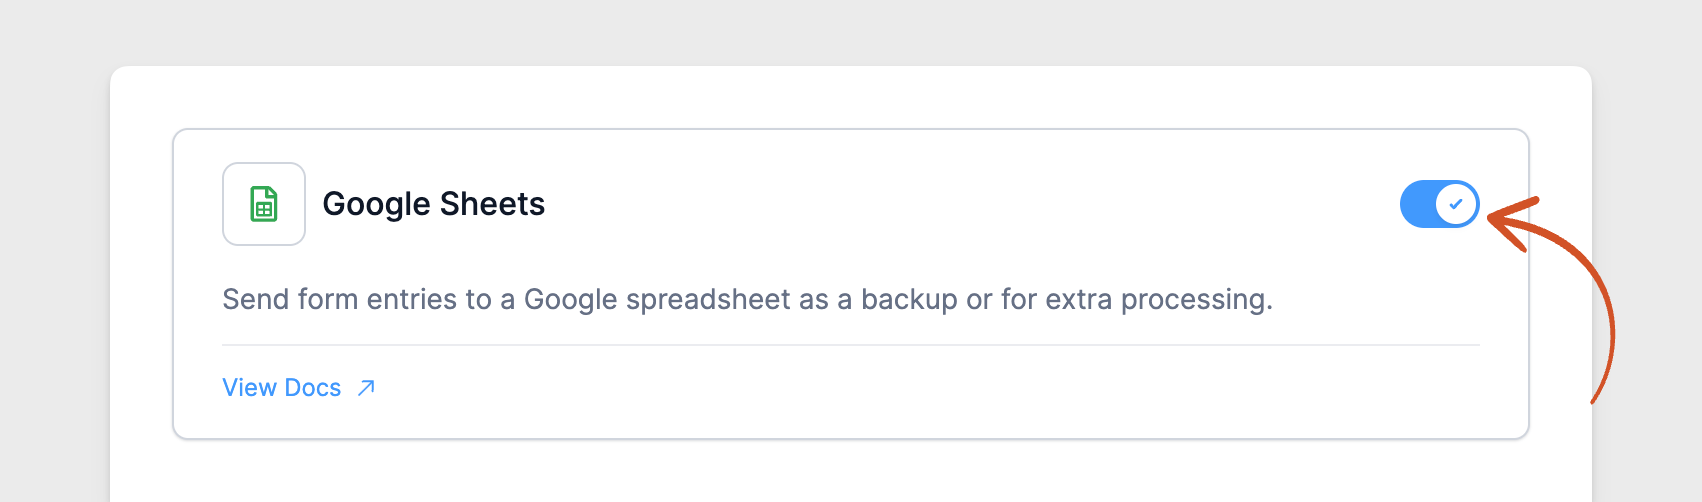
- After confirming your Formidable Forms license, go to Formidable → Add-Ons and toggle on the Google Sheets add-on.

From Idea to Reality in Minutes. Build Powerful Forms, Dashboards, Apps and More.
Formidable Forms makes advanced site building simple. Launch forms, directories, dashboards, and custom WordPress apps faster than ever before.
Set up Google API integration
To connect your site, you need a project in the Google Cloud Console, a consent screen, and an OAuth client ID. Formidable uses the client ID and secret to ask your Google account for access to your spreadsheets.
Step 1: Create Google API project
First, create a Google Cloud project and turn on the 2 Google APIs the add-on uses. It lists your files with the Google Drive API and adds rows with the Google Sheets API.
- Go to the Google Cloud Platform Console. Select an existing project or create a new project.
- After you open the project, Google takes you to the APIs & Services dashboard. In its left menu, click Library.
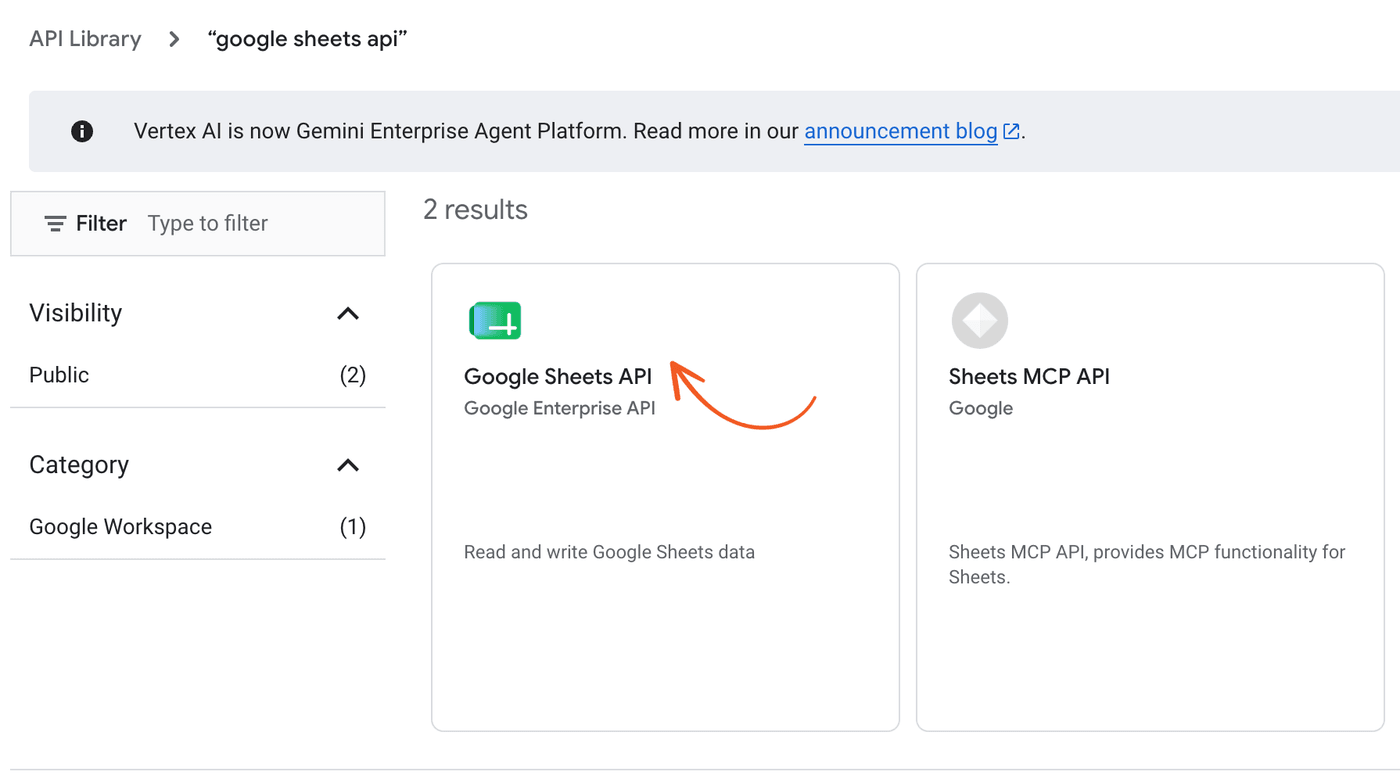
- Search for Google Sheets API and click its card.
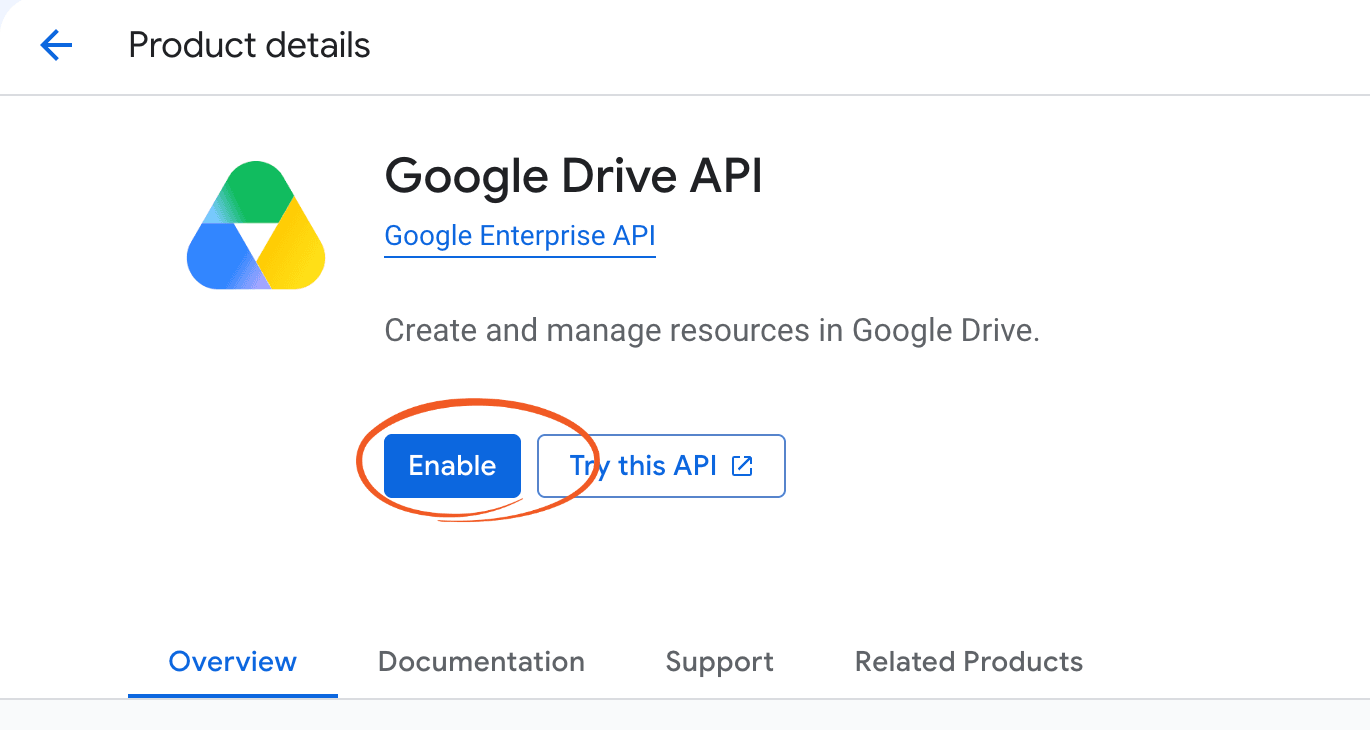
- On the Google Sheets API page, click Enable.
- Go back to the Library, search for Google Drive API, and click Enable on its page too.
Step 2: Set up the OAuth consent screen
The consent screen is what you see when you connect Formidable to your Google account. Google keeps these settings in the Google Auth Platform section of the console.
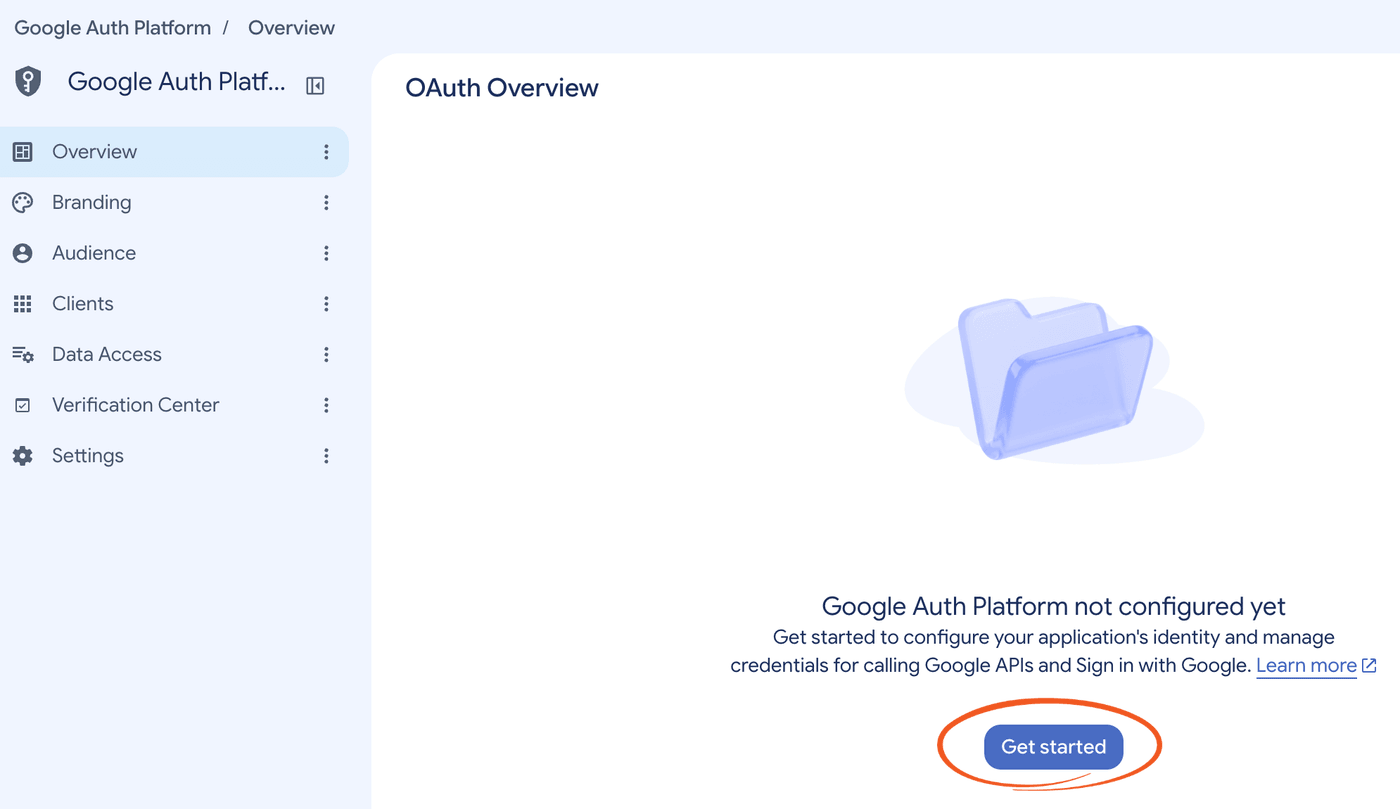
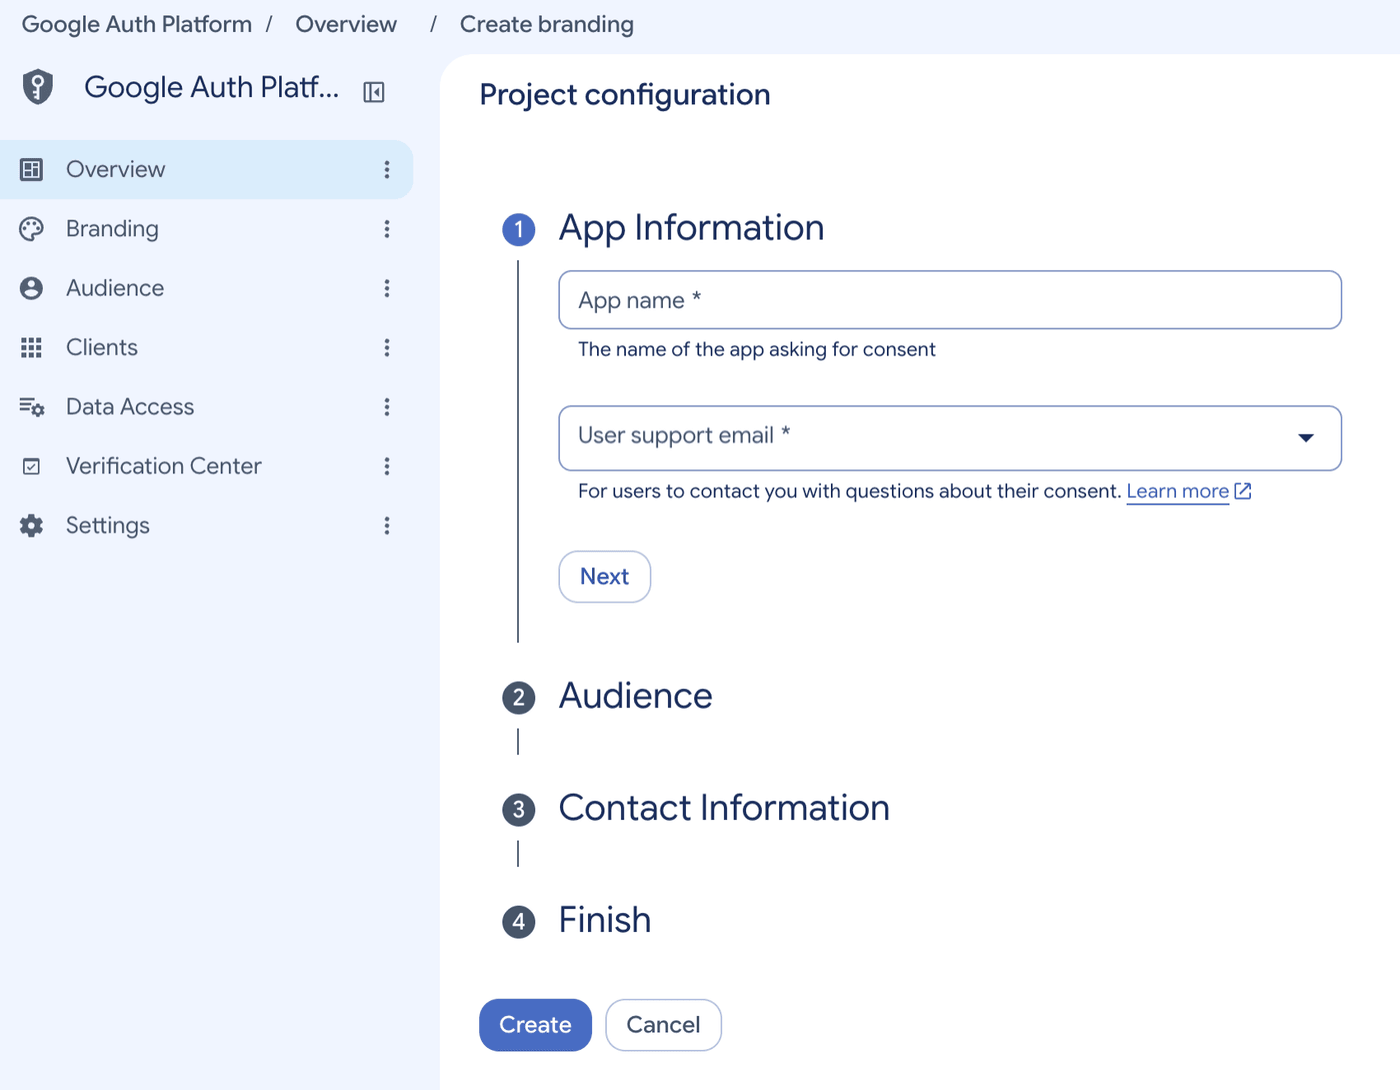
- Open the menu and go to Google Auth Platform. If the page says Google Auth Platform not configured yet, click Get started.
- The Project configuration form opens. Under App Information, enter an App name and choose a User support email. Click Next.
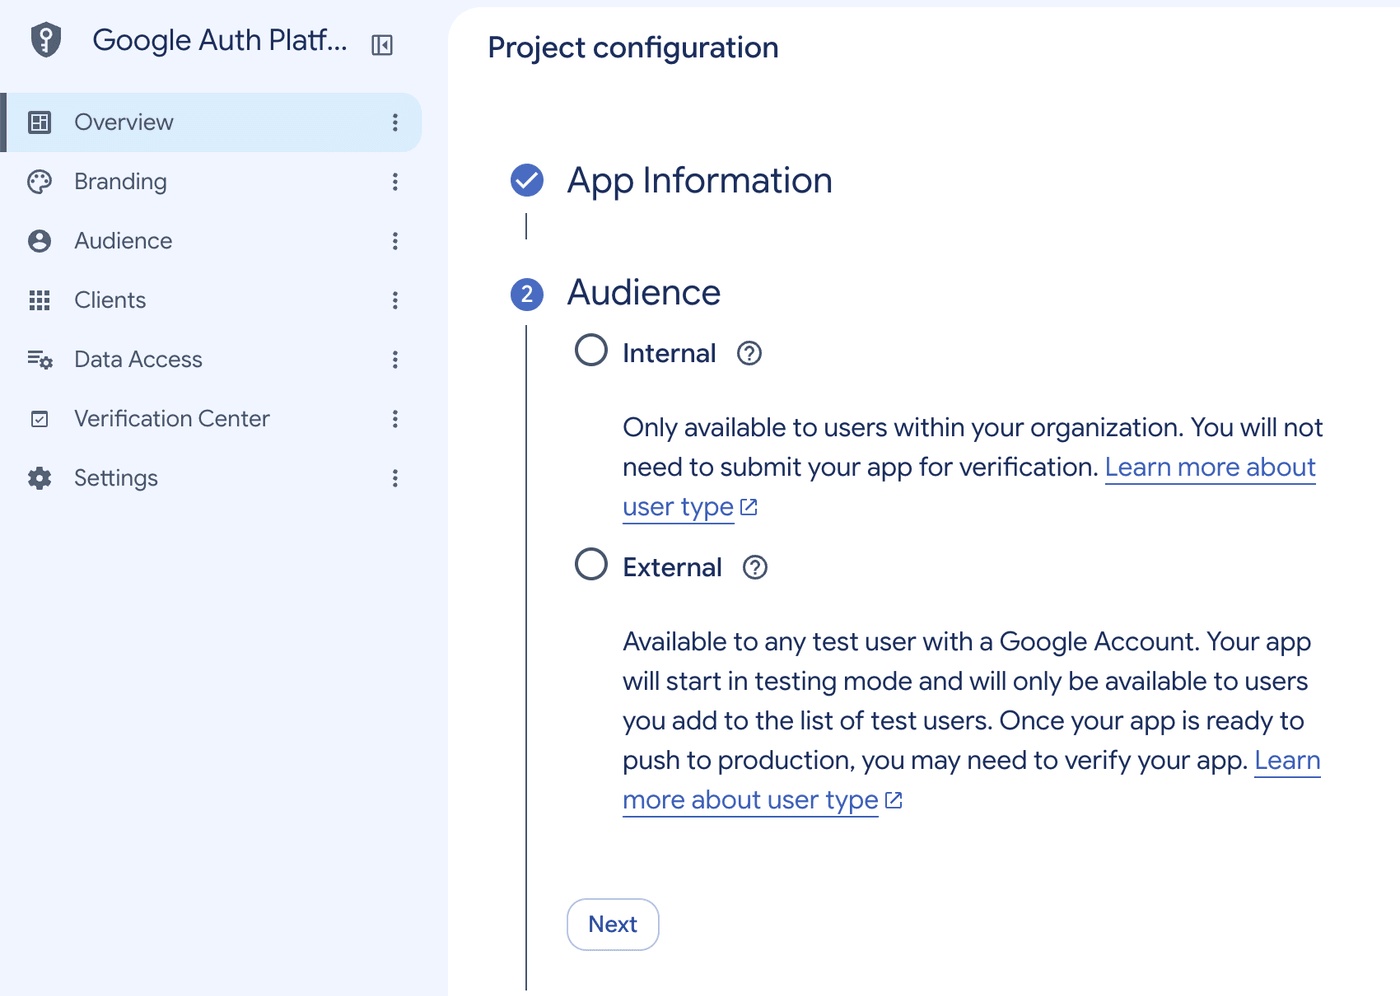
- Under Audience, select External and click Next. Choose Internal only if your Google account belongs to a Google Workspace organization and only people in that organization will connect.
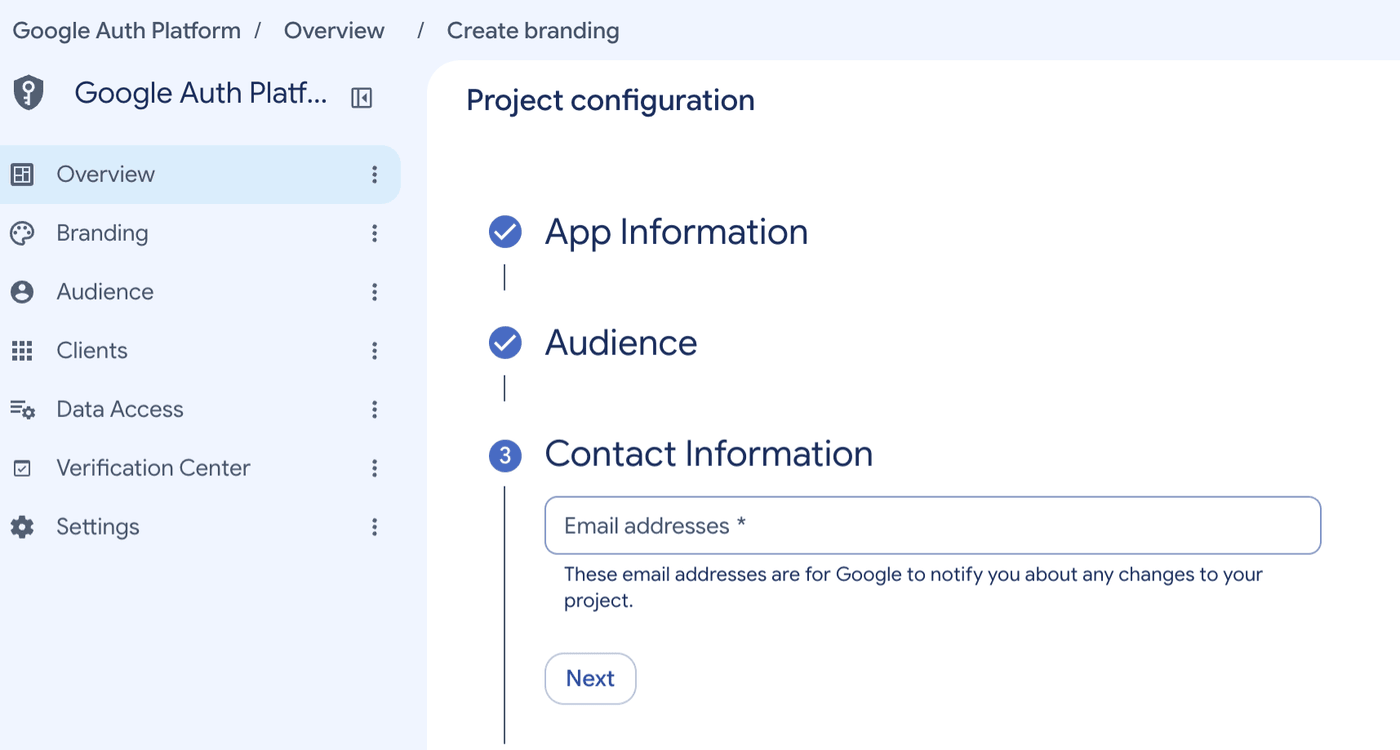
- Under Contact Information, enter an email address where Google can send you notices about your project. Click Next.
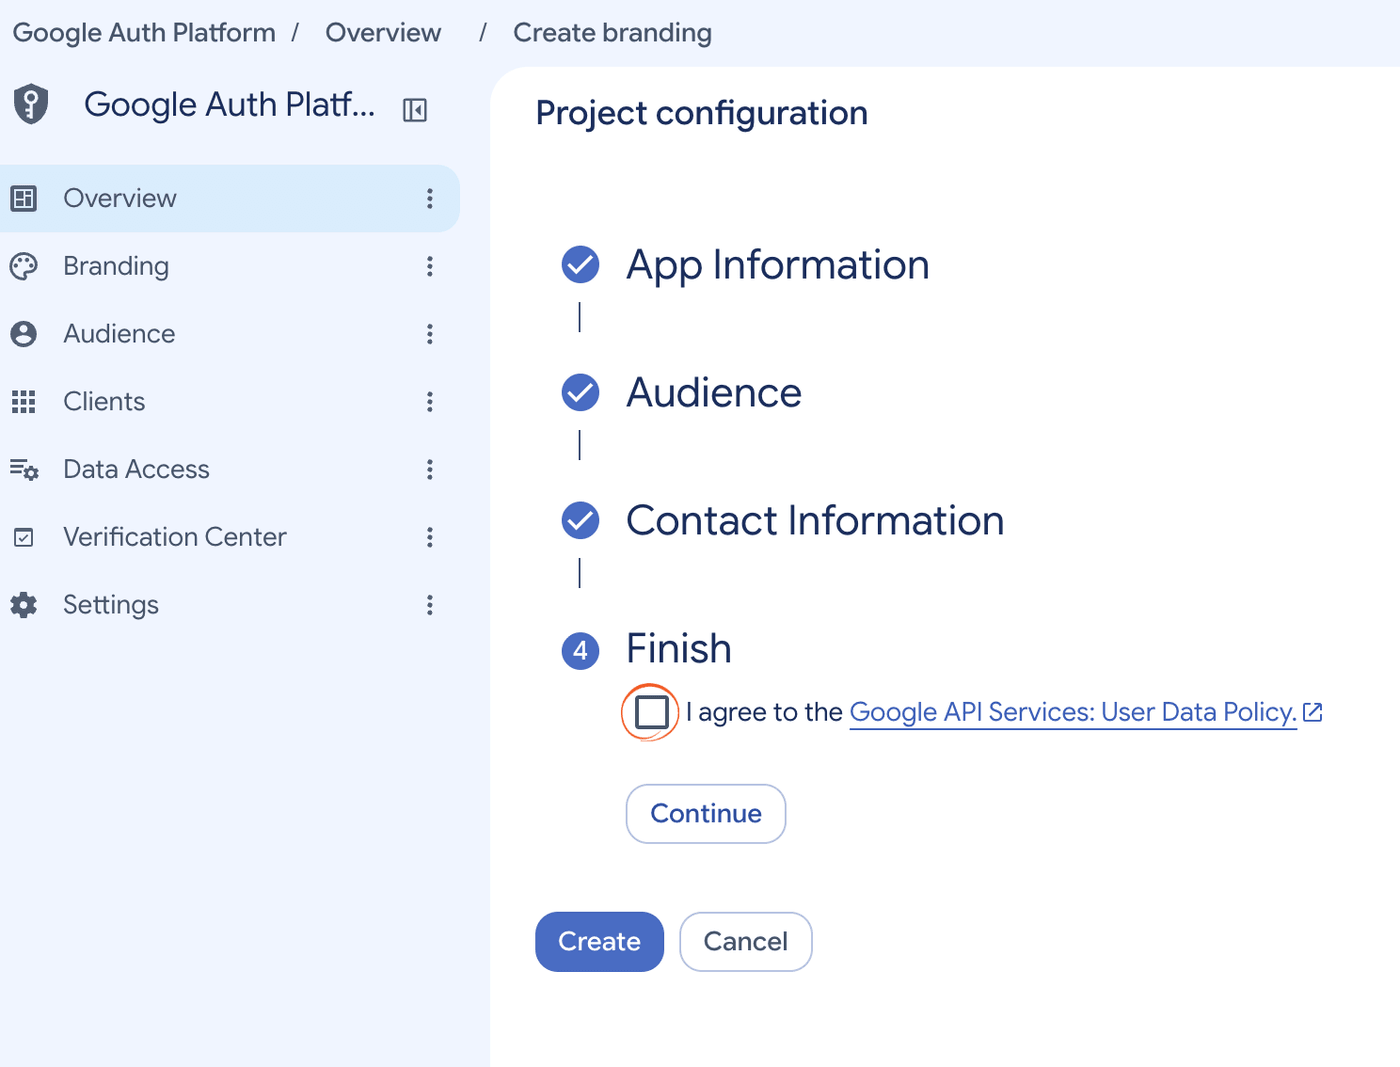
- Under Finish, check the I agree to the Google API Services: User Data Policy box. Click Continue. Then click Create.
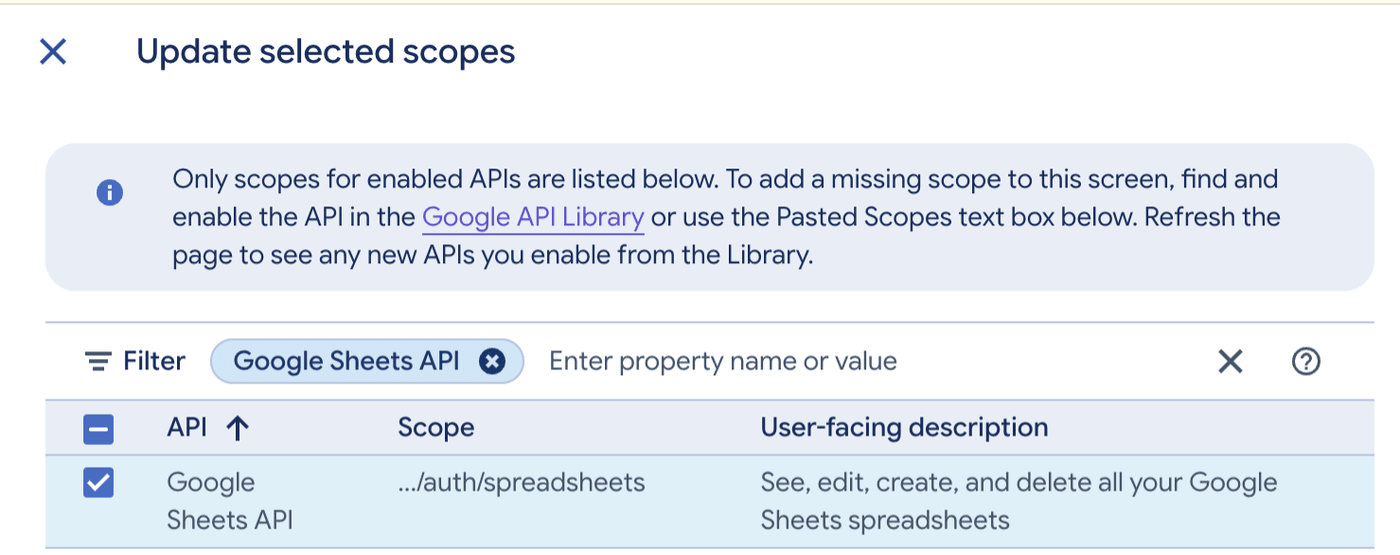
- Go to Google Auth Platform → Data Access and click Add or Remove Scopes. In the Update selected scopes panel, filter by Google Sheets API and check
…/auth/spreadsheets. - In the same panel, change the filter to Google Drive API and check
…/auth/drive. Then save your changes. These are the 2 permissions Formidable asks for when you connect.
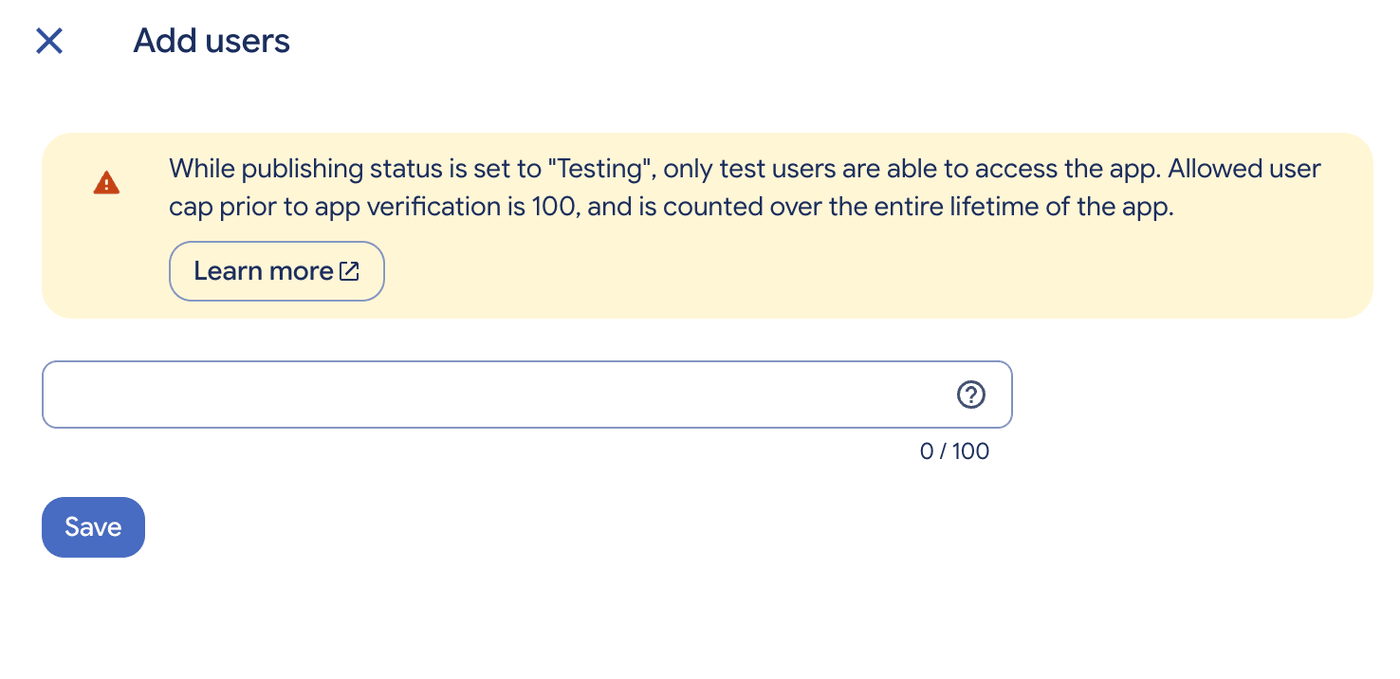
(Optional) To test the connection before you publish the app in Step 4, add yourself as a test user. Only test users can connect while the app is in testing mode. Before verification, Google allows up to 100 users, counted over the life of the app.
- Go to Google Auth Platform → Audience.
- Under Test users, click Add users. Enter the email address of the Google account you'll use to connect, and click Save.
Step 3: Get OAuth client ID
The OAuth client gives you the Client ID and Client Secret that Formidable uses to connect to your Google account.
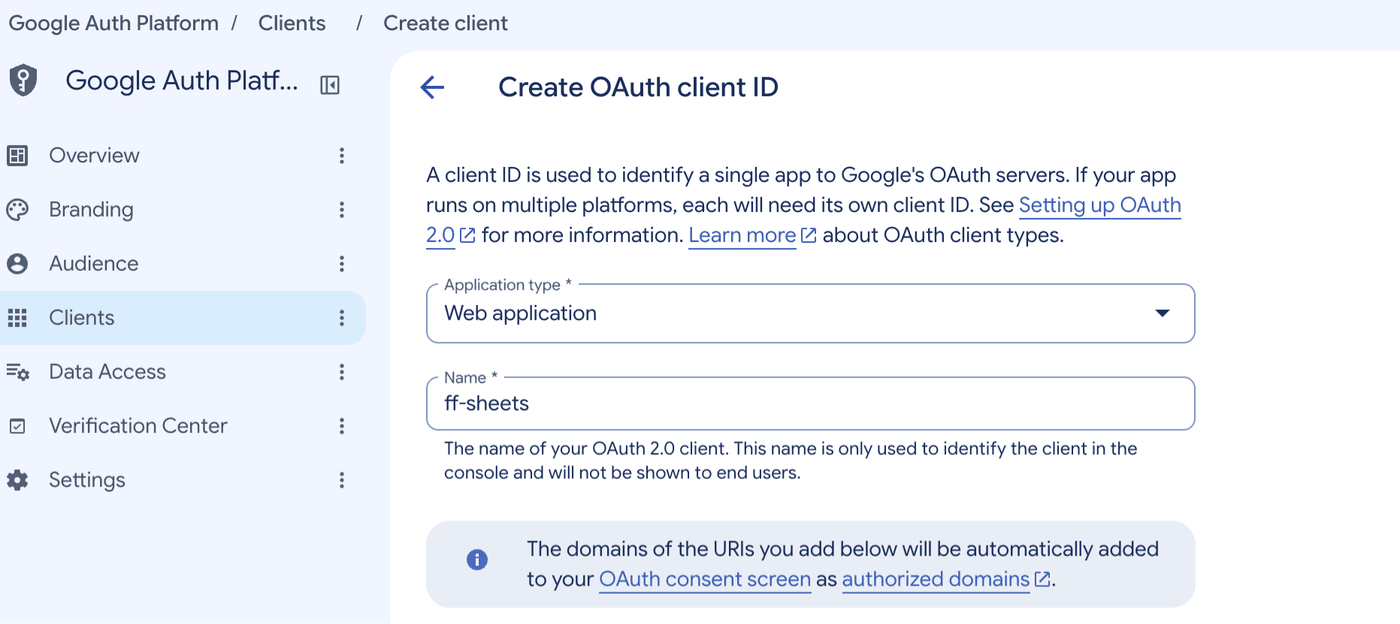
- Go to Google Auth Platform → Clients and click Create Client.
- In the Application type dropdown, select Web application. Give the client a Name for easy reference. The name is only used to identify the client in the console.
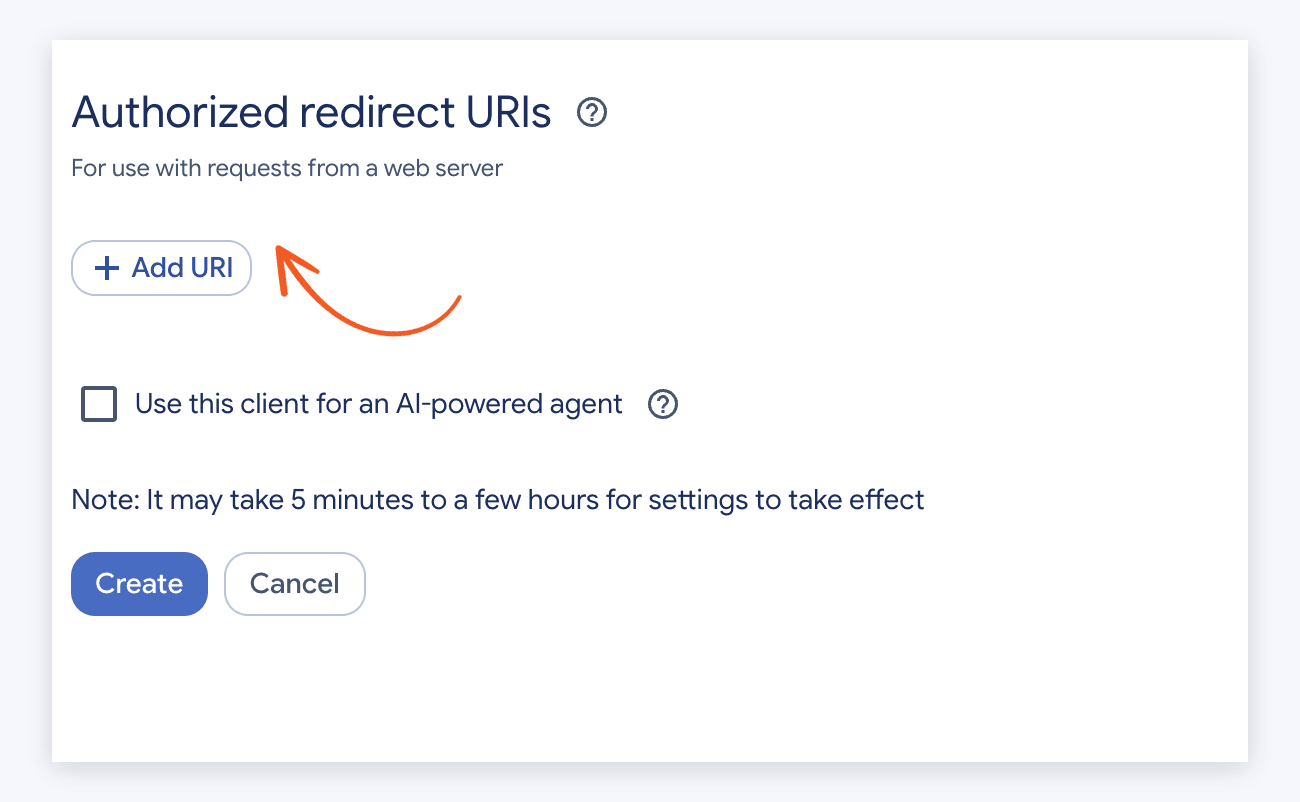
- Under Authorized redirect URIs, click Add URI. Enter your site's address as it appears in Settings → General → Site Address (URL) in WordPress. Add a slash at the end, such as
https://example.com/. Google accepts only HTTPS addresses here, except forlocalhost. It also adds your site's domain to the consent screen's authorized domains for you. - Click Create. Google notes that new settings can take from 5 minutes to a few hours to take effect.
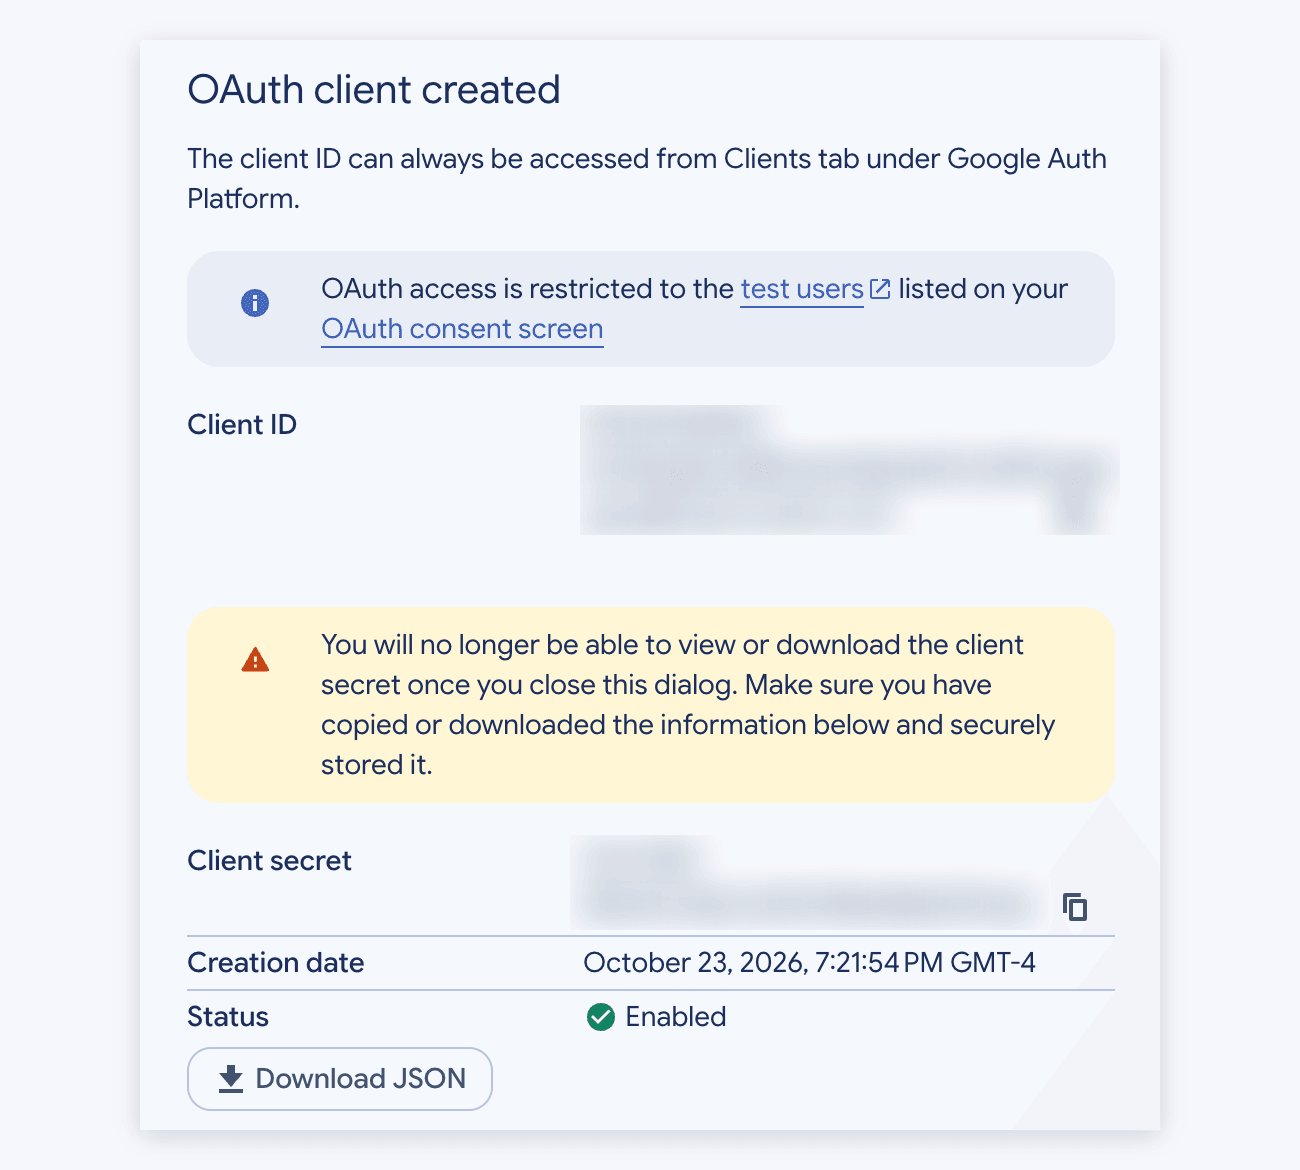
- In the OAuth client created window, copy your Client ID and Client secret, or click Download JSON to save a file that has them. Once you close this window, you can't view or download the client secret again. Later, the console shows only its last 4 characters.
Step 4: Publish the app
A new External app starts in testing mode, and Google ends a test connection 7 days after you authorize it. Publish the app so the connection lasts. Testing mode and its 7-day limit apply to External apps, so if you chose Internal in Step 2, skip this step.
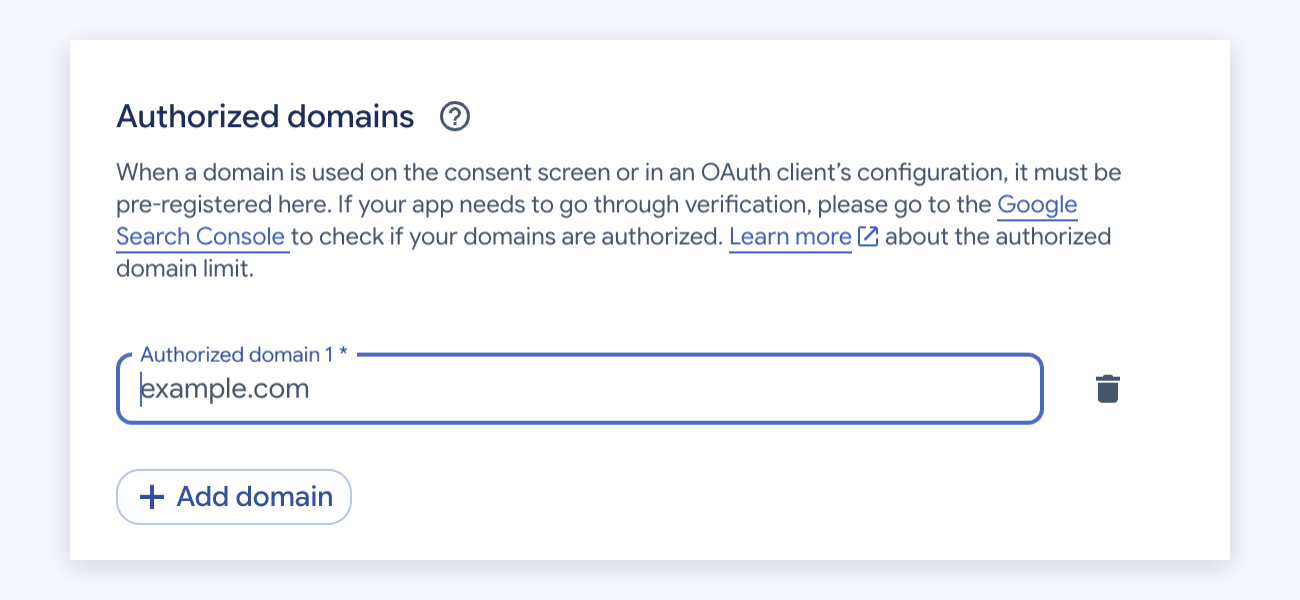
- Go to Google Auth Platform → Branding. Under Authorized domains, check that your site's domain is listed, such as
example.com. If it isn't, click Add domain, enter it, and save your changes. - Go to Google Auth Platform → Audience. Under Publishing status, click Publish app and confirm. In a new project the button is grayed out until the Branding page is complete, as the next paragraph explains.
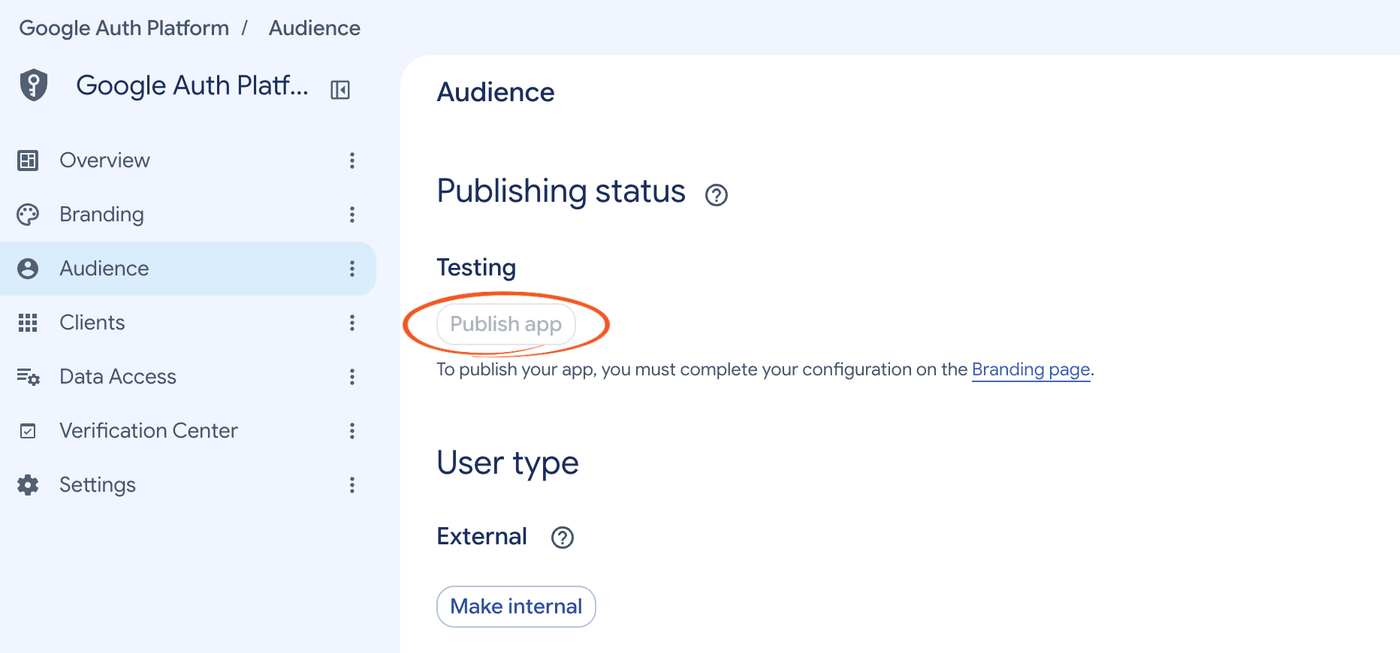
If Publish app is grayed out, Google shows the note To publish your app, you must complete your configuration on the Branding page. In that case, click the Branding page link and fill in the fields it marks as missing. Then go back to Audience and publish.
Step 5: Save project keys in settings
Next, add your keys to Formidable and connect your Google account.
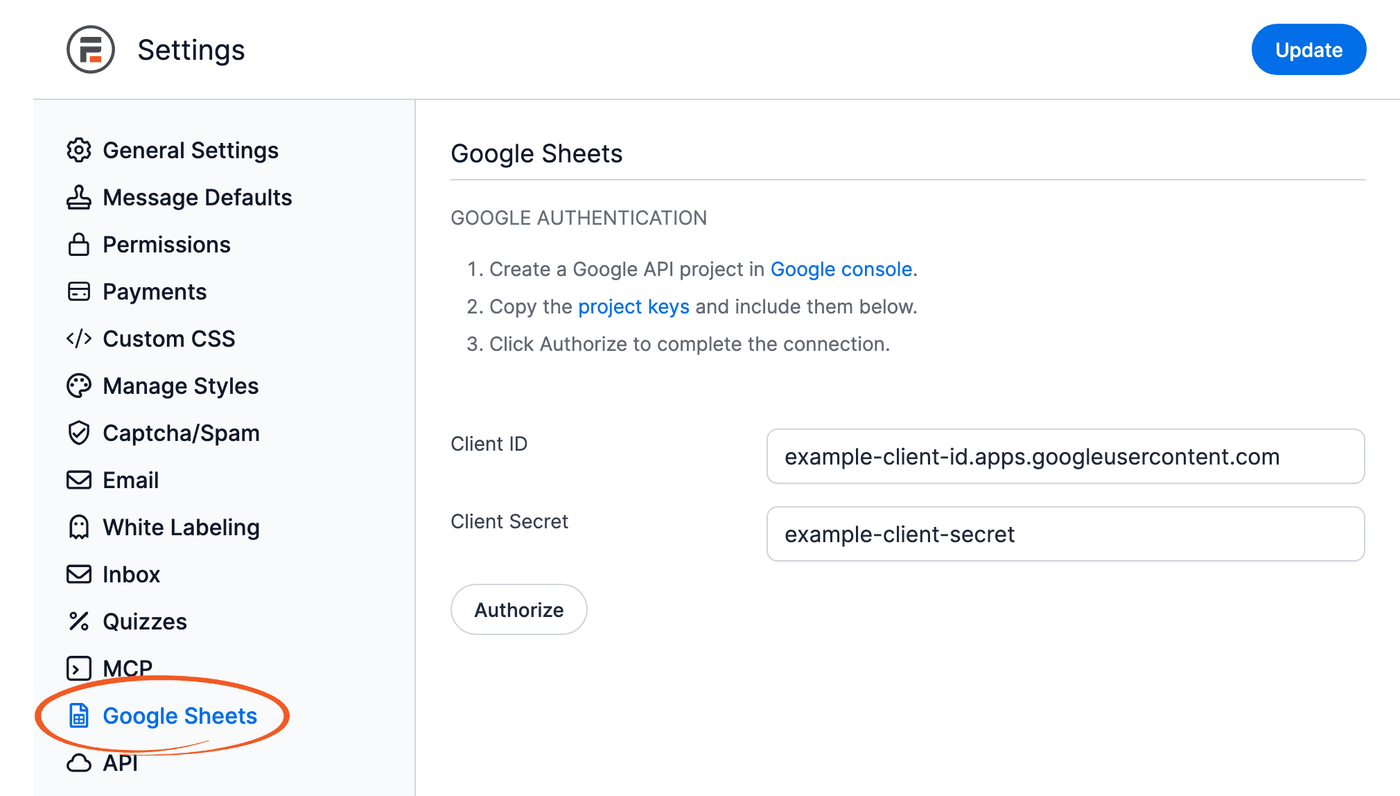
- Go to Formidable → Global Settings and click the Google Sheets tab.
- Paste your Client ID and Client Secret. The Authorize button shows only after both fields are filled in.
- Click Authorize. Formidable saves the keys and opens a Google window.
- Choose the Google account that can open the spreadsheets you want to use, and allow access to Google Sheets and Google Drive. When the connection is complete, you'll see the message Google Sheets has been authorized successfully.
After you connect, the Authorize button changes to Deauthorize. To change the Client ID or Client Secret later, click Deauthorize first.
Create a Google Sheets form
Now that you have added the project keys to your Formidable settings, you're ready to set up a Google Sheets form. All Google Sheets forms work the same way: each form sends its entries with its own Google Sheets action.
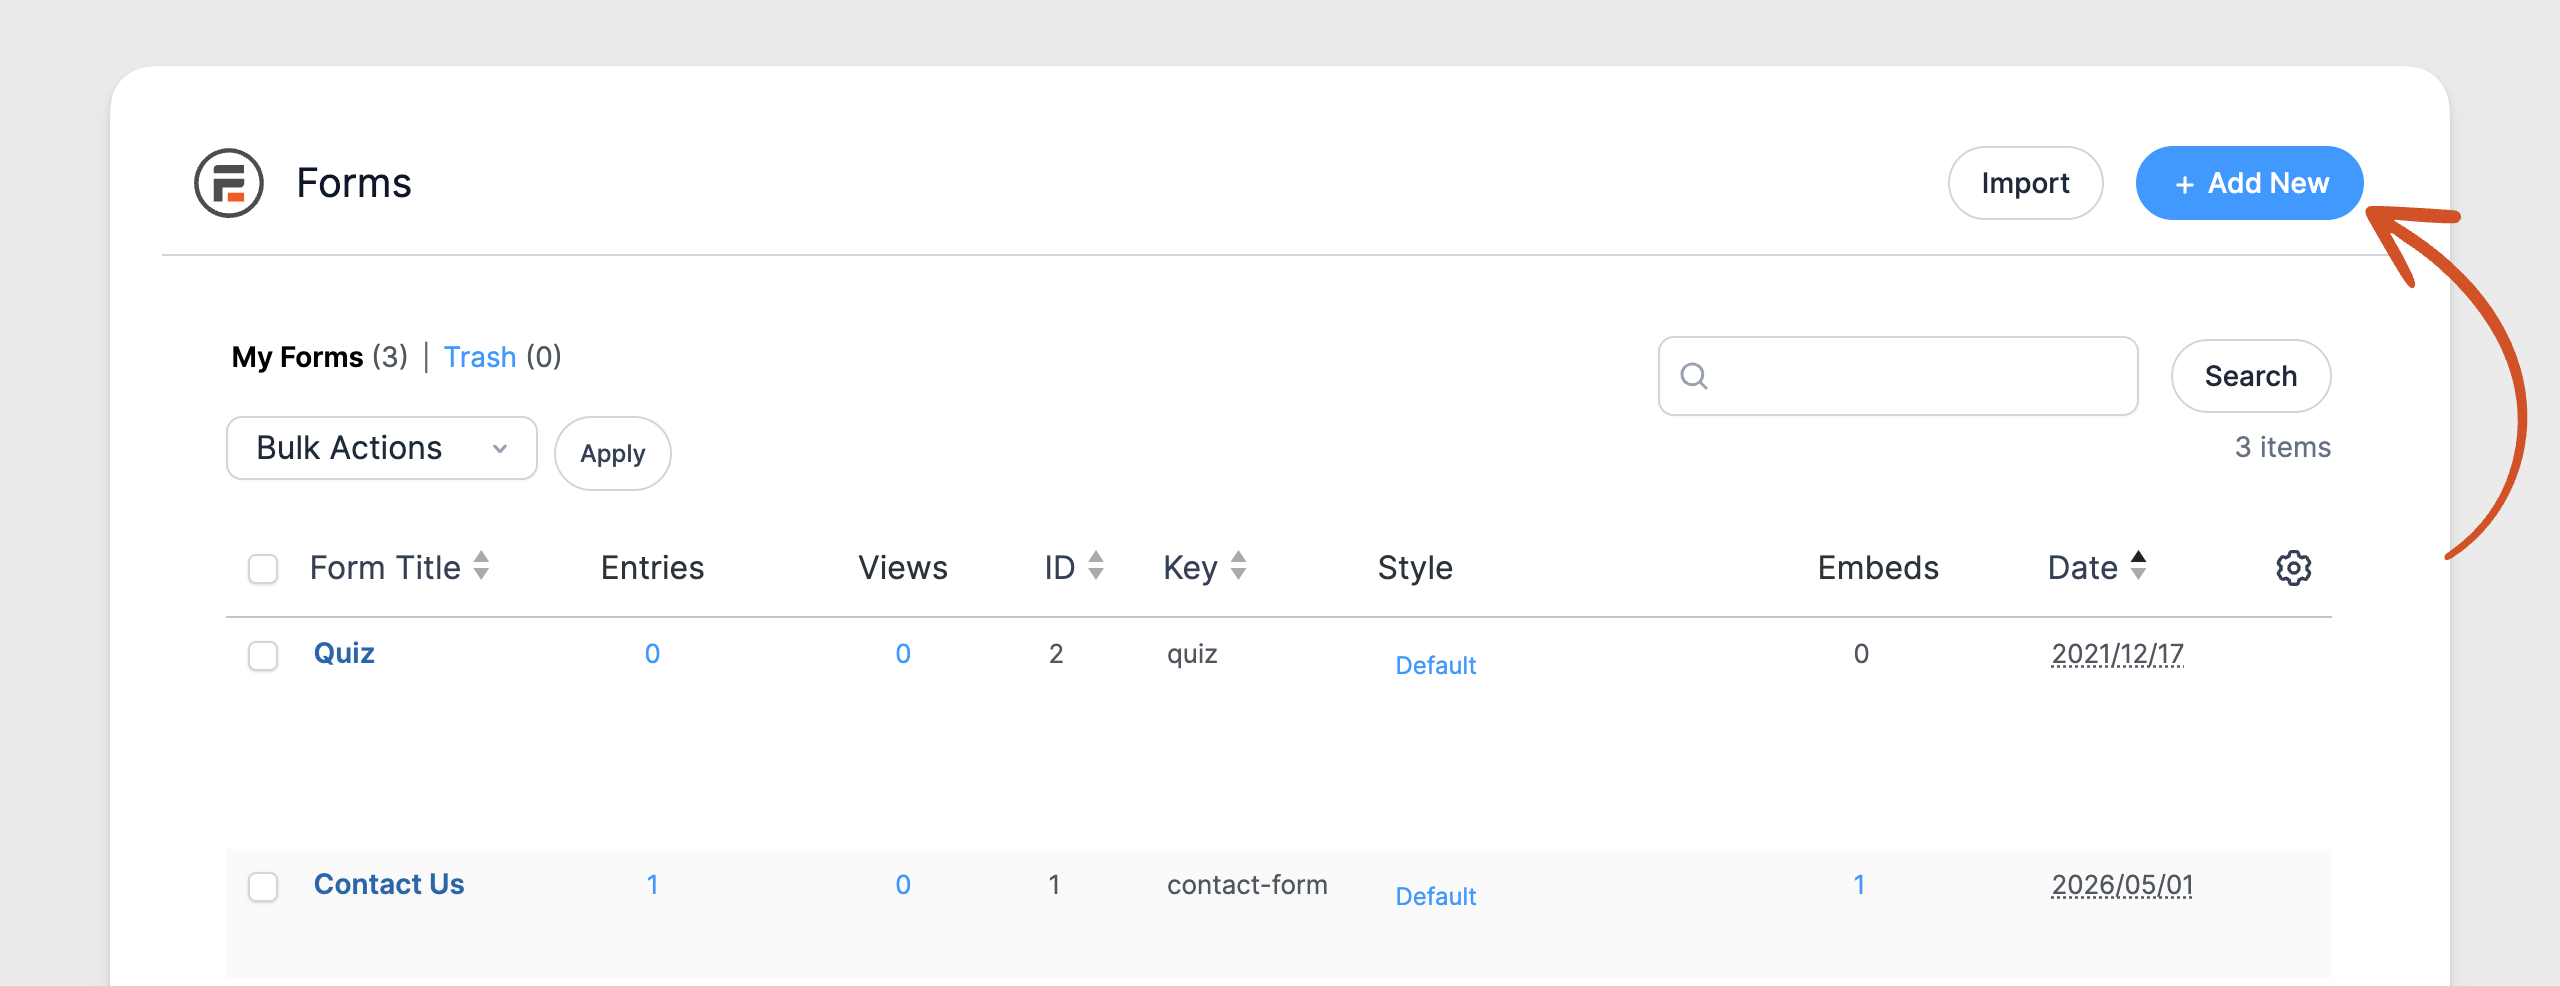
- First, create a form in the same way as other Formidable Forms. From the Forms list, click Add New in the top-right corner.
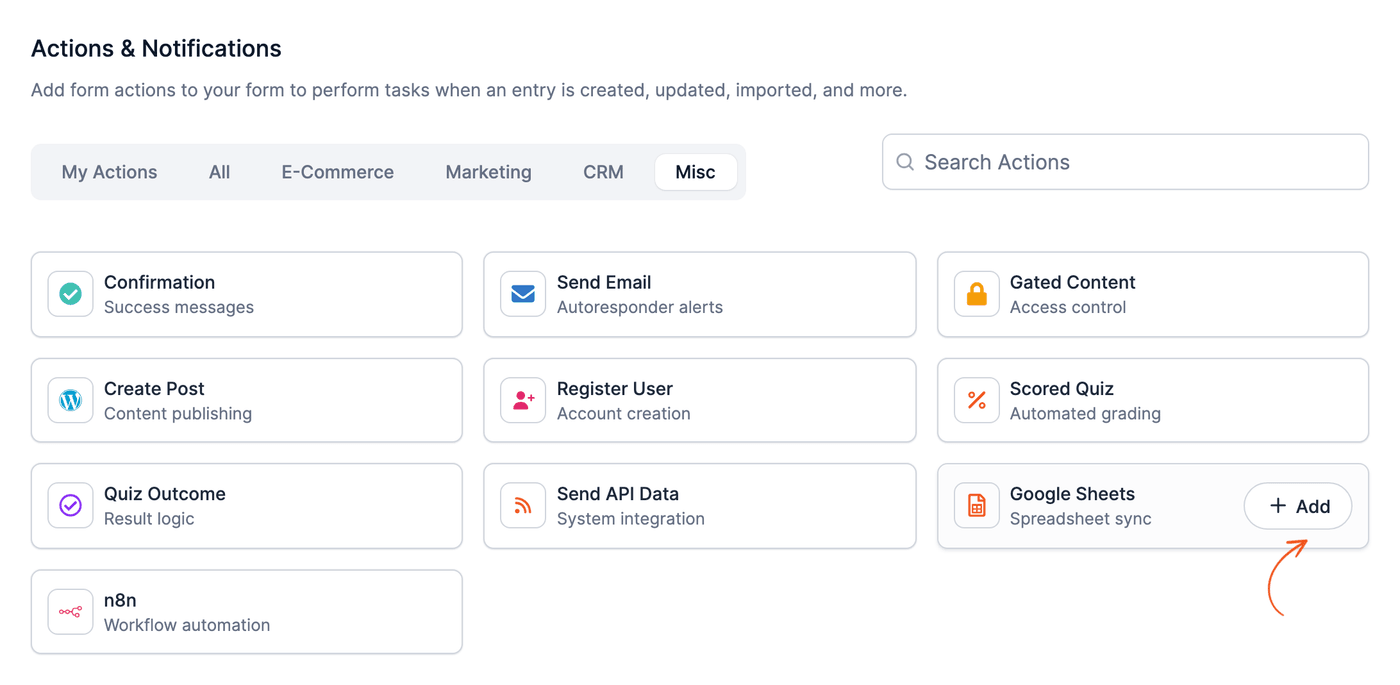
- Go to your form's Settings → Actions & Notifications. In the Misc tab, hover over the Google Sheets action and click + Add. You can also type Google Sheets in Search Actions to find it.
- Give the action an Action Name for easy reference. This name is only seen on the back end. Until your Google account is connected, the action hides its file settings and shows this message: Oops! The Google Sheets API is not authorized. Please set it up here. Click here to open the Google Sheets settings and finish Step 5.
- In Trigger this action when, choose when to send the entry.
- Entry is created: sends each new entry when someone submits the form. Choose this for most forms.
- Entry is imported: sends entries when you import them into the form. Choose this if you add entries with an import.
- A payment event, such as Successful Payment: sends the entry when its payment reaches that status. Choose this if you only want paid entries in the sheet.
- Entry is abandoned: sends the entry when it's marked as abandoned. This option shows only when the Form Abandonment add-on is active.
- In the Select File dropdown, choose the Google Sheets file where you want to send the form data. Add a column header in the first row of the sheet so you can map your form fields to those headers.
- If your file has more than 1 sheet, choose the sheet for the form data in the Select Sheet dropdown. This dropdown shows only when the file has several sheets.
- Under the Map Sheet Headers section, map your form fields to the sheet headers.
- Click Update to save your changes.
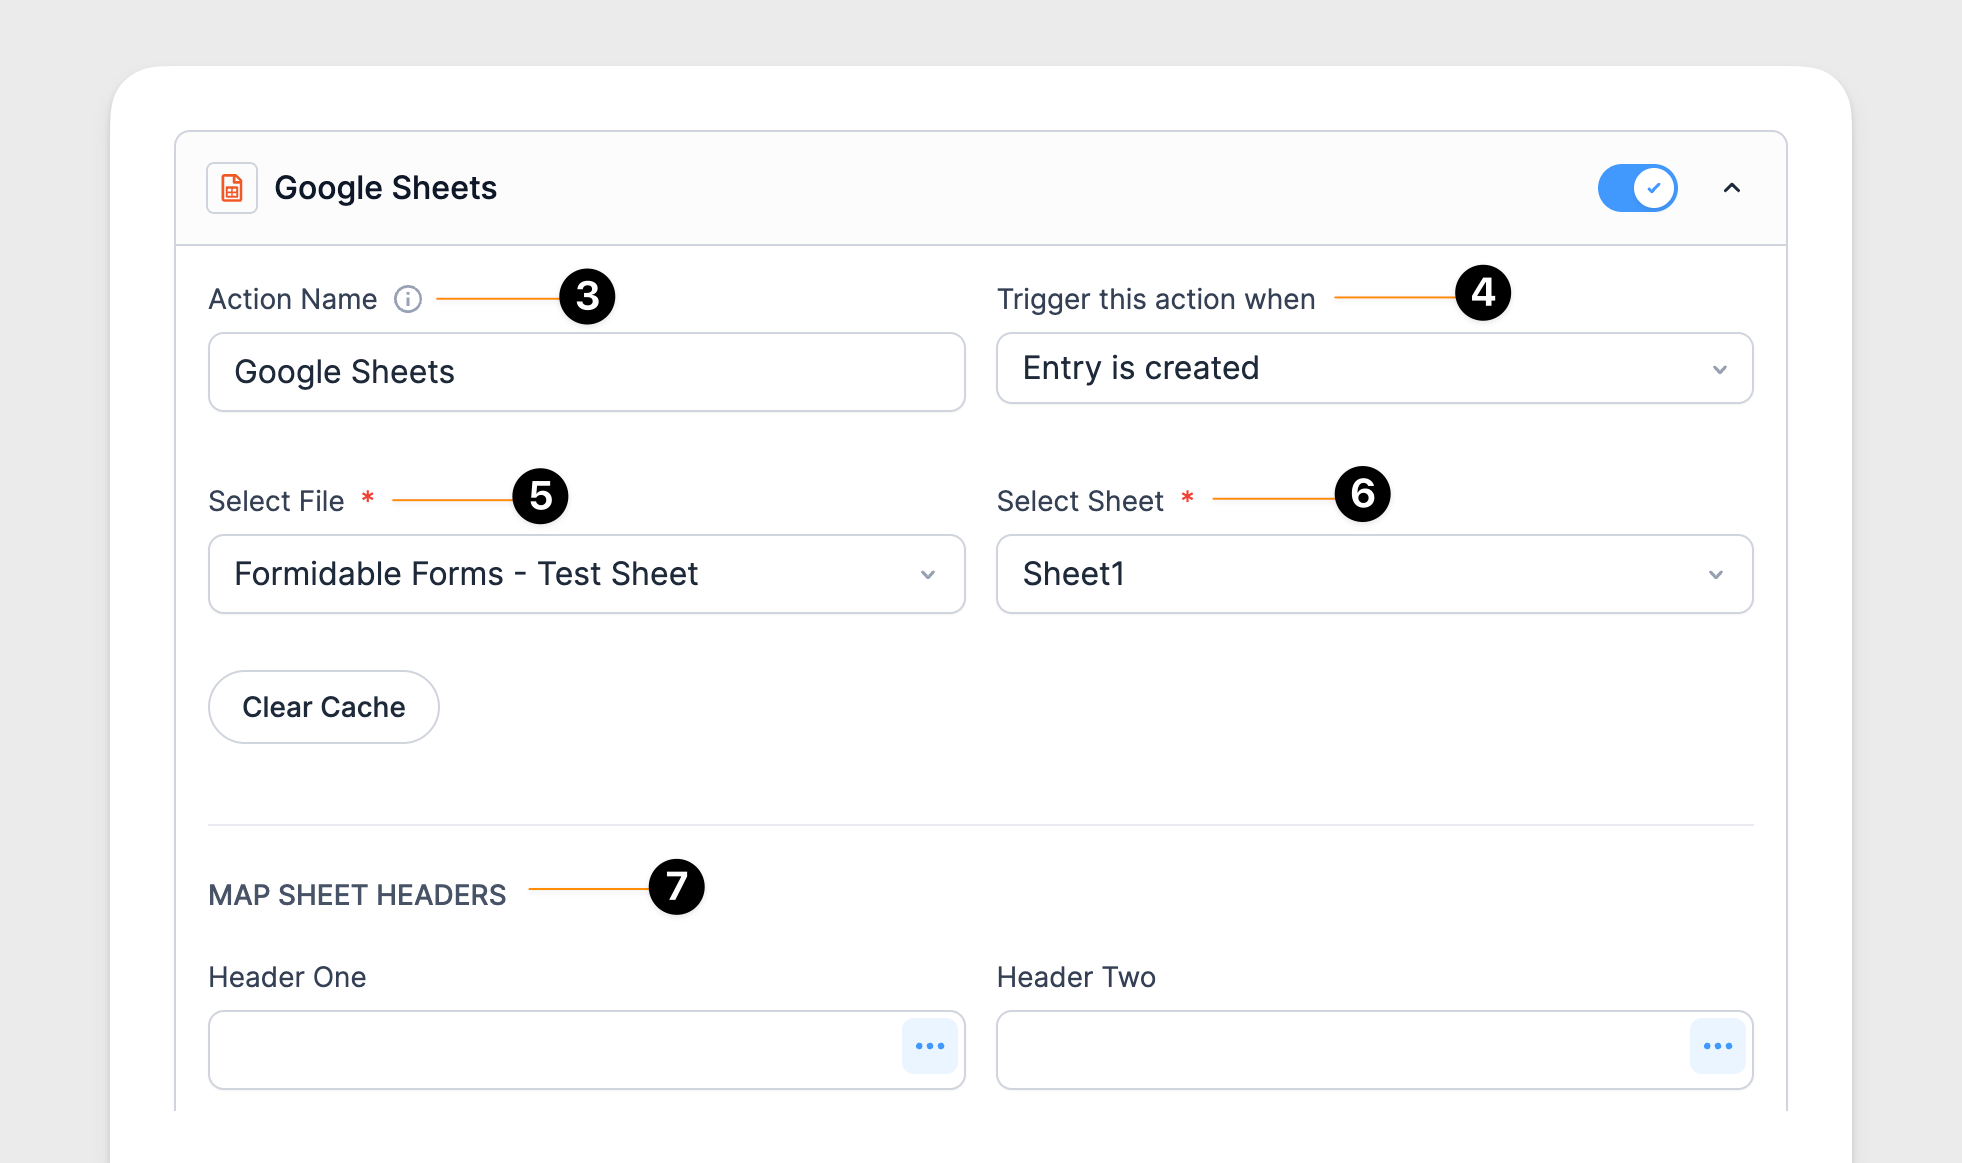
Formidable remembers your file list, sheets, and headers for up to 60 hours. If you add a file, rename a sheet, or change a header in Google Sheets, click Clear Cache in the action to load the changes. A new file shows in the Select File dropdown after you also reload the page.
Send existing entries
If you have existing entries in your form, click the Send Existing Entries button. It adds all the existing form entries to the selected Google sheet, including draft entries. To avoid errors, map the sheet headers to form fields before sending the data.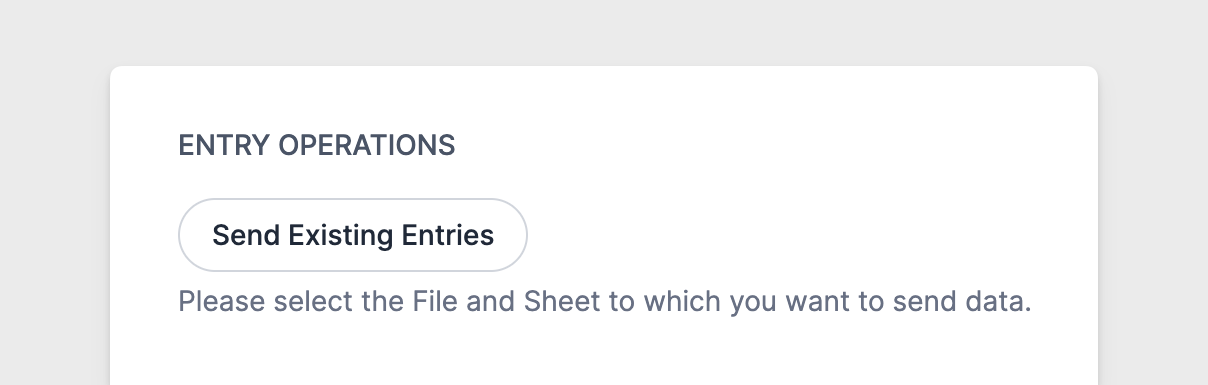
Limitations
- The Google Sheets add-on doesn't currently support two-way sync. The information is synced one way from Formidable to Google Sheets.
- The Google Sheets actions do not currently support Excel and Open Document spreadsheet files.
- The Google Sheets action runs when a new entry is created, imported, or abandoned, or on a payment event. It does not update rows when an entry is changed in Formidable.
Troubleshooting
Missing sheet in form action
The Select File dropdown lists only files saved as Google Sheets. If you uploaded an Excel file or an Open Document spreadsheet file to Google Drive, change its file type to Google Sheets.
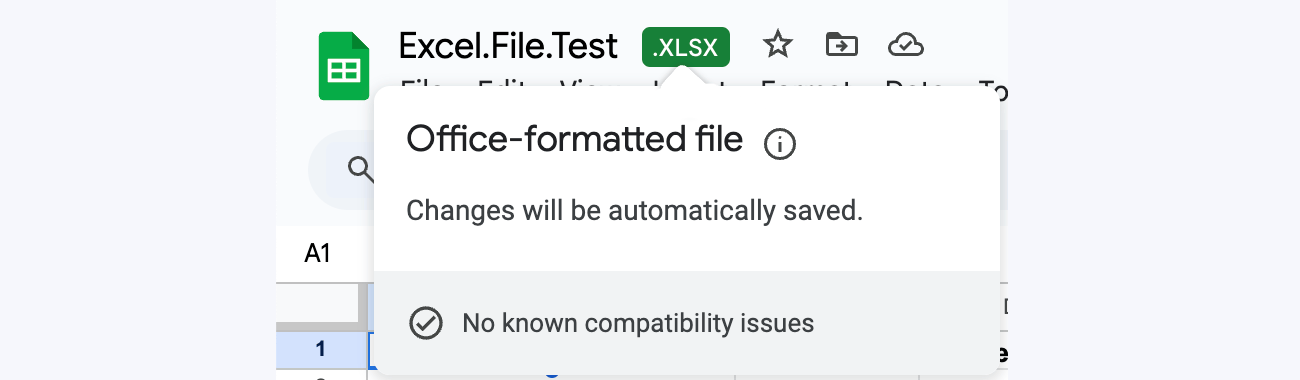
- Check the file type. If you see a big green .XLSX tag next to the file name, it must be changed. If you select this tag, it will show it as an Office-formatted file.
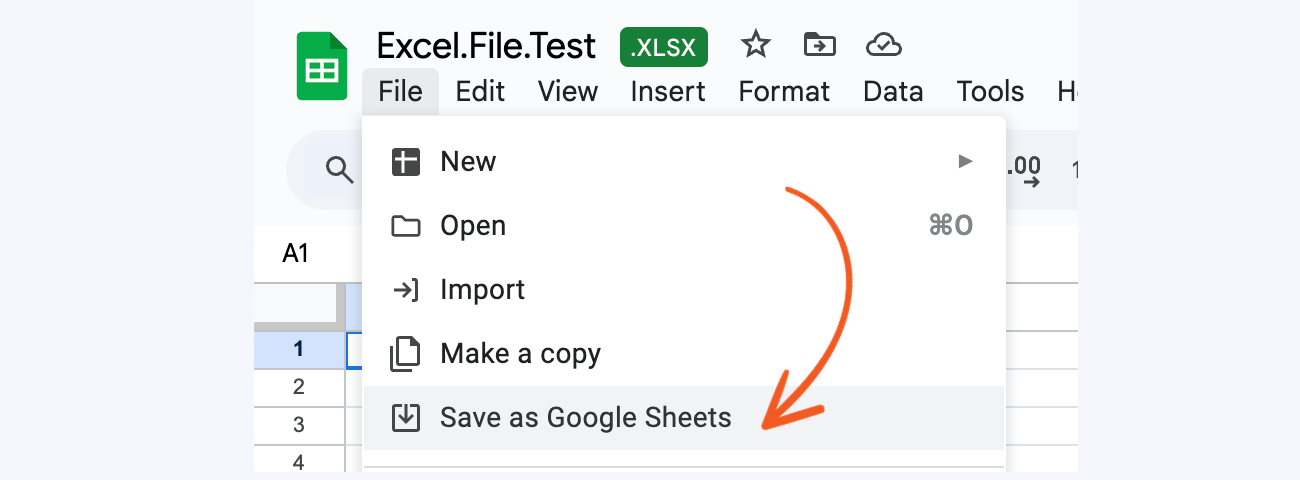
- To change the file type, go to File → Save as Google Sheets.
If the file is a Google Sheets file but you created it recently, click Clear Cache in the Google Sheets action. Then reload the page. The file then shows in the Select File dropdown. The file also needs to be one that the connected Google account can open.
Redirect URI mismatch
If you see the error message Error 400: redirect_uri_mismatch, the redirect URI in your OAuth client ID settings doesn't match your site's address. It must be your WordPress Site Address (URL) with a slash at the end, including https:// and any www.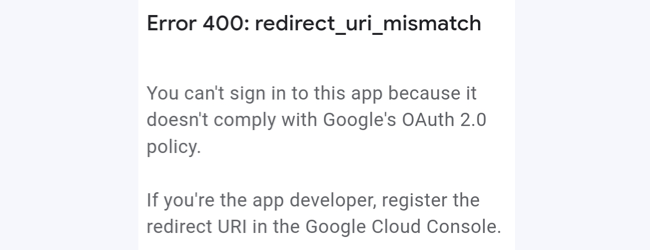
Error 400: invalid_request
If Google shows Error 400: invalid_request and says the app doesn't comply with Google's OAuth 2.0 policy when you click Authorize, check your site's address. Google accepts only redirect URIs that start with https://, except for localhost.
- In WordPress, go to Settings → General and check that the Site Address (URL) starts with
https://. If your site doesn't have an SSL certificate yet, ask your host to add one. - Update the redirect URI in your OAuth client ID settings to match the
https://address, with a slash at the end. - Go to Formidable → Global Settings → Google Sheets and click Authorize again.
Google hasn’t verified this app
Google shows this screen when you authorize an app that Google hasn't verified. The add-on asks for access to Google Drive, and Google only verifies apps with that access after a security assessment. You don't need verification to connect your own site: Google lets an app that fewer than 100 people use skip it.
- On the warning screen, click Advanced.
- Click the link to go to your app. Then allow access to Google Sheets and Google Drive.
Keep the app published. If you move it back to testing mode, the connection ends 7 days after you authorize it, and you must authorize again each time. If your Google account belongs to a Google Workspace organization, you can set the app's Audience to Internal instead, and this screen doesn't show.

Unable to parse range
If you see the Unable to parse range error, the sheet saved in the form action was probably renamed in Google Sheets. The action saves the sheet by its name, so it can't find the renamed sheet.
- Open the Google Sheets action in your form's Settings → Actions & Notifications.
- Click Clear Cache to load the new sheet names.
- If the file has more than 1 sheet, choose the renamed sheet in the Select Sheet dropdown. A file with 1 sheet uses it automatically. Then check the Map Sheet Headers section.
- Click Update to save your changes.
Please ensure you have enabled the Google Drive API and Google Sheets API
The Google Sheets action shows this message when Google doesn't answer the request for your files. To fix it, check these causes in order.
- Confirm that both the Google Sheets API and the Google Drive API are enabled in your Google Cloud project. See Step 1.
- Check whether your Google app is still in testing mode. In testing mode, authorization expires after 7 days. Go to Google Auth Platform → Audience and click Publish app, as shown in Step 4.
- Connect again. Go to Formidable → Global Settings → Google Sheets and click Deauthorize. Then click Authorize. Choose a Google account that can open your spreadsheet. If the app is still in testing mode, the account must be on the test users list.
- Check for security and cache plugins or settings that might interfere with the API connection. To troubleshoot these issues, temporarily turn off any security or caching plugins. If you're using external caching services like Cloudflare, switch to Development Mode while you test.
