
What a pleasure to have support within minutes. Brillant, accurate answer, and solved the question. Thanks to the Formidable Team. Eric


Last updated on August 27, 2026 by Formidable Team
How to Create a WordPress Application Form [Four Steps!]
Somewhere in your inbox is a great candidate you never got back to. A WordPress application form keeps every application, attachments and all, organized in one place. Here's how to fix it with Formidable Forms.

Approximate read time: 10 minutes
Upgrade your WordPress site with powerful, flexible forms.
What an online application form needs to do
Before you drag in a single field, it helps to know what separates a working application form from a glorified contact form. A good one handles four things:
- Collect the right answers. Name, contact details, the role, and whatever role-specific questions you need, all in one place.
- Accept file uploads. Resumes, cover letters, and portfolios come in as attachments, not pasted text.
- Confirm receipt. The applicant gets a clear message and, ideally, an email so they know the form went through.
- Stay organized on your end. Every submission lands in one list where you can review, filter, and update its status.
The good news is that a WordPress application form covers all four, and the free version of Formidable Forms already handles the first three.

Staying organized is where the paid licenses come in, and we'll note which license you need as each feature comes up.
From Idea to Reality in Minutes. Build Powerful Forms, Dashboards, Apps and More.
Formidable Forms makes advanced site building simple. Launch forms, directories, dashboards, and custom WordPress apps faster than ever before.
Why build your application form in WordPress
You could send applicants to a third-party form tool, but then your data lives on someone else's server and your applicants leave your site to fill it out.
Building the form in WordPress keeps everything in one place: the form matches your branding, the submissions stay in your own database, and you can display or export them however you like.
We built Formidable Forms to handle the builder, the uploads, and the applicant tracking in one plugin. The drag and drop builder and file uploads are in the free Lite version, and the applicant-tracking and front-end display features come with the paid licenses. Over 300,000 sites run on it, including plenty that needed a form to do more than say hello.
How to build the form step by step
Here's the full build, from installing the plugin to reviewing applications in your dashboard. We'll use a job application as the example, but the same steps work for rental applications, memberships, grants, or any other kind of application you collect.
Step 1: Install Formidable Forms
From your WordPress dashboard, go to Plugins → Add New, search for Formidable Forms, then click Install Now and Activate.
That gives you the free Lite version, which is enough to build the form itself and accept file uploads.
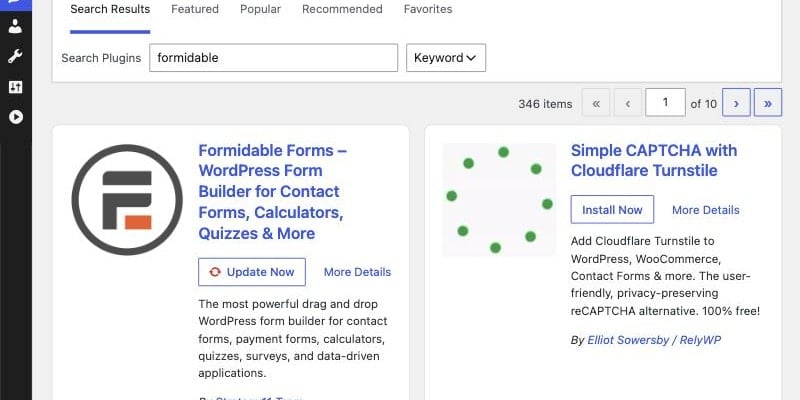
If you want applicant tracking and a front-end applicant list later in this guide, activate a paid license now. We'll note the tier as each feature comes up.
Step 2: Create your application form
Go to Formidable → Forms → Add New. You can start from a blank form or pick the application template to get a head start on the structure.
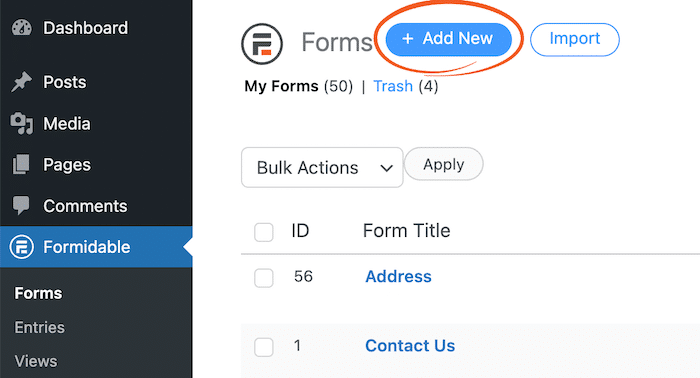
Give the form a clear name like "Job Application" so it's easy to find later. Type it right into the header, no separate popup needed.
Step 3: Add your application fields
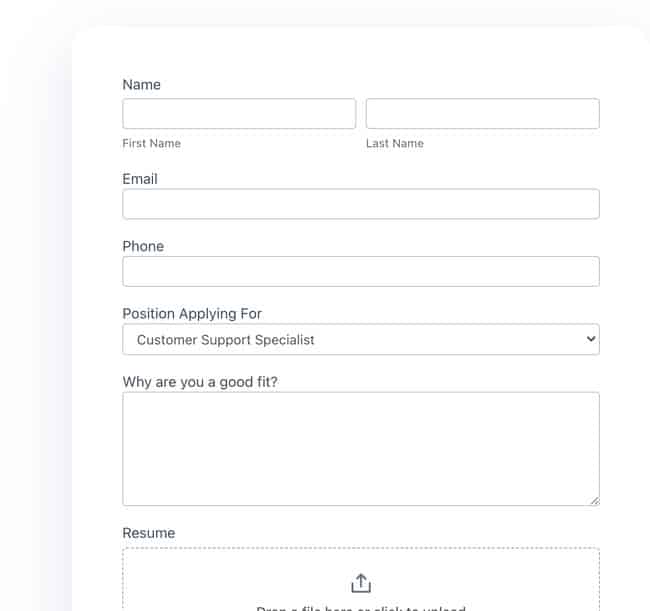
Now build out the questions. Drag each field from the panel on the left onto the form. For a job application form, a solid starting set is:
- Name field for the applicant's full name
- Email field for their contact address
- Phone field for a callback number
- A Dropdown field labeled Position applying for, with your open roles as the options
- A Paragraph Text field labeled Why are you a good fit? for a short cover note
- A Date field for the applicant's earliest start date
- A Checkbox confirming the applicant is legally eligible to work
You can edit each field's label and placeholder in the panel on the right, and drag fields up or down to reorder them.
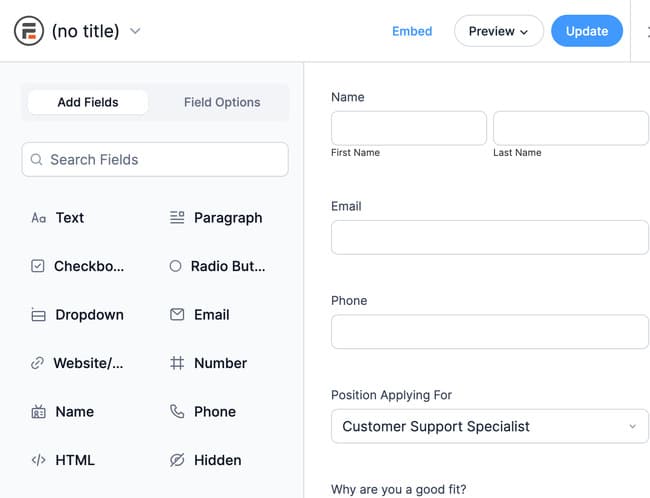
Keep the list tight. Every extra field is another reason for a good candidate to give up partway through, so ask only for what you'll actually use to make a decision.
Step 4: Add a resume file upload
This is the field that turns a contact form into a real application form. Drag in a File Upload field and label it Resume.
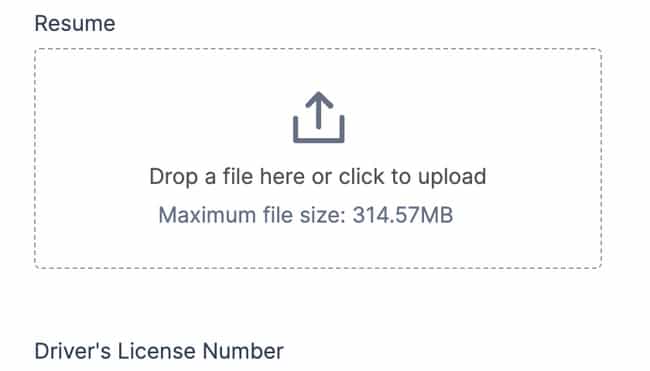
Open the field's options to control what applicants can send:
- File types: limit uploads to the formats you want, such as PDF and DOCX, so you don't get files you can't open.
- Maximum file size: set a sensible cap so a huge file doesn't fail to send.
- Number of files: allow more than one if you also want a cover letter or portfolio in the same field.
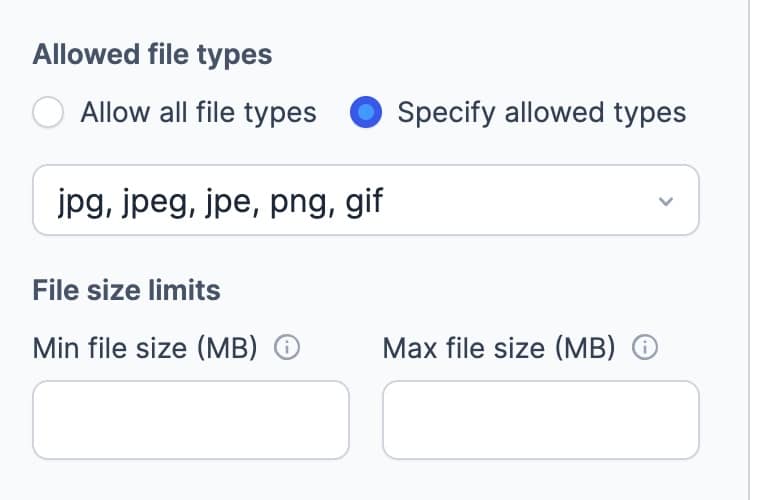
File uploads are included in the free Lite version, so you don't need a paid license just to accept resumes.
Step 5: Show role-specific questions with conditional logic
Most application forms ask a few questions that only apply to some applicants. Rather than showing everyone every field, you can reveal fields based on earlier answers with conditional logic.
Select the field you want to control, open Conditional Logic in its settings, and set the rule. For example, add a Driver's license number field and set it to show only when "Position applying for is equal to Delivery Driver."
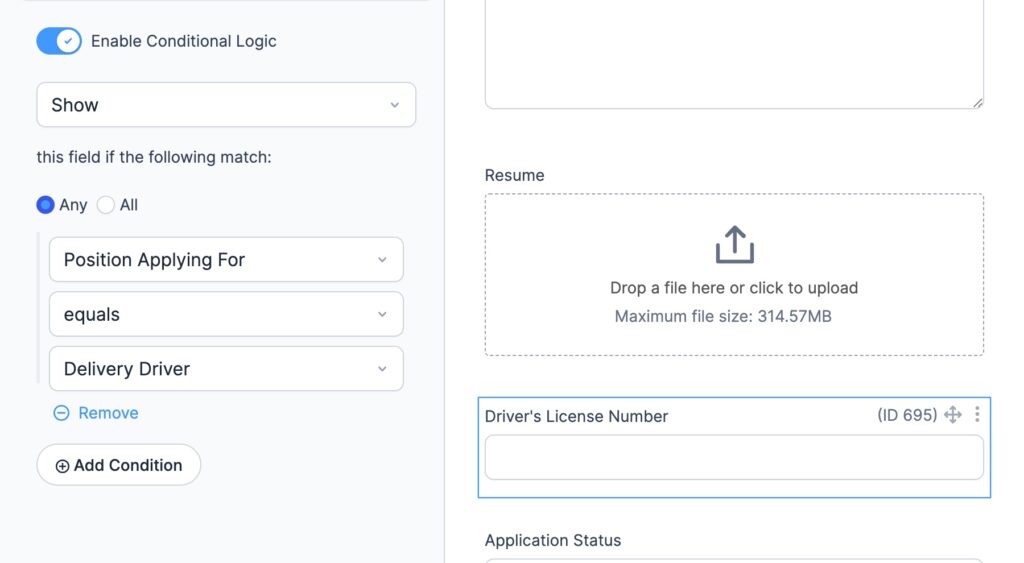
The form stays short for everyone and only expands when a question is actually relevant. Conditional logic is a premium feature included with the paid licenses.
Step 6: Set the confirmation and notification emails
When someone applies, two things need to happen: they see a confirmation, and you get an email so the application doesn't sit unnoticed.
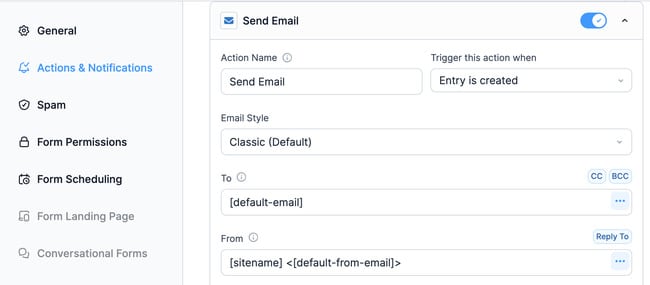
Open the form's Settings, then Actions & Notifications.
The Email Notification action is there by default. Set it to send to your hiring inbox so you're alerted the moment an application comes in.
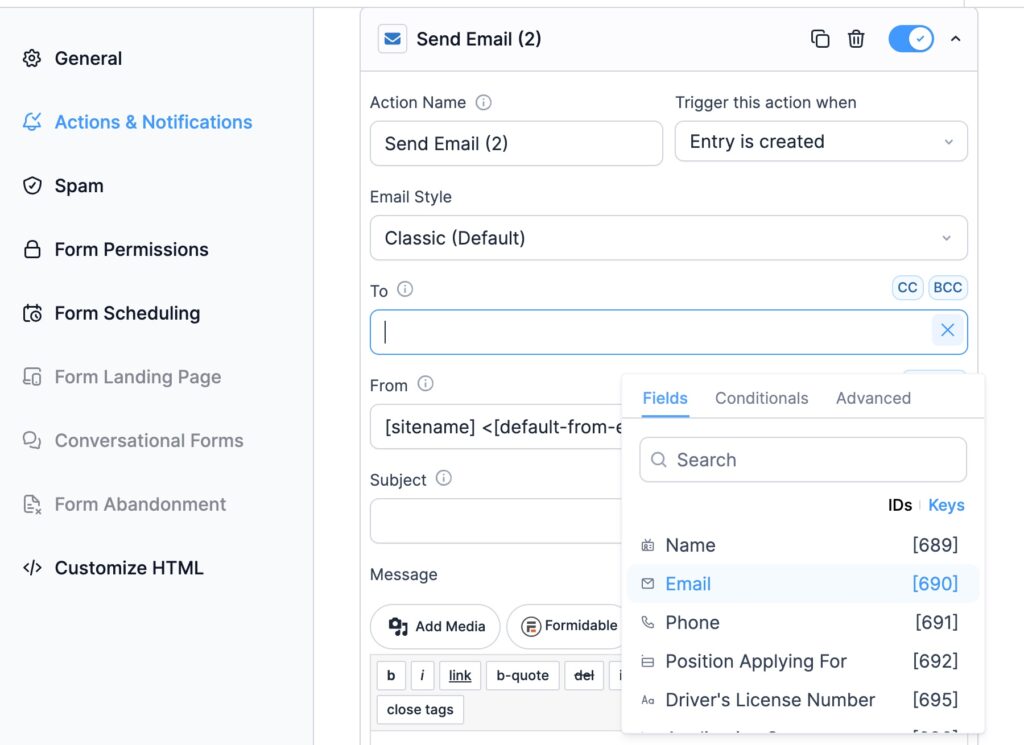
To also email the applicant a "we received your application" note, add a second Email Notification action and set the To field to the applicant's email address from the dropdown.
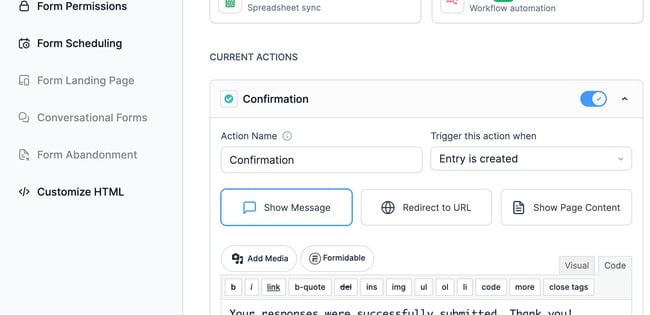
Next, set what the applicant sees after submitting. In the Confirmation action, choose to show a message, redirect to a thank-you page, or display the default confirmation. A short message like "Thanks for applying. We'll be in touch within a week." sets expectations and reassures the applicant that the form went through.
Step 7: Publish the application form on your site
Save the form, then add it to any page. Create or edit a page, add the Formidable Forms block, and select your job application form from the dropdown. You can also paste the form's shortcode into any post, page, or widget area.

Publish the page and run through the form yourself as a test: submit an application, upload a sample resume, and confirm both emails arrive. Formidable's forms are responsive out of the box, so test yours on a phone too, since plenty of applicants will apply from one.
Track application status and manage applicants
Collecting applications is half the job. The other half is knowing where each one stands. Formidable Forms saves every submission as an entry, and you can review, filter, and update those entries right from your dashboard.
Review applications in your dashboard
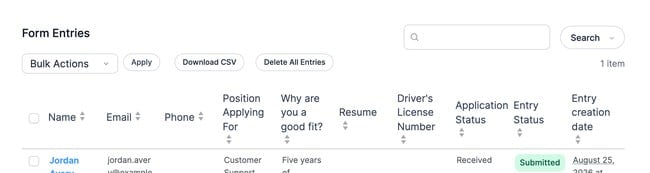
Go to Formidable → Entries and pick your application form. Every submission is listed there with its answers and uploaded files, so you can open any application and read it in full without digging through your inbox.
Add an application status field
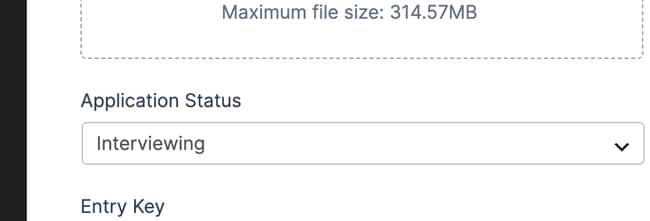
To track where each applicant is in your process, add a Dropdown or Radio Buttons field labeled Application status with options like "Received," "Interviewing," "Offer," and "Rejected."
You can update the status on each entry as an applicant moves through your pipeline, which keeps your whole team looking at one source of truth instead of a thread of forwarded emails.
Build an applicant tracker with Formidable Views
To see and manage all your applicants on the front end instead of only in the admin area, display entries with a Formidable View.
A Formidable View turns your submissions into a sortable, filterable list or table anywhere on your site. Think a hiring dashboard your team can open without logging in to WordPress admin, filtered by position or status.
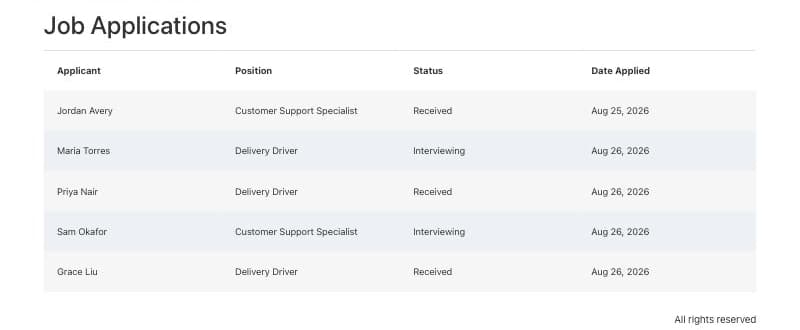
Formidable Views is included on the Plus license and above (Plus is $99.50 for the first year, then $199 on renewal). It's the piece that turns a pile of form entries into a working applicant tracker, and it's the same tool you'd use to build directories, listings, or any front-end data display from form submissions.

More ways to level up your application form
Once the core form works, a few extras make it easier to run at scale:
- Save and continue. Let applicants save a long application and finish it later, so a great candidate doesn't lose their progress. This comes with the paid licenses.
- Multi-page forms. Break a long application into steps so it feels manageable instead of like a wall of fields.
- Digital signatures. Add a signature field for offer acceptances or eligibility attestations.
- Export to CSV. Download your applications as a CSV (a spreadsheet format) to share with a hiring committee or import into another tool.
Each one follows the same idea: make the form easy for the applicant and the pile of applications easy for you.
From open role to organized list
A WordPress application form takes you from a messy inbox to one clean, sortable list: the right questions, resumes as file uploads, a confirmation for every applicant, and a status you can update as people move through your process. You can build the whole thing without code, and the form itself runs on the free version.
Get Formidable Forms and start collecting applications you can actually manage.
How do I create an application form in WordPress?
Install Formidable Forms, go to Formidable → Forms → Add New, and build your form by dragging in fields for the applicant's name, contact details, the role, and a File Upload field for their resume. Set a confirmation message and an email notification, then add the form to any page with the Formidable Forms block. The form builder and file uploads are in the free Lite version.
Can applicants upload a resume to my WordPress form?
Yes. Add a File Upload field to your form and set the allowed file types, such as PDF and DOCX, along with a maximum file size. Applicants can then attach their resume, and optionally a cover letter or portfolio, directly to the application. File uploads are included in the free version of Formidable Forms.
How do I track the status of each application?
Every submission is saved as an entry under Formidable → Entries. Add an "Application status" dropdown field with options like Received, Interviewing, and Offer, and update it as each applicant moves forward. To see all applicants in a sortable, filterable list on the front end, build a Formidable View, which is included on the Plus license and above.
Is the free version of Formidable Forms enough for an application form?
For collecting applications, yes. The free Lite version includes the drag and drop builder, file uploads, email notifications, and confirmation messages. Conditional logic, save and continue, and the Formidable Views applicant tracker come with the paid licenses, with Formidable Views starting on the Plus license.
This article may contain affiliate links. Once in a while, we earn commissions from those links. But we only recommend products we like, with or without commissions.