
Do you want to display your form entries as an eye-catching slider instead of a plain list? Formidable Views makes it easy to pull in live entry data, and pairing a Classic View with the free Swiper.js library turns those entries into a polished carousel. In this guide, we'll show you how to create a slider with Swiper.js and Formidable Views.

Before we dive in, here's a quick look at how a Classic View is structured. A Classic View has three sections:
- Before Content runs once, before your entries loop begins.
- Content repeats once for every entry.
- After Content runs once, after the loop ends.
That structure is exactly what we need to build a slider. We'll open the slider wrapper before the loop, output one slide per entry, and then close the wrapper and start up the JavaScript after.
Upgrade your WordPress site with powerful, flexible forms.
Step 1 – Create a new Classic View
First, create a View for the form you'd like to display as a slider. When prompted, select Classic for the View type and connect it to your form.
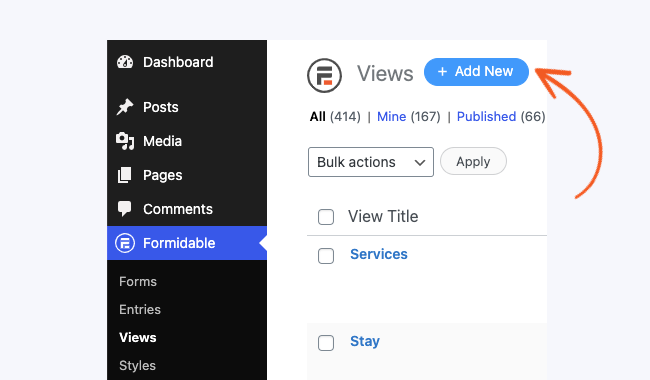
- Go to Formidable → Views. Click the Add New button at the top of the page.

- Select Classic for the View type.

From Idea to Reality in Minutes. Build Powerful Forms, Dashboards, Apps and More.
Formidable Forms makes advanced site building simple. Launch forms, directories, dashboards, and custom WordPress apps faster than ever before.
Step 2 – Add the Before Content code
Next, we'll load the Swiper.js library and open the slider wrapper. No installation is needed since we're pulling Swiper from a CDN.
Paste the following code into the Before Content box of your View:
<link rel="stylesheet" href="https://cdn.jsdelivr.net/npm/swiper@11/swiper-bundle.min.css">
<script src="https://cdn.jsdelivr.net/npm/swiper@11/swiper-bundle.min.js"></script>

<div class="swiper frm-entry-slider">
  <div class="swiper-wrapper">
Step 3 – Add the Content code
This is the part that repeats for every entry in your form. Each entry becomes one slide in the carousel.
Paste the following code into the Listing Content box of your View:
<div class="swiper-slide">
  <div class="slide-card">
    <div class="slide-image">[2353 show_image=1]</div>
    <h3>[2350]</h3>
    <p>[2351]</p>
    <span class="slide-meta"> Submitted by [2352]</span>
  </div>
</div>
Step 5 – Add Custom CSS to the View
On the Sidebar of the Listing Content box add the following custom CSS on the View-Specific Custom CSS box.

  .frm-entry-slider {
    width: 100%;
    max-width: 800px;
    margin: 30px auto;
    padding-bottom: 50px;
  }
  .slide-card {
    background: #fff;
    border-radius: 12px;
    padding: 24px;
    box-shadow: 0 2px 12px rgba(0,0,0,0.08);
    text-align: center;
  }
  .slide-card img {
    max-width: 100%;
    border-radius: 8px;
    margin-bottom: 16px;
  }
  .slide-card h3 { margin: 10px 0 8px; font-size: 1.2rem; }
  .slide-meta { font-size: 0.8rem; color: #888; }
  .swiper-button-next,
  .swiper-button-prev { color: #e85d04; }
  .swiper-pagination-bullet-active { background: #e85d04; }
Step 4 – Add the After Content code
Now we'll close the slider wrapper, add the navigation arrows and pagination dots, style the slider, and start up Swiper.
Paste the following code into the After Content box of your View:
</div>

  <div class="swiper-button-next"></div>
  <div class="swiper-button-prev"></div>
  <div class="swiper-pagination"></div>
</div>

<script>
document.addEventListener('DOMContentLoaded', function() {
  new Swiper('.frm-entry-slider', {
    slidesPerView: 1,
    spaceBetween: 20,
    loop: true,
    autoplay: { delay: 4000, disableOnInteraction: false },
    pagination: { el: '.swiper-pagination', clickable: true },
    navigation: { nextEl: '.swiper-button-next', prevEl: '.swiper-button-prev' }
  });
});
</script>
Step 5 – Publish your View
Save your View, then copy the View shortcode and paste it onto any WordPress page or post where you'd like your slider to appear. Preview the page, and you'll see a working carousel pulling live data from your form entries.
That's it! You've just turned your form entries into a Swiper.js slider using Formidable Forms Views.
Frequently asked questions
Can I show more than one slide at a time?
Yes. In the After Content script, change the slidesPerView value from 1 to however many slides you want visible at once. You can also add a breakpoints option to Swiper to show a different number of slides on mobile, tablet, and desktop. The Swiper API documentation has full details.
How do I turn off autoplay?
In the After Content script, remove the autoplay line from the Swiper options. Your slider will stay put until a visitor clicks the navigation arrows or pagination dots.
My slider shows up as a plain list. What went wrong?
This usually means Swiper.js didn't load, or the JavaScript ran before the slider HTML was on the page. Double-check that the Before Content, Content, and After Content code was pasted into the correct boxes and that none of the HTML tags were accidentally stripped out. Also, make sure no caching or optimization plugins are blocking the Swiper script from loading.
Can I filter which entries show up in the slider?
Yes. Open your View and scroll to the Advanced Settings section. Add any filters you want, and only the entries that match will appear as slides in your carousel.
Next steps
Now that your entries are displaying as a slider, you might want to explore more ways to use Formidable Views. Check out our guide on how to create a View to learn about all the ways you can display your form data.
