
Upgrade your WordPress site with powerful, flexible forms.
Introduction
Google Analytics is a developer tool created by Google that allows you to learn about and manage how people experience your site. You can implement Google Analytics on any website to see how users browse your site, from what pages they arrive at your forms, how many times your forms are submitted, and so much more! This article will teach you how to set up Google Analytics and track form submissions.
Google will sunset Google Analytics 3 (Universal Analytics) and stop collecting data. It means that Universal Analytics will no longer receive data from your WordPress website and will finally cease to function after the sunset date. Google strongly recommends migrating to Google Analytics 4 (GA4) as soon as possible to avoid starting from scratch with no historical data.
Read more on this issue in Google's support thread for further information.
From Idea to Reality in Minutes. Build Powerful Forms, Dashboards, Apps and More.
Formidable Forms makes advanced site building simple. Launch forms, directories, dashboards, and custom WordPress apps faster than ever before.
Set up Google Analytics 4
If you are a new user of Google Analytics, you are most likely using a GA4 property already, and no action is required on your end. Confirm which Google Analytics property you are using by looking at the property ID.
If you have not used Universal Analytics before and need to set up GA4, follow this article on how to set it up.
If you use Universal Analytics and want to migrate to GA4, follow this article to create a GA4 property using the Setup Assistant.
Set up Google Tag Manager
With Google Analytics 4, tracking events with Google Tag Manager is possible. A brief description of event tracking from a Google support article states the following:
An event allows you to measure a specific interaction or occurrence on your website or app. For example, you can use an event to measure when someone loads a page, clicks a link, or completes a purchase, or to measure system behavior, such as when an app crashes or an impression is served.
You can configure the GA4 tags in your Google Tag Manager to get more information on how to set it up. For the objective of this documentation, we will show you how we configured it to track form submissions whenever the submit button is clicked.
This guide assumes you have already done the following setup:
- Set up a Google Tag Manager container within your site.
- Set up Google Analytics tracking within Tag Manager.
- Publish a form on your site.
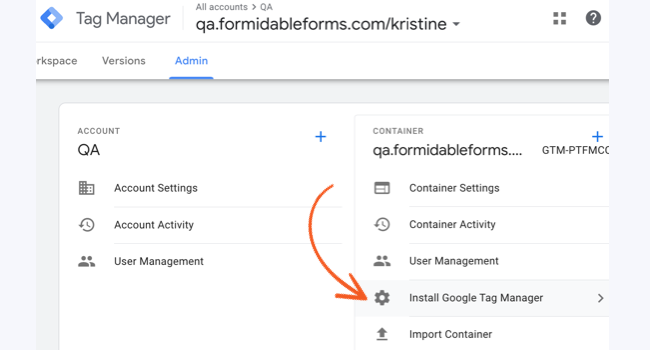
Step 1: Install Google Tag Manager
- In the Google Tag Manager Overview, go to Admin. Then select the Install Google Tag Manager in the Container column.

- Copy and paste the code snippets to your site's header and body section. The easiest way to do this is using the WPCode plugin, which you can download from WordPress.org or install through the WordPress dashboard.
- In your WordPress admin panel, go to Code Snippets → Headers & Footers. Paste the <head> code in the Header field and the <body> code in the Body field.

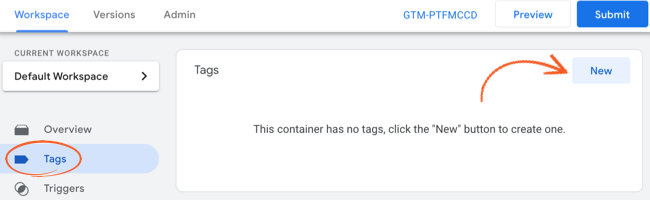
Step 2: Create a GA4 Event tag
- In Google Tag Manager, look for Tags in the left sidebar. Click the New button.
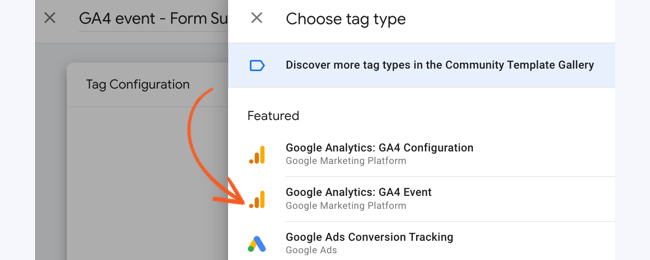
- For the Tag type, select Google Analytics: GA4 Event.
- In the Configuration Tag, select None- Manually set ID.
- For the Measurement ID, insert your GA4 Measurement ID number. If you need help finding this, check out this documentation.
- Add an Event Name to your tag called form_submission_success. You can change this to your preferred Event name if you want.
- In the Event Parameters, click the Add Row button and add the following:
- Parameter Name: form_page_path
- Value: {{Page Path}}
You can also include additional Event Parameters to be passed through when the tag is fired. Google offers a helpful list of pre-programmed event names that correspond to specific parameters. For a complete list of these recommended events, refer to this article.
- Save the tag configuration.

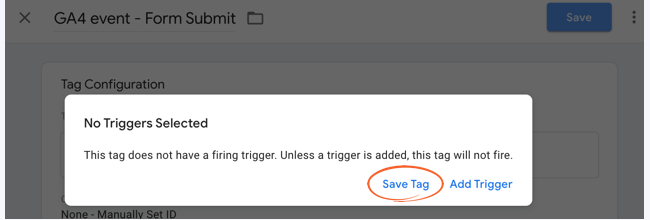
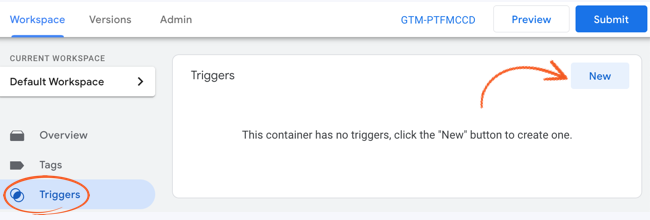
Step 3: Create a trigger
Once you have created an event tag, you can create a trigger.
- Click Triggers in the left sidebar, then click the New button.
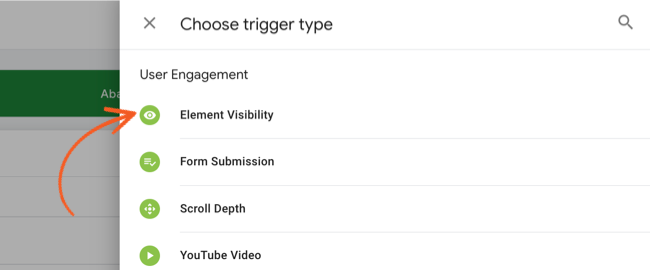
- Choose User Engagement: Element Visibility as the trigger type in the Trigger configuration.
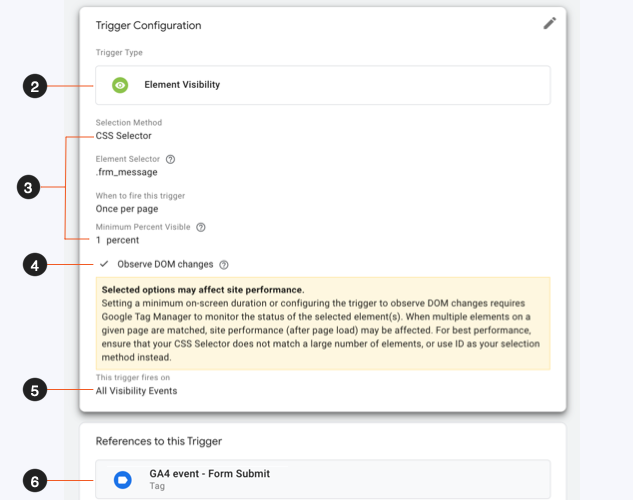
- Choose the following settings for the Trigger configuration.
- Selection Method: CSS selector
- Element Selector: .frm_message
- When to fire this trigger: Once per page
- Minimum percent visible: 1
- Select the Observe DOM changes checkbox.
- Choose All Visibility Events for when this trigger fires on. Save the trigger configuration.
- Return to the GA4 event tag you created, choose this trigger, and save your changes.
Step 4: Verify if the tag works
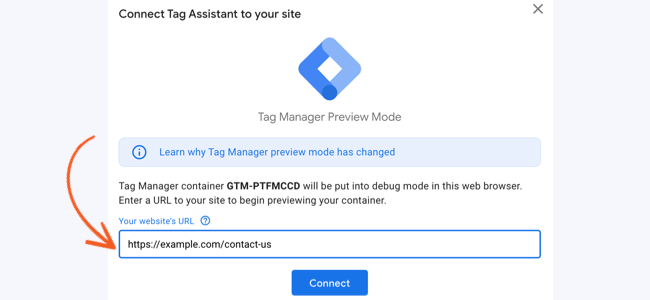
To verify if your tag is sending data, follow the steps below.
- Connect to the Google Tag Assistant by clicking the Preview button.
- Enter the URL where your form is published and click the Connect button.
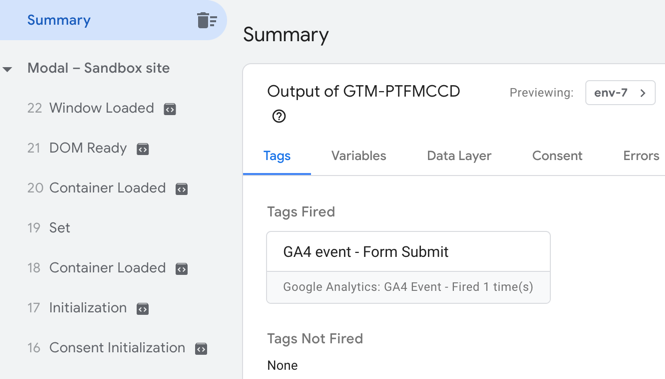
- It will open your site in a new window where you can submit your form and debug whether the Google tag is fired. Follow the instructions to check if the tag sends any events in the Summary tab.
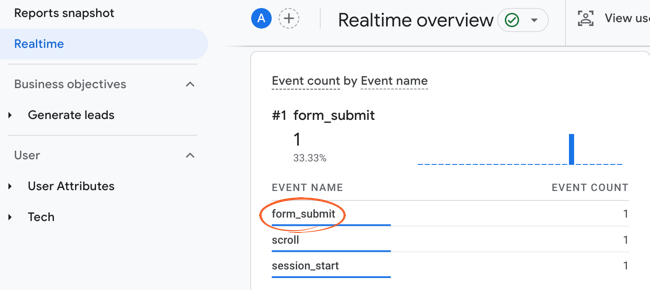
- To immediately check if this new event is transferred to your Analytics dashboard, go to your Analytics account → Reports → Realtime.
- Look for the Event count by Event name section, and click the form_submit event name. You can track all the events from here when the form submit button is clicked.
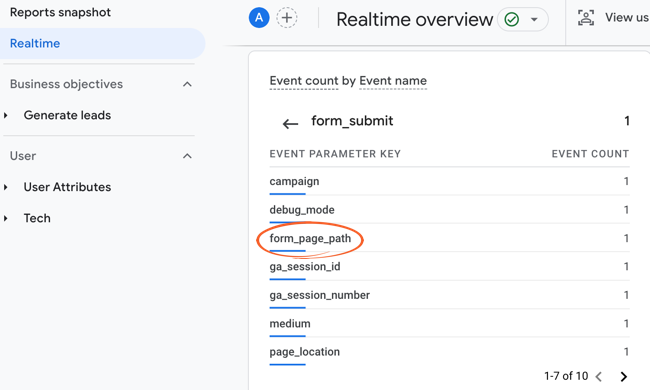
- By clicking the form_page_path event parameter, you can track the page path from which the form was submitted.


Using Google Analytics with MonsterInsights
If you'd rather not manually add the tracking code to your site, you can easily set up Google Analytics tracking with MonsterInsights. This plugin simplifies the whole process with an integration that includes features like:
- Tracking all forms created on your site
- Enabling event tracking for form submissions
- Tracking form views and conversions
- Easily view reports within the WordPress dashboard
- Comprehensive conversion rates report
Start tracking the traffic immediately on your Formidable Form the easy way with MonsterInsights.
