
Formidable Forms has made my life so much easier as an event planner.


Last updated on September 19, 2023 by Formidable Team
How To Set Up Recurring Donations in WordPress
Accepting recurring donations online is an easy way to generate a steady stream of income for your nonprofit. Here's how to set up recurring donations in WordPress!

If your WordPress website accepts online donations, you're probably already familiar with the basics of the most popular payment gateways. However, you might also want to provide convenience beyond one-time contributions.
Enabling recurring donations in WordPress can be the perfect solution.
Fortunately, you can easily add this feature with the help of Formidable Forms. Adjusting a few settings can provide a seamless experience for your most loyal donors.
This article will cover a few benefits of setting up recurring donations in WordPress. Then, we’ll show how to include WordPress recurring donations in three easy steps. Let’s jump right in!
Upgrade your WordPress site with powerful, flexible forms.
Why you might enable recurring donations in WordPress
Your WordPress donation page can be an economic lifeline for your website. One-time contributions are important. However, they don’t have to be your only funding source. Recurring donations also have a lot to offer.
For example, one of the biggest advantages of regular contributions is reliability. Recurring payments can help you estimate your monthly income more accurately. As a result, it might be easier to manage your site’s funds.
However, you're not the only one who can benefit: 31.3% of users prefer to give regular contributions. As such, enabling recurring donations in WordPress is an easy way to provide a better experience for your donors.
This same principle applies to attracting new donors. You may miss out on long-term gifts if you only offer a one-time donation option. Suggesting a regular contribution option to your visitors can help you maximize their generosity.
Finally, this feature can also provide you with valuable user data. Loyal donors are more likely to increase their contributions. As a result, you can use this information to direct your fundraising efforts more efficiently.
From Idea to Reality in Minutes. Build Powerful Forms, Dashboards, Apps and More.
Formidable Forms makes advanced site building simple. Launch forms, directories, dashboards, and custom WordPress apps faster than ever before.
How to set up recurring donations in PayPal with WordPress
Before starting this walkthrough, ensure you have the premium version of Formidable Forms installed and activated on the site.
One-time donations work on the free Lite plugin, but the recurring donations in this guide require the Business plan.
Don't have our form builder plugin yet? Click below to grab a plan!
You'll also want to make sure that you've connected your PayPal account.
Step 1: Enable your WordPress form to accept PayPal donations
Begin by creating your donation form from your WordPress dashboard. Formidable offers many different nonprofit templates to help you get started. A few examples include:
- Alumni donations geared toward schools
- Raffle-based giving events
- Donation requests to boost your outreach efforts
You can use the template as-is or tweak it to fit your needs. On the other hand, you could also choose a Blank Form to start from scratch.
At this point, you may also want to consider getting creative with your field types. For example, you could put your donation options on a number range scale. This can be a subtle visual way to encourage larger donations.
Include a Payment field in your form to start accepting donations through Stripe.
After you've made your form, you'll need to add an option to accept PayPal donations. Go to Settings → Actions & Notifications → PayPal:
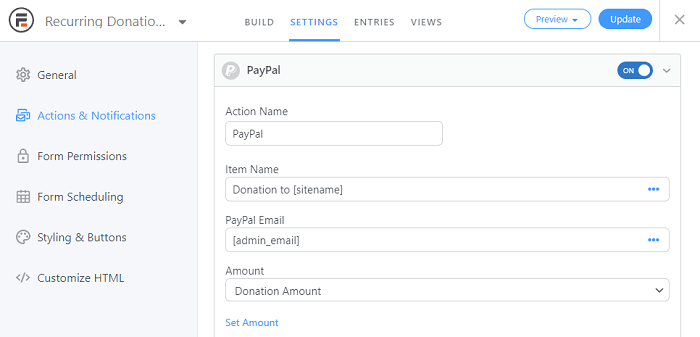
The Action Name is only for your back-end reference. However, the Item Name will appear on the donor's receipt. As such, try to choose a field that describes the donation accurately.
Afterward, enter the email associated with your PayPal account into PayPal Email.
Finally, move on to the Amount drop-down.
You can either choose a field from your form or enter a value. You can even accept a custom donation amount. The users will be charged this for their donations, so it's worth double-checking that you input an accurate amount!
Once these basic settings are sorted out, you can move on to the next step.
Step 2: Adjust your recurring donations settings
Next up, we'll finish filling out this form with recurring donation settings. Scroll down to find the Payment Type field. Make sure you select Subscription:
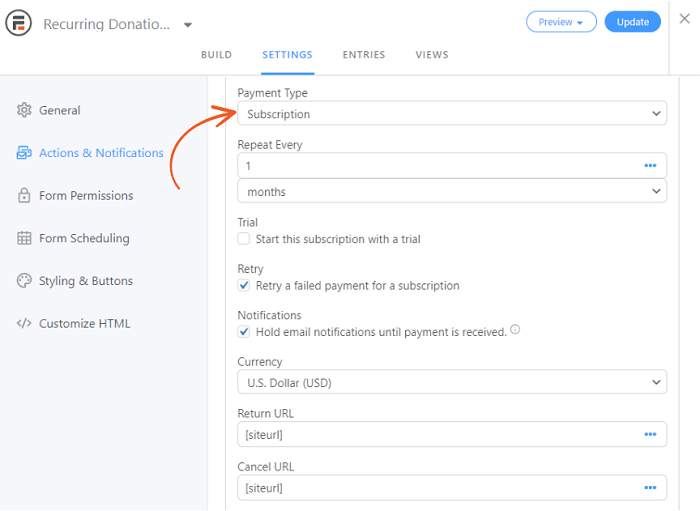
Once you've chosen this field, you should see a new field labeled Repeat Every. Select the time interval for how often the donation will be charged. In this example, we've chosen to set up a monthly donation button for PayPal.
Next, you have the option to provide a Trial. Checking this box will generate a field where you can choose the trial's length. If you're running a membership site, this can be a very useful feature.
You can also enable Retry a failed payment for a subscription. If you check this box, any transactions that don't go through will be attempted again. However, remember that this setting doesn't apply to the first payment sent to PayPal.
The last checkbox is for notifications. Select this setting if you want to withhold emails until donations successfully go through.
Finish the form with your site's Currency, Return URL, and Cancel URL.
When you're all set, click Update and move to the next step.
Step 3: Finalize your advanced PayPal settings
Now, you've covered the basics of our WordPress donation plugin. You could technically publish this form right now to provide users with a PayPal recurring donation button.
However, there are a few other features you can add. So, let's take a moment to cover a few ways to set up recurring donations with PayPal.
For example, you may want to display the previous form submissions to encourage others to contribute. Don't worry about giving away personal information — you can build a layout showing only a first name and donation amount.
Additionally, you might want to personalize the email notifications. You can do so by going to Settings → Actions & Notifications → Send Email on your form. Thanking donors for their monthly gifts can help encourage ongoing generosity.
You may also want to consider taking these emails a step further. By using conditional logic, you can send different messages based on the values of the donor gifts:
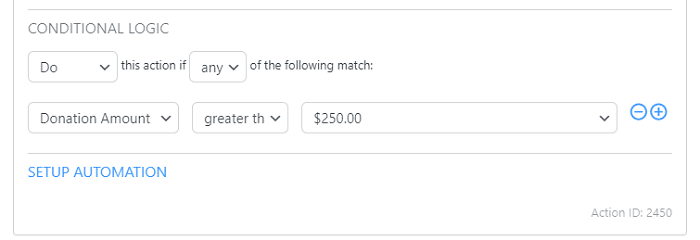
It may take time to write different messages for each donation tier. However, this can show users that you appreciate them enough to customize their thank-you emails.
Your work is done once you've published this form on a page or in a donation widget! PayPal will automatically bill these donations at your predetermined intervals.
Ready to accept recurring donations on your website?
Donations are key to ongoing success regardless of what cause or charity your WordPress site represents. Regular contributions, in particular, offer consistent support. Fortunately, all you have to do is install a recurring payments plugin to accept recurring donations in WordPress.
We've covered how to set up recurring donations in PayPal, but Stripe payments are also a great alternative.
In this article, we covered three steps to set up recurring donations:
- Set up a WordPress donation form that can accept PayPal donations.
- Adjust the payment settings to repeat transactions regularly.
- Consider adding advanced features to make your forms more professional.
If you're looking for a powerful yet simple form-building plugin, Formidable Forms has you covered. Consider checking out our premium plans today!
Read more about donations in WordPress
 How To Create a WordPress Fundraising Thermometer [No Code!]
 7 Best Payment Processors for Nonprofits
 The 10 Best Donation Plugins for WordPress
This article may contain affiliate links. Once in a while, we earn commissions from those links. But we only recommend products we like, with or without commissions.

