
The PayPal forms plugin allows you to add PayPal to your website and collect PayPal payments using Formidable Forms. Send users and a total directly to PayPal after submitting a Formidable form. Your users do NOT need to have a PayPal account in order to pay with PayPal.

Upgrade your WordPress site with powerful, flexible forms.
Download and install
- If you haven't already, install and activate the current version of Formidable Forms Premium on your WordPress site.
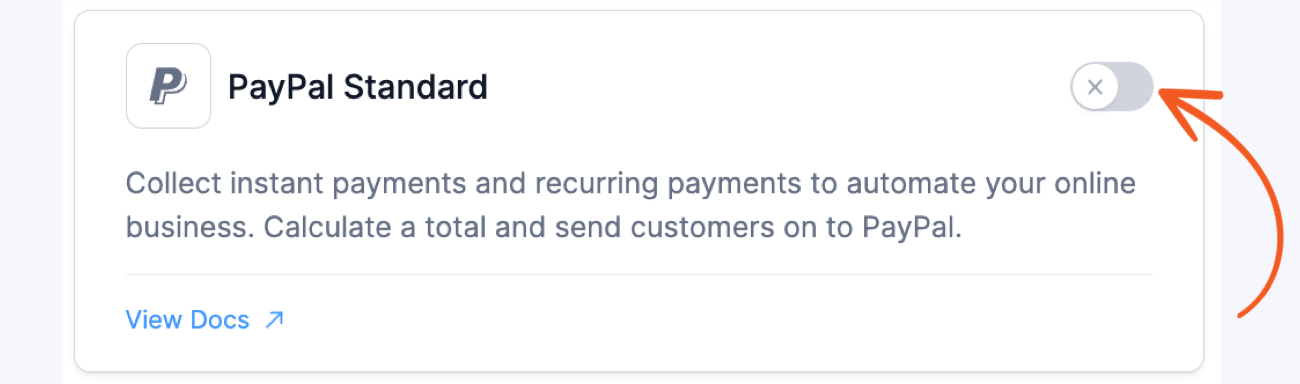
- After confirming your Formidable Forms license, proceed to the Formidable → Add-Ons page and toggle on the WordPress PayPal plugin.

From Idea to Reality in Minutes. Build Powerful Forms, Dashboards, Apps and More.
Formidable Forms makes advanced site building simple. Launch forms, directories, dashboards, and custom WordPress apps faster than ever before.
Set up the PayPal add-on
Now that the PayPal forms plugin is activated, set up Formidable Forms to integrate with your PayPal account. To add PayPal to your website, connect your PayPal account and set up instant payment notifications.
Connect your PayPal account
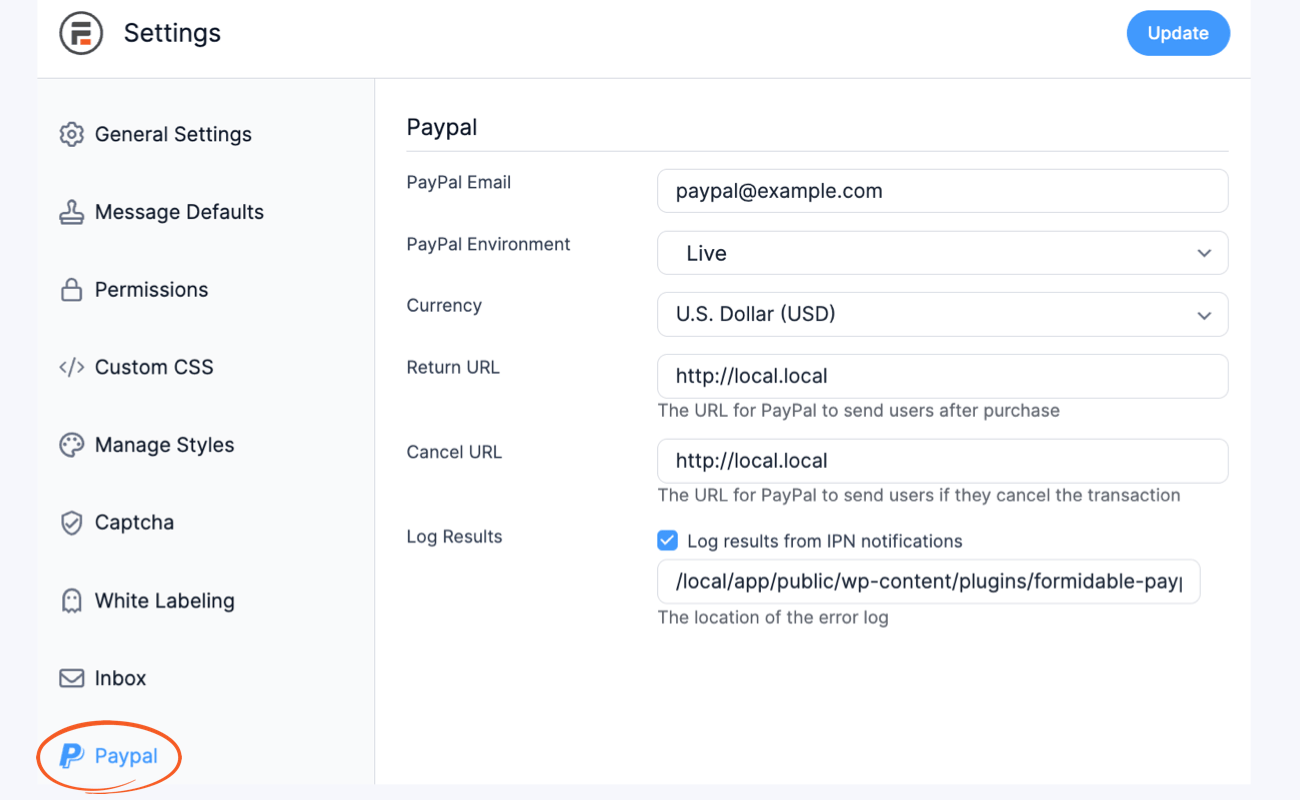
- Now that the PayPal form plugin is activated, go to Formidable → Global Settings and click the PayPal tab.
- Insert your PayPal email address and update any other settings. For live sites, make sure the PayPal environment is set to Live. Otherwise, users will be prompted to set up new PayPal accounts.
Set up instant payment notifications
Your PayPal account must be set up to automatically send payment notifications to ensure your received payments are accurately recorded as paid. Follow the directions below to get started.
- Log in to your PayPal Business account.
- Hover to your name at the top right section of the page, then select Account Settings from the dropdown menu.
- Navigate to Account Settings → Notifications → Instant payment notifications and click the Update link.
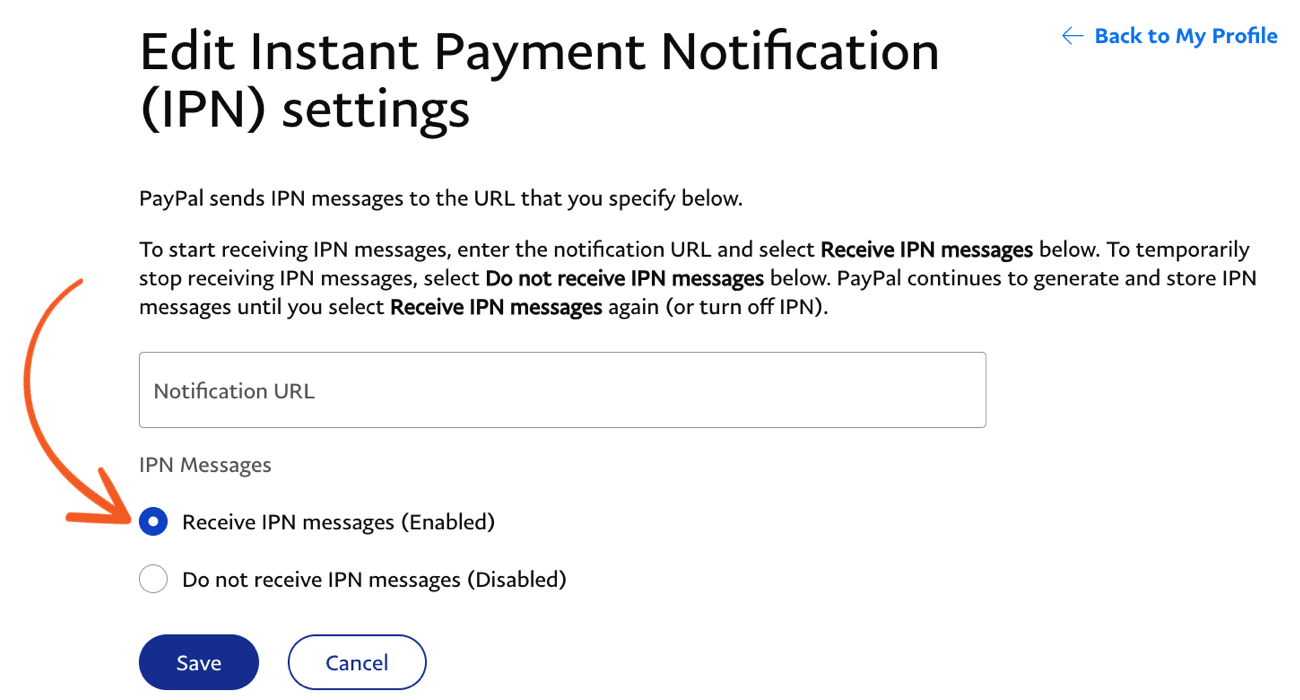
- Click the Choose IPN Settings button.
- Specify the notification URL and select Receive IPN messages (Enabled). Click the Save button to save your changes. The notification URL input in the specified field will be irrelevant since Formidable PayPal will override it.
Learn more about PayPal instant payment notifications (IPN).


 Learn more about
 Set up a form to take PayPal payments
Once the PayPal Forms plugin is activated, connect your PayPal account and set up instant payment notifications. After doing so, set up a form for collecting payments. Follow the directions below to collect PayPal payments with a Formidable form.
- Go to edit the form you want to use with PayPal. Click on form Settings → Actions & Notifications → PayPal.
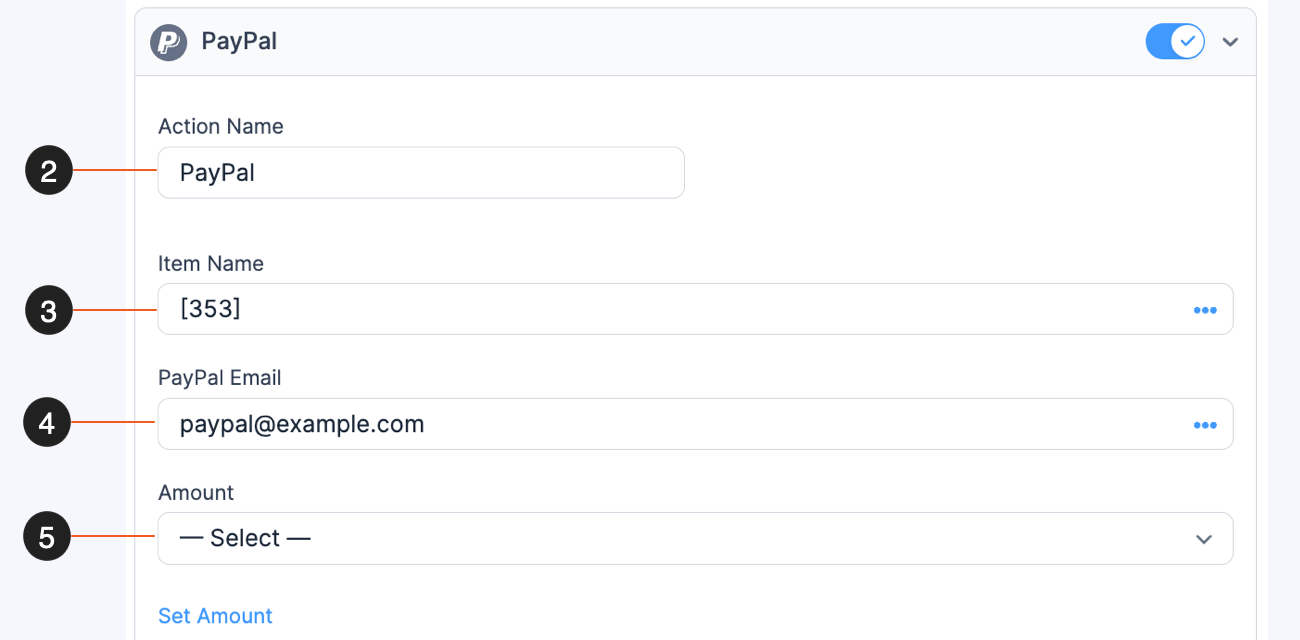
- Give your PayPal form action an Action Name for easy reference. This name will only be seen on the back-end.
- Set the Item Name. The item name will appear on the PayPal page and the PayPal receipt. You can either type in a static product name or select a field from your form if it will change depending on your user's selection.
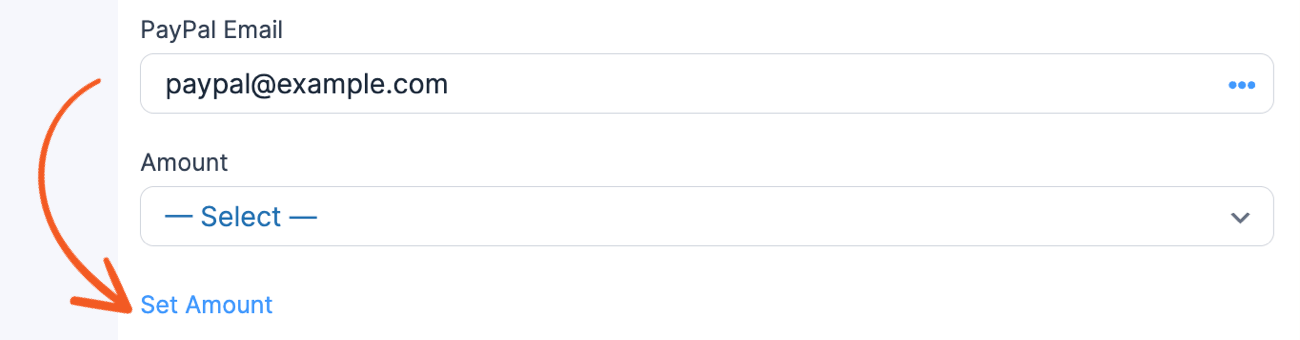
- Insert the email in the PayPal Email associated with your PayPal account.
- Set an Amount for the online payment. Click the Set Amount link if you want a specific value used in the transaction.
If you want the PayPal amount to change based on a field in the form, enable separate values in a dropdown or radio button field, then enter the amount for each option in the Saved Value column.
You can then select this field in your PayPal form action.
- Set the Payment Type:
- One-time Payment: Collect a one-time payment.
- Donation: Collect a one-time donation.
- Subscription: Use this option to set up recurring payments. Check out Set up a recurring payment for more instructions.
- Select the Currency that will be used.
- In the Return URL box, insert the URL you want to send the user to after processing their online payment. In the Cancel URL box, insert the URL you want to send the user to if they cancel the transaction. If these boxes are left blank, the defaults set in your Formidable Global Settings → PayPal tab will be used.
- In the After Payment section, you may change the value of a field when the status of a payment has changed. Use this setting to save the payment status in a field.
- If you want to conditionally send users to PayPal after form submission, you will need to add Conditional Logic. Please note that Conditional Logic is only available in the Pro version of Formidable Forms.
- Hit Update so these settings will be saved.
 If you want the PayPal amount to change based on a field in the form, enable
  You can then select this field in your PayPal form action.
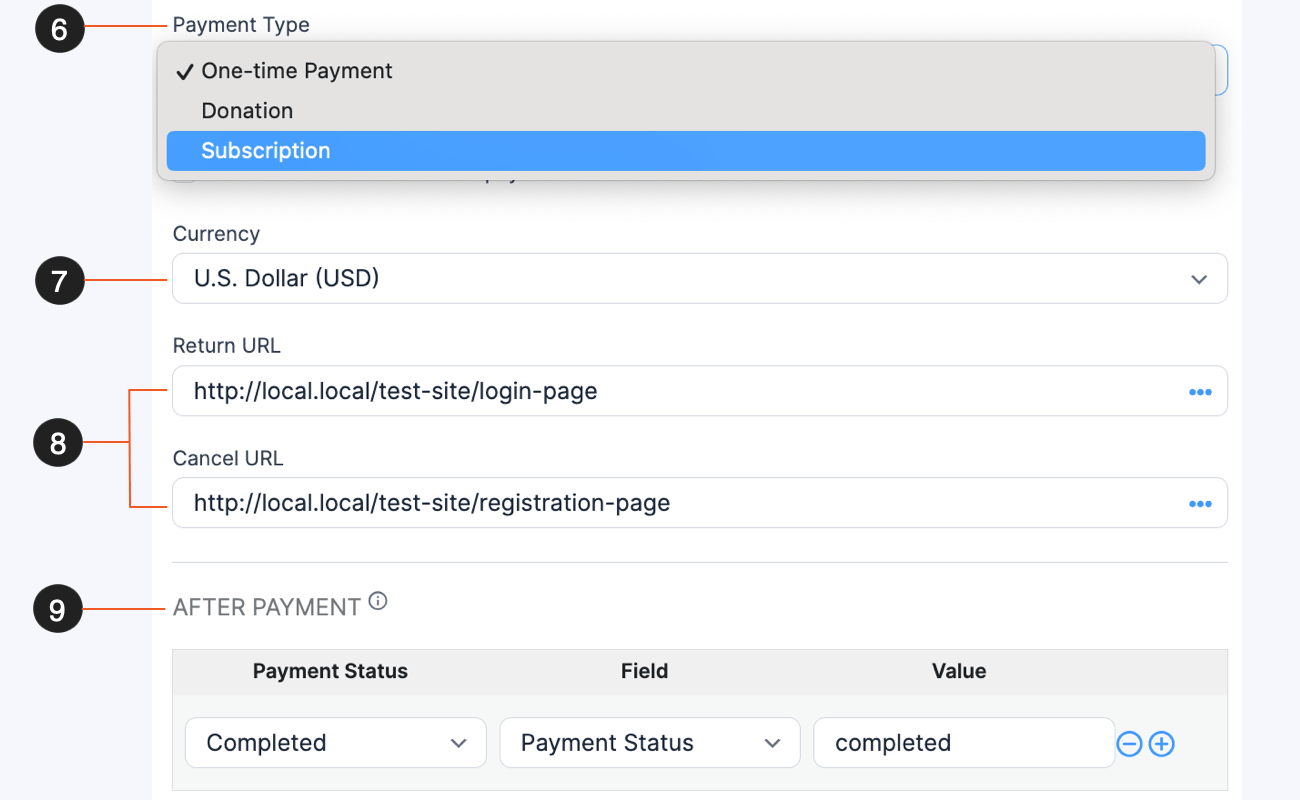
Save payment status in a field
If you want to save the status of a payment in a field in your form, follow the instructions below.
- Go into editing a form that has a PayPal action included.
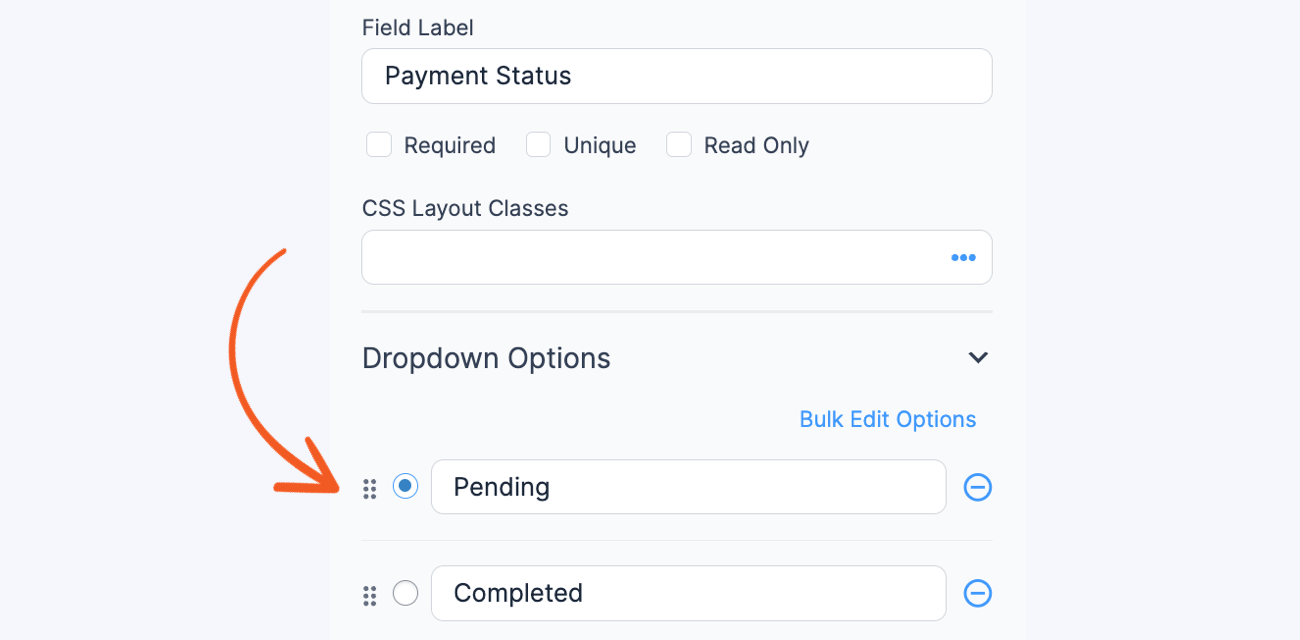
- Add a dropdown field. Set the field label as Payment status and add the options Pending and Completed. Select Pending as the default value.
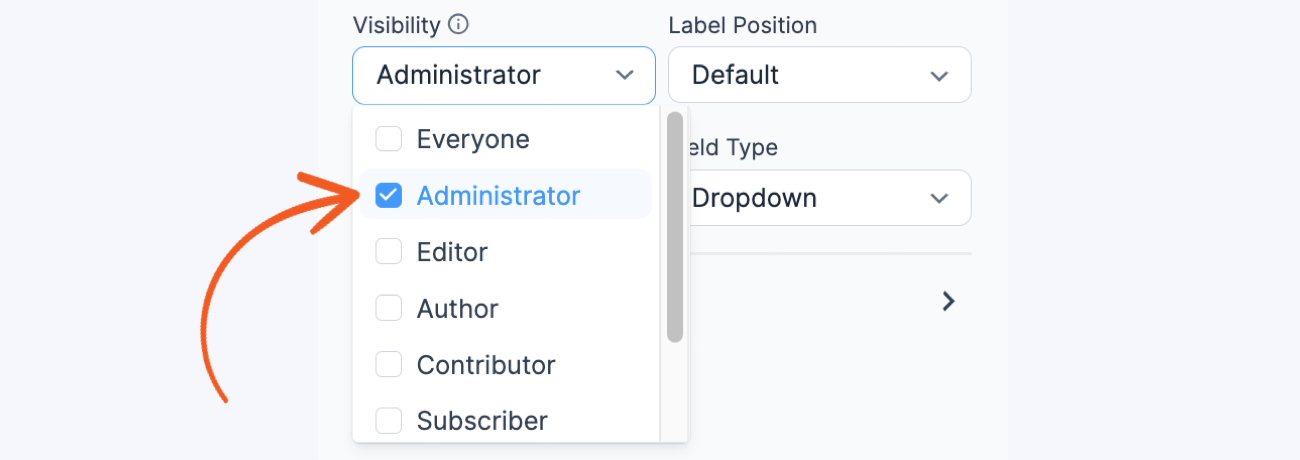
- If you want to hide the field from the user, go to your Field Options, scroll down to Visibility, select Administrator, and then click the Update button.
For extra security and to prevent malicious users from changing the values of the payment status field, use the frm_validate_field_entry filter to set the value to pending only for a new entry.
- Go into your form Settings → Actions & Notifications and select the PayPal form action.
- Scroll down to the After Payment section. Click the Add button.
- In the Payment Status column, select Completed. In the Field column, select your Payment status field. In the Value column, insert the text completed.
- Hit Update. Now when a Forms payment is successfully completed, the payment status field will switch to completed to reflect the status of the PayPal payment. If the payment status is not updating properly, please review the IPN troubleshooting steps.


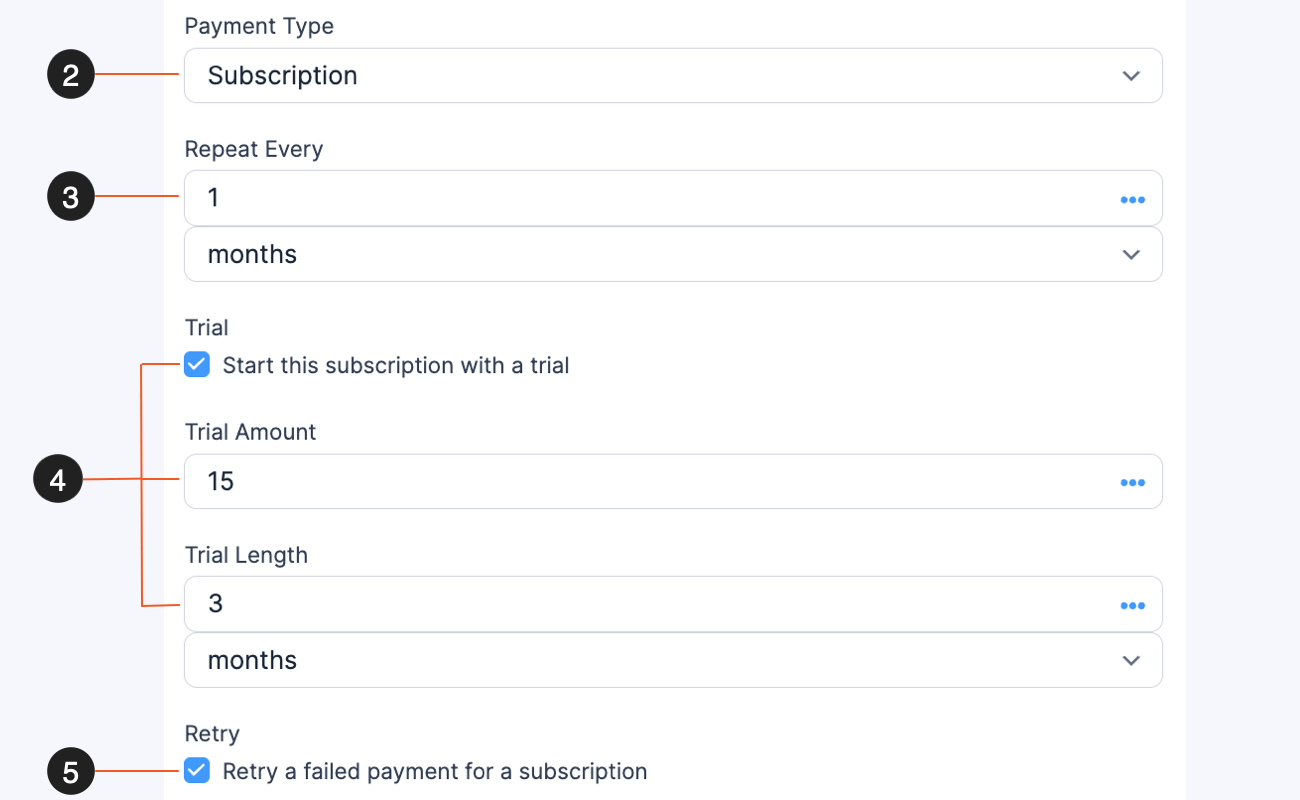
Set up a recurring payment
If you want to set up a PayPal form action to take recurring payments, follow the steps below:
- Set up your WordPress form to take PayPal payments.
- Under Payment type, select Subscription.
- In the Repeat Every section, select how often the payment will recur.
- You may include a trial period before the actual subscription begins. If you want to include a trial period, select Start this subscription with a trial. Input how much the Trial amount will be, then select how long the Trial Length will be.
- If you want to retry a failed recurring payment, select Retry a failed payment for a subscription. A failed PayPal payment is considered to be a subsequent payment in a recurring profile that doesn't go through. This does not include failing to complete the first payment once sent to PayPal.
- Click Update. Now when a user submits the form, they will be taken to PayPal to make the first payment of the recurring series. PayPal will automatically bill the user at intervals determined by your Repeat Every setting.
Set up a recurring and non-recurring payment
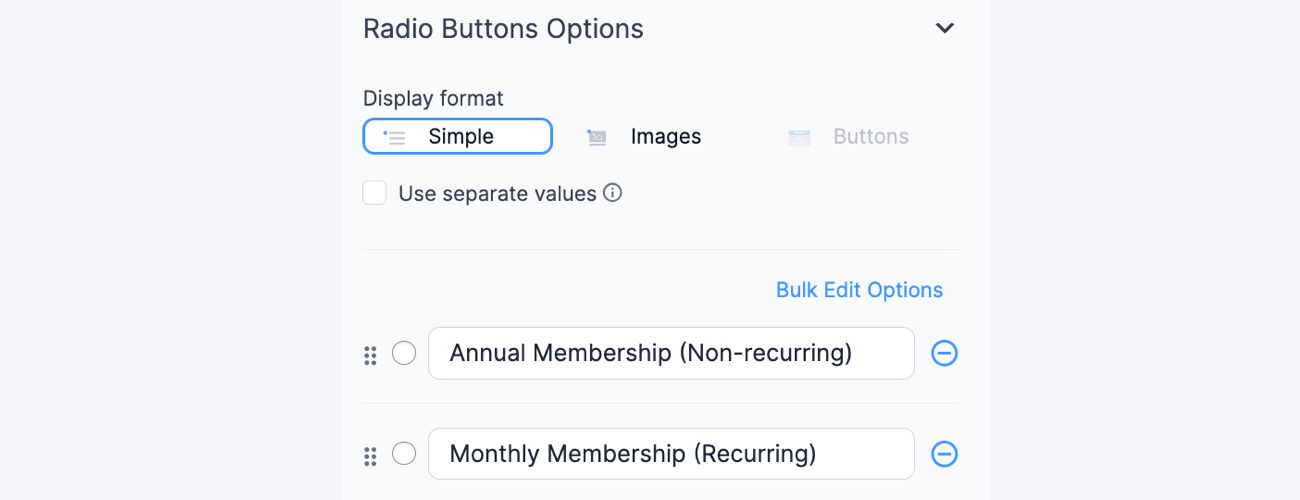
If you want to set up a WordPress form that allows a user to select a recurring payment or a non-recurring payment, follow the instructions below.
- Create a new form or edit an existing form that takes payments. Add a Radio Button or Dropdown field. Add options for the user to select a recurring or non-recurring payment.
- Click Update.
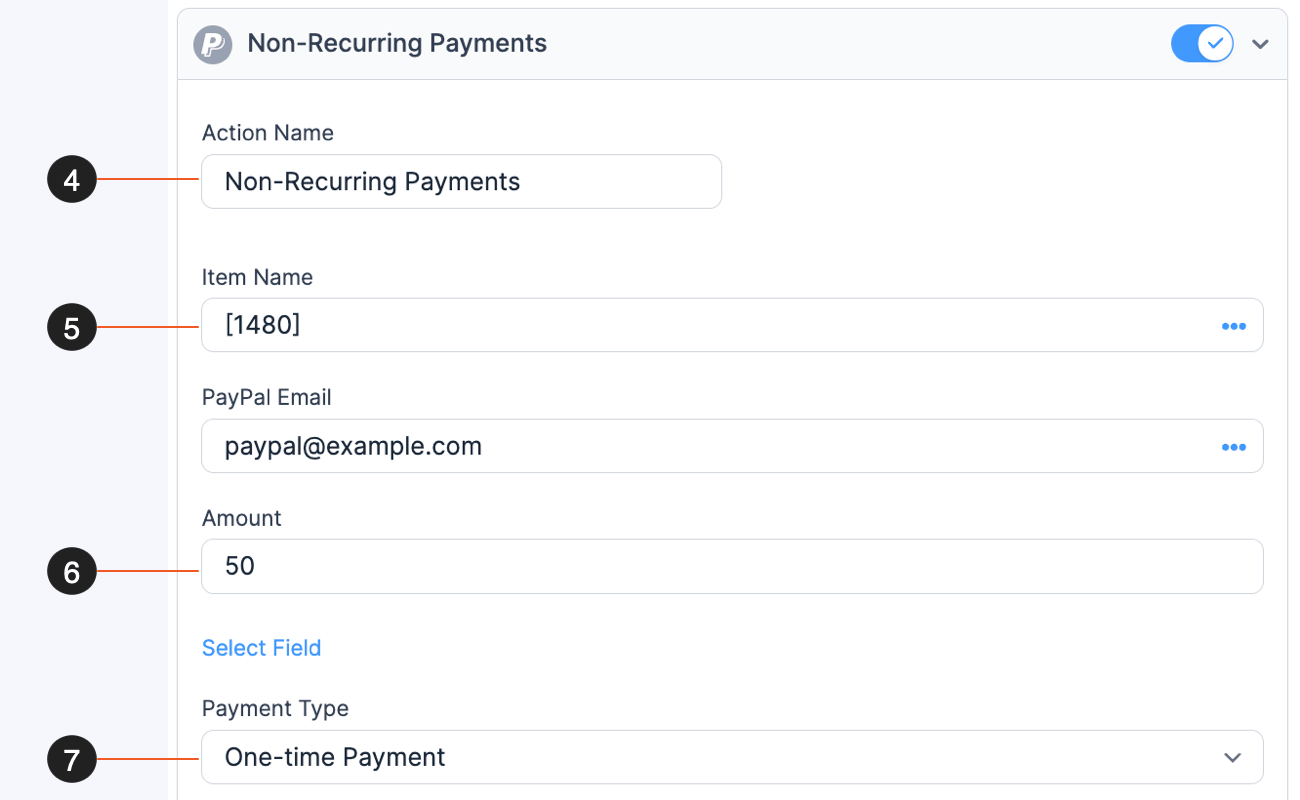
- Go to the form Settings → Actions & Notifications. Click the PayPal icon to add a PayPal form action.
- In the Action Name field, insert Non-Recurring Payments.
- In the Item Name, insert the ID of the radio button field. With this in place, the value submitted in the form will appear on the PayPal page.
- In the Amount section, select Set Amount. In the box, type in the amount of the non-recurring payment.
- In the Payment Type, select One-time Payment.
- Scroll down to the Conditional Logic section and have it read:
- Do this action if any of the following match: Radio Button field equals Non-Recurring option.
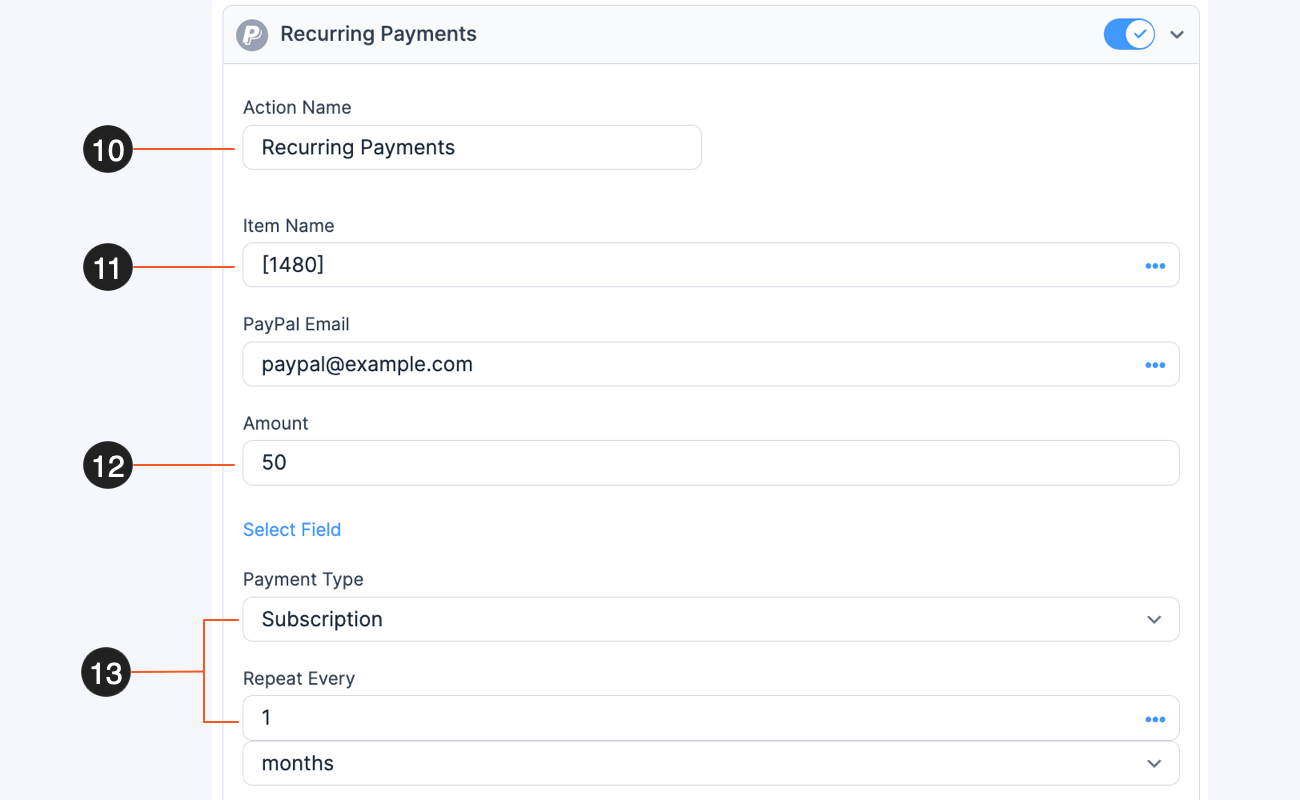
- Go to the form Settings → Actions & Notifications, add another PayPal form action.
- In the Action Name field, insert Recurring Payments.
- In the Item Name, insert the ID of the radio button field. With this in place, the value submitted in the form will appear on the PayPal page.
- In the Amount section, select Set Amount. In the box, type in the amount of the recurring payment.
- In the Payment Type, select Subscription. In the Repeat Every section, select how often the recurring payment will occur.
- Scroll down to the Conditional Logic section and have it read:
- Do this action if any of the following match: Radio Button field equals Recurring option.
- Click Update. Now when the user submits a form, they will be charged depending on their selection of either the recurring or non-recurring option.


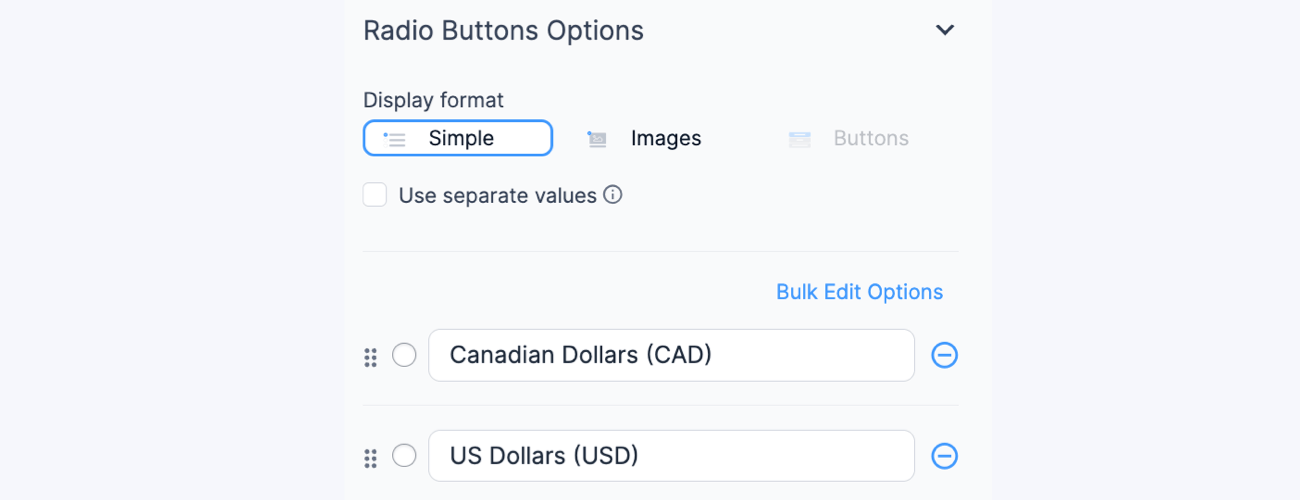
Set up two different currencies
If you want to set up a form that allows a user to select between two different currencies (e.g. US Dollars (USD) and Canadian Dollars (CAD)), follow the instructions below.
- Set up your form to take PayPal payments.
- Add a Radio button or Dropdown field in your form with options for users to select their preferred currency payment.
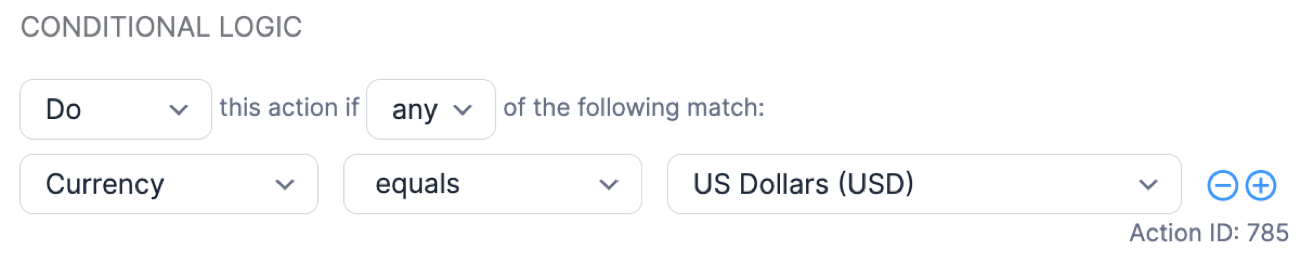
- Add a PayPal form action, set the currency to US Dollars (USD), then add a Conditional Logic section and have it read:
- Do this action if any of the following match: Currency equals US Dollars (USD).
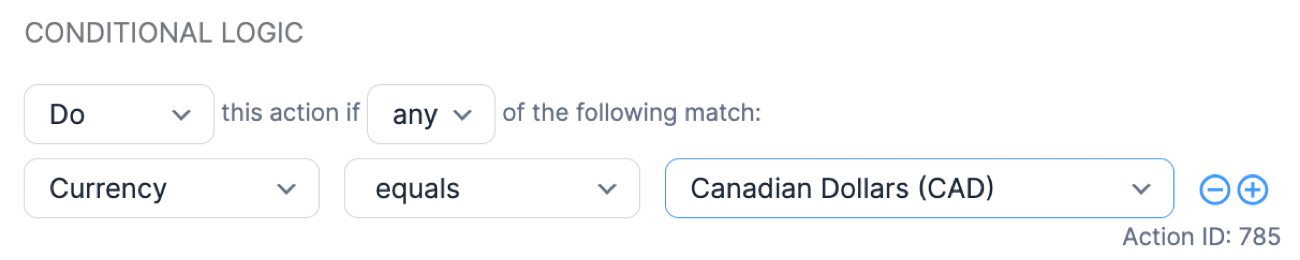
- Add another PayPal form action, set the currency to Canadian Dollars (CAD), then add a Conditional Logic section and have it read:
- Do this action if any of the following match: Currency equals Canadian Dollars (CAD).
- (Optional) For the other PayPal form action using Canadian Dollars (CAD) currency, you can change the Return URL and Cancel URL to that of your separate PayPal Canadian account. These are the URLs used for PayPal to send users after purchase or if they cancel the transaction.
If you want to accept recurring and non-recurring payments for both currencies, follow the steps below instead.
- Set up your form to take recurring and non-recurring payments.
- Add a Radio button or Dropdown field in your form with options for users to select their preferred currency payment.
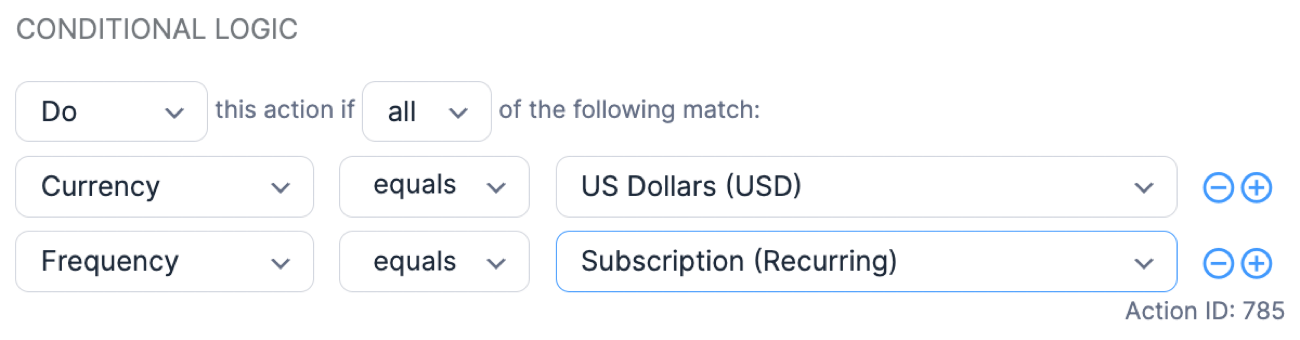
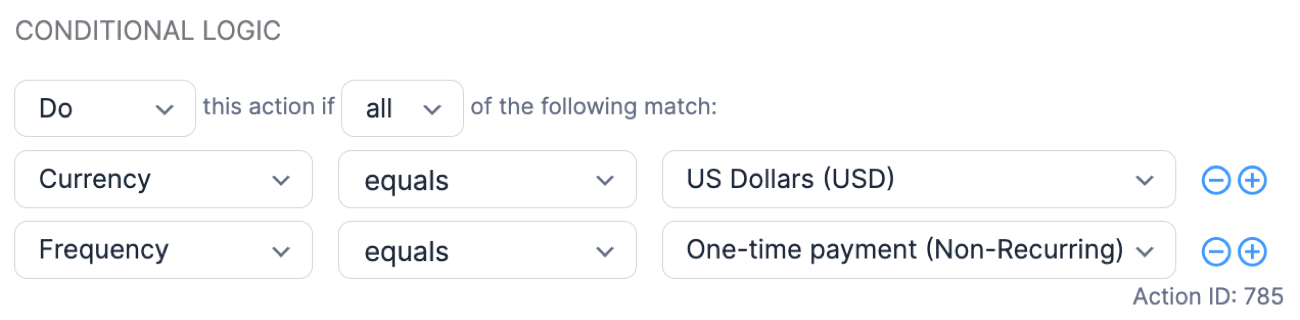
- In the Recurring Payments form action with US Dollars (USD) currency, add two conditional logic and have it read:
- Do this action if ALL of the following match:
- Currency equals US Dollars (USD)
- Frequency equals Subscription (Recurring)
- Do this action if ALL of the following match:
- In the Non-Recurring Payments form action with US Dollars (USD) currency, add two conditional logic and have it read:
- Do this action if ALL of the following match:
- Currency equals US Dollars (USD)
- Frequency equals One-time payment (Non-Recurring)
- Do this action if ALL of the following match:
- Repeat steps 3 and 4 to create the form actions for the Canadian Dollars (CAD) currency payments.
How to use PayPal testing mode
If you have a new website and want to test accepting payments through PayPal, you can set up a sandbox account to do the testing without using your personal PayPal account. Follow the instructions below to get started.
- If you still need to, sign up for a personal and PayPal Business account.
- Once logged into your account, ensure you have configured the instant payment notifications (IPN) in your PayPal Business account.
- Open a separate window on your browser and go to the Sandbox Account Dashboard at https://developer.paypal.com/dashboard/accounts.
- On the PayPal Sandbox Accounts page, you will see that your first Business and Personal Sandbox account was created when you signed up for a developer account on the developer site. Copy the Business Sandbox email, as this is the email address you will use in your Formidable PayPal settings.
- Go back to your WordPress site. In the Formidable → Global Settings → PayPal, select Testing as the PayPal environment and set the PayPal email to the email address from your Business Sandbox test account. Click the Update button to save your changes.
- To check if the PayPal testing environment is working properly, go to the form you want to use with PayPal and click on form Settings → Actions & Notifications → PayPal.
- Insert the Business Sandbox email into the PayPal email field of the form action.
- Run a test transaction and pay using your Personal Sandbox email, which you can find in your PayPal Sandbox account.


Trigger an action after payment is complete
Trigger an action after a PayPal payment is completed. Send a payment notification email, subscribe a user to MailChimp, send a text, or register a user only after a successful PayPal payment. Please note that any actions you want to trigger after a completed payment must be included in the same form.
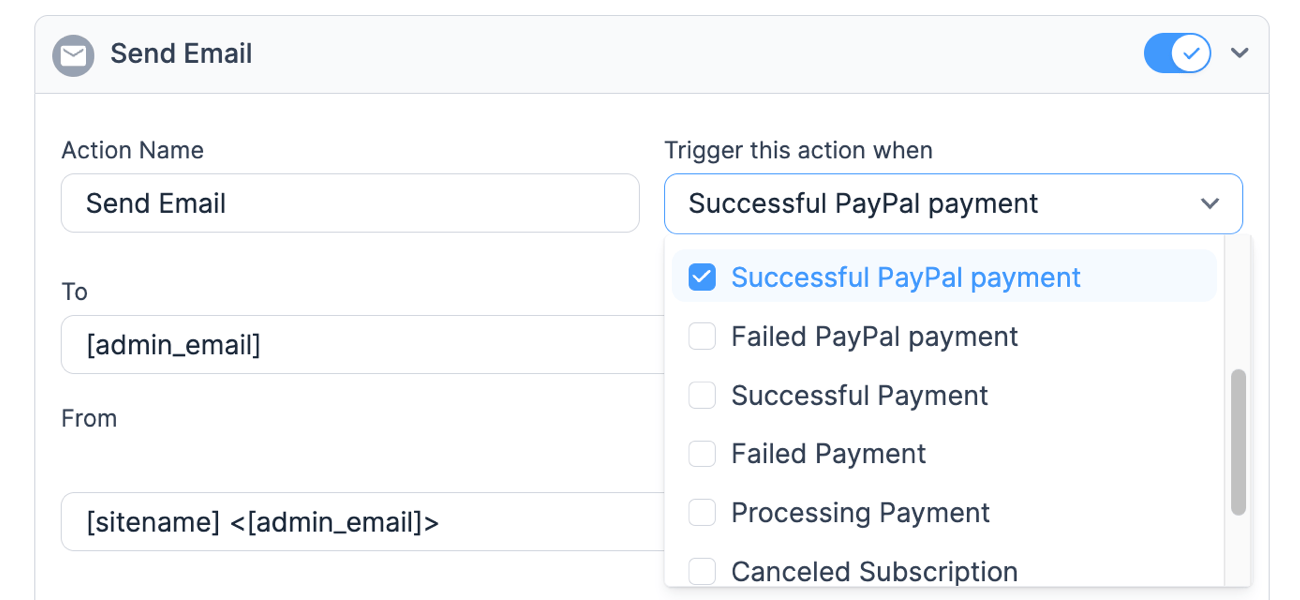
- Go to your form Settings → Actions & Notifications and open the action that you want to trigger after a PayPal payment is completed.
- In the Trigger this action when dropdown, select Successful PayPal payment.
- Click Update. Now when the user submits a payment in PayPal, and your site is notified by PayPal of the payment completion, the action will be triggered. The action will not be triggered until the PayPal notification is received. If the actions are not triggering after a complete payment, please review the IPN troubleshooting steps.
Publish a post on complete payment
If you want to publish a post only after collecting a PayPal form payment, follow the steps below.
- Set up your form to take a PayPal payment.
- Add a Create posts action.
- Add a post status field to your form, if you don't have one already.
- Select Draft as the default value in your new Status field.
If you do not want the user to have access to changing the status of this field you can set the field to Read Only. You can also hide the whole field from the user by changing the Visibility to Administrator.
- Click Update.
- Go into the form's PayPal action. In the After Payment section:
- Set the dropdown in the Payment Status column to Completed.
- Set the dropdown in the Field column to your Status field.
- Type publish in the Value column.
- Click Update and Publish your form on a page. Now when a user creates a post and submits the form, they will be taken to PayPal so they can submit a payment. The post will not be published until the PayPal payment notification is received.
 If you do not want the user to have access to changing the status of this field you can set the field to
Enable guest checkout
If you want to allow users to checkout without having to sign up for a PayPal account, follow the instructions below. Please note that users with PayPal accounts will still have the option to sign in.
- Log into your PayPal account.
- Click the gear icon at the top right section of the page. Then click the Seller Tools button.
- From the list of options, select Website preferences.
- You will then be redirected to the Website payment preferences page. Scroll down to PayPal account optional and make sure the PayPal account optional is turned on.
- Now when the user checks out can sign in to their account to check out, or check out as a guest. Please note that if the user chooses to sign out as a guest, they can sign up for a PayPal account after checkout.


Troubleshooting
Not sending to PayPal on submit
If you're not sent to PayPal when your form is submitted, you may have one of the following problems:
- The 'Total' amount is 0. You must have a Total greater than 0 in order to be sent to PayPal.
- You may have conditional logic on your PayPal action that is preventing it from firing.
If this does not help solve the problem, please create a ticket in our help desk.
Instant payment notifications
If PayPal is not notifying your site when a payment is complete, please go through each of the steps below.
- Double-check that instant payment notifications are enabled in your PayPal account.
- Check if you have a firewall plugin that may prevent PayPal from reaching your site. If you're not sure, visit yoursite.com/wp-admin/admin-ajax.php?action=frm_payments_paypal_ipn while logged out. If you see a blank page, that's good. If you are running a firewall plugin that may be blocking the IPN data, please disable that plugin and submit a new payment.
- If you are implementing any Access Control List (ACL) or filters on IP addresses for the IPNs received from PayPal, You need to add or whitelist the following PayPal IP Addresses. Doing so will help avoid missing IPNs from PayPal.
- 66.211.170.66, 173.0.81.1, 173.0.81.0/24, 173.0.81.33, 173.0.81.65, 173.0.81.140
- If your PayPal environment is set to 'Testing', try switching to 'Live'. You can switch from Testing to Live in your Formidable → Global Settings → PayPal.
- Check to see if you have any custom code on your site that could interfere. If you have custom code that uses the frm_payment_paypal_ipn hook or that modifies any entry values in the PayPal form, please remove the code and submit a new payment.
- Turn on the debug log. Go into Formidable → Global Settings → PayPal and check the 'Log results from IPN notifications' option. Hit Update. Then submit a new payment and open the debug log. Create a new ticket in our help desk and paste the log data in the ticket.
- If you see 'IPN Response from PayPal Server: INVALID' in your debug log, please log into your PayPal account and review your IPN history page. Check if there are any notifications logged there and check their status. Report your findings in a help desk ticket.
- If you see pending_reason=unilateral in your debug log, check if you have verified your email address. The payment is pending because it was made to an email address that is not yet confirmed or registered. Report your findings in a help desk ticket.
PayPal emails not being sent
While it is possible to trigger an email on successful payments, PayPal only sends out a Payment Failure notice on recurring payments. It gets fired when a subscription payment attempts to charge and fails. It doesn’t fire, however, on initial or one-time payments that aren’t completed or even new payments that fail.
A workaround would be to use the Form Action Automation add-on to send a reminder 30 mins after purchase. You could then add a conditional logic to the email notification based on your Paid status. If the payment status field is not updated to Paid, then the email sends out.
Things don't appear to be working at the moment
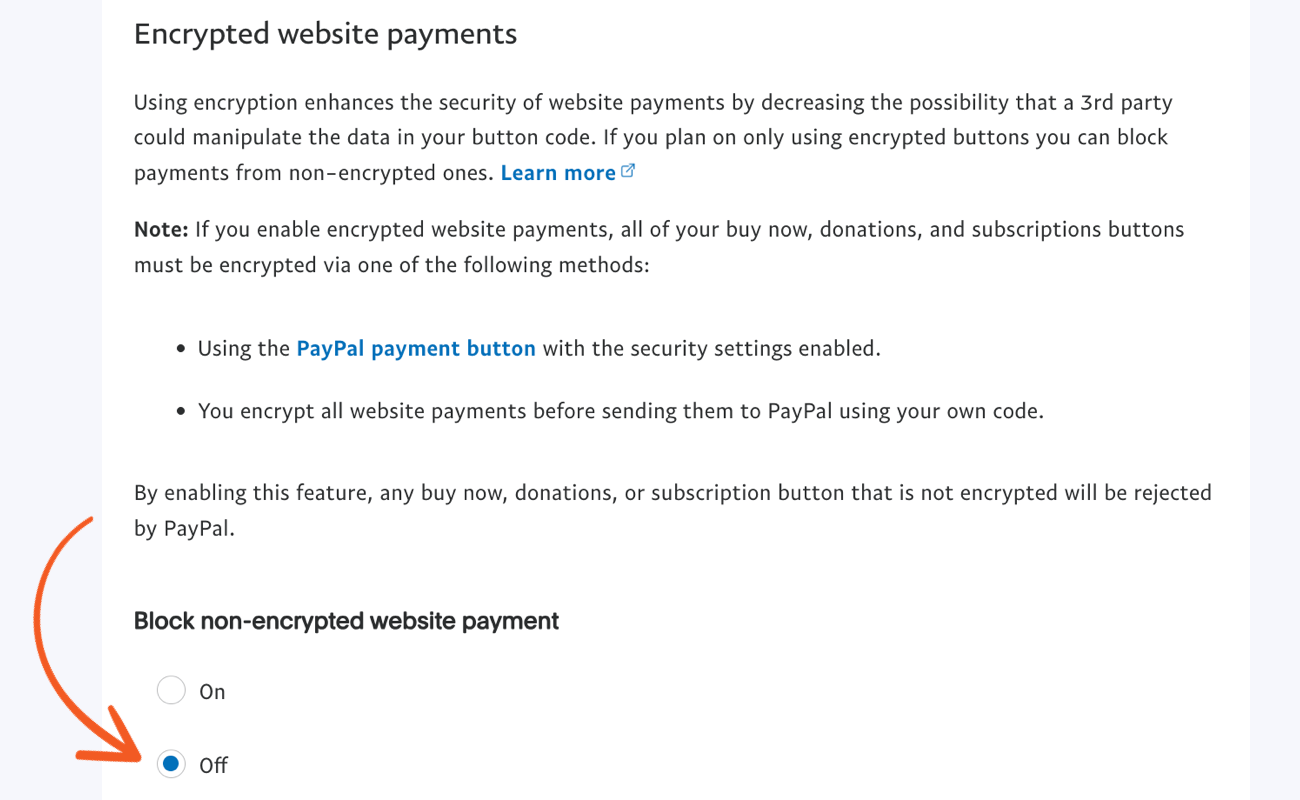
If you're seeing an error message Things don’t appear to be working at the moment in your PayPal checkout page, you may need to unblock the non-encrypted websites to make payments. To resolve this, follow the instructions below.
- Log into your PayPal account.
- Click the gear icon at the top right section of the page. Then click the Seller Tools button.
- From the list of options, select Website preferences.
- You will then be redirected to the Website payment preferences page. Scroll down to Encrypted website payments and select Off next to Block Non-encrypted Website Payment.
Additional customizations
Add a currency
If you need to take a payment in a currency that is not included in the PayPal action's currency options, you may add a currency using the frm_currencies hook.
Send user info to PayPal
When a visitor fills in details on your site, save them time by passing this information along to PayPal. This prefills the field values over at PayPal. A full list of allowed values is kept in the PayPal docs.
add_filter( 'formidable_paypal_url', 'set_recurring_payment_limit', 10, 3 );
function set_recurring_payment_limit( $paypal_url, $entry_id, $form_id ) {
  if ( $form_id == 5 ) { //change 5 to the ID of your form
    $entry = FrmEntry::getOne( $entry_id, true );
    $paypal_url .= '&first_name=' . urlencode( $entry->metas[25] ); // change 25 to your first name field ID
    $paypal_url .= '&last_name=' . urlencode( $entry->metas[26] ); // change 26 to your last name field ID
	$paypal_url .= '&email=' . urlencode( $entry->metas[27] ); // change 27 to your email field ID
	$address_field_id = 28; // change 28 to your address field ID
	$address_meta = $entry->metas[$address_field_id];
    $paypal_url .= '&address1=' . urlencode( $address_meta['line1'] );
    $paypal_url .= '&address2=' . urlencode( $address_meta['line2'] );
	$paypal_url .= '&city=' . urlencode( $address_meta['city'] );
	$paypal_url .= '&zip=' . urlencode( $address_meta['zip'] );
	$paypal_url .= '&state=' . urlencode( $address_meta['state'] );
    $paypal_url .= '&country=' . urlencode( $address_meta['country'] );
  }
  return $paypal_url;
}
Limit number of recurring payments
Setting an end date for recurring payments is not currently an option, but you may use the code below to only have a certain number of recurring payments. Replace 5 with your form ID. Replace 4 with the number of recurring payments that you want to take.
add_filter( 'formidable_paypal_url', 'set_recurring_payment_limit', 10, 3 );
function set_recurring_payment_limit( $paypal_url, $entry_id, $form_id ) {
	if ( $form_id == 5 ) { //change 5 to the ID of your form
		$paypal_url .= '&srt=4';
	}
	return $paypal_url;
}
Change the user role after payment
Use the following example to change a user's role after they make a PayPal payment. Change 'contributor' to the role you want to set after a payment is completed. Change 123 to your form ID.
add_action('frm_payment_paypal_ipn', 'change_paid_user_role');
function change_paid_user_role($args){
    if ( $args['entry']->form_id != 123 ) {
        return;
    }
    $new_role = 'contributor'; //change this to the role paid users should have
    if(!$args['pay_vars']['completed']) {
       return; //don't continue if the payment was not completed
    }
    if(!$args['entry']->user_id or !is_numeric($args['entry']->user_id)) {
       return; //don't continue if not linked to a user
    }
    $user = get_userdata($args['entry']->user_id);
    if(!$user) {
        return; //don't continue if user doesn't exist
    }
    $updated_user = (array) $user;
    // Get the highest/primary role for this user
    $user_roles = $user->roles;
    $user_role = array_shift($user_roles);
    if ( $user_role == 'administrator' ) {
        return; //make sure we don't downgrade any admins
    }
    $updated_user['role'] = $new_role;
    wp_update_user($updated_user);
}
Save transaction ID in field
If you want to save the transaction ID in a field after the payment is complete, you may use the code below. You can add it to a child theme's functions.php file or the Code Snippets plugin. Replace 10 with the ID of your form and replace 123 with the ID of the field that will store the transaction ID. Make sure the field is blank by default or you will get extra data added to your database when this code is triggered.
The $vars includes three keys:
- pay_vars: an array that includes the data from the frm_payments table so it should have id, meta_value, receipt_id, invoice_id, sub_id, item_id, action_id, amount, status, begin_date, expire_date, paysys, created_at, completed.
- payment: the raw object version of pay_vars.
- entry: the entry object that was just created.
add_action('frm_payment_paypal_ipn', 'save_frmpaypal_transaction_id');
function save_frmpaypal_transaction_id( $vars ){
    if ( ! $vars['pay_vars']['completed'] ) {
        return; //don't change value if the payment was not completed
    }
    if ( $vars['entry']->form_id == 10 ) {
        $field_id = 123;
        $transaction_id = $vars['pay_vars']['receipt_id'];
        if ( $transaction_id ) {
            FrmEntryMeta::add_entry_meta( $vars['entry']->id, $field_id, null, $transaction_id );
        }
    }
}
Insert a link for payment
If the one-time payment fails the first time, you can generate a link to allow users to pay again without filling out the form a second time. This shortcode can be used in a number of different ways, but the most likely would be in a view where you can add filters like "User ID equals current user", and the shortcode would be [pay_again id=[id]]. You can also set a specific entry id here if you want [pay_again id=60].
Note: This isn't setup to work with recurring payments.
add_shortcode('pay_again', 'pay_frm_again');
function pay_frm_again($atts) {
    if ( ! class_exists('FrmPaymentsController') ) {
        return;
    }
    $atts = shortcode_atts(array('id' => '', 'form_id' => ''), $atts);
    $entry_id = $atts['id'];
    $entry = FrmEntry::getOne($entry_id, true);
    if ( empty($atts['form_id']) ) {
      $atts['form_id'] = $entry->form_id;
    }
    $form = FrmForm::getOne($atts['form_id']);
    $action_control = FrmFormActionsHelper::get_action_for_form($form->id, 'paypal', 1);
    if ( ! $action_control ) {
       return;
    }
    $settings = $action_control->post_content;
    $amount_field = isset($settings['paypal_amount_field']) ? $settings['paypal_amount_field'] : '';
    $_POST['item_meta'][$amount_field] = $entry->metas[$amount_field]; // set the POST for the amount
    $amount = FrmPaymentsController::get_amount($form, $settings);
    if ( empty($amount) ) {
      return;
    }
    global $wpdb;
    $invoice = $wpdb->get_var($wpdb->prepare('SELECT id FROM '. $wpdb->prefix .'frm_payments WHERE item_id=%d AND amount=%s AND paysys=%s', $entry_id, (float) $amount, 'paypal'));
    if ( ! $invoice ) {
        return;
    }
    $frm_payment_settings = new FrmPaymentSettings();
    $paypal_url = 'https://www.paypal.com/cgi-bin/webscr/';
    $paypal_url .= '?cmd='. (( isset($settings['paypal_type']) && ! empty($settings['paypal_type']) ) ? $settings['paypal_type'] : '_xclick');
    $paypal_url .= '&' . 'notify_url='. FrmPaymentsHelper::format_for_url(admin_url('admin-ajax.php') . "?action=frm_payments_paypal_ipn");
    $paypal_url .= '&business='. FrmPaymentsHelper::format_for_url($frm_payment_settings->settings->business_email);
    $paypal_url .= '&' . 'currency_code='. FrmPaymentsHelper::format_for_url($frm_payment_settings->settings->currency);
    $paypal_url .= '&return='. FrmPaymentsHelper::format_for_url( FrmPaymentsHelper::get_action_setting( 'return_url', array( 'settings' => $settings ) ) );
    $paypal_url .= '&cancel_return='. FrmPaymentsHelper::format_for_url( FrmPaymentsHelper::get_action_setting( 'cancel_url', array( 'settings' => $settings ) ) );
    $paypal_url .= '&invoice='. FrmPaymentsHelper::format_for_url($invoice .'-'. FrmPaymentsHelper::get_rand(3));
    $paypal_url .= '&custom='. $entry_id.'|'. wp_hash($entry_id);
    $paypal_url .= '&amount='. urlencode($amount);
    if ( defined('ICL_LANGUAGE_CODE') ) {
      $paypal_url .= '&lc='. FrmPaymentsHelper::format_for_url(ICL_LANGUAGE_CODE);
    }
    $item_name = apply_filters('frm_content', $settings['paypal_item_name'], $form, $entry_id);
    $paypal_url .= "&item_name=". urlencode($item_name);
    return '<a href="'. $paypal_url .'">Pay Now</a>';
}
Change return URL
Please Note: The Return URL option has been added to the PayPal action since version 3.0.
add_filter('formidable_paypal_url', 'formidable_paypal_url', 10, 3);
function formidable_paypal_url($paypal_url, $entry_id, $form_id){
  if($form_id == 5) //change 5 to the ID of your form
    $paypal_url .= '&return='. urlencode('http://example.com');
  return $paypal_url;
} How to Setup Recurring Payments for Memberships in WordPress Without Coding
 Authorize.net vs PayPal: The Best Features, Pricing, and More
 How To Create a PayPal Payment Form in WordPress
 How To Make a WordPress Form with Payment Gateways
 The 10 Best Donation Plugins for WordPress
 Is Stripe Better than PayPal for a Business?
 How to Make a PayPal Order Form in WordPress
 PayPal vs Stripe for Nonprofits in WordPress
 How To Set Up Recurring Donations in WordPress
 The Best WordPress PayPal Plugin (3 Ways to Sell)
 How to Add PayPal Payment to WordPress Sites
 How to Create a Donation Form in WordPress [5 Easy Steps!]