
Formidable Forms has made my life so much easier as an event planner.


Last updated on July 10, 2025 by Formidable Team
How to Add Testimonials to Your WordPress Website
Strong testimonials are powerful social proof that drives business. Learn how to easily add testimonials on your WordPress website.

Customer testimonials are powerful. It feels great to know your hard work isn't going unrecognized.
Not only are testimonials good for your mood, but they're also good for business. In our article on customer reviews, we mentioned a recent report where 88% of customers say positive reviews influence their purchasing decisions.
That's good news. Because a strong testimonial is like a positive review on steroids.
A testimonial serves as an endorsement of your product or service. They are different than reviews in their flexibility. Reviews give a general sense of audience satisfaction, whereas testimonials highlight prominent customer feedback.
Did some work for a huge industry player? Set it in stone with a testimonial!
Today, we're going to show you how a simple form builder plugin can add testimonials to your WordPress site.
Sure, you could use a dedicated WordPress testimonials plugin to do that. But a testimonial plugin is just a form builder in disguise!
Upgrade your WordPress site with powerful, flexible forms.
Why not use a WordPress testimonials plugin?
As mentioned above, a dedicated WordPress testimonials plugin is an option. But before you look for one, check your WordPress plugin directory. How many plugins are installed? Can you remember what they all do?
If you have too many plugins on your WordPress site, there are some risks:
- Decreased Site Speed
- Security Vulnerabilities
- Reliability Issues & Site Crashes
- Difficulty Managing Your Site
So really, you should be trying to minimize the number of plugins on your site.
One solid form plugin with a built-in application builder can handle the job of several plugins, going a long way towards solving the above issues.
With that in mind, let's see how you can add testimonials to your WordPress site in just a few steps.
Still want to use a plugin? Check out our 7 Best WordPress Testimonial Plugins
From Idea to Reality in Minutes. Build Powerful Forms, Dashboards, Apps and More.
Formidable Forms makes advanced site building simple. Launch forms, directories, dashboards, and custom WordPress apps faster than ever before.
Step 1: Create a testimonials form
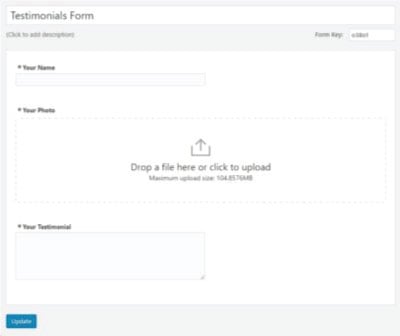
The first thing to do is create a form where people can input their testimonial.
Make it really easy for your website visitors to add new testimonials by keeping this form short and simple.
Let's include the following three fields:
- Name (text field)
- Photo (file upload)
- Testimonial (paragraph field)
A star rating may be worth adding too.
You can even take a shortcut and use our testimonial form template.
Once your form is built, perhaps modify your forms success message to say "Thank you for the testimonial–you've made our day!" or something similar.
Insert your testimonials form on a page
Next, create a new page on your site or choose a spot on an existing page. Insert your form shortcode to display your testimonials form for the world to see. Submit a few example testimonials to help set up the front-end display. These can be deleted later and replaced with new submissions.
Step 2: Create a testimonials page or widget
You'll need to set up a View to display your testimonials. Go to Formidable → Views and select Add New.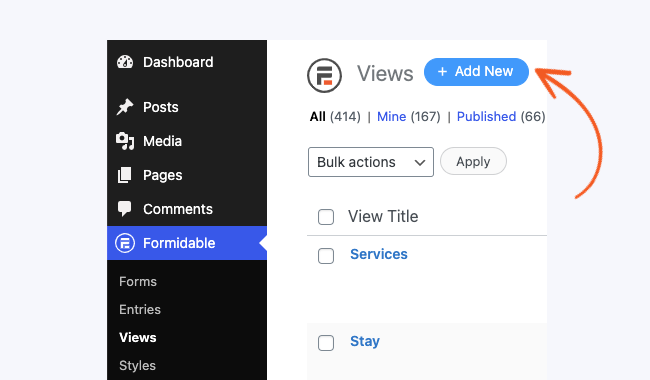
Choose the Grid View type and select your testimonials submission form for the data source in the Use Entries from Form box. Let's call this new View "Testimonials View".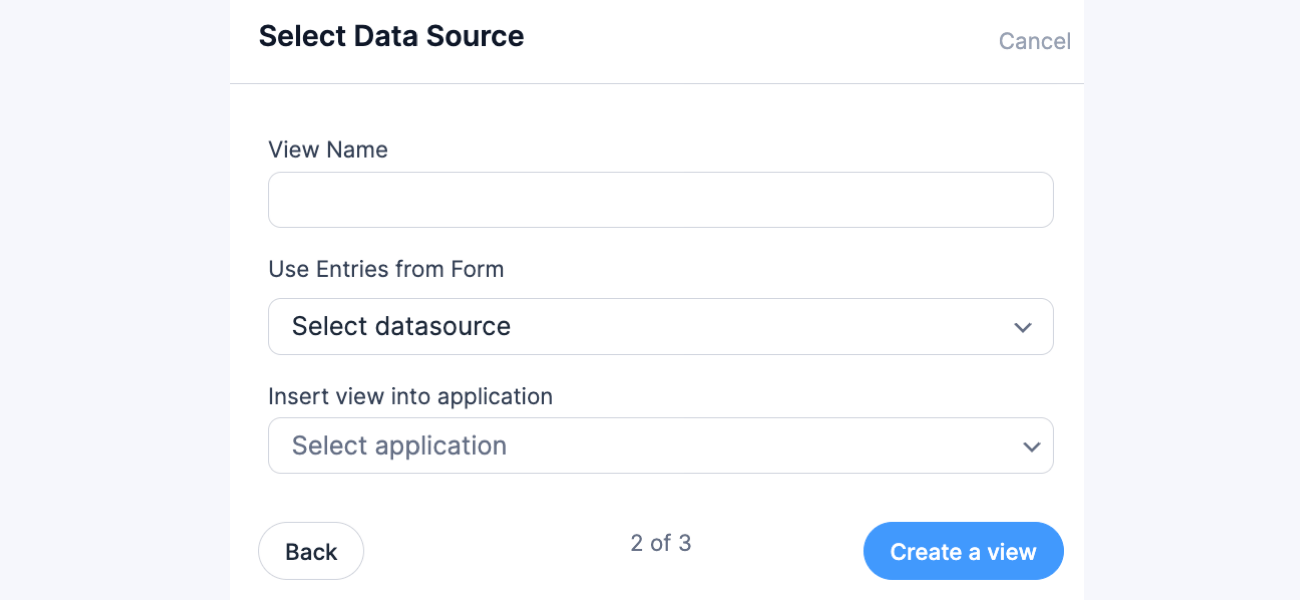
Choose your testimonial layout
Next, you'll need to decide how you want your testimonial list to look. For this example, we'll do a customer featured image side by side with their quote. Click the Layout Builder button and add a side-by-side layout.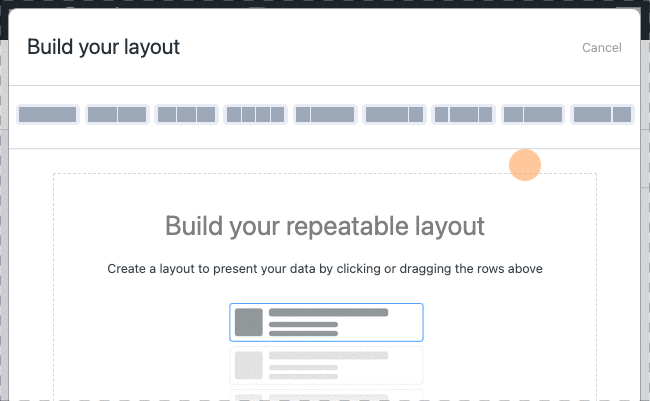
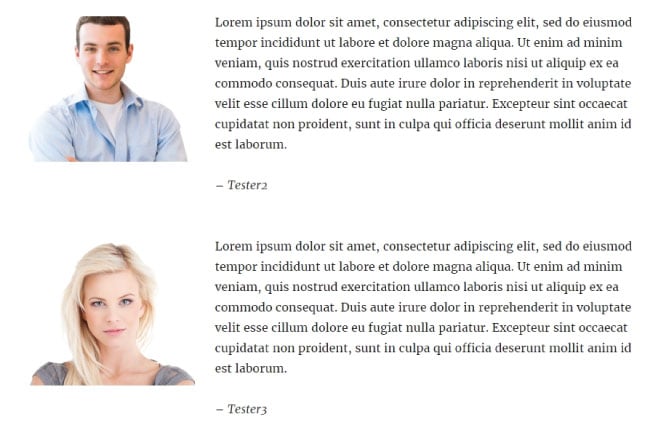
After you click Save Layout, you'll see an example of how this might look with entries.
Add the content to display your WordPress testimonials
Click the plus icon to add content to the first box.
This one will be for the image, so click on the name of your file field in the sidebar. It should look like this:[499 show_image=1]
Switch to the box for the content by clicking the blue layout boxes in the top corner.
Click on the name and testimonial field names in the sidebar to insert the data. You'll end up with something like this:[498]
- <i>[496]</i>
The ID of the image field is [499], the name field is [496], and the testimonial field is [498]. So adding this to the content box works perfectly. Just change the field IDs to suit your form.
Create a testimonials page on your website and insert your new View into the page. Check your post or page and make any styling or layout adjustments needed. This is where having a few dummy testimonials really helps!
The display keeps the uploaded photo to the left, the testimonial text to the right of the image, and the name below the main text. Depending on your theme and styling preferences, you may wish to modify the HTML slightly to suit your needs.
Bonus Option - Create a WordPress testimonial rotator widget

A page full of testimonials looks great. But not all of your visitors will go out of their way to visit that page. Sometimes testimonials inserted into your main pages have more impact, simply because they are seen more often. See more testimonial page examples to decide where you'd like to start.
For this example take what you did above and modify it slightly to display a single, randomly selected testimonial in a sidebar widget.
- In the Advanced Settings box in the View sidebar, set the limit to 1 to set the number of testimonials.

- Click on the Sort Entries link and select the Random option.
- Modify your layout to use a single box instead of two side-by-side. It looks neater this way when displayed in a narrow sidebar.
- Save your changes and copy your view shortcode.
- Go to Appearance → Widgets, and add a new text widget to your sidebar. Add your View shortcode to this widget and save your changes.


That's it!
In just 2 or 3 minutes you've created a testimonials widget that displays a single testimonial. Each time the page is loaded a random testimonial appears. Now your visitors get to see a selection of the great feedback for your business.
Step 3: Ask for strong testimonials!
Don't forget the most important step! Let your customers know you value their feedback & would love to have their testimonial displayed proudly on your website.
One of our favorite ways to do this is the simplest. Add a line to your email signature that includes a link to your testimonial form and says "Happy with our service? Show your appreciation by leaving a review!"
Now there's no need to even think about asking for testimonials! It happens automatically with a simple email reply.
Easy WordPress testimonials
Adding a testimonial widget or page to your WordPress website has never been easier. All the steps above can be completed in about 20 minutes, so stop procrastinating!
If you're not taking advantage of the powerful conversions boost that testimonials can provide, you may be loosing out! Schedule a few minutes today & add this simple feature to your online presence. You'll soon see the difference it can make!
Read more of our WordPress testimonial tips
 How to Build a WordPress Customer Feedback Portal
 14 Customer Satisfaction Survey Questions You Can Steal
 How To Create a Customer Survey [With Examples and Tips!]
 How to Create a WordPress Photo Rating Form
 How to Add a Feedback Form in WordPress
 How to Add Reviews to Your WordPress Website
This article may contain affiliate links. Once in a while, we earn commissions from those links. But we only recommend products we like, with or without commissions.

